Construction Manual www.oldschoolmodels.com Page 5
n n Step 13 - Wing Assembly (R3 ribs)
With the SPACERs in place, carefully align both R3 ribs and the
outermost R2 rib, then tack them in place to the spars (best to tack
glue on the back side of the spars). Make sure that the SPACERS
are not glued to spars or any of the ribs as they will be VERY hard
to remove.
n n Step 14 - Wing Assembly (WH3)
Locate one of the WH3s from LP1.
It’s outer tabs fit into the pre-cut
slots on the back of the R2 ribs as
shown here. Glue it to the outer
R2 rib first, then properly align the
inner R2 rib. Once aligned, glue
that R2 rib in place by tacking it in
place to the back of the spars, and
then glue the WH3 to it as well.
n n Step 15 - Wing Assembly (WH1, WH2, WH4)
Locate WH1, WH2, and WH4 from LP1.
Note that WH1, WH2 and WH4 have a
small circle engraved on one side. This
designates the side that should face
R1 because it has a small angle pre-
cut into it. Glue each WH1, WH2 and
WH4 to R2 making sure their tabs are
completely inserted into the holes on
the innermost R2 rib.
n n Step 16 - Wing Assembly (R1)
Locate DH-JIG from LP1. This is used to help align R1 in this step.
WH1, WH2, and WH3 already have this angle cut into them, but
you can also use this DH-JIG to further aid the R1 alignment. Slide
each of the tabs from those WH pieces into the pre-cut holes of R1,
making sure they are completely inserted. When properly aligned
you should be able to double-check it with the DH-JIG.
After everything is aligned, tack glue R1 to the back of the spars,
then also glue R1 to WH1, WH2 and WH3.
n n Step 17 - Wing Assembly (SPACER)
With the ribs all in place, carefully remove the SPACER pieces and
then glue ribs R3, R2 and R1 to the spars. Make sure you do NOT
have any extra glue fouling the holes where the dihedral braces
will slide into.
n n Step 18 - Wing Assembly (R1A)
Locate two of the R1A pieces from
LP1. These are glued into the center
rectangular cutout in WH4 and WH3 as
shown here, pointing towards the trailing
edge of the wing. Make sure they are
firmly seated as the glue cures.
n n Step 19 - Wing Assembly (trailing edge)
Locate one 1/4” square length of balsa
strip. This will be the trailing edge of
the wing. Measure and trim it to length,
leaving about an extra 1/4” or so. Then
carefully slide it on to the back of each
of the ribs and it should be held in
place between the two “fingers/fangs/points” on the back of each
rib. Working from one side to the other, glue the trailing edge to
each of the ribs, making sure that the alignment of each rib is still
spot on.
n n Step 20 - Wing Assembly (leading edge)
Locate one length of 1/2” square
balsa strip. This is the leading edge
of the wing. Measure and trim it to
length, again, leaving about a 1/4”
extra. Working from one end to
the other, glue the leading edge in
place to each of the ribs, making
sure it is firmly seated into the pre-cut, angled slot of each rib.
n n Step 21 - Wing Assembly (trailing edge sanding)
You'll now need to very lightly sand the
trailing edge. Refer to this diagram to
show what I'm on about. The trailing
edge needs just a little sanded off the
rear edge it so it will continue the airfoil
shape. Do this for the top and bottom
surface of the trailing edge.
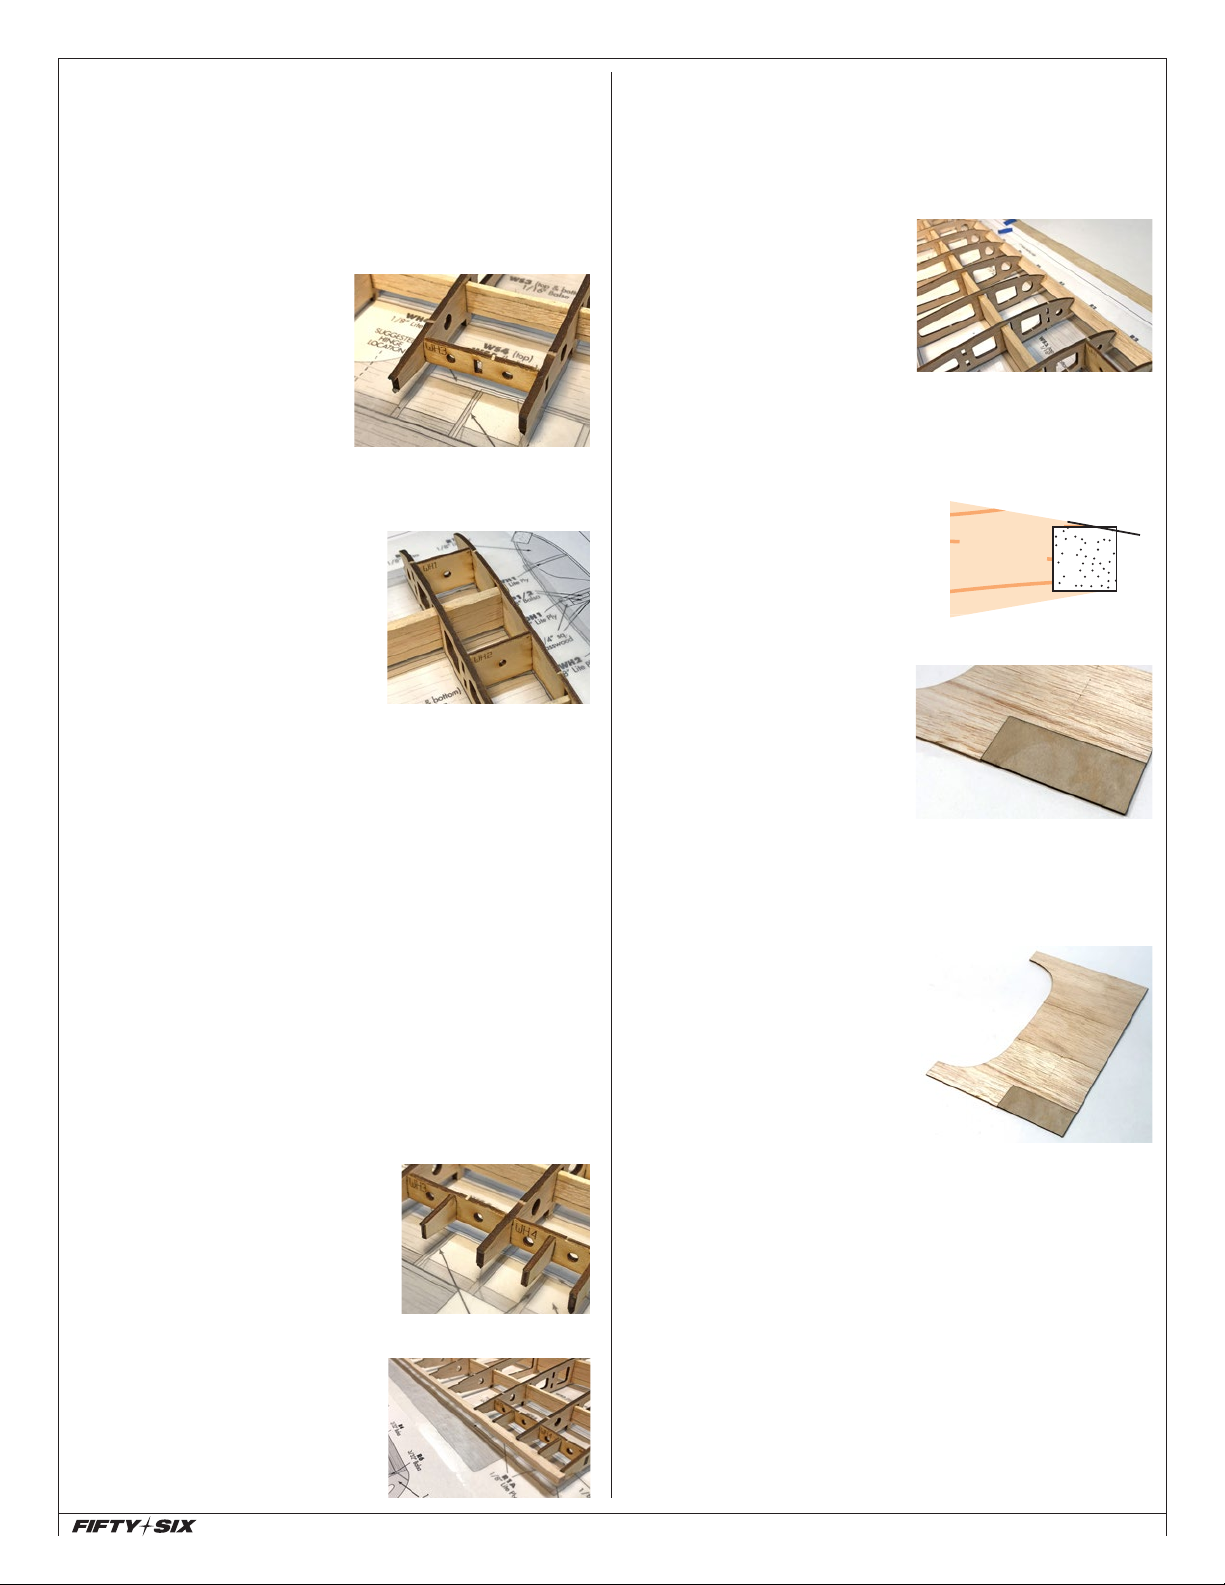
n n Step 22 - Wing Assembly (CS2, CS5)
Locate one CS2 from BP15 and
one CS5 from LP6. CS5 fits into
the pre-cut notch of CS2 as shown
here. Before gluing it place, lightly
sand the edges of CS5 where it
will contact CS2, so you’ll have a
good fit. When happy with the fit,
carefully apply glue to the two contacting edges of CS5 and attach
it to CS2. Apply a bit of downward pressure along the seams to
make sure the joint is flat along the edges as the glue cures.
n n Step 23 - Wing Assembly (CS1, CS2, CS3)
Locate one CS1 and one CS3 from
BP15. After trimming, these will
all be glued together to form the
top sheeting of the wing’s center
section. Place the CS2 assembly
in place on the rear section of the
wing, then place the CS1 on the
front edge, simulating how it will
wrap around the leading edge rib
curve (temporarily tape in place if that helps). CS3 has purposely
been cut a little long, so you'll need to trim it to get a perfect fit
filling the gap between CS1 and CS2.
When satisfied with how it all looks, remove the pieces and it’s time
to glue them together into a single sheet.
When edge gluing the sheeting pieces together, first make sure
the edges are flat (give a quick, swipe or two with a sanding block).
Then tape the two pieces together with a piece of masking tape.
As you lift the sheeting from the board you’ll see that the tape will
act as a hinge allowing you to put a small amount of adhesive into
the joint. When the adhesive is applied, place the sheeting back
down on the waxed paper, so that it’s flat and apply pressure to
the joint while it cures to make sure it’s flat along it’s entire length.
Sand this lip to
match airfoil