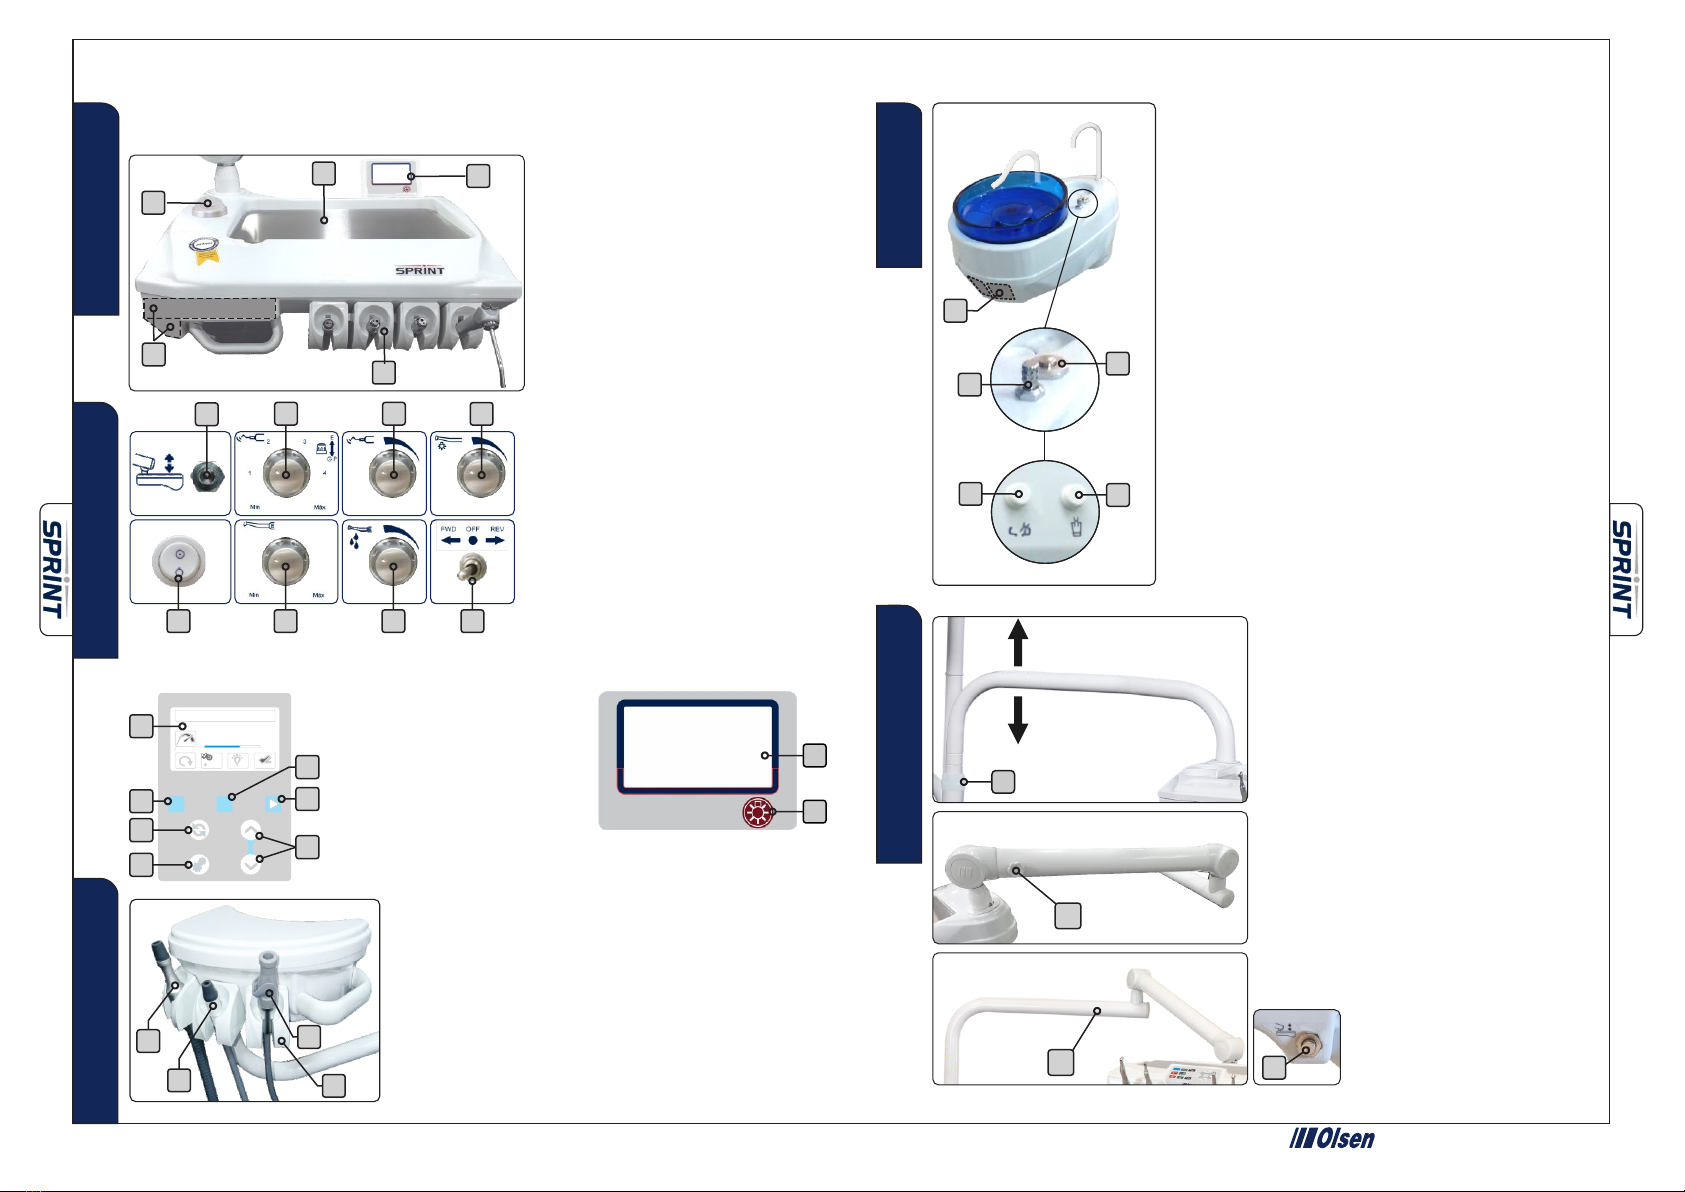
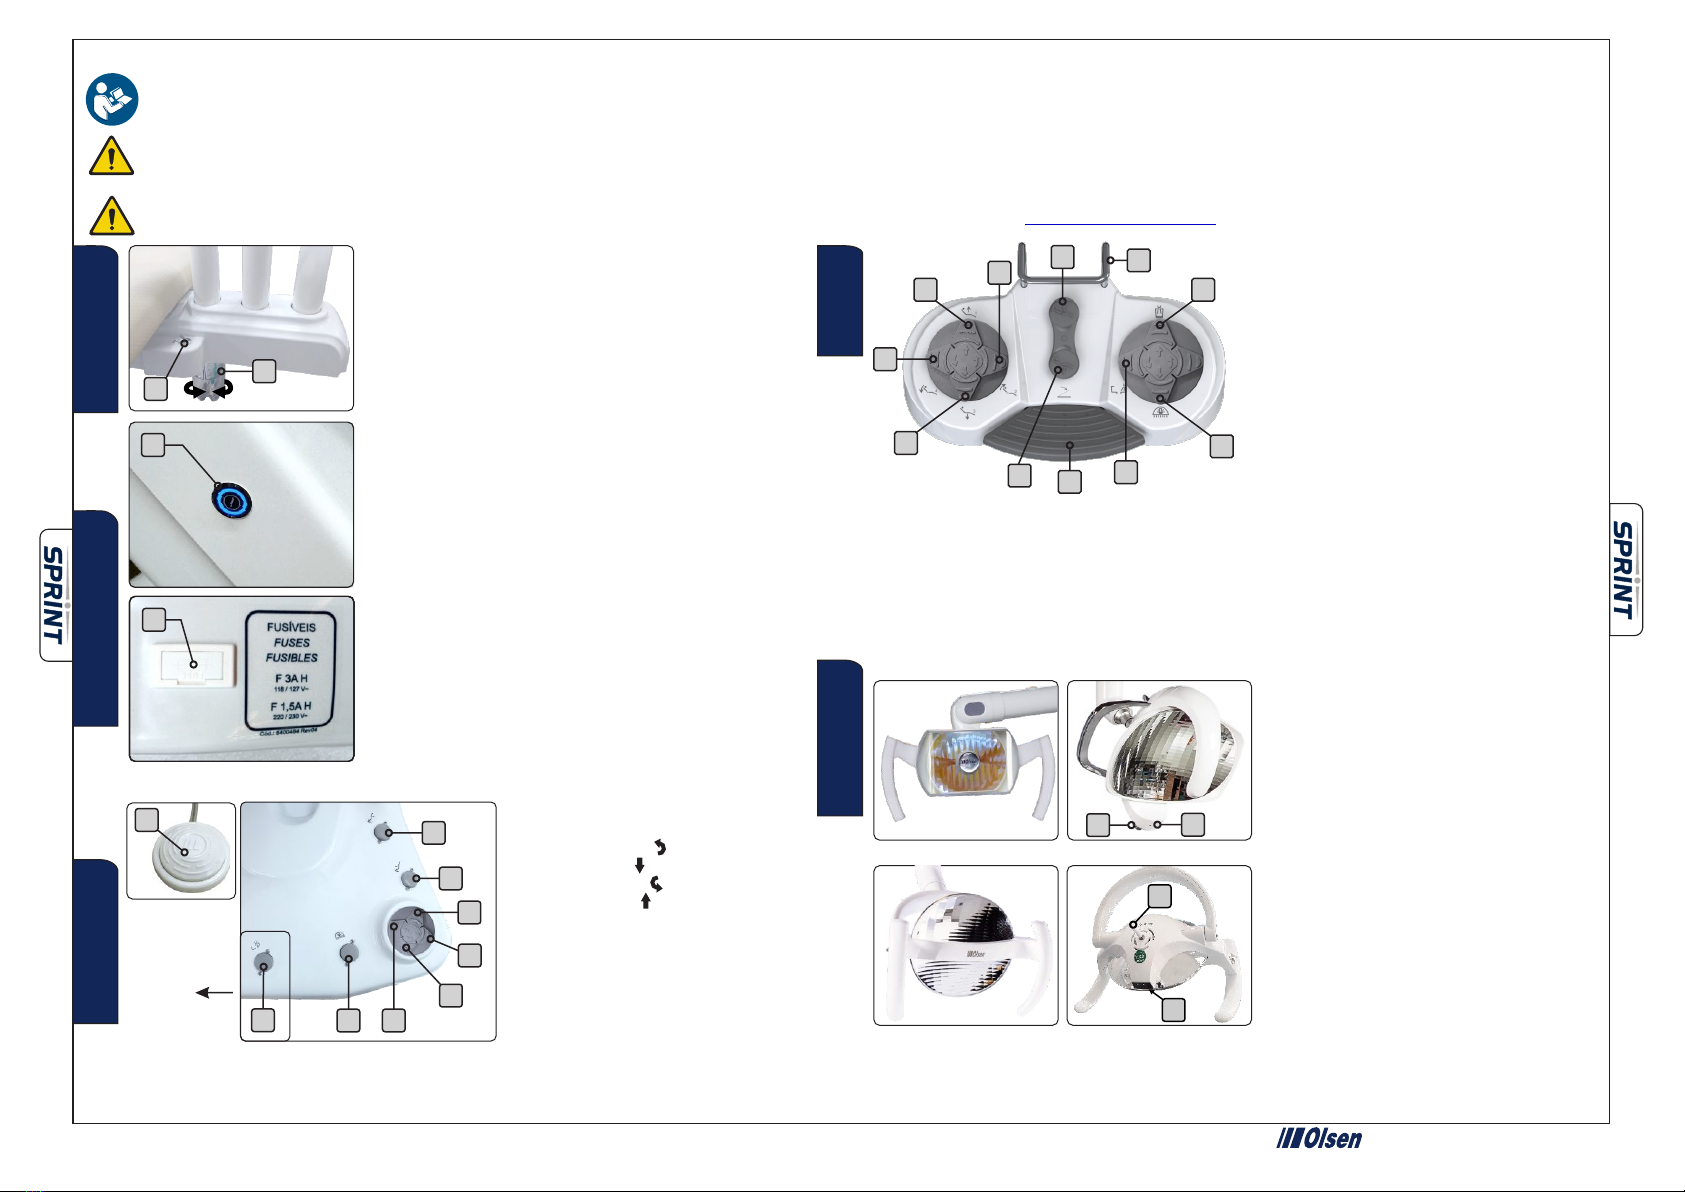
Olsen Sprint User guide

Water Tank
Pressure Valves
Before Turning On the Equipment:
Page 01 - 5403132 - R06
1A -
2A -
Delivery System
Sprint Quick Operation Guide - Description of Parts and Controls of Equipment
Observe the Scheduled Review system for your equipment.
- Equipments made to last!
1 -
2 -
3 -
4 -
5 -
6 -
7 -
8 -
9 -
Zero Position
Work Position
Backrest Up ( )
Seat Down ( )
Backrest Down ( )
Seat Up ( )
On/Off Operating Light
Spittoon Bowl Flush
Progressive/Activation Pedal
Commands
1º - Check if the equipment is properly installed in accordance
with the instructions in chapter 6 of the User
Manual Dental Line;
2º - Turn On the air compressor that supplies the equipment;
3º - Open the main water supply valve of the equipment;
4º - Turn On the equipment's power circuit breaker.
9
7
8
1
2
3
4
5
6
F03
Before using the equipment, please read the User Manual Dental Line carefully.
The purpose of this guide is to identify commands, parts, and instruments that may be available to the equipment, including optional items.
This guide does not define the equipment configuration that may vary according to the customer's request.
In case of loss of the User Manual and/or Operation Guide, please contact us by e-mail informing the serial number of your equipment.[email protected]
Operating Lights
Control Knob
Control Rod
Sensor
1 -
2 -
3 -
Seat Up/Position 1
Backrest Up/Position 2
Seat Down/Position 3
Backrest Down/Spit Position
Work Position
Zero Position
Progressive/Activation Pedal
Cup Filler
On/Off Operating Light
Spittoon Bowl Flush
Metal Handle
1 -
2 -
3 -
4 -
5 -
6 -
7 -
8 -
9 -
10 -
11 -
Remote Foot Pedal
1A
2A
Chair Base
1B -
2B -
On/Off Switch with LED Indicator
Fuse Holder
Turning On the Equipment:
1º - Turn On the On/Off switch;
2º - Activate the "Seat Up" command on the chair base until the
seat reaches its maximum height limit;
3º - Close the pressure valve;
4º - Remove the water tank and make sure it filled with water. If
necessary, fill it with drinkable water up to the limit indicated in
tank and reattach it again. If you wish, to place prophylactic
products (low concentration);
5 º - Open the pressure valve and check if the water tank is well
attached and free of leaks;
6º - Before starting the use equipment, verify the operation of all
instruments and commands available and perform the cleaning
and sterilization of the instruments.
Concept Plus
3
2
LED Premium
13
Evolution Plus
1° - To activate the Operating Light, press the
Operating Light On/Off button at the base of the
chair (section Commands - 7), this action also
enables the sensor (3) and the control button/
rod (2);
2° - To change the lighting intensity of the
Evolution Plus Operating Light, keep the
command button - Commands section (7) -
pressed for more than 2 seconds;
3° - To turn on or off the Concept Plus and LED
Premium Operating Light, pass your hand in
front of the sensor (3) at approximately 5 cm
distance or hold the control rod (2), in the case of
Concept Plus, or turn the control button (1), in the
case of the Premium LED spotlight;
4° - To change the lighting intensity of the
Concep Plus and Premium LED reflectors, keep
your hand in front of the sensor (3) or hold the control rod (2), in the case of Concept Plus or turn the control
knob (1), in the case of the Premium LED Operating Light.
To save a work position:
1º - Press the Zero Position button;
2º - Adjust the backrest to the desired position;
3º - Adjust the seat to the desired position;
4º - Press the Work Position button for 5 seconds. The equipment will emit 2 long beeps;
5º - Press command 1 (Seat Up) while the equipment beeps; The equipment will emit 2 short beeps to
confirm the procedure;
6º - Press the Zero Position button.
2
4
7
6
5
10
11
1 8
9
3
1B
2B

Page 02 - 5403132 - R06
Working Table
The Sprint working table can present some configurations of command panels, varying
according to available instruments.
Instruments Control Panel
Instruments Holder
Stainless Steel Tray
Bicarbonate Reservoir
X-ray Viewer
1 -
2 -
3 -
4 -
5 -
X-Ray Viewer
On/Off X-Rray Viewer
1 -
2 -
Observe the Scheduled Review system for your equipment.
- Equipments made to last!
Sprint Quick Operation Guide - Description of Parts and Controls of Equipment
Water Unit
Area for Instruments
Spittoon Bowl Manual Control
Cup Holder Manual Control
Spittoon Bowl Control with Timer
Cup Holder Control with Timer
1 -
2 -
3 -
4 -
5 -
Instruments Holder
Vacuum Pump Ejector
Venturi Saliva Ejector
Vortex Saliva Ejector
1 -
2 -
3 -
4 -
Assistant Module
Working Table Arm
1
5
2
3
4
Instruments Panel
Pneumatic Brake Valve*
Scaler Power Control
Scaler Water Control
Optical Fiber Water Control
Optical Fiber On/Off
Electric Micromotor Speed Control
Electric Micromotor Water Control
Electric Micromotor Rotation Direction Inverter
1 -
2 -
3 -
4 -
5 -
6 -
7 -
8 -
To activate the water control in the Spitton Bowl, turn the
Spittoon Bowl Manual Control (2). To activate the manual water
control on the Cup Holder, keep the Cup Holder Manual
Control (3) pressed.
When the Water Unit is equipped with timed controls, to
release timed water in the spitton bowl, press the Spittoon Bowl
Control with Timer (4), to release timed water in the Cup
Holder, press the Cup Holder Control with Timer (5). In addition
to being available on the side of the Water Unit, the controls (4)
and (5) may be available on the base control or on the remote
pedal.
1
2
3
4
The Straight Arm allows 5 manual height
adjustment levels.
To lower/raise the arm: holding the arm in the
part closest to the equipment column, pull it firmly
upward to disengage it. Adjust the lock (1) to the
desired height and then push the arm down until it
locks into place.
The Articulated Arm features 2 articulations
between the delivery unit and the working table
and mechanical lock system. It requires manual
adjustment by a handle (2) to adjust the height
from the floor.
The Flex Arm features 2 articulations (3) and
pneumatic lock that are disabled by activating the
pneumatic valve (4), allowing the
working table movement.
1234
7
56 8
X-Ray Viewer
Command Panel
1
2
Display
Program
Directional
Gear Ratio
Setting
Manual Start
Adjust Keys
1 -
2 -
3 -
4 -
5 -
6 -
7 -
Brushless Micromotor
Command Panel
PS
200000
High Speed
rpm
ON
/
OFF
P1
F:
1 1
10S
1
2
3
4
6
5
7
Command Panel
2
4
31
2
1
3
45

Lámparas
Botón de Control
Palanca de Control
Sensor
1 -
2 -
3 -
Sube Asiento/Posición 1
Sube Respaldo/Posición 2
Baja Asiento/Posición 3
Baja Respaldo/Posición de Enjuague
Posición de Trabajo
Posición Cero
Pedal de Propulsión
Agua del Llena Vasos
On/Off de la Lámpara
Agua en la Taza
Manija Metálica
1 -
2 -
3 -
4 -
5 -
6 -
7 -
8 -
9 -
10 -
11 -
Pedal
Concept Plus
3
2
LED Premium
13
Evolution Plus
1° - Para activar la lámpara, presione el
comando de On/Off de la lámpara en la base,
esta acción también habilita el sensor y el
botón/palanca de control;
2º - Para cambiar la intensidad de iluminación
del Evolution Plus , mantenga presionado el
comando durante más de 2 segundos;
3° - Para encender/apagar el Concept Plus y
LED Premium mueva su mano delante del
sensor a aproximadamente 5 cm de distancia
o sostenga la palanca de control en el caso
del Concept Plus o gire el botón de control en
el caso del LED Premium;
4° - Para cambiar la intensidad de iluminación
del Concept Plus y el LED Premium,
Para grabar una posición de trabajo:
1º - Presione el comando Posición Cero;
2º - Ajuste el respaldo en la posición deseada;
3º - Ajuste el asiento en la posición deseada;
4º - Por 5 segundos presione el comando Posición de Trabajo. El equipo emite 2 bip largo;
5º - Presione el comando 1 (Sube Asiento) mientras el equipo está emitiendo el bip; El equipo emitirá
2 bips cortos para confirmar el procedimiento;
6º - Presione el comando Posición Cero.
Guía Rápida de Operación Sprint - Descripción de Partes y Controles del Equipo
Antes de utilizar el equipo, por favor lea el Manual del Usuario Línea Odontológica cuidadosamente.
En caso de pérdida del Manual del Usuario y/o el Guía de Operación, contáctenos por correo electrónico informando el número serial de su equipo.[email protected]
El propósito de esta guía es identificar los comandos, piezas e instrumentos que pueden estar disponibles para el equipo, incluidos los elementos opcionales.
Esta guía no define la configuración del equipo que puede variar según la solicitud del cliente.
Base del SillónPlataforma Comandos
mantenga la mano delante del sensor o sostenga la barra de control en el Concept Plus o gire el
botón de control en el caso del LED Premium.
Página 01 - 5403132 - R06
Tenga en cuenta el Sistema de Revisión para su equipo - Capítulo 12 del Manual del Usuario - Línea Odontológica.
- Equipos hechos para durar
9
7
8
1
2
3
4
5
6
1A
2A
1B
2B
1B -
2B -
3 -
Interruptor On/Off con LED Indicador
Portafusibles
Llave Stop de Emergencia
Tanque de Agua
Válvula de Presurización
1A -
2A -
Antes de encender el equipo:
1º - Encienda el Interruptor On/Off, su LED indicador se
encenderá;
2º - Accione el comando "Sube Asiento" en la base del
sillón hasta que el sillón llegue a su límite de altura;
3º - Cierra la válvula de presurización;
Encendiendo el Equipo
4º - Remueva el tanque de agua y asegúrese de que esté
completo con agua. Si es necesario, llénelo con agua
potable filtrada hasta el límite indicado en el tanque y
acóplalo nuevamente. Si desea, colocar productos
profilácticos (baja concentración);
5º - Abra la válvula de presión y verifica si el tanque de
agua está bien acoplado, sin fugas;
6º - Antes de empezar la utilización del equipo, verifica la
operación de todos los instrumentos y comandos
disponibles y realiza la limpieza y esterilización de los
instrumentos (capítulo 7 del Manual del Usuario Línea
Odontológica - Limpieza y Desinfección).
1 -
2 -
3 -
4 -
5 -
6 -
7 -
8 -
9 -
Posición Cero
Posición de Trabajo
Sube Respaldo ( )
Baja Asiento ( )
Baja Respaldo ( )
Sube Asiento ( )
On/Off Lámpara
Comando de Agua en la Taza
Pedal de Propulsión/Activación
Para grabar una posición de trabajo:
1º - Presione el comando Posición
Cero;
2º - Ajuste el respaldo en la posición deseada; 3º - Ajuste el asiento en la posición deseada;
4º - Por 5 segundos presione el comando Posición de Trabajo. El equipo emite 2 bip largo;
5º - Presione el comando 1 (Sube Asiento) mientras el equipo está emitiendo el bip; El equipo
emitirá 2 bips cortos para confirmar el procedimiento; 6º - Presione el comando Posición Cero.
2
4
7
6
5
10
11
1 8
9
3

Página 02 - 5403132 - R06
Mesa Sprint
La mesa Sprint podrá presentar diferentes configuraciones de paneles de comando,
de acuerdo con los instrumentos disponibles.
Panel de Control de Instrumentos
Soporte de Instrumentos
Bandeja de Acero Inoxidable
Reservatorio de Bicarbonato
Negatoscopio
1 -
2 -
3 -
4 -
5 -
Tenga en cuenta el Sistema de Revisión para su equipo - Capítulo 12 del Manual del Usuario - Línea Odontológica.
- Equipos hechos para durar
Panel del Negatoscopio
Negatoscopio
On/Off Negatoscopio
1 -
2 -
Guía Rápida de Operación Sprint - Descripción de Partes y Controles del Equipo
1 -
2 -
3 -
4 -
5 -
6 -
7 -
8 -
Válvula del Freno Neumático*
Potencia del Ultrasonido y Selector
de Funciones G-P/E
Control de Agua del Ultrasonido
Control de Agua de Fibra Óptica
On/Off luz de Fibra Óptica
Control de Velocidad del Micromotor Eléctrico
Control de Agua del Micromotor
Inversor de Rotación del Micromotor
Eléctrico
Unidad de Agua
Zona para Instrumentos
Botón Agua en la Taza
Botón del Llena Vasos
On/Off Agua en la Taza con Timer
On/Off Llena Vasos con Timer
1 -
2 -
3 -
4 -
5 -
Brazo de la Mesa
1
5
2
3
4
1
2
3
El brazo recto permite el ajuste manual de 5
niveles de altura.
Para bajar/subir el brazo: sostenga el brazo
cerca de la columna y tire firmemente hacia
arriba hasta que se desenganche. Ajuste el freno
plástico (1) a la altura deseada y luego empuje el
brazo hacia aba j o hasta que en c a je
completamente en su lugar.
Panel de Control de Instrumentos
Mesa Sprint
Panel de Control Mesa Sprint
Módulo Para Assistente
Para activar el control manual de agua en la taza, gire el botón
agua en la taza (2). Para activar el control manual del agua en
el llena vasos, mantenga presionado el botón del llena vasos
(3). Para liberar el agua programada en la taza, presione el
on/off agua en la taza con timer (4), para liberar el agua
programada en el llena vasos, presione el on/off llena vasos
con timer (5). Además de estar disponibles en el lateral de la
unidad de agua, los controles (4) y (5) pueden estar
disponibles en el control de la base o en el pedal remoto.
El brazo articulado presenta dos articulaciones
entre el módulo odontológico y la mesa y sistema
de freno mecánico. Necesario ajuste manual a
través del perno (2) para ajustar la altura de la
mesa en relación con el piso.
4
El brazo flex presenta dos articulaciones (3) y
sistema de freno neumático que es desactivado
por el accionamiento de la válvula
n eu má tica ( 4) , l ib eran d o e l
movimiento de la mesa.
1234
7
56 8
1
2
Display
Program
Directional
Gear Ratio
Setting
Manual Start
Adjust Keys
1 -
2 -
3 -
4 -
5 -
6 -
7 -
PS
200000
High Speed
rpm
ON
/
OFF
P1
F:
1 1
10S
1
2
3
4
6
5
7
Panel del Micromotor Brushless
2
4
31
Soporte de Instrumentos
Bomba Aspiradora
Eyector Venturi
Eyetor Vórtex
1 -
2 -
3 -
4 -
2
1
3
45
Table of contents
Languages:
Other Olsen Medical Equipment manuals
Popular Medical Equipment manuals by other brands

Varex Imaging
Varex Imaging Optica 30 Series user manual

Pressalit Care
Pressalit Care R8478 Mounting instruction

Withings
Withings Sleep Quick installation guide

Beckman Coulter
Beckman Coulter IM3632 manual

BIOTRONIK
BIOTRONIK ICD Series Technical manual

DENTSPLY
DENTSPLY Cavitron Select SPS Directions for use