Olympus BX51 User manual

1
OlympusBX51Microscope
(May2014)
BX51Microscope
Brightfieldhalogenlamp;reflected(top)ortransmitted(bottom)illumination
Fluorescencemercurylamp
Filterpositions1.HQ:RDil(red)
2.DAPI(340‐380Ex;400dichroic;435‐485Em)
3.DIC
4.brightfield
5.darkfield
6.QdothxCM(red/blue)
Objective MagnificationImmersionN.A.WorkingDistanceFilters
MPlanFluorite 2.5X Dry 0.08 10.7 brightfieldonly(w/polarizer)
UMPlanFluorite 5X Dry 0.15 12.0 all
UMPlanFluorite 10X Dry 0.30 11.0 all
LMPlanFluorite 20X Dry 0.40 12.0 all
LMPlanFluorite 50X Dry 0.50 10.6 all
LMPlanFluorite 100X Dry 0.80 3.4 all(availableuponrequest)
Filters
Wheel Position1–HQ:Rdilred
Position2–DAPI,fluorescencefilterforfluorophores,nuclearstain
Position3–DICNomarskiDifferentialContrastfilter
Position4–BF,brightfield(forallwhitelight)
Position5–DF,darkfieldfilter
Position6–QdothxCMred/blue
CookeSensiCAMCamera
BlackandWhitecamera
ImageProPlusSoftware
Capturesingleimages(8‐bitor12‐bit)ormovies(.avifiles)
Imageadjustments(gamma,saturation,backgroundsubtraction,etc.)
Measuredistances
Addlabelsorscalebars
Coloradjustmentsandfalsecolor

2
TableofContents
QuickGuide…………………………………………………………………………………………………page3
Diagram Where’sthatknob?………………………………………………………………..4
What’sthatknobdo?...............................................................5
Brightfield(transmittedlight)………..……………………………………………………………… 5
Brightfield(reflectedlight)………..…………………………..…………………………………….. 6
Fluorescence………………………………………………………………………………………………… 7
Imageacquisitionandmeasurements………………………………………….……………..8
Troubleshooting……………………………………………………………………………………………..11

3
ShutdownSteps
Alwaysturnoffthecamera.
Alwaysturnoffthelamps.
Swingthe2.5Xobjectiveinplace.
Transferyourimages.
QUICKGUIDE
(Boldnumbersareshownonthemicroscopediagram).
1. LogintoCORAL.
2. Turnonthehalogenlamp(1).
3. Selecttransmitted(bottom)light(4)fortransparentsamplesorreflected(top)light.
4. Turnonthecameraforpicturesormeasurements(switchatopthebluecamera).
5. ONLYIFusingfluorescence,turnonthemercurylamp(18).
6. Setthelightpathforthehalogenormercurylamp(30).
7. Choosethefilterwheelsetting(17)(NOTBFforUVlightoryouwilldamageyoureyes).
8. Choosetheobjective(6).
9. Loadsampleonthestage.
10. Focus(10)andadjustillumination(3).
Iftransmittingfluorescence
Slidethefilterwheeltoposition2.Theposition4(BF)filterwillexposeyoureyestoUVlight.
Usethe25%NDfilter(31)toreducetheUVintensity.
Closetheshutter(20)toprotectsamplefromexcessUVlight.
Forpictures(Seepage9fordetails).
Sendlighttothecamerawiththecamera/eyepiecesplitterknob(2).
OpenImageProPlussoftwarewiththedesktopicon.
Openanacquisitionwindow.
SelecttheSensiCAMCookeDriverv3.6.
Setbitacquisitiondepth.
Setfilesavingoptions.
Setsingle,intervalortimelapsecapturemodes.
Setspatialcalibrationtomatchtheobjectivethatisbeingused.
Setexposuretimeoruseautoexposure.
Openalivepreviewwindow.
Focus,adjustexposuretimeorlighting,adjuststageposition.
Stopthepreviewandcapturetheimage(ormovie).
Savetheimage.
Formeasurements
Verifythatthespatialcalibrationmatchestheobjective.
Measurethedistanceorfeature.
Toburnthenotationsintotheimage,selectthecameraiconandsavethenewfile.
Toburnascalebarintotheimage,usethecaliperbuttonandthe‘Marker’button.Savethenewfile.

4
WHERE’STHATKNOB?

5
WHATDOESTHATKNOBDO?
(1)White(halogen)lightpowerswitch–turnsonbothtransmittedandreflectedlight.
(2)Eyepiece/Cameralightpathselector–sendslighttoeyepieces,cameraorboth.
(3)Brightnessadjustment–controlsintensityoftransmittedandreflectedlight.
(4)Lightintensityandtoggleswitches–Thetoggleselectsthelower(transmitted)orupper(reflected)
lightsource.The‘PRESET’buttongivesmaximumillumination.
(5)Eyepieces–canadjusttheinterpupillarydistanceandfocus.Thelefteyepiecehasamicrometer.
(6)Objectives
(7)Stagewithsteelplatesformagneticprobearmsforfluidicdevices.Removetheglassstagetouse
magneticprobes.
(8)Stageclip.AskBethtoputiton.
(9)Stagecontrols(actuallyonleftsideofstage).
(10)FineandCoarsefocus.Eachunitis1microninstageheightadjustment.
(11)Diopterring–forfocusingtheocular
(12)Rotatingnosepiece–forselectingobjectives
(13)Fieldirisdiaphragmfortransmittedlight–forestablishingKoehlerillumination
(14)Condenserheightadjustment‐forestablishingKoehlerillumination
(15)Condensercenteringscrews‐forestablishingKoehlerillumination
(16)Condenserapertureirisdiaphragm‐forestablishingKoehlerillumination
(17)Filterwheelholdingmirrorsandfiltersforreflectedlight
(18)Mercurylamppowerswitch–toturnthefluorescencelightonandoff.
(19)Mercurylamppowerindicator–redwhenthemercurybulbisON.
(20)Shutterknob–shutterforreflectedlight(whiteorfluorescent)toprotectsamplefromexcessUVlight.
(21)Fieldirisdiaphragm–restrictsthediameterofthebeamoflightenteringtheobjective(excludes
extraneouslightandimprovesimagecontrast).Alsoslowsfadinginotherpartsofthesample.
(22)Apertureirisdiaphragm–adjuststhebrightnessoftheobservedimageandimprovescontrast.
Usetofine‐tuneafterusingtheNDfilters.
(23)Notonthismodel
(24top)‐condenserscrew.Notonthismodel
(24bottom)–reflectedlightanalyzer.Notonthismodel.
(25)Polarizer
(26)DICprismslidefilter–adjuststhecontrastwhenusingDIC
(30)Lightpathselector–selectshalogenlampandormercurylampforreflectedlight.
(31)Buttonsforbuilt‐infilters
ND6decreasesexcitationlightintensityto6%(fluorescenceapplications)
ND25 decreasesexcitationlightintensityto25%(fluorescenceapplications)
LBDcolorconversionfiltertosimulatedaylight(BF,imagecapture)
OPdunno
(32)Slidefiltersforreflectedlight
U‐25FR,frostslidefilter‐toeliminateunevenillumination
U‐25ND25,NDslidefilter‐toreducetheexcitationlightintensity.
(33)Rearhalogenlamphousing–sourceofthereflectedwhitelight.

6
BRIGHTFIELDTransmittedlight
Whitelighttransmitsthroughatransparentsamplefromunderneath.
1.Turnonthewhite(halogen)lightswitch(1)fortransmittedlightto“│”(ON).
2.Engagethebrightfield(BF)mirrorunit(17).
3.Adjustthelightpath.Thelightpathselectorknob(2)shouldbepushedinalltheway.
4.Selecttransmittedlight(lowerposition)ontheswitchbythebrightnessindicator(4).
5.Adjustthelightintensityusingthebrightnessadjustmentknob(3).Thenumeralsbythelampvoltage
indicator(4)indicatethevoltage.Deselectthe“PRESET”button(notilluminatedgreen)toavoid
maximumillumination.
6.Adjusttheinterpupillarydistance.Whilelookingthroughtheeyepieces,adjusttheeyepieces(5)untilthe
leftandrightfieldsofviewcoincide.
7.Swingthe2.5xobjective(6)inplace.Mountthespecimenonthestage(7).
8.Findthespecimenusingthestagecontrols(9).
9.Focusonthespecimenusingfine/coursefocusingknobs(10).
10.Adjustthediopter:
‐Closeyourlefteyeandfocusonthespecimenusingthefinefocusknob.
‐Closeyourrighteyeandfocusonthespecimenusingthediopterring(11)ontheleftocular.
‐Openbotheyestoseeifthefocusiscorrect.
11.Ifneeded,switchtothenextobjectivebyrotatingthenosepiece(12)andfocus.
Continuetothedesiredmagnification.
12.EstablishKoehlerillumination:
‐Closethefieldirisdiaphragm(13)untilyoucanseetheedges.
‐Focustheimageofthefieldirisdiaphragmbyraisingorloweringthecondenserusingthecondenser
heightadjustmentknob(14).
‐Checkwhetherthelightiscenteredinthefieldofview.Ifnot,usethecondensercenteringscrews
(15)tomovethefieldirisdiaphragmimagetothecenterofthefieldofview.
‐Openthefieldirisdiaphragmuntilitsimagecircumscribesthefieldofview.
‐Matchtheopeningofthecondenserapertureirisdiaphragm(16)withtheN.A.oftheobjectivein
usetoachievetheoptimumobjectiveperformance.
13.Examinespecimenandtakeapicture,ifneeded(Seepage9fordetails).
14.Whenfinished:
‐Lowerthestagebyturningthefocusknob(10)andremovethespecimen.
‐Turnthenosepiece(12)untilthe2.5xobjectiveisintoplace.
‐Lowerthelightintensitytozerousingthebrightnessadjustmentknob(3)
‐Turnthehalogenlightswitch(1)to“○”(OFF).
‐Returnanyslidefilters(26)(31)(32)totheirdisengagedpositions.

7
BRIGHTFIELDReflectedlight
Whitelightisshoneontoareflectivesamplefromabove.
1.Turnthehalogenbulbswitch(1)forreflectedlightto“│”(ON).Engagethebrightfield(BF)filter(17).
2.Adjustthelightpath.
‐Thelightpathselectorknob(2)shouldbepushedinalltheway.
‐Theknobonthereflectedlightsplitter(30)shouldbepushedinalltheway.
‐Theshutterknob(20)shouldbeslidtothepositionmarked“○”(OPEN).
3.Selectreflectedlight(upperposition)ontheswitchbythebrightnessindicator(4).
4.Adjustthelightintensityusingthebrightnessadjustmentknob(3).Thelightintensityscale(4)indicatesthe
lampvoltage.Deselectthe“PRESET”button(notilluminatedgreen)toavoidmaximumillumination.
5.Adjusttheinterpupillarydistance.Whilelookingthroughtheeyepieces,adjusttheeyepieces(5)untilthe
leftandrightfieldsofviewcoincide.
6.Swingthe2.5xobjective(6)inplace.
7.Placethespecimenonthestage(7).
8.Findthespecimenusingthestagecontrols(9).
9.Focusonthespecimenusingfine/coursefocusingknobs(10).
10.Adjustthediopter:
‐Closeyourlefteyeandfocusonthespecimenusingthefinefocusknob.
‐Closeyourrighteyeandfocusonthespecimenusingthediopterring(11)onthelefteyepiece.
‐Openbotheyesandconfirmthatitisinfocus.
11.Switchtothenextobjectivebyrotatingthenosepiece(12)andfocus.Continueuntilyoureachthedesired
magnification.
12.EstablishKoehlerillumination:
‐Closethefieldirisdiaphragm(13)untilyoucanseetheedges.
‐Focustheimageofthefieldirisdiaphragmbyraisingorloweringthecondenserusingthecondenser
heightadjustmentknob(14).
‐Checkwhetherthelightiscenteredinthefieldofview.Ifnot,usethecondensercenteringscrews
(15)tomovethefieldirisdiaphragmimagetothecenterofthefieldofview.
‐Openthefieldirisdiaphragmuntilitsimagecircumscribesthefieldofview.
‐Matchtheopeningofthecondenserapertureirisdiaphragm(16)withtheN.A.oftheobjectivein
usetoachievetheoptimumobjectiveperformance.
13.Examinespecimenandtakeapicture,ifneeded.(Seepage9fordetails).
14.Whenfinished:
‐Lowerthestagebyturningthefocusknob(10)andremovethespecimen.
‐Turnthenosepiece(12)untilthe2.5xobjectiveisintoplace.
‐Lowerthelightintensitytozerousingthebrightnessadjustmentknob(3)
‐Turnthehalogenlightswitch(1)to“○”(OFF).
‐Returnanyslidefilters(26)(31)(32)totheirdisengagedpositions.

8
FLUORESCENCE(Transmittedlight)
NOTE:Themercurybulbisfragile.Itneedstobecoolfor30minutesbeforebeingturnedonagain.Itneedsto
stayonforatleast15minutes.
1.Switchonthemercurylampbysettingtheswitch(18)to“I”(ON).Theindicator(19)shouldlightup.
Thebulbwillstabilizein5‐10minutes.
2.Setthemicroscopeforbrightfieldimaging(‘Brightfieldreflectedlight’page2,steps2–12.)
Usethereflectedlightsplitterknob(30)toswitchbetweenwhitelightandUVlightlamps.
3.Turnthefilterwheel(17)toselectafiltercube:
position#1.HQ:RDil(red)
2.DAPI(340‐380Ex;400dichroic;435‐485Em)
3.DIC
4.Brightfield(BF)
5.Darkfield
6.QdothxCM(red/blue)
4.Whenusingthefiltercubes,turnthelightintensitydownalltheway(3).
5.Toavoidphotobleaching,closetheshutter(20)“●”(CLOSED)whennotacquiringanimage.
6.Toimproveimagecontrastandtopreventphotobleachingotherpartsofthespecimen,pulloutthefieldiris
diaphragmknob(21)sothattheimageofthefieldirisdiaphragmjustcircumscribesthefieldofview.
7.Toadjustthebrightnessandtoimprovecontrast,pullouttheapertureirisdiaphragmknob(22),the
diaphragmwillbesmaller.
8.Examinespecimenandtakeapicture,ifneeded.(Seepage9fordetails).
9.Whenfinished:
‐Slidetheshutterknob(20)to“●”(CLOSED).
‐Pushtheknobonthereflectedlightsplitter(30)inalltheway.
‐Ifmercurybulbhasburnedforatleast15minutes,turnitoffbysettingthemainswitch(18)to“O”.
‐Lowerthestagebyturningthefocusknob(10)andremovethespecimen.
‐Turnthenosepiece(12)backuntilthe10xobjectiveisintoplace.
‐Pushthefieldirisdiaphragmknob(21)andtheapertureirisdiaphragmknob(22)allthewayin.
‐Turnthefilterwheel(17)toBF(brightfield).
‐Returnanyslidefilters(26)(31)(32)totheirdisengagedpositions.

9
ImageacquisitionCookeSensiCAMB/Wcamera;driverv3.6&ImageProPlussoftware;v6.2
1.TurnontheblueSensiCAMcamera(switchatthetopofthecamera).Waituntiltheblinkinglightturnsgreen.
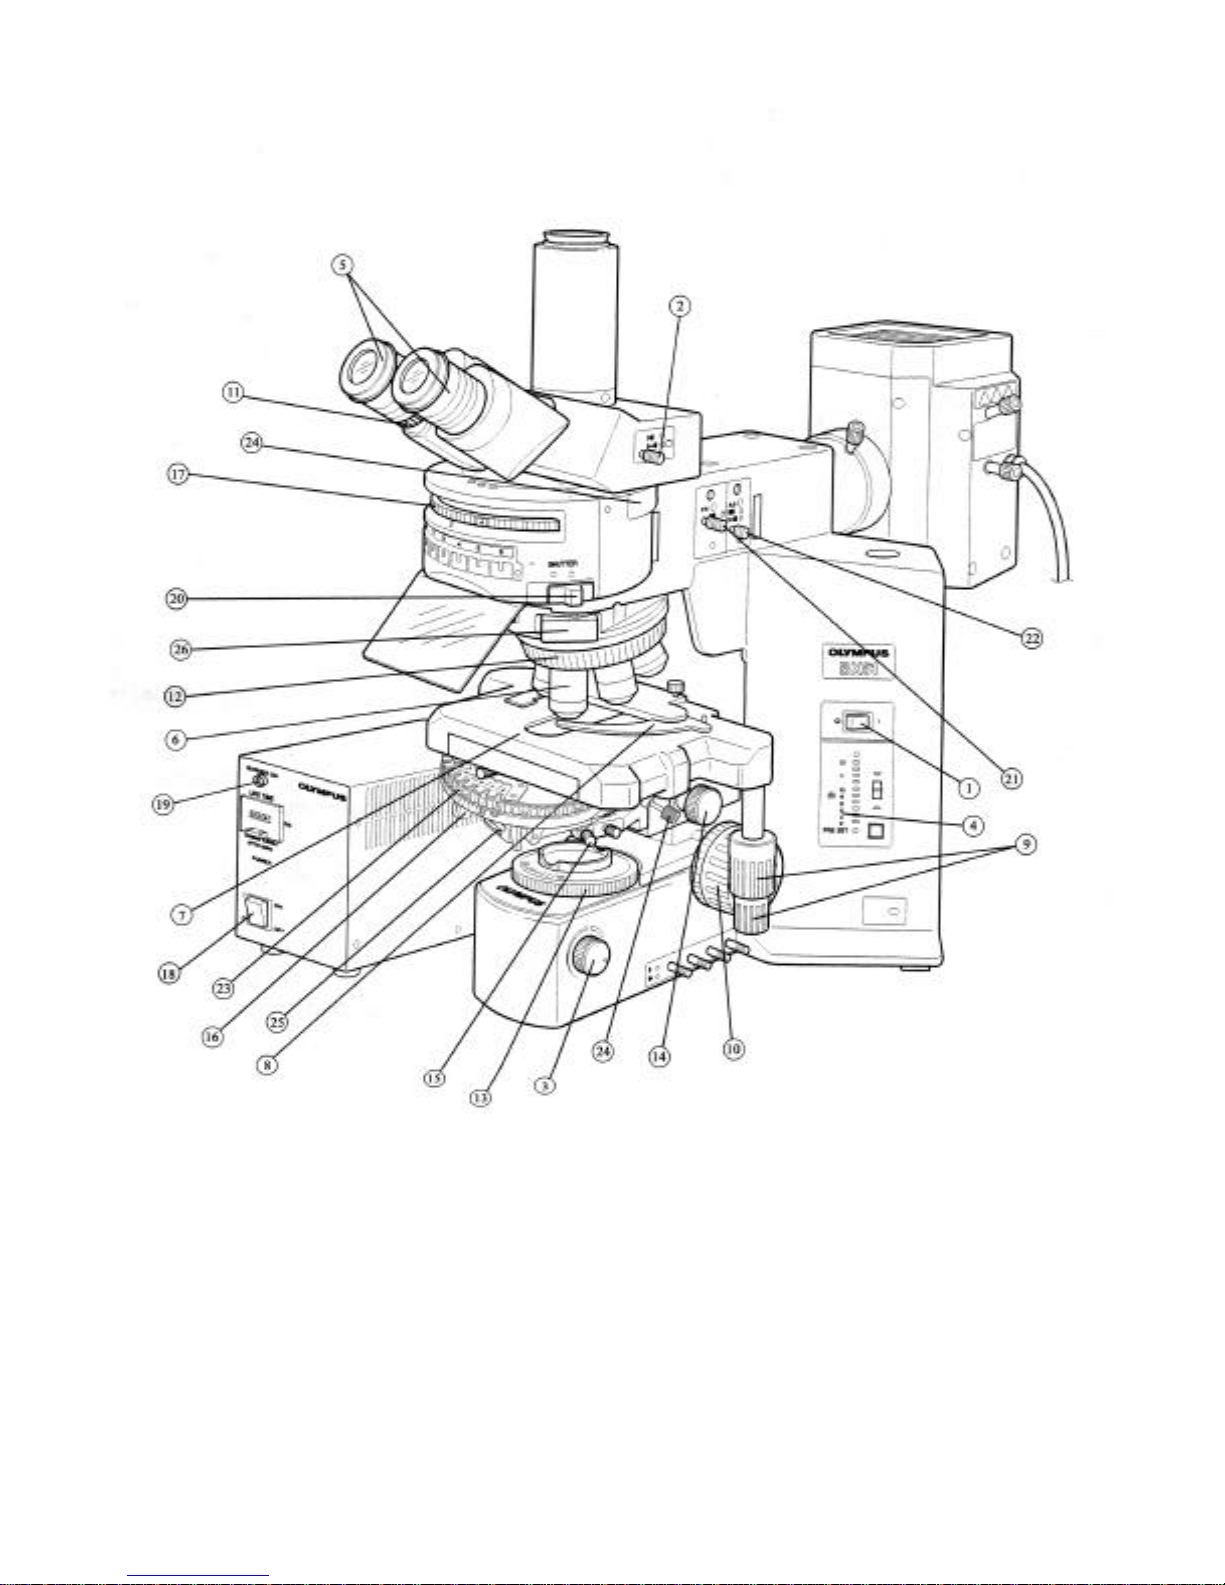
2.Slidethelightpathselectorknob(2)tosharetheimagewiththecamera(eyeandcameraposition).
3.OpenImageProPlusandadjustsettings.
‐LogonthecomputerasCNFUSER(nopassword).
‐Double‐clickonthe“USEthisImageProPlus”desktopicon.
‐SelectAcquire:Video/Digital.
Ifawindowtoselectan“AnalogSimulationImageFile”appears,click“Cancel”
‐Awindowtitled‘AnalogSimulation’appears.UsetheCurrentDriverpulldownmenutoselectthe
“SensiCAMCookeDriver(3.6)”BESURETHEDRIVERREMAINSSELECTED.
‐SettheCaptureDepthto8‐bitmonointhepulldownmenu.
‐Setthepreview(pvw)andacquisition(acq)areas(Fullis1376x1040).
4.OpenaliveimagePreviewbutton.
‐Adjustfocusandlighting(3)onthemicroscope.
‐Adjustcameraexposure.
‐SethowtheimagefileistobesavedusingtheImageTab.
‐Formultipleimages/movies,checkthe‘EnableMultipleImagesCapture’box,andsetcontrols.
5.Capturetheimage.
‐StopthelivePreviewusingthe‘Stop’button.
‐Clickthe‘Snap’button,andanimagefilewillappear.
‐Savetheimage.Ifitwastakenin12‐bitmono,thecomputercan’topenit.Youcouldconvertitusing
File>BatchConversionandselectthesourcefileandthedestinationfolderandfiletype(TIFFisbest).
6.Takemeasurementsinthesavedimage.
‐Selecttheobjective(spatialcalibration).Clickthecaliperbuttononthemenubar,andselectthe
objectivethatisinuse.
‐ClickthemeasureDistancebuttononthemenubartoopena‘MeasureDistance’popupwindow.
‐Clickanddragtomeasurethefeature(inmicrons).
‐Tosavetheannotation,clickthecamerabuttononthemenubar.Anewfileiscreated.SaveitasaTIFF.
7.Toinsertascalebar,clickthecaliperbuttononthemenubar,anddouble‐checkthatthecorrectobjectiveisselected.
‐Selectthe‘Marker’buttoninthepop‐upwindow.
‐A‘SpatialcalibrationMarker’pop‐upwindowappears.
‐Choosecolor,markerlength,andnon‐destructivemode.
‐Changethepositionsbydouble‐clickingonthebarorthelabelBEFOREclosingthemessagewindow.
‐Tosavethescalebar,clickthecamerabuttononthemenubar.Anewfileiscreated.Saveit.
8.TaketheimagesonaflashdriveortransferthemtotheLab_xfericon.
Filesareautomaticallydeletedin7days.
9.ClosetheImageProPlussoftware.
10.Leavethecomputeron.

10
Troubleshooting
1.White(brightfield)lightisn’tmakingittothesample.
CAUSE&REMEDY
Lampnoton.
Turnonthelamp(1)andlooktoseeifbothbulbscomeon.Onelampisunderthe
stage(13)andtheotherisintherearlamphousing(33).
Turnonthemercurylamp(18)(ifithasbeenoffforatleast30minutes).Wait5‐10
minutesforthebulbtostabilize.
Wronglightsourceorincorrectlightpath.
Selecttheocularpath(2)toallowthesampletobeseenintheoculars.
Selectreflected(top‐side)ortransmitted(underneath)whitelightwithswitch(4).
Selectreflectedwhitelightvs.fluorescentlightwithslideknob(30).
Opentheshutter(20)forreflectedlight.
Intensityislow.
Turn(3)uptheintensityoflightsource.
DisengagetheNDfilters(32).
Openthefieldirisdiaphragm(13).
Opentheapertureirisdiaphragm(22)andfieldirisdiaphragm(21).
SelectBF,DForDICmirrors(17)whenusingwhitelight.
2.PROBLEM:Whitelight(brightfield)istoointense.
CAUSE&REMEDY
“Preset’(4)ispushedinwhichautomaticallyturnsonthemaximumlightvoltage.
Deselectthebutton(greenlightwillgooff).
Intensityisturneduptoohigh.
Dial(3)itdown.
3.PROBLEM:Fluorescentlightisnothittingsamplecorrectly.
CAUSE&REMEDY
Lampnoton.
Turnonthemercurylamp(18)(ifithasbeenoffforatleast30minutes).
Wait5‐10minutesforthebulbtostabilize.
Wronglightsourceorincorrectlightpath.
Selecttheeyepiecepath(2)toallowthesampletobeseenintheoculars.
Selectreflectedlight(top‐side)switch(4).
Selectfluorescentlightwithslideknob(30).
Opentheshutter(20)forreflectedlight.
4.PROBLEM:Can’tcaptureadigitalimage.
CAUSE&REMEDY
Cameraisnotturnedonorstabilizedyet
Turnonthecamera(34)attheblackpowerswitchandwait2minutes.

11
Incorrectlightpathforthecameratoaccessthesample.
Selecttheeyepiecepathsetting(2)toallowthesampletobeseenbythecamera.
Wrongdriverisselectedforsoftwareimagecapture.
SelecttheCookeSensiCAMDriver.SelectAcquire:Video/Digitalfromthemenu.
Clickthe‘Setup’tabinthewindow,andselectthecorrectdriverfromthepull‐downmenu.
Other manuals for BX51
4
Table of contents
Other Olympus Microscope manuals

Olympus
Olympus DSX1000 User manual

Olympus
Olympus JM User manual

Olympus
Olympus BX-URA2 User manual

Olympus
Olympus PM10SP Installation guide

Olympus
Olympus VANOX Operating instructions

Olympus
Olympus BH2 Series User manual

Olympus
Olympus CHS User manual

Olympus
Olympus BHS User manual

Olympus
Olympus U-UVF248 User manual

Olympus
Olympus BHA-P User manual

Olympus
Olympus bx40 User manual

Olympus
Olympus BX60M User manual

Olympus
Olympus IMT-2-11 User manual

Olympus
Olympus fsx100 User manual

Olympus
Olympus FV3000 User guide

Olympus
Olympus DP73 User manual

Olympus
Olympus MX50A/T User manual

Olympus
Olympus SZ-III User manual

Olympus
Olympus BX60 User manual

Olympus
Olympus VM Series User manual