Omcan SB-TW-0016-S User manual

Bread Slicers
Model SB-TW-0016-S
Instruction Manual
Revised - 10/2/2014
Toll Free: 1-800-465-0234
Fax: 905-607-0234
Email: [email protected]
www.omcan.com

2
Page
-------------------------------------------------------------------------------- 3
--------------------------------------------------------------------------- 3 - 4
-------------------------------------------------------------------------- 4
-------------------------------------------------------------------------------------------- 5
--------------------------------------------------------------------------------------------- 5
------------------------------------------------------------------------------------ 5 - 6
---------------------------------------------------------------------------- 6 - 9
----------------------------------------------------------------------------------- 10
-------------------------------------------------------------------------- 11 - 13
---------------------------------------------------------------------------- 14
---------------------------------------------------------------------------- 15
Table of Contents
Section
General Information
Safety and Warranty
Technical Specications
Installation
Operation
Maintenance
French Instructions
Figure Drawings
Parts Breakdowns
Electrical Schematics
Warranty Registration
Model SB-TW-0016-S

3
General Information
Safety and Warranty
Omcan Manufacturing and Distributing Company Inc. and Food Machinery of America, Inc. dba Omcan
are not responsible for any harm or injury caused due to any person’s improper or negligent use of
this equipment. The product shall only be operated by someone over the age of 18, of sound mind, and
not under the inuence of any drugs or alcohol, who has been trained in the correct operation of this
machine, and is wearing authorized, proper safety clothing. Any modication to the machine voids any
warranty, and may cause harm to individuals using the machine or in the vicinity of the machine while
in operation.
CHECK PACKAGE UPON ARRIVAL
Upon receipt of an Omcan shipment please inspect for external damage. If no damage is evident on the
external packaging, open carton to ensure all ordered items are within the box, and there is no concealed
damage to the machine. If the package has suffered rough handling, bumps or damage (visible or concealed),
please note it on the bill of lading before accepting the delivery and contact Omcan within 24 hours, so we may
initiate a claim with the carrier. A detailed report on the extent of the damage caused to the machine must be
lled out within three days, from the delivery date shown in the shipping documents. Omcan has no recourse
for damaged products that were shipped collect or third party.
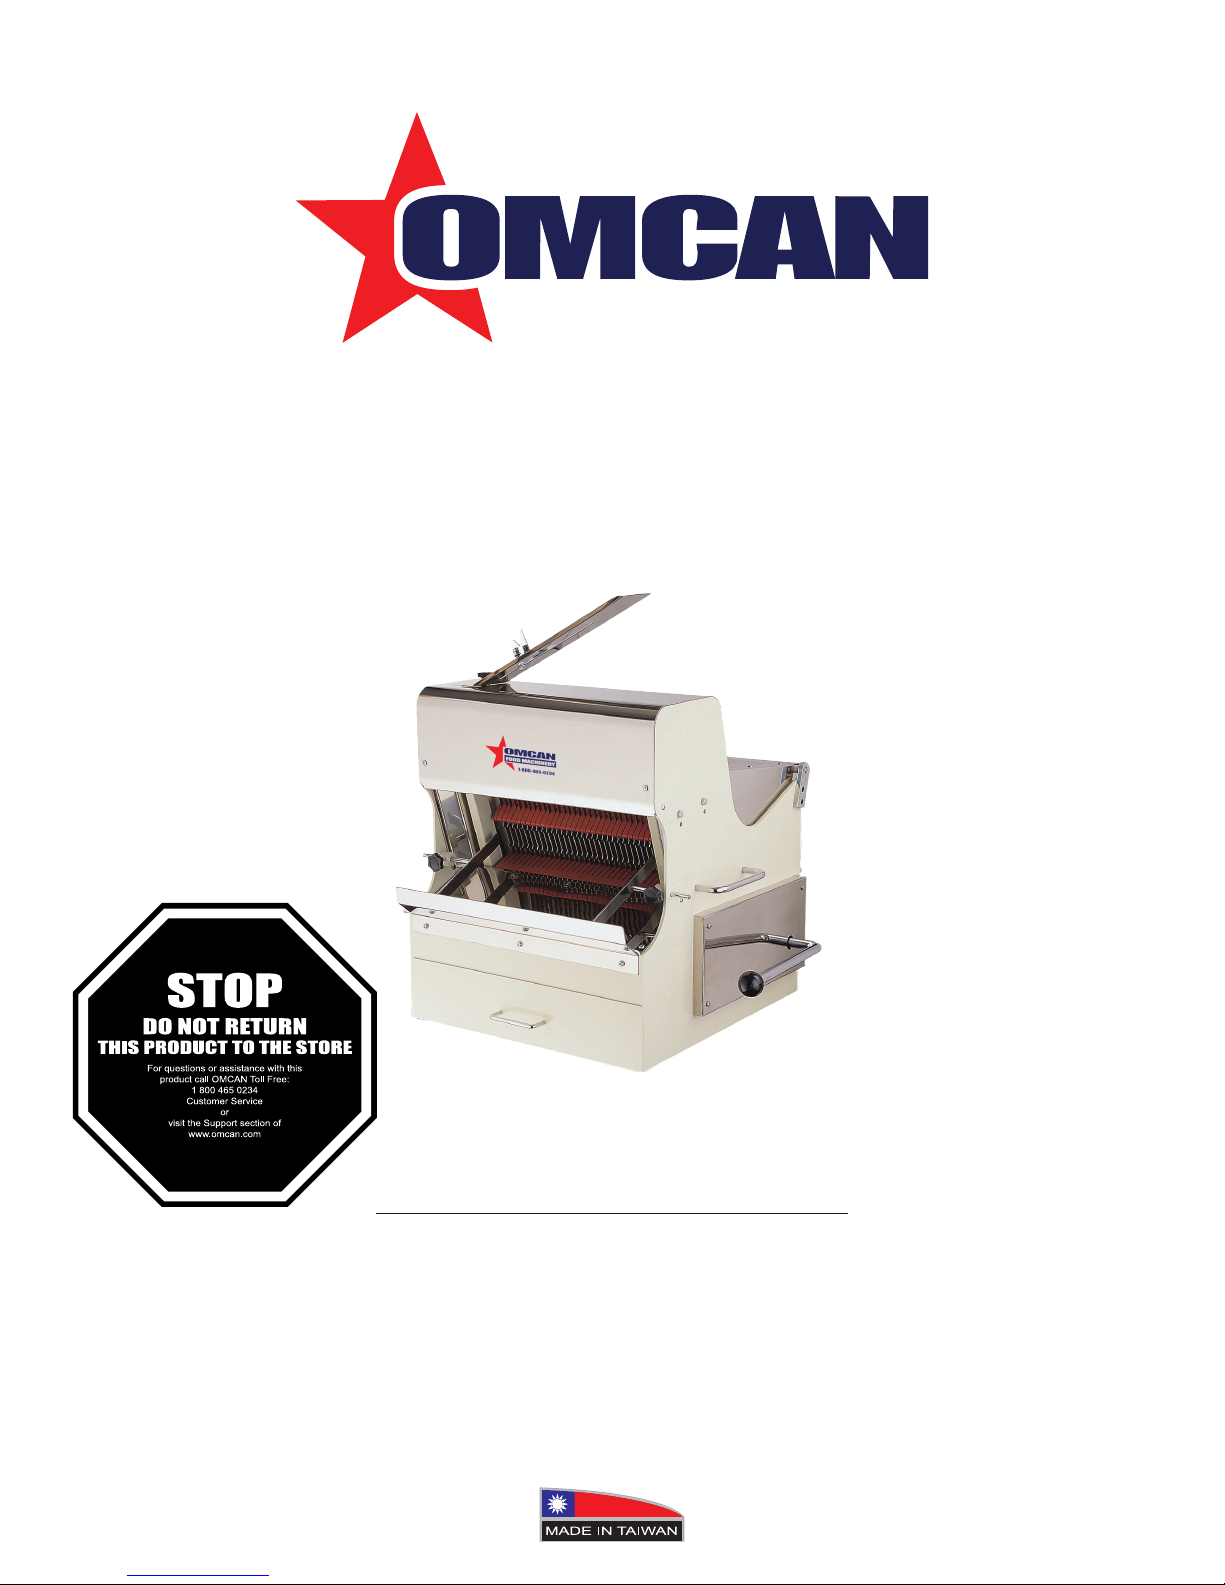
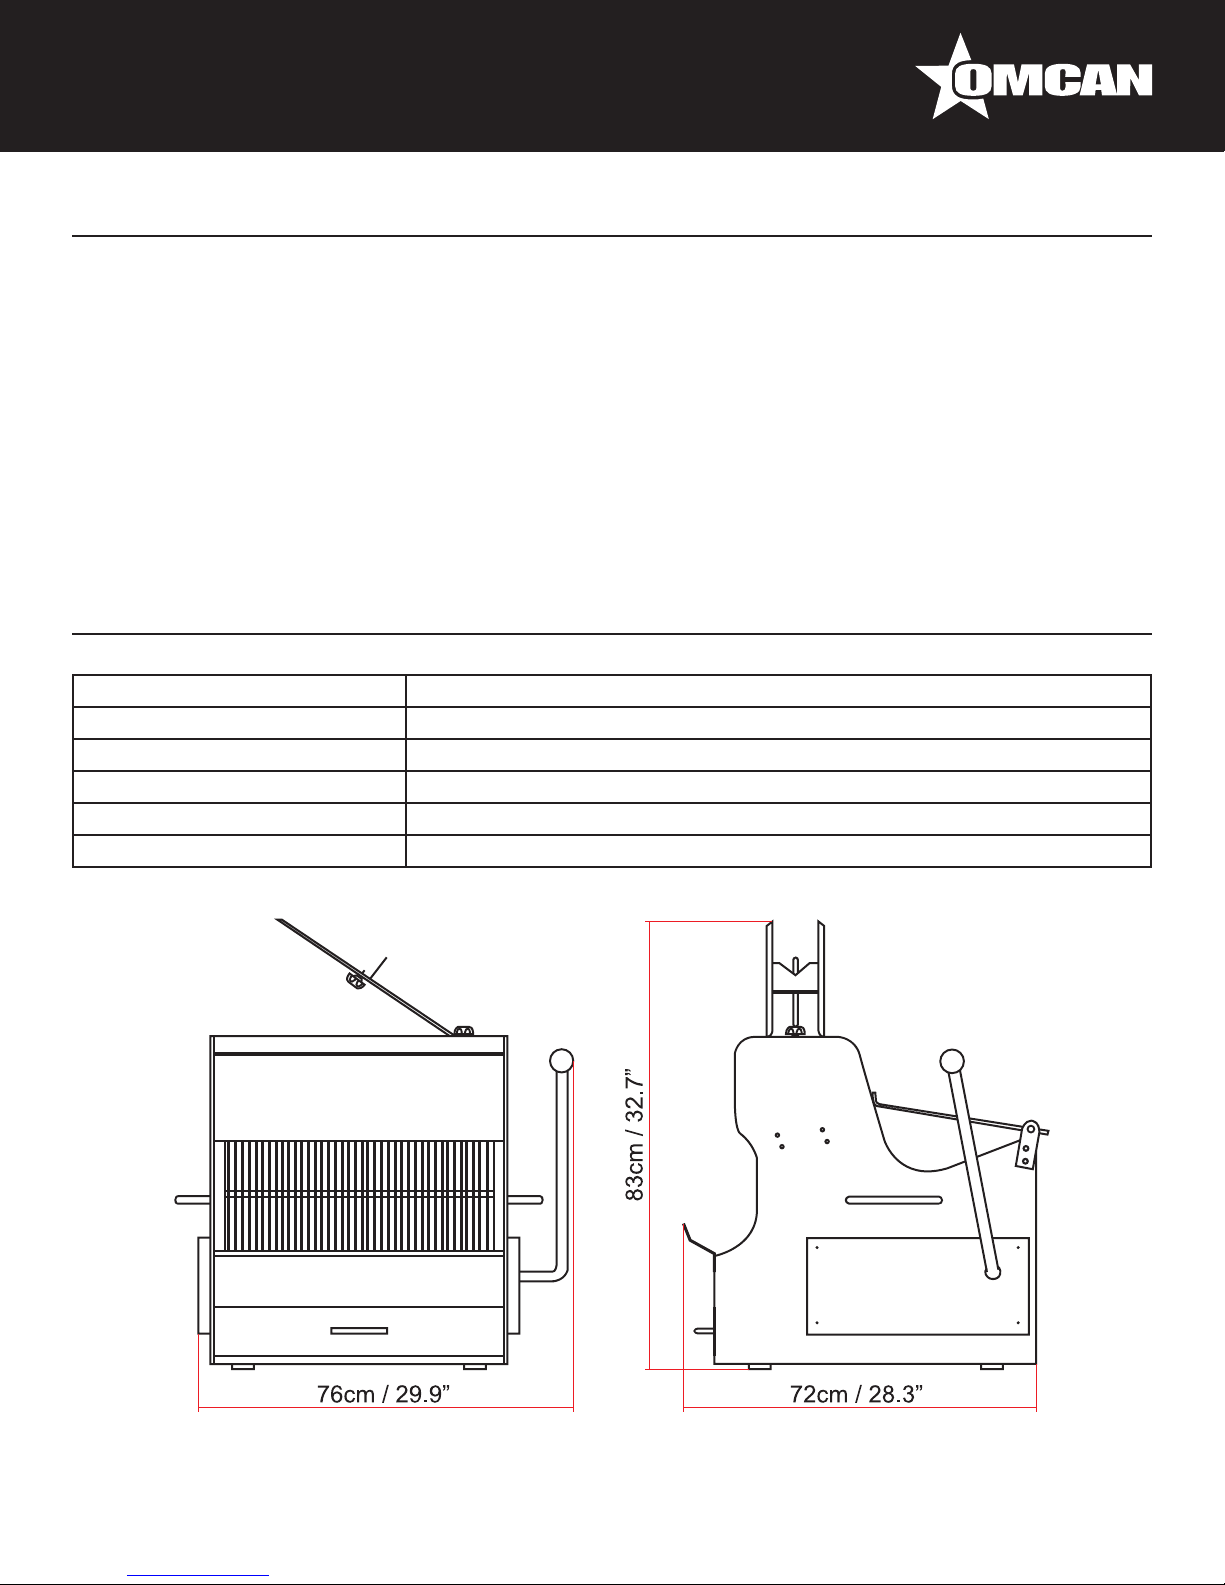
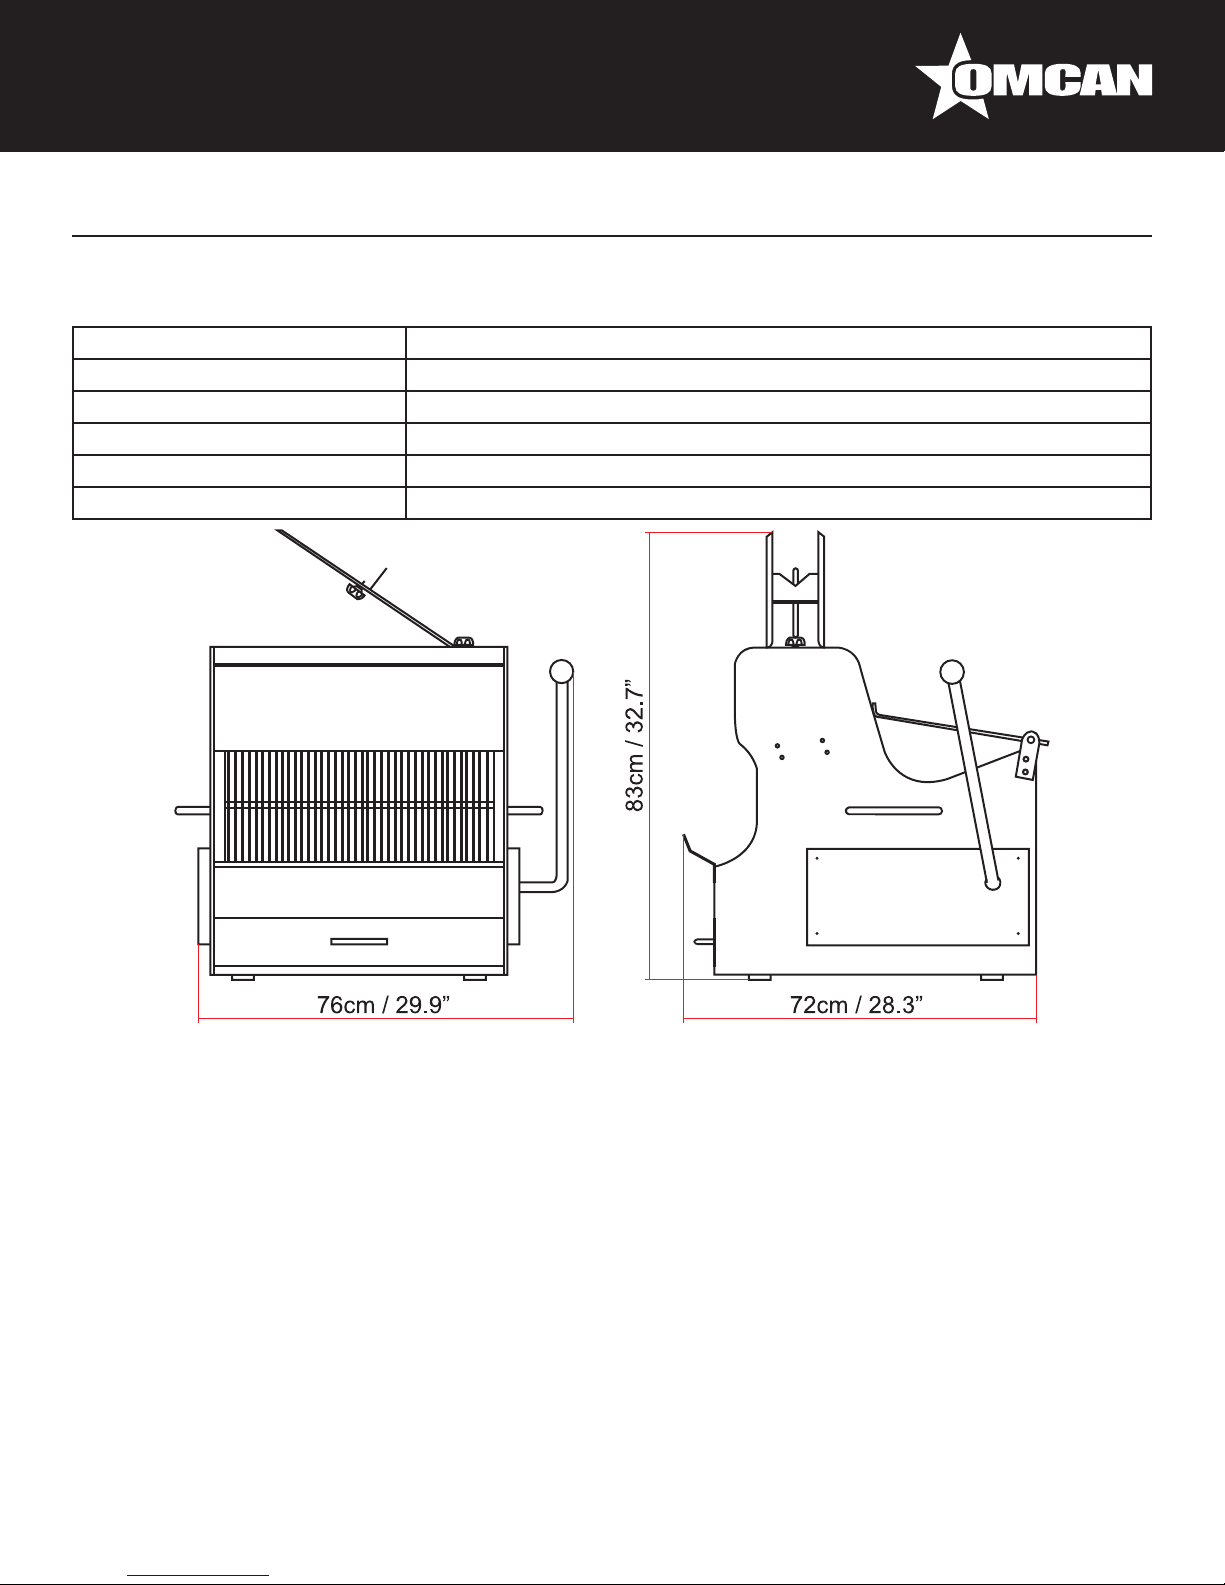
This bread slicer is designed for shops, bakeries. The safety guard device is designed especially for protecting
the operator with an interlocked safety loaf pusher system and is powered by a 1/2 HP motor. A packing shelf
is provided so the operator can pack bread easily. A crumb drawer is tted for collecting excess bread pieces.
The heavy construction blade frame makes smoothly and even sliced bread.
WARNING: These slicers are designed and constructed for bread processing only, they must not be
used for any other reason.
When using this machine, always make sure the following conditions or operations are in effect.
Failure to do this may cause an accident, damage to the machine or void the manufacturer’s warranty.
• This bread slicer is designed and constructed for bread processing only.
• Do not put any inexible material into the slicing area.
• Do not put hands into the feed when opening pusher of slicer.
• When slicing, do not put hands into slicing area.
• Make sure your electrical service is corresponded specication on the name plate.
• All maintenance work should be carried out after having removed the plug socket.
1 YEAR WARRANTY

4
Safety and Warranty
Technical Specications
WARNING:
The packaging components (cardboard, polyethylene, and others) are classied as normal solid urban waste
and can therefore be disposed of without difculty.
In any case, for suitable recycling, we suggest disposing of the products separately (differentiated
waste) according to the current norms.
DO NOT DISCARD ANY PACKAGING MATERIALS IN THE ENVIRONMENT!
Model SB-TW-0016-S
Slice Thickness 10, 12, 13, 15 mm / 0.4”, 0.5”, 0.5”, 0.6”
Maximum Loaf Length 38 cm / 15”
Motor 1/2 HP (0.375 kW)
Machine Size 76 x 72 x 83 cm / 29.9” x 28.3” x 32.7”
Net Weight 115 kg. / 253.5 lbs.

5
Installation
Operation
Maintenance
LOCATION
• Carefully remove the protective crate and skids to prevent the machine and parts from being scratched or
damaged.
• Placing the bread slicer on a smooth and stable surface of table. Allowing working space large enough for
putting bread on guide board and packing sliced bread. It is not necessary to x the machine to table, but
smooth surface is important to prevent from vibrating.
• The bread slicer is cleaned before shipment, the machine may get dirty during transportation, please clean
it with suitable solution.
ELECTRICAL CONNECT
• Before making the electrical connections, read the specications on the rating plate to make sure that they
agree with those of your electric service.
• Electrical connect should be made by qualied technician who will observe all applicable safety codes and
the national electrical standards.
1. Pull starting handle to forward direction, safety guard is opening and power is shut off.
2. Place bread on guide board.
3. Pull handle back. Safety guard closed automatically and power turns on. The safety loaf pusher passed
each loaf completely through the slicer blades and power is shut off.
4. Take sliced bread out from front guide board.
CLEANING
• The slicer should be cleaned daily; wipe slicer with a clean damp cloth or a brush to aid in cleaning
operation.
• The crumb drawer must be emptied at regular intervals to prevent from mechanical failure.
WARNING: It is not recommended that gasoline or any other highly inammable cleaning agent is
used.
WARNING:
1. A metal brush is prohibited.
2. Never clean the slicer with a water hose or high pressure water jets.

6
Maintenance
French Instructions
3. Do not use harsh cleaning solutions.
REPLACEMENT OF SLICING BLADES
• To remove front knives frame for replacement of blades, it is necessary to take off the knives frame (see
Fig. 1).
• Loosen the tension screw, loosening the tension on the blades. Then replace the old blades with new
blades (see Fig. 2).
ADJUSTING BELT OF DRIVE PULLEY
• The tension of belt of drive pulley (Fig. 3, #1) becomes improper occasionally and causes slicing to be
inefcient.
• To adjust belt, rst, taking off guard board to expose the transmission mechanism, then loose bolt (Fig. 3,
#2) to move motor to get proper tension.
• The tensions should be rechecked after rst working day to make sure it is at proper position.
INFORMATIONS GÉNÉRALES
Omcan Fabrication et distribution Companie Limité et Food Machinery d’ Amerique, dba Omcan ne
sont pas responsables de tout dommage ou blessure causé du fait que toute personne ait utilisé
cet équipement de façon irrégulière. Le produit ne doit être exploité que par quelqu’un de plus de 18
ans, saine d’esprit, et pas sous l’inuence d’une drogue ou d’acohol, qui a été formé pour utiliser
cette machine correctement, et est vêtu de vêtements de sécurité approprié. Toute modication de la
machine annule toute garantie, et peut causer un préjudice à des personnes utilisant la machine ou
des personnes à proximité de la machine pendant son fonctionnement.
VÉRIFIEZ LE COLIS DÈS RÉCEPTION
Dès réception d’une expédition d’Omcan veuillez inspecter pour dommages externes. Si aucun dommage
n’est visible sur l’emballage externe, ouvrez le carton an de s’assurer que tous les éléments commandés
sont dans la boîte, et il n’y a aucun dommage dissimulé à la machine. Si le colis n’a subi aucune mauvaises
manipulations, de bosses ou de dommages (visible ou cachée), notez-le sur le bond de livraison avant
d’accepter la livraison et contactez Omcan dans les 24 heures qui suivent, pour que nous puissions engager
une réclamation auprès du transporteur. Un rapport détaillé sur l’étendue des dommages causés à la machine
doit être rempli dans un délai de trois jours, à compter de la date de livraison indiquée dans les documents
d’expédition. Omcan n’a aucun droit de recours pour les produits endommagés qui ont été expédiées ou
cueilli par un tiers transporteur.
Ce pain trancheuse est conçu pour les magasins, les boulangeries. La protection de sécurité périphérique

7
French Instructions
est spécialement conçue pour la protection de l’opérateur avec un asservissement de sécurité poussoir pain
système et est alimenté par un 1/2 HP moteur. Un emballage étagère est fourni an que l’opérateur puisse
emballer le pain facilement. La machine est équipé d’un tiroir ramasse-miettes pour recueillir l’excédent de
morceaux de pain. La construction lourde du châssis lame permet de trancher le pain de façon homogène.
AVERTISSEMENT: Ces pains trancheuse sont conçus et construits pour le traitement de pain
seulement, ils ne doivent pas être utilisés pour toute autre raison.
SÉCURITÉ ET GARANTIE
Lors de l’utilisation de cette machine, assurez-vous toujours que les conditions suivantes ou
opérations sont présents. Le non-respect de cette consigne peut provoquer un accident, des
dommages à la machine ou annuler la garantie du fabricant.
• Ce pain trancheuse est conçu et construit pour le traitement de pain uniquement.
• Ne pas insérer aucun matériau rigide dans la zone de découpage.
• Ne mettez pas vos mains dans l’alimentation lors de l’ouverture du pousseur.
• Pendant le découpage, ne pas mettre vos mains dans la zone de découpage.
• Assurez-vous que votre service et spécications correspond au même voltage spécié sur la plaque
signalétique.
• Tous les travaux d’entretien doit être effectuée après avoir enlevé la prise de courant.
GARANTIE D’UN AN
AVERTISSEMENT:
Les composants de l’emballage (carton, polyéthylène, et autres) sont classés comme des déchets urbains
normaux et solides et peuvent donc être éliminés sans difculté.
En tout cas, pour recyclage adéquats, nous suggérons la mise au rebut des produits séparément
(différencié des déchets) selon les normes actuelles.
NE JETEZ PAS LES MATÉRIAUX D’EMBALLAGE DANS L’ENVIRONNEMENT!

8
French Instructions
EMPLACEMENT
• Retirez soigneusement la caisse de protection et les palettes pour éviter que la machine et lespièces soient
rayé ou endommagé.
• Le pain trancheuse est nettoyée avant expédition, la machine peut être sali pendant le transport, veuillez
nettoyer avec solution adaptée.
• Placer la trancheuse à pain sur une surface lisse et stable de la table,permettant un grand espace de
travail sufsant pour mettre du pain sur la planche de guidage et d’emballage du pain tranché. Il n’est pas
nécessaire que la machine soit xer à la table table, mais la surface lisse est important an d’empêcher
la michine de vibrer. La trancheuse à pain est nettoyé avant l’expédition, la machine risque de se salir
pendant le transport, Merci de nettoyer avec la solution adaptée.
CONNEXION ÉLECTRIQUE
• Avant d’effectuer les connexions électriques, lire les spécications sur la plaque signalétique pour s’assurer
qu’ils sont en accord avec celles de votre service électrique.
SPÉCIFICATIONS TECHNIQUES
Modèle SB-TW-0016-S
Épaisseur de coupe 10, 12, 13, 15 mm / 0.4”, 0.5”, 0.5”, 0.6”
Longueur maximale de pain 38 cm / 15”
Moteur 1/2 HP (0.375 kW)
Taille de la machine 76 x 72 x 83 cm / 29.9” x 28.3” x 32.7”
Poids Net 115 kg. / 253.5 lbs.

9
French Instructions
• La Connexion électrique doit être effectuée par un technicien qualié qui va observer tous les codes de
sécurité applicables et respecter normes électriques en vigueur.
MODE OPÉRATOIRES
1. Tirez la poignée de démarrage en marche avant, la barrière de sécurité est ouvert et le courant est coupé.
2. Placer le pain sur le moule.
3. Tirez sur la poignée en mode arrière. La protection de sécurité se ferme automatiquement et se met sous
tension. Le poussoir de sécurité met chaque miche complètement à travers la trancheuse et le courant est
coupé.
4. Prendre les tranches pain à l’avant du guide.
ENTRETIEN
NETTOYAGE
• La trancheuse devrait être nettoyée quotidiennement; Essuyez la trancheuse essuyer avec un chiffon
propre et humide ou utiliser une brosse pour faciliter le nettoyage.
• Le tiroir ramasse-miettes doit être vidé à intervalles réguliers pour éviter toute défaillance mécanique.
AVERTISSEMENT: Il n’est pas recommandé que l’essence ou tout autre produit de nettoyage
hautement inammable agent soit utilisé.
AVERTISSEMENT:
1. L’utilisation de la brosse métallique est interdite.
2. Ne jamais nettoyer le broyeur avec un exible d’eau ou jets d’eau à haute pression.
3. N’utilisez pas les dures solutions de nettoyage.
REMPLACEMENT DES LAMES DE DECOUPAGE
• Pour retirer les couteaux avant du châssis pour le remplacement des lames, il est nécessaire de déposer
les couteaux du châssis (voir Fig. 1).
• Desserrer la vis de tension, en desserrant les tensions sur les lames. Puis remplacer les anciennes lames
avec de nouvelles lames (voir Fig. 2).
RÉGLAGE DE LA COURROIE DE LA POULIE D’ENTRAÎNEMENT
• La tension de la courroie de la poulie d’entraînement (Fig. 3, # 1) devient mauvaise occasionnellement et
provoque le tranchage à être inefcace.
• Pour régler la tension de la courroie, d’abord, enlevez la couverture de protection et exposez le mécanisme
de transmission, puis desserrer le boulon (Fig. 3, # 2) pour déplacer le moteur pour obtenir la tension
correcte.
• Les tensions doit être revérié après une première journée de travail pour s’assurer qu’elle est à la bonne
position.

10
Figure Drawings
FIGURE 1
FIGURE 2
FIGURE 3

11
Parts Breakdown
Model SB-TW-0016-S 21122

12
Parts Breakdown
Model SB-TW-0016-S 21122
Description Position Description Position Description Position
Column 1 Rod-Left 40 Spacer 79
Drawer 2 Slide Seat-Right 41 Spacer 80
Upper Lid 3 Slide Seat-Left 42 Spacer 81
Rear Guide Board 4 Fixing Plate of Busher 43 Ball Bearing 82
Front Guide Board 5 Bearing Housing 44 Ball Bearing 83
Left Side Cover 6 Spring 45 Ball Bearing 84
Right Side Cover 7 Fixing Ring 46 Ball Bearing 85
Front Side Cover 8 Rubber Wheel 47 Ball Bearing 86
Safety Plate 9 Wheel Ring 48 C-Type Snap Ring R40 87
Packing Shelf 10 Rod 49 C-Type Snap Ring R42 88
Base of Packing Shelf 11 Axle 50 C-Type Snap Ring R30 89
Lower Comb 12 Axle 51 Spring Washer 1/4” 90
Fixing Plate 13 Wheel Support 52 Spring Washer 5/8” 91
Handle 14 Motor 53 Spring Washer 5/16” 92
Handle of Drawer 15 Motor Bearing 54 Spring Washer 1/4” 93
Bread Guide Bar 16 Shaft Motor-Bearing 55 Spring Washer 3/8” 94
Fixing Plate 17 Bearing Housing 56 Spring Pin 3*16 95
Rubber Ring 18 Bush 57 Cap Screw 1/4*5/8 96
Axle 19 Pulley 58 Screw 97
Knives Frame A 20 Driving Shaft 59 Screw 98
Knives Frame B 21 Connecting Rod 60 Screw 99
Frame Holder 22 Shaft Crank 61 Screw 100
Fixed Plate 23 Pulley 62 Screw 101
Knives Hook 24 Belt 63 Bolt 5/16*1 102
Slicer Blades 25 Bearing Seat 64 Screw 103
Fixed Nail Knives 26 Shaft 65 Screw 104
Knives Holder 27 Crank-Knives Frame 66 Screw 105
Guide Arm 28 Crank-Knives Frame 67 Cap Screw 3/8*3/4 106
Pressing Guide Board 29 Clamp Block 68 Cap Screw 1/4*5/8 107
Bush 30 Support Shaft 69 Screw 108
Axle 31 Clamp Ring 70 Screw 109
Spring 32 Bearing Housing 71 Screw 110
Upper Comb 33 Safety Guard 72 Screw 111
Fixing Plate 34 Left Cover 73 Cap Screw 1/4*1/2 112
Knob 35 Right Cover 74 Screw 113
Starting Crank 36 Fixing Plate 75 Screw 114
Pusher 37 Support Shaft 76 Screw 115
Fork-Pusher 38 Support Shaft 77 Screw 116
Rod-Right 39 Cam 78 Screw 117

13
Parts Breakdown
Model SB-TW-0016-S 21122
Description Position Description Position Description Position
Nut 5/16*18NC 118 Bolt 5/16*1/2 126 Bolt 5/16*1-1/4 134
Nut 1/4*20NC 119 Screw 127 Cap Screw 5/16*1-1/4 135
Nut 5/8*11NC 120 Screw 128 Screw 136
Nut 3/16*24NC 121 Rubber Foot 129 Nut 3/8*16NC 137
Nut M8*12 122 Bottom Pad 130 Flat Washer 138
Key 5*5*40 123 Bolt 5/16*3/4 131 Flat Washer 139
Bolt 5/16*1-3/4 124 Cap Screw 5/16*1 132
Nut 5/16*18NC 125 Bolt 1/4*1/2 133

14
Electrical Schematics
Model SB-TW-0016-S 21122

15
Warranty Registration
Thank you for purchasing an Omcan product. To register your warranty for this product, complete the information below, tear off the card at
the perforation and then send to the address specied below. You can also register online by visiting:
OMCAN INC.
PRODUCT WARRANTY REGISTRATION
3115 Pepper Mill Court,
Mississauga, Ontario
Canada, L5L 4X5
www.omcan.com/warrantyregistration.html
Thank you for choosing Omcan
Purchaser’s Information
Name: Company Name:
Address:
Telephone:
City: Province or State: Postal or Zip: Email Address:
Country: Type of Company:
Restaurant Bakery Deli
Dealer from which Purchased: Butcher Supermarket Caterer
Dealer City: Dealer Province or State: Institution (specify):
Invoice: Other (specify):
Model Name: Model Number: Serial Number:
Machine Description:
Date of Purchase (MM/DD/YYYY): Date of Installation (MM/DD/YYYY):
For mailing in Canada For mailing in the US
OMCAN
PRODUCT WARRANTY REGISTRATION
4450 Witmer Industrial Estates, Unit 4,
Niagara Falls, New York
USA, 14305

Over the last 65 years, Omcan has grown to become a leading supplier to the food
service industry in Canada and the USA. Our success over these many years is
directly attributed to our established relationships with all of our valued customers
and through providing them with Diverse, Dependable and Proven products.
Omcan continues to help our customers remain competitive.
With associates in North America, Europe, Asia, and South America, our global
footprint continues to expand as we hold to the principle that clients benet from
the accessibility and familiarity of our sales team. In 2013 as our geography and
brand recognition continued to grow, we changed to one name Omcan Food
Machinery.
In over 200,000 sq ft of warehouse space we stock over 2,500 quality food
equipment and supplies for the food preparation market.
Table of contents
Languages:
Other Omcan Kitchen Appliance manuals

Omcan
Omcan CE-CN-0012-E User manual

Omcan
Omcan 23835 User manual

Omcan
Omcan CE-CN-0227-R User manual

Omcan
Omcan FW-CN-1800 User manual

Omcan
Omcan 28 User manual

Omcan
Omcan GR-IT-1500-H User manual

Omcan
Omcan FP-CN-0010 User manual

Omcan
Omcan CE-CN-1450 User manual

Omcan
Omcan SS-ES-0015 User manual

Omcan
Omcan SSFD10 User manual

Omcan
Omcan CF-CN-0005 User manual

Omcan
Omcan ABN-HD User manual

Omcan
Omcan CE-CN-0010-D User manual

Omcan
Omcan CE-CN-0016G User manual

Omcan
Omcan VP-NL-0004-SN User manual

Omcan
Omcan FW-CN-0200-H User manual

Omcan
Omcan MS-IT-0370-H User manual

Omcan
Omcan SG101 User manual

Omcan
Omcan VP-NL-0004-S User manual

Omcan
Omcan PE-BR-0004 User manual