ooma HUB User manual

i
QuickStart Guide

Everything you need to get started is in this box, and everything you need to know about
your ooma setup is in your hands. Don’t be fooled by the size of this Quick Start Guide; it
may be 20 pages long, but only a few of these pages will apply, based upon:
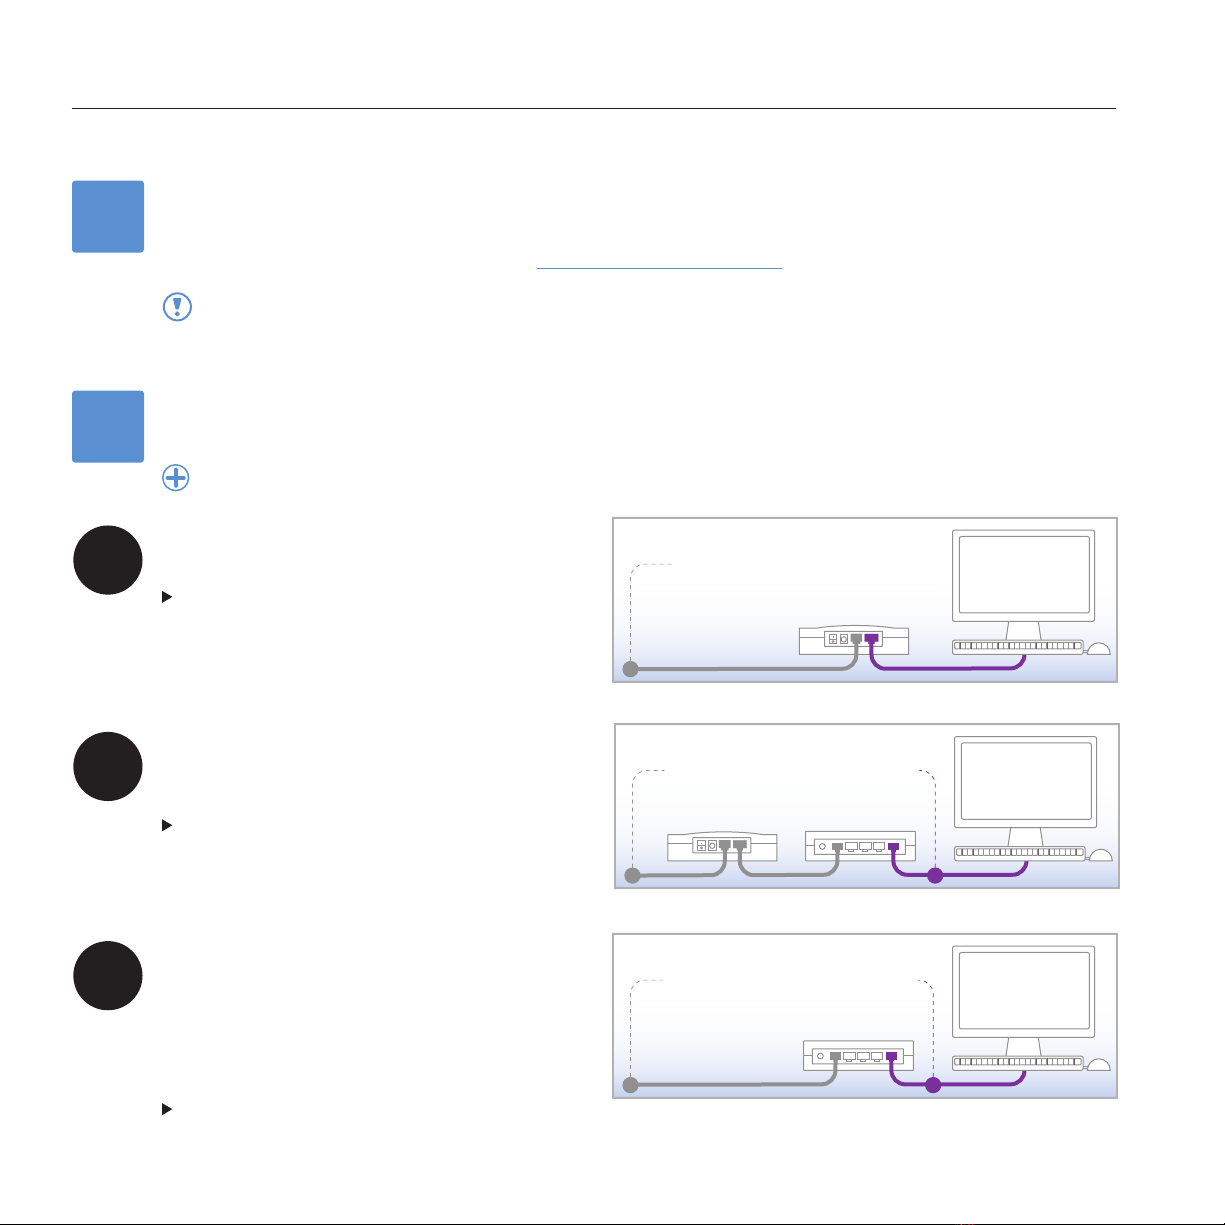
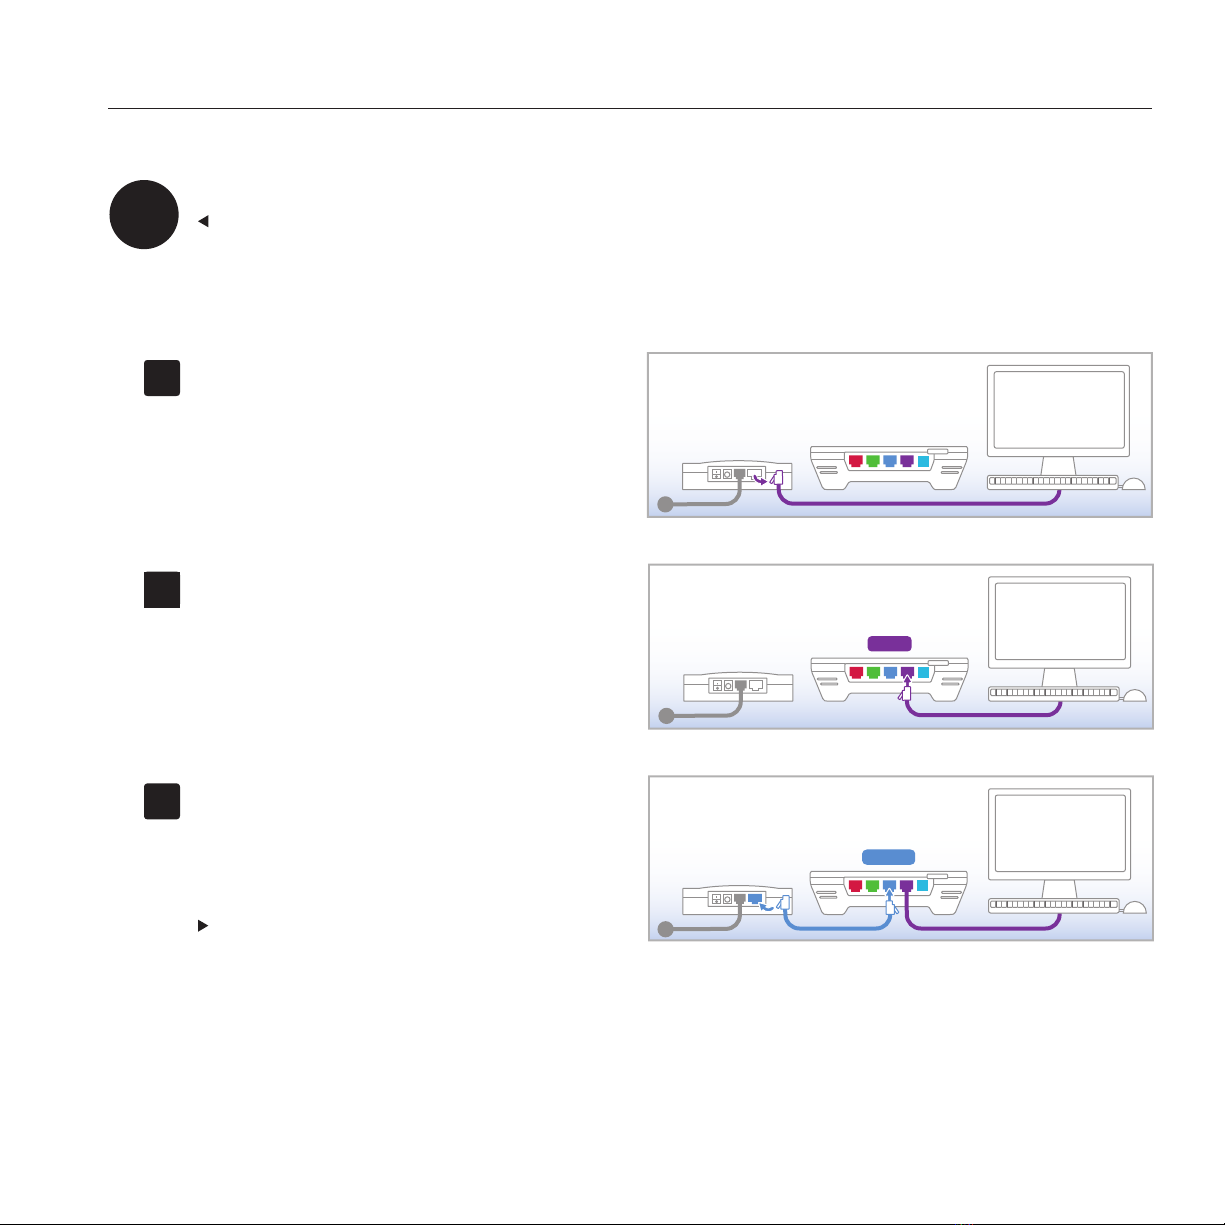
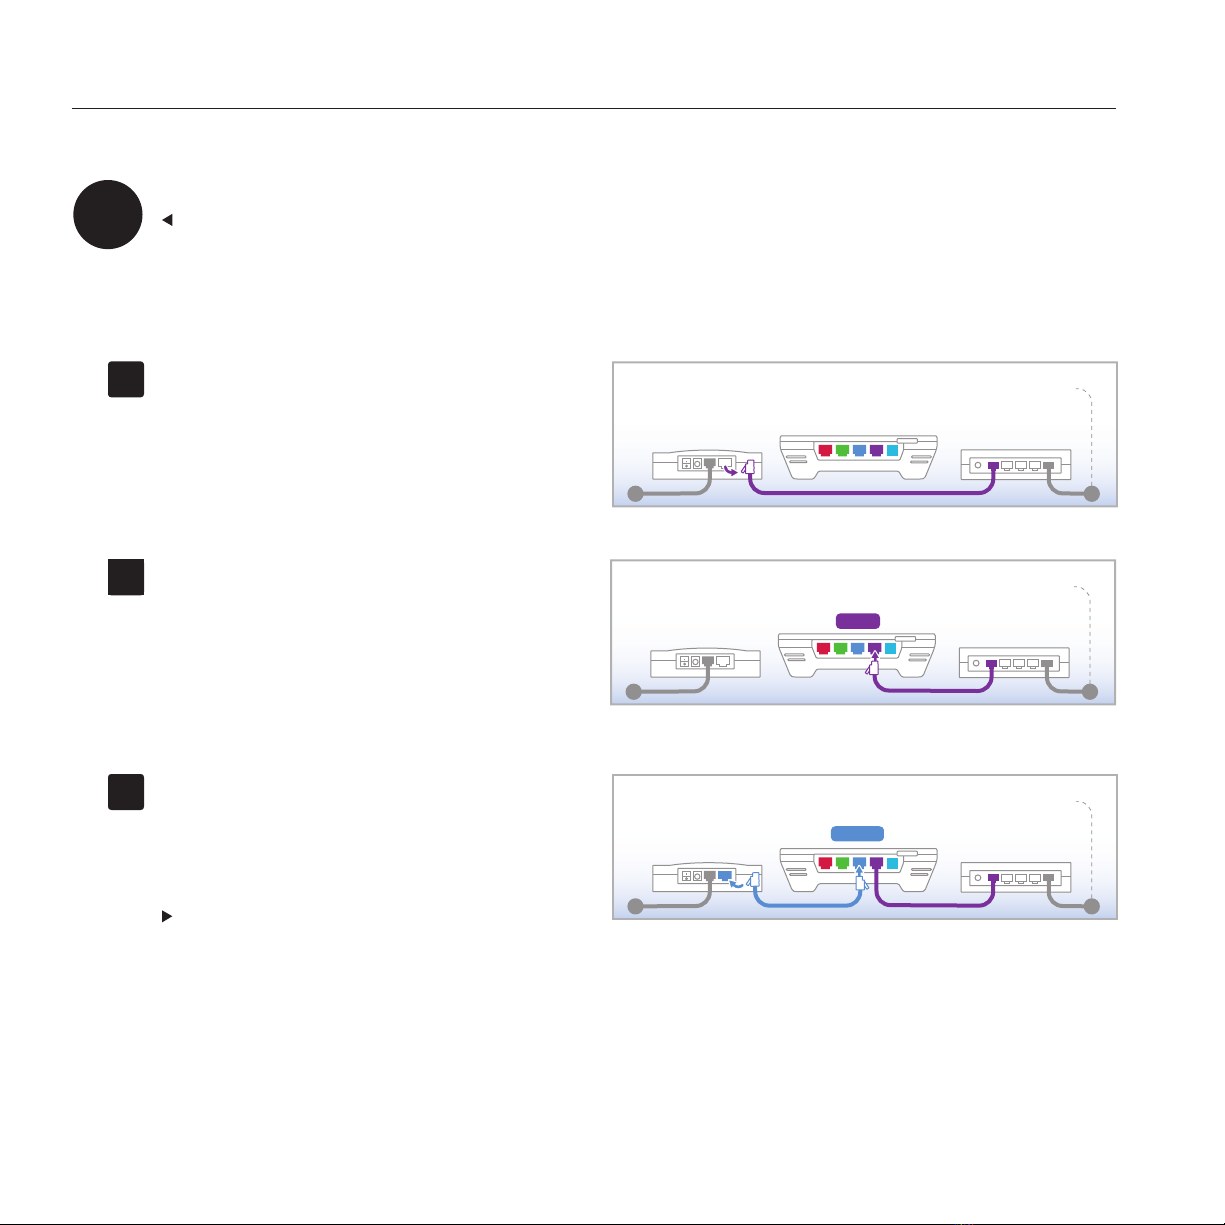
What type of network setup you have
How many phone jacks you have in your home
If you will be using ooma with a landline
By answering a few questions along the way, you’ll be able to jump to the exact pages you
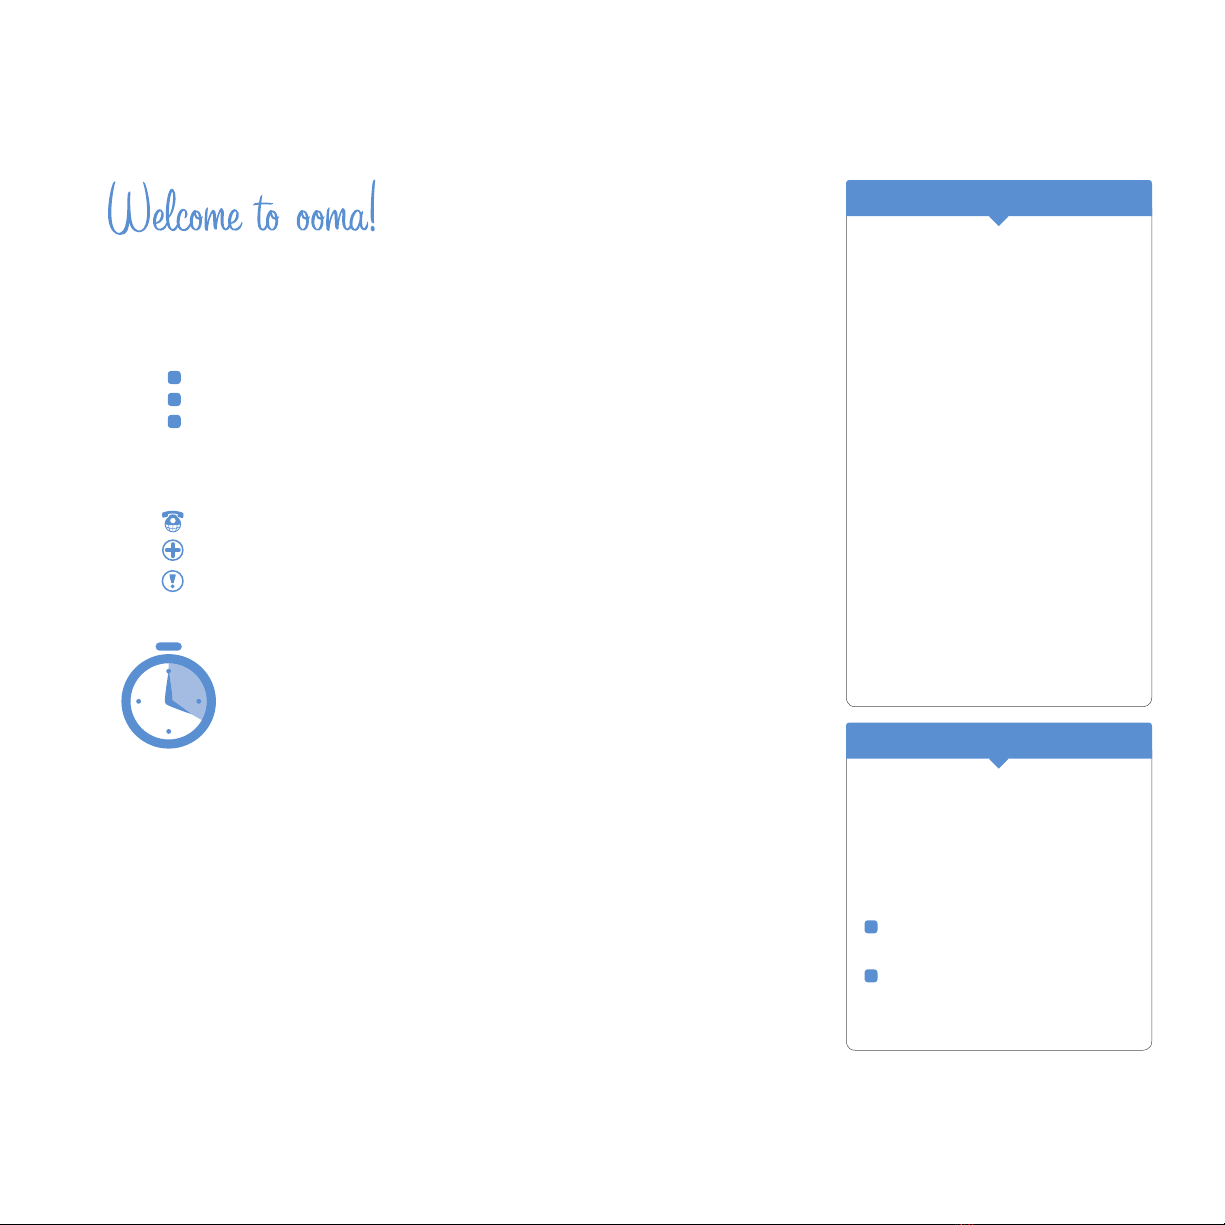
need. We’ve also included these icons to help you identify when there are:
Instructions specic to using the ooma system with a landline
Further details available in the User Guide
Important information or notices
20 minutes to unlimited calling within the US
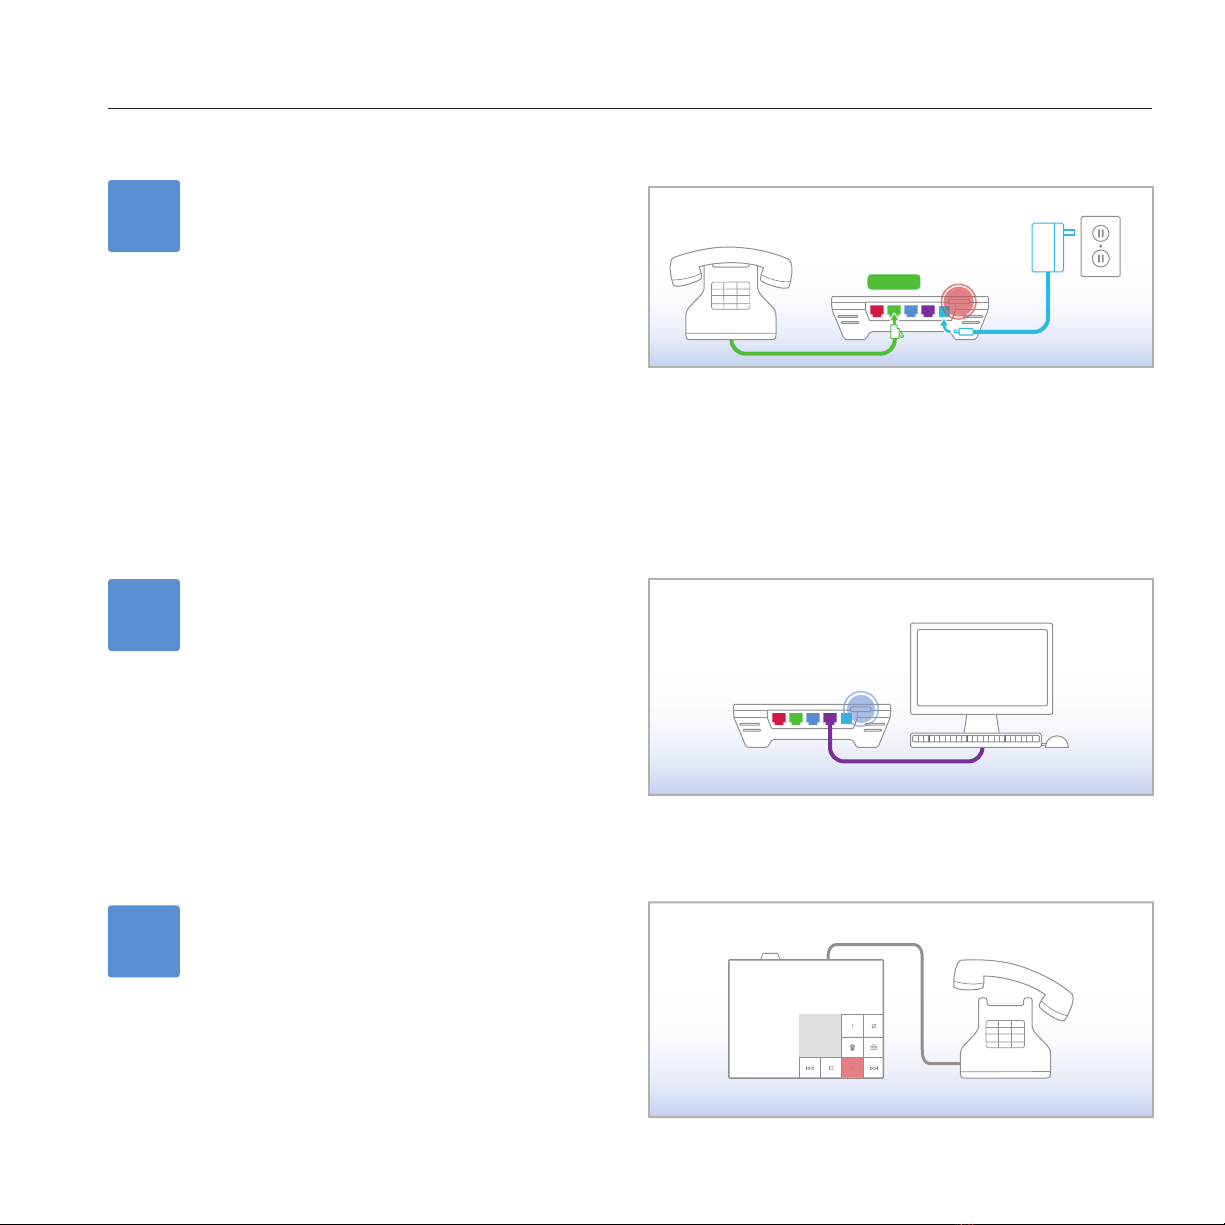
Installing the ooma system is quick and simple. Most users take about
20 minutes to complete the process. Once you activate the ooma Hub™
device and connect to a high-speed Internet connection and your home
phone, you’ll be ready to make unlimited calls in the US without
charge.
We’ll also show you how to connect the ooma Scout™ device, which extends the power of
the ooma system to other areas of your home through your existing phone wiring.
After you have everything setup and running, we encourage you to visit the online ooma
Lounge at www.ooma.com/lounge. The ooma Lounge is a Web portal where you can
listen to voicemail, view account information, customize your privacy settings, and more!
Until later,
Team ooma
OWN YOUR DIALTONE
When you hear the signature ooma
dialtone, you know you own it.
This means you have unlimited US
calling with no monthly charges.
ENJOY BUNDLED FEATURES
Get all the features you’ve come to
depend on, including caller-ID, call-
waiting, and voicemail.
EXPERIENCE OOMA PREMIER*
Your free trial of ooma Premier
gives you access to all of ooma’s
enhanced features. Try out the
Instant Second Line™, real-time
message screening, personal
numbers, and more!
YOU’RE ALMOST READY TO
Should you encounter any
problems or have questions during
the installation process – we’re
here to help. There are two ways to
get assistance:
Visit our support site at:
http://www.ooma.com/support
Call 1-888-711-6662 to speak
with a member of our customer
support team.
WE’RE HERE IF YOU NEED US
© 2008 ooma, Inc. All rights reserved. Reproduction in whole or in part without written permission is prohibited. ooma, the ooma logo, ooma Hub, ooma
Scout, Instant Second Line, Broadband Answering Machine, the sound of the ooma dialtone, and all other ooma company, product and service names and
slogans are trademarks of ooma, Inc. All other product, service or brand names are the property of their respective owners.
*ooma Premier features may only be available with subscription.


1
Before you begin, check the following:
If you have a standalone answering machine, DISCONNECT it.
If any phone has an answering machine function built-in, DISABLE it now.
Unpack the ooma Hub™ device
The ooma Hub package should contain the following items:
Port and Color Guide
Here is a closer look at the back of your ooma Hub device. Throughout the set up process, each port on the back of your ooma Hub will be
indicated with the following colors for quick identication.
installing the ooma hub
ooma Hub
Long Phone CableShort Phone Cable
ooma Splitter
Ethernet Cable
AC Adaptor

2
2Choose the illustrated example that best matches your home network set-up and
continue to the appropriate page:
If you need help in identifying your home network equipment, see APPENDIX A of the User Guide.
A
B
C
Modem connected directly to one computer (desktop
or laptop).
SKIP TO PAGE 3
Modem connected to a router. The router may be
connected to one or more computers, and may be
wired or wireless (as in Wi-Fi).
SKIP TO PAGE 4
Integrated router (with built-in modem). The router may
be connected to one or more computers, and may be
wired or wireless (as in Wi-Fi).
OR
You have an advanced network conguration and wish
to install the ooma Hub behind a router.
SKIP TO PAGE 5
Router
May not be present
with Wi-Fi
Modem
Internet
Connection
Integrated Router
May not be present
with Wi-Fi
Internet
Connection
Modem
Internet
Connection
1Activate the ooma Hub online
Before proceeding with the ooma Hub installation, you must activate it online. To complete the online activation, open a web
browser on your home computer and navigate to: http://www.ooma.com/activate
installing the ooma hub
After you’ve nished your online activation, be sure to TURN OFF any personal computers, modems, switches and
routers that are connected to your home network before proceeding to the next installation step.

3
A
installing the ooma hub
Disconnect the existing cable
Unplug the existing Ethernet cable from your modem.
This is the cable that connects the modem to your
computer.
Reconnect to the ooma Hub
Plug the existing Ethernet cable into the port labeled
HOME on the ooma Hub.
Connect to the modem
Use the Ethernet cable provided and connect the port
labeled MODEM on the ooma Hub to the Ethernet
port of the modem.
SKIP TO PAGE 6
Modem connected directly to your computer
CONTINUED FROM PAGE 2
Modem
HOME
Modem
MODEM
Modem
A1
A2
A3

4
Disconnect the existing cable
Unplug the existing Ethernet cable from your modem.
This is the cable that connects the Ethernet port of the
modem to the port usually labeled “WAN” or “Internet”
on the router.
Reconnect to the ooma Hub
Plug the existing Ethernet cable into the port labeled
HOME on the ooma Hub.
Connect to the modem
Use the Ethernet cable provided and connect the port
labeled MODEM on the ooma Hub to the Ethernet
port of the modem.
SKIP TO PAGE 6
Modem connected to a router
CONTINUED FROM PAGE 2
Modem Router
May not be present
with Wi-Fi
Modem Router
May not be present
with Wi-Fi
HOME
MODEM
Modem Router
May not be present
with Wi-Fi
installing the ooma hub
B1
B2
B3
B

5
installing the ooma hub
Disconnect the existing cable
Unplug the existing Ethernet cable from your router.
This is the cable that connects the router to a
computer.
Reconnect to the ooma Hub
Plug the existing Ethernet cable into the port labeled
HOME on the ooma Hub.
Connect to the router
Use the Ethernet cable provided and connect the
port labeled MODEM on the ooma Hub to an open
Ethernet port on the router.
Integrated router (with built-in modem)
CONTINUED FROM PAGE 2
If your computers connect wirelessly to your router or you have an advanced networking conguration and do not want to
connect devices behind the ooma Hub, skip to step C3.
Integrated Router
Integrated Router
HOME
Integrated Router
MODEM
C1
C2
C3
C

6installing the ooma hub
3Choose the example below that best matches your situation:
If you plan on using the ooma Hub with an existing landline or you plan on installing one or more ooma Scouts, follow the
directions below to connect your ooma Hub to your phone system. Otherwise, you may: SKIP TO PAGE 7
If you’re not sure whether you have DSL or Cable, ask yourself this: Who do I pay for high-speed Internet service?
If you pay your phone company, you have DSL.
If you pay your cable television provider, you have CABLE.
See the CONNECTING THE OOMA HUB TO YOUR PHONE SYSTEM section of the User Guide if you need help selecting
among the choices below.
Cable or ber-optic Internet
Use the long phone cable provided and connect the
port labeled WALL on the ooma Hub to the phone jack
in the wall.
DSL & phone on separate lines
1Leave your DSL modem connected as is.
2UNPLUG and REMOVE any existing DSL lters or
splitters on your phone line (not your DSL line).
3Use the long phone cable provided and connect the
port labeled WALL on the ooma Hub to the phone
jack in the wall (not your DSL jack).
Phone Jack
WALL
Modem
ooma Splitter
Phone / DSL Jack
WALL
Modem
WALL
Modem
Phone JackDSL Jack
DSL & phone on the same line
1Plug the ooma splitter provided directly into the
phone jack in the wall. UNPLUG any existing DSL
lters or splitters from the wall.
2Connect your DSL modem to one port of the ooma
splitter using the original DSL modem phone cable
(leaving any DSL lters connected to the modem).
3Use the long phone cable provided and connect the
port labeled WALL on the ooma Hub to the other
port of the ooma splitter.

7
4Connect your phone and power
Use a phone cable to plug your phone into the port
labeled PHONE on the ooma Hub (a short phone
cable is provided).
Plug one end of the AC adaptor into the port labeled
POWER on the ooma Hub and the other end into a
power outlet.
The clear ooma Tab, at the top left corner of the ooma
Hub device, should light up RED and begin to blink as
it boots up.
Next, power on your network devices (modem, switch,
router). Wait a few minutes for everything to boot up.
5
ooma.com
PHONE
installing the ooma hub
Initialize your Broadband
Answering Machine™ feature
Pick up the phone attached to the ooma Hub and
press the PLAY button. Follow the voice prompts to
setup your Broadband Answering Machine.
6
Conrm installation
Turn on your computer and connect to the Internet.
Open up a web browser to make sure you are online.
IMPORTANT: This allows the ooma Hub to complete its
self-conguration.
Within a few minutes, the clear ooma Tab should turn
BLUE.Pick up the phone connected to the ooma Hub.
You will hear the signature ooma dialtone that conrms
the ooma system is working.


9
Unpack the ooma Scout™ device
Each additional phone on the same phone line as the ooma Hub (i.e. that shares the same phone number) must be connected to an ooma
Scout. Any phones that are not connected to an ooma device should be disconnected.
The ooma Scout box should contain the following items:
Port and Color Guide
Here is a closer look at the back of your ooma Scout device. Throughout the set up process, each port on the back of your ooma Scout will
be indicated with the following colors.
ooma Scout
Short Phone CableAC Adaptor
installing the ooma scout

10
1Connect the phone line
If you have DSL, trace the phone cable to the wall.
UNPLUG and REMOVE any existing DSL lters or
splitters.
Unplug the phone cable from your phone and plug it
in the port labeled WALL on the ooma Scout.
2Connect your phone
Use a phone cable to plug your phone into the port
labeled PHONE on the ooma Scout (a short phone
cable is provided).
WALL
PHONE
3Connect the power
Plug one end of the AC adaptor into the port labeled
POWER on the ooma Scout and the other end into a
power outlet.
Within 30 seconds, the clear ooma Tab at the top left
corner should turn BLUE.
installing the ooma scout
Install more ooma Scout devices
Locate other phones that you want to use with your
ooma system. Repeat steps 1-3 for each phone.
If you do not have an ooma Scout for each phone,
you should disconnect those phones. Additional ooma
Scout devices can be purchased on the ooma website.
4

11installing the ooma scout
Cordless Phones
To connect a cordless phone to your ooma system, simply plug
the base station into the port labeled PHONE on an ooma Hub or
ooma Scout.
For cordless phone systems with multiple handsets, only the main
base station needs to be plugged into an ooma Hub or ooma
Scout. Handset charging cradles that do not plug into a phone jack
do not need to be connected to an ooma device.
Please refer to the USING THE INSTANT SECOND LINE WITH
CORDLESS PHONES section of the User Guide for more
information.
Fax Machines
For best results, fax machines should be connected to the ooma
Hub, not to an ooma Scout.
Please refer to the HOW PHONE DEVICES WORK WITH
THE OOMA SYSTEM section of the User Guide for more
information.
Other Devices
Devices such as digital video recorders, satellite receivers, security
systems and other machines that utilize the phone line to make
outgoing calls do not need to be connected through an ooma
device. Leave them connected to the phone line, as-is.
Please refer to the HOW PHONE DEVICES WORK WITH
THE OOMA SYSTEM section of the User Guide for more
information.
© 2006 TiVo Inc. TiVo and the TiVo logo are registered trademarks of TiVo Inc. or its subsidiaries.
Cordless Phone
Base Station
Cordless Phone
Charging Cradle
Base Station
Digital Video Recorder
(before installation)
Digital Video Recorder
(after installation)
How Phone Devices Work with the ooma System
See below for more information about how your ooma system works with common devices that plug into the phone line.


13
buttons quick reference
LINE 1 AND LINE 2
TRASH
SEND-TO-VOICEMAIL
PLAY
FORWARD
STOP
VOLUME ADJUSTMENT BRIGHTNESS ADJUSTMENT
REVERSE
OOMA TAB
ooma Hub device
left side view right side view

14
LINE 1 AND LINE 2
TRASH
SEND-TO-VOICEMAIL
PLAY
FORWARD
STOP
REVERSE
OOMA TAB
ooma Scout device
VOLUME ADJUSTMENT BRIGHTNESS ADJUSTMENT
left side view right side view
buttons quick reference

15
buttons quick reference
Trash Button
During playback, press to delete current message.
Send-to-Voicemail
Press-and-hold for two seconds to turn
Do not Disturb
on or off (a solid light indicates that all calls are sent
directly to voicemail).
During playback, press to save current message.
While ringing, call-waiting or talking, press to transfer
the call to voicemail.
Volume Adjustment
To adjust the speaker volume, rotate the knob on the
left side of the unit.
Brightness Adjustment
To adjust the brightness of the button lights and
indicators, rotate the knob on the right side of the unit.
Solid Blue ooma Tab
Indicates ooma service is working. All ooma services are operational, including unlimited calling within the US.
Line 1 & Line 2 Buttons
A solid light shows the line your call is on.
Pick up a phone and press the blinking line button to
join a call in progress.
Press both buttons at the same time to create a three-
way conference call.
Play Button
Blinks when there are new messages.
Press to hear new messages.
Forward Button
Press to skip to the next message.
Reverse Button
Press to replay current message.
Press twice to skip back to previous the message.
Stop Button
Press to stop playing messages.
Clear ooma Tab
Indicates ooma device is not powered or that the brightness is turned down (check the brightness control). If there is no power,
you will not hear any dialtone and will be unable to use your phone.
If you are using your ooma system with a landline and there is no power, you will hear the your regular landline dialtone, not
the ooma dialtone.
Outgoing calls are subject to your landline phone company calling charges.
Blinking Red ooma Tab
Indicates ooma service is not working. All services are unavailable. When ooma service is unavailable, you will not hear any
dialtone and will be unable to use your phone.
If you are using your ooma system with a landline, you will hear the regular landline dialtone, not the ooma dialtone. Your
Internet or phone connection may be down.
Outgoing calls are subject to your landline phone company calling charges.


17
on the ooma Hub is blinking red
If no other button lights are on, press the ooma Tab to
illuminate the diagnostic light pattern.
on the ooma Scout is blinking red
The ooma Hub is down. Check the diagnostic light
pattern on the ooma Hub to troubleshoot the problem.
are solid red
When the ooma Hub is used with a landline, it does
not detect the phone line. Check that the ooma Hub
WALL port is connected to a working phone jack.
are solid red
The ooma Hub cannot get a network connection.
Check that the network cable is plugged in correctly.
The ooma Hub MODEM port (and the HOME port, if
plugged in) should show a solid green light.
Reboot any network devices, such as modems,
routers, hubs, switches, and any computers.
are solid red
The ooma Hub is unable to register to the ooma
network. Check your Internet connection to
see if it is working and that you can browse to
http://www.ooma.com.
or buttons do not light up
Check that the device is powered properly and that the
brightness control knob (on the right side of the unit) is
not turned all the way down.
are solid red on the ooma Scout
Make sure the ooma Hub is powered and the ooma
Tab is blue.
Check that ooma Scout WALL port is plugged into the
wall jack. If you have multiple phone lines, verify that
the ooma Hub and ooma Scout are connected to the
same line.
cycles between blue and red every few
seconds
Swap the phone cables going into the WALL and
PHONE ports of the ooma Hub or ooma Scout. They
may not have been plugged in correctly.
Hear regular dialtone instead of the ooma dialtone
Check that your ooma system is powered. The ooma
Tab should be solid blue.
Check that the phone (or cordless base station) is
correctly plugged into the PHONE port of an ooma
Hub or ooma Scout.
If you make any outgoing phone call when
you hear the regular dialtone, regular calling
charges will apply.
Nothing is heard when a phone is picked up
Check that your phone is correctly plugged into the
PHONE port of an ooma Hub or ooma Scout and that
the WALL port is plugged into a working phone jack.
Verify your Internet connection is working properly.
Verify that the landline is working by connecting
your phone directly to a phone jack. You should
hear a regular dialtone.
To troubleshoot other problems, please refer to the TROUBLESHOOTING section of the User Guide, or visit our online support section
at http://www.ooma.com/support. You can also call ooma support seven days a week at 1-888-711-6662.
troubleshooting
If your ooma Tab is not blue or you do not hear the signature ooma dialtone, check if you have run into one of the following common
installation problems.
Other manuals for HUB
3
Table of contents
Other ooma IP Phone manuals
Popular IP Phone manuals by other brands

Teletronics International
Teletronics International EZLoop 21-102 Quick product guide

Escene
Escene ES620 user manual

YAKPATH
YAKPATH Grandstream GXP2170 user guide

Avaya
Avaya 3616 Series Installation and configuration guide

Yealink
Yealink SIP-T23P Quick user guide

Avaya
Avaya one-X 9600 Series instruction manual