Please read and follow every steps to avoid any malfunction.
B2.Young Plant Stage
1. Add 10.5 gallons water to the water tank.
2. During Young Plant Stage
, turn on LED and Pump . Please refer to the ChartII.
3. Add
adjustment
into the water tank and ensure EC value between(=1.0-2.0mS/cm)
4. Ensure pH between 5.5-6.5 (adjust by pH+/-). For EC& pH adjustment instruction, please
refer to following Chart at below.
B3. Growing Stage
B. Seedling
Status
Salt#1
0.0-0.5
Add Ax2
0.5-1.0
Add Ax1
1.0-1.5
Standard range
over 2.0
Add water
Satus
Soda#1
Lemon#1
4.0-4.5
Add Bx0.5
4.5-5.0
Add Ax2
5.0-5.5
Add Ax1
5.5-6.5
Standard range
Standard range
6.5-7.0
Add Bx0.5
7.0-7.5
Add Bx1
plants grow to over 2 inches height, switch control
n e h W . 1 box to auto mode. Please refer to Chart II.
2. After 4-6
weeks, harvest the larger plants for consumption and keep smaller plants growing.
3. For time
saving, sow the new seeds in sprout tray one week before you start next planting process.
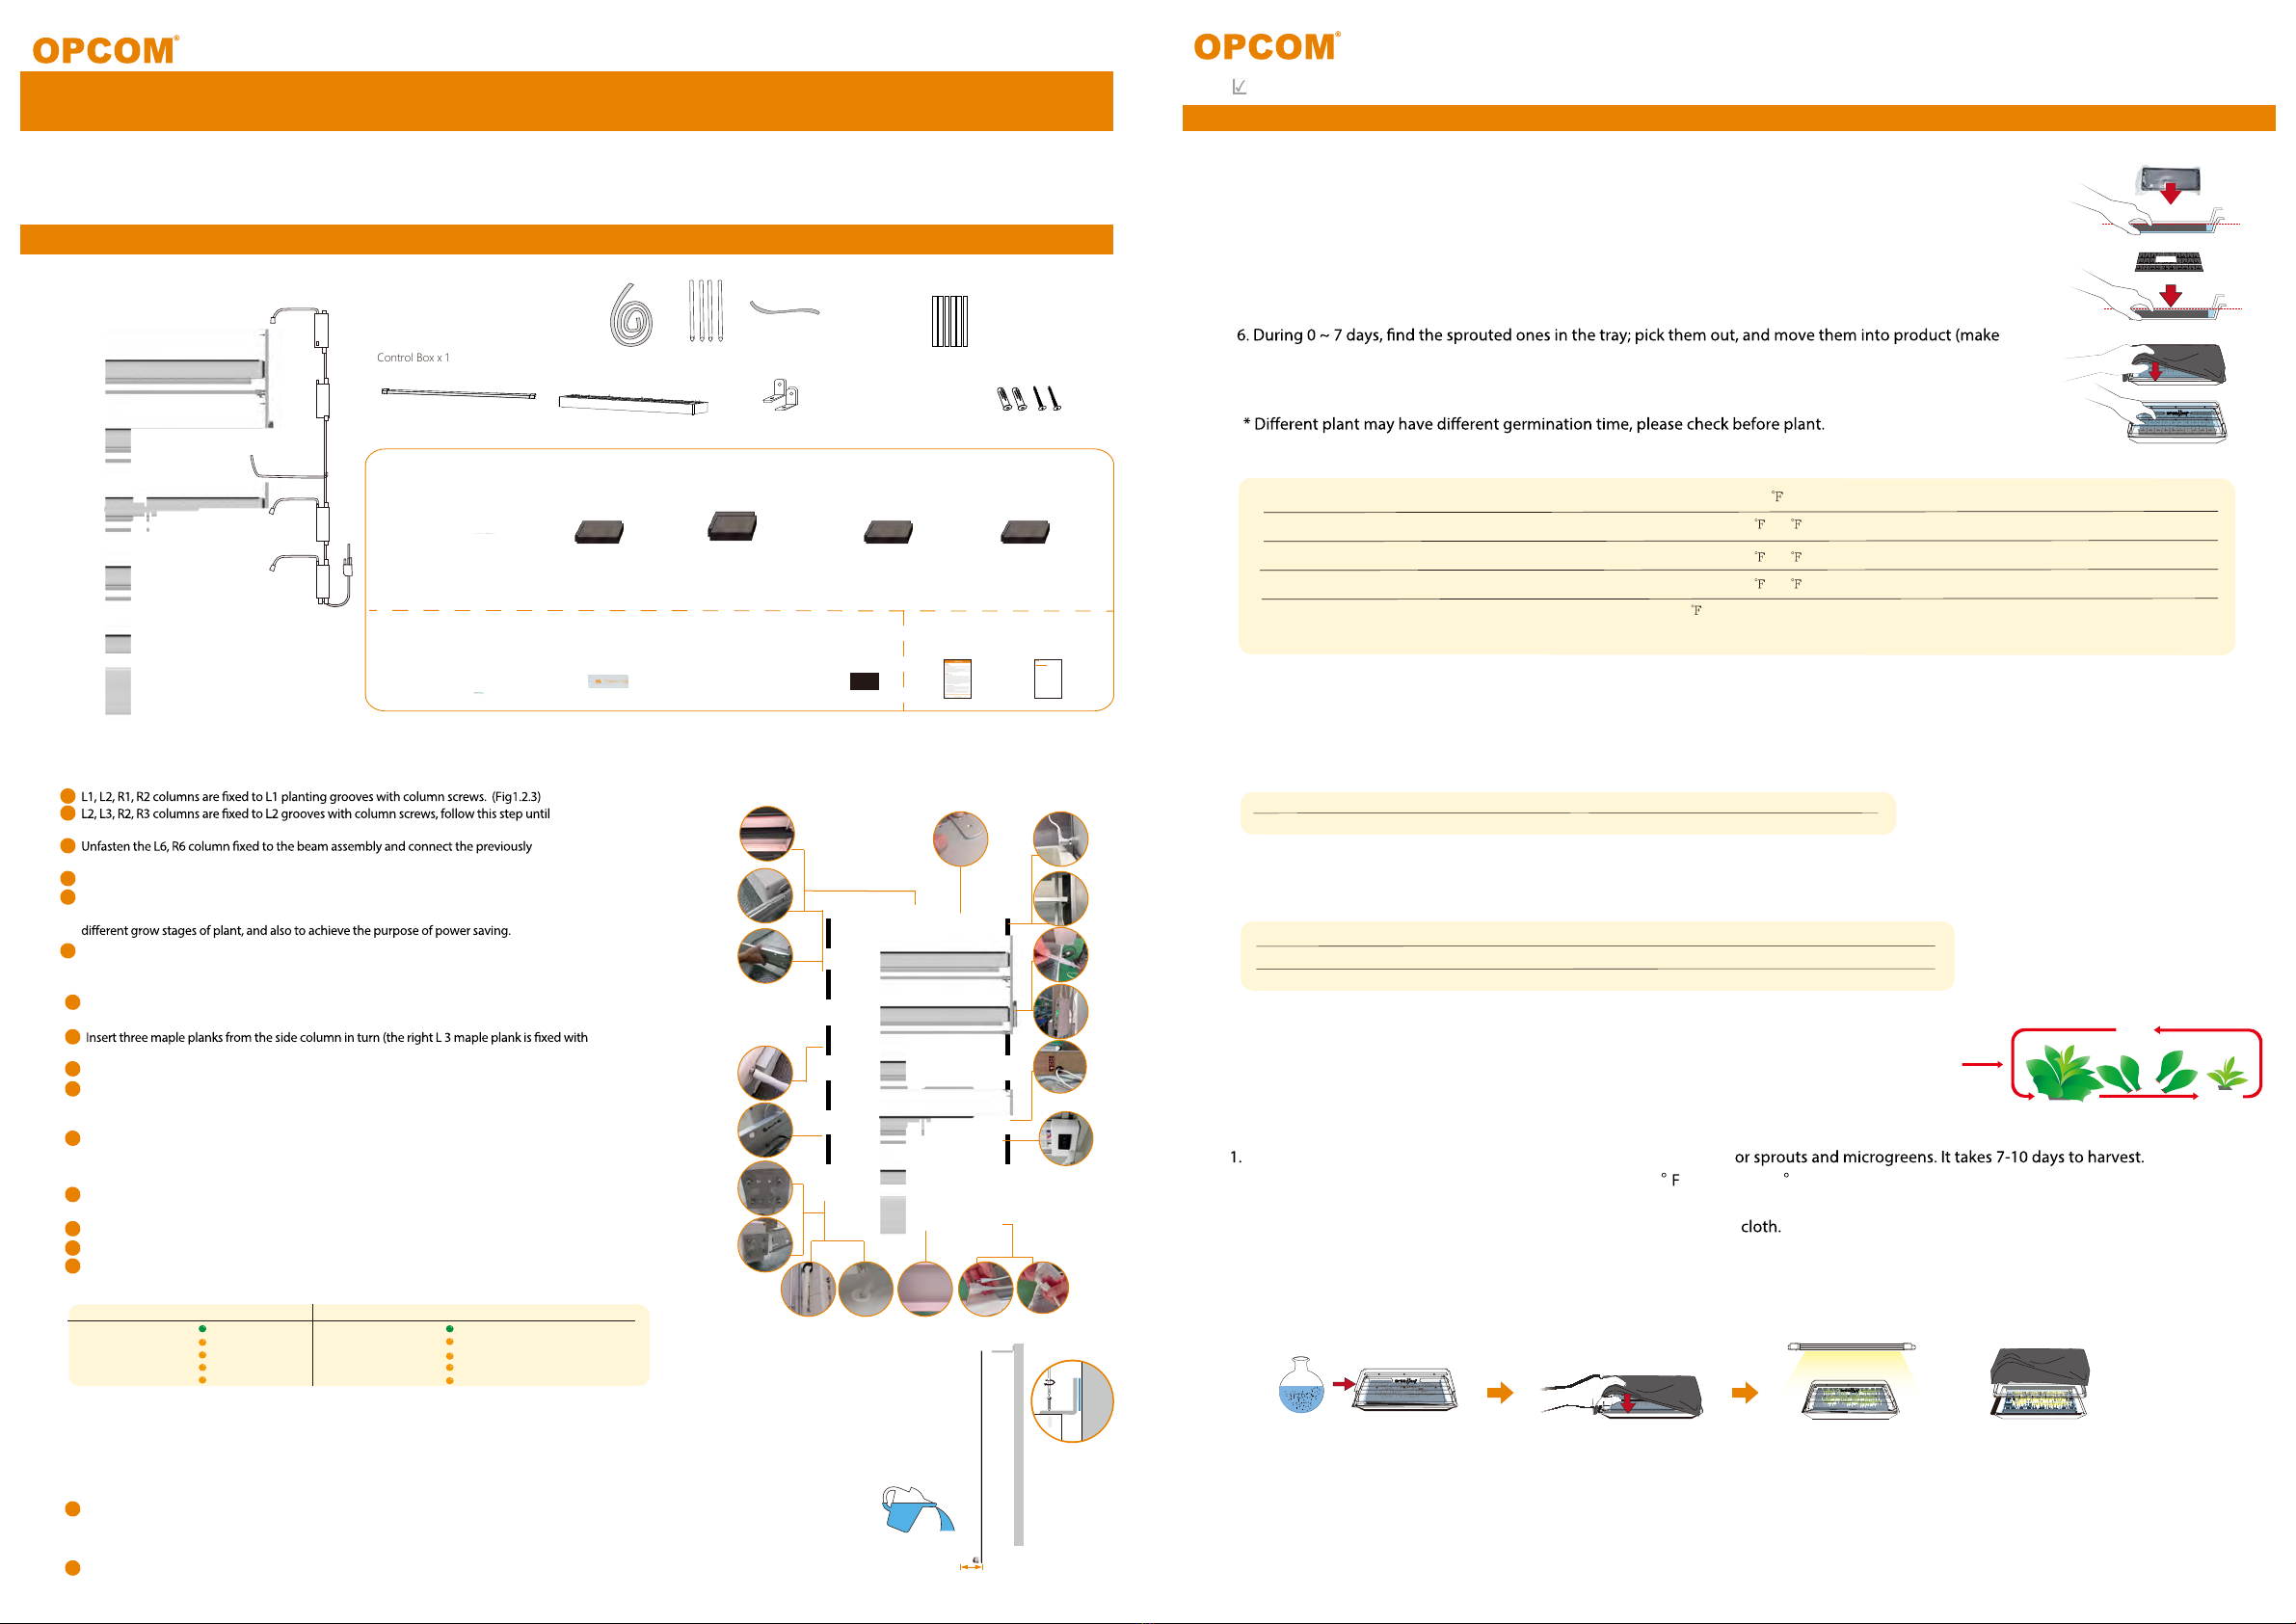
2. Put seeds in warm water(recommeded temperature is 95
3. Cover the sponges with wet paper towels.
4. Place the seedling tray with cover in the shade or cover it with black
5. After germination, during the growing stage, keep green sprout under the light and white sprout in the shade or cover it
with black cloth; in 7-10 days, you can harvest.
Day 7-10Day 0 Day 1
Green sprout White sprout
Chart II: Plant Stage
Basil, Lemon Balm
Germination Stage
Planting Time
Day 0~7
LED Mode
N/A
Pump Mode
N/A
Notes
* For your expected plant amount, you can refer to the sprout rate of 1st planting cycle.
* If you need more planting information, please vist to www.opcomfarm.com and read “Plant Q&A”.
Nourishment
N/A
T ( )
68 - 77
RH
80%
EC
0.5-1.0
pH
5.5-6.5
Young Plant Stage Day 3~1 4 ON ON NT-Starter 59 - 86 45%-70% 1.0-2.0 5.5-6.5
Growing Stage After Day 1 4 Auto Auto NT-Adjuster 59 - 86 45%-70% 1.0-2.0 5.5-6.5
Be sure each sponge is fully wet in
seedling tray.
* Please keep the seeds in refrigerator if you don’t use it, recommended temperture is 41 -50.
(Fig4)
(Fig3)
This side up!
(Fig2)
(Fig1)
1. Add water to the seedling tray, up to the water (red) level.(Fig1)
2. First time sprout: just open the seedling box and add water. Then go to step 4. (Fig 1)
3. Second time sprout: Open Grow Sponge package,put each sponge piece into water of seedling tray
(make sure the front side with the seed label is side up), press the sponges into water 5 seconds and
ensure the sponges absorb water completely. Put seed moisturizing cover on the sponges.(Fig2)
4. Place the seedling tray with cover in the shade.(Fig3)
5. Suggest using Watering Spray water to sponges and keep them wet everyday.
sure the sponges lineup with the black dot on the partition)(Fig4) and to next stage: B2. Young Plant Stage.
7. Discard unsprouted sponges after regular germination time.
8. In each sponge, keep strong plants and cut the other weak plants.
B1. Germination Stage
C. Sprouts and Microgreens.
Before you start next seedling, take advantage of the seedling tray f
, not over 104 F) for 24 hours.
L4
L5
L3
L2
L1
A. Assembly
A1. Remove all the parts from box and check all the accessories
L1
L2
L3
L4
L5
Chart I: Control Box Mode
Status
Auto
ON
High
Low
OFF
Fuction
Pump
Light Time(On/Off)
12 cycles/day
4 cycles/day
2 cycle/day
0 cycle/day
( 30 mins/cycle )
( 30 mins/cycle )
( 30 mins/cycle )
( 30 mins/cycle )
Status
Auto
O N
High
Low
OFF
Fuction
LED
Light Time(On/Off)
12H/12H
24H/0H
24 cycles/day
18H/6H
6H/18H
0H/24H
LED Growth Lightx5
Control Box x 1
Wall Mount Brackets x 2pcs
Base Standx2
Planting tray x5pcs
Hose x 1
Seedling Tray(ST-70) x2pcs
(665*175*65mm)
Grow Kits
Warranty Card Quick Guide Manual
Grow Sponge 4 x 60pk
(OASP001)
1. EC Meter
x1pc
2.pH test
paper x1pc
Accessories Manual
5.Cleaning s
ponge x1pc
3. Water
Spray x1pc
4. Remote
Controller x 1pc
Grow Sponge 3x60pk
(OASS001 For Green Lettuce)
Grow Sponge 3x60pk
(OASS006 For Basil)
Grow Sponge 3 x60pk
(OASS002 For Red Leaf Lettuce)
QuickGuide Manual
Grow Wall3
HydroponicsGreen Wall3
maple plank x6
Tube(2) x 1
8 gallons(30L)
7.87 inch
Tube(1) x 4
Pump x 2pcs
(Backup pump x 1)
Expansion Anchor Bolts x4pcs
Wall-Mount Screws x4pcs
Ribbon x10pc
6. Screwdriver Cross-
Head x1pc
7.Filter
Spongex10pc
A2. Assemble GrowWall3
* Most plants can be grown using the AUTO mode.
*Remote controller support wireless remote control.
* When Power On, press hold POWER button until 2 beep sound (About 5 second) to reset power on timeline.
* When Power Off, press hold POWER button until 2 beep sound (About 5 second) to reset power off timeline.
1. Assembly
1
2
the L5 grooves assembly iscompleted. (Fig4)
3
installed assemblyB13. (Fig.5)
4
The side column is assembled with the main line.
5
6
Put LED light inthe center of each layer, slide along the magnets on both sides to adjust
the height of LED. Three positioning heights to meetthe lighting needsof
(Fig6.)
insert the ligh line linto the power interface of the side column.(Fig7.)
7
The upper water pipe ispassedthrough the hole of the L6 column, and the hose passes through
the hole from the uppertothe lower to the L1 column. (Fig9.10)
8
the crossbeam part). (Fig8)
And a lower water pipe is arranged according tothe opening hole of the planting groove.(Fig11)
Install the wallmount bracket onthe top of the beam and stand up the product.(Fig12)
11
Place the motor pack in the water tank and connect the motor powerline on the right (Fig13)
12
9
10
Place the planting tray corresponding to the position of the lower waterpipe at
the opening of the planting plate(Fig14)
13
Add 8 gallons (90% full) of water tothe water tank(Fig15)
14
Connect the controlbox to the markedposition andconnect the main line.(Fig16.17)
15
Connect the main power supply and start the power on.(Fig18)
2. Water Line Set Up
3. Electric Line Set Up
4. Other Installations
5. LED light Control
1
1
Don’tremovethe tape until
finishliftingrod assembly!
(Fig1)
(Fig2)
(Fig3)
(Fig11)
(Fig4)
(Fig5)
(Fig14) (Fig12)
(Fig7)
(Fig6)
(Fig17)
(Fig16)
(Fig8)
(Fig19)
(Fig18)(Fig13)(Fig15)(Fig10)(Fig9)
Grow Wall3
Thank you for purchasing OPCOM Farm GrowWall3, the indoor hydroponics growing system. lt is designed for easy to use and
efficient growth by one-touch AUTO mode.lt holds up to180 plants capacity. Please read the quick guide carefully before setting it
up. For detailed user guide video, please visit GrowWall3 page at http://www.opcomfarm.com
A spoon=1g / B spoon=5g / C spoon=10g
A spoon=1g / B spoon=5g / C spoon=10g
4-6 weeks
Harvest
Cut off Large leaf
1 week
Keep
for regrow
Adjustment
Soda#1 50ml x1
Salt#1 250ml x2 Lemon#1 50ml x2
Select your color of LED light - There is aswitch in the right side of the LED light.(Fig19)You can select the color manually
by pressing the switch. We have white lightand white-red lightmode for your selection. Please note that the control box
can only control the time of LED On or LED OFF, the color of LED light need to controlmanually.
The heightof LED light - Youcan decide the height of the LED light depending on your needs. Please note that thecloser
the light to the plants the higher the temperature is.
16
17


