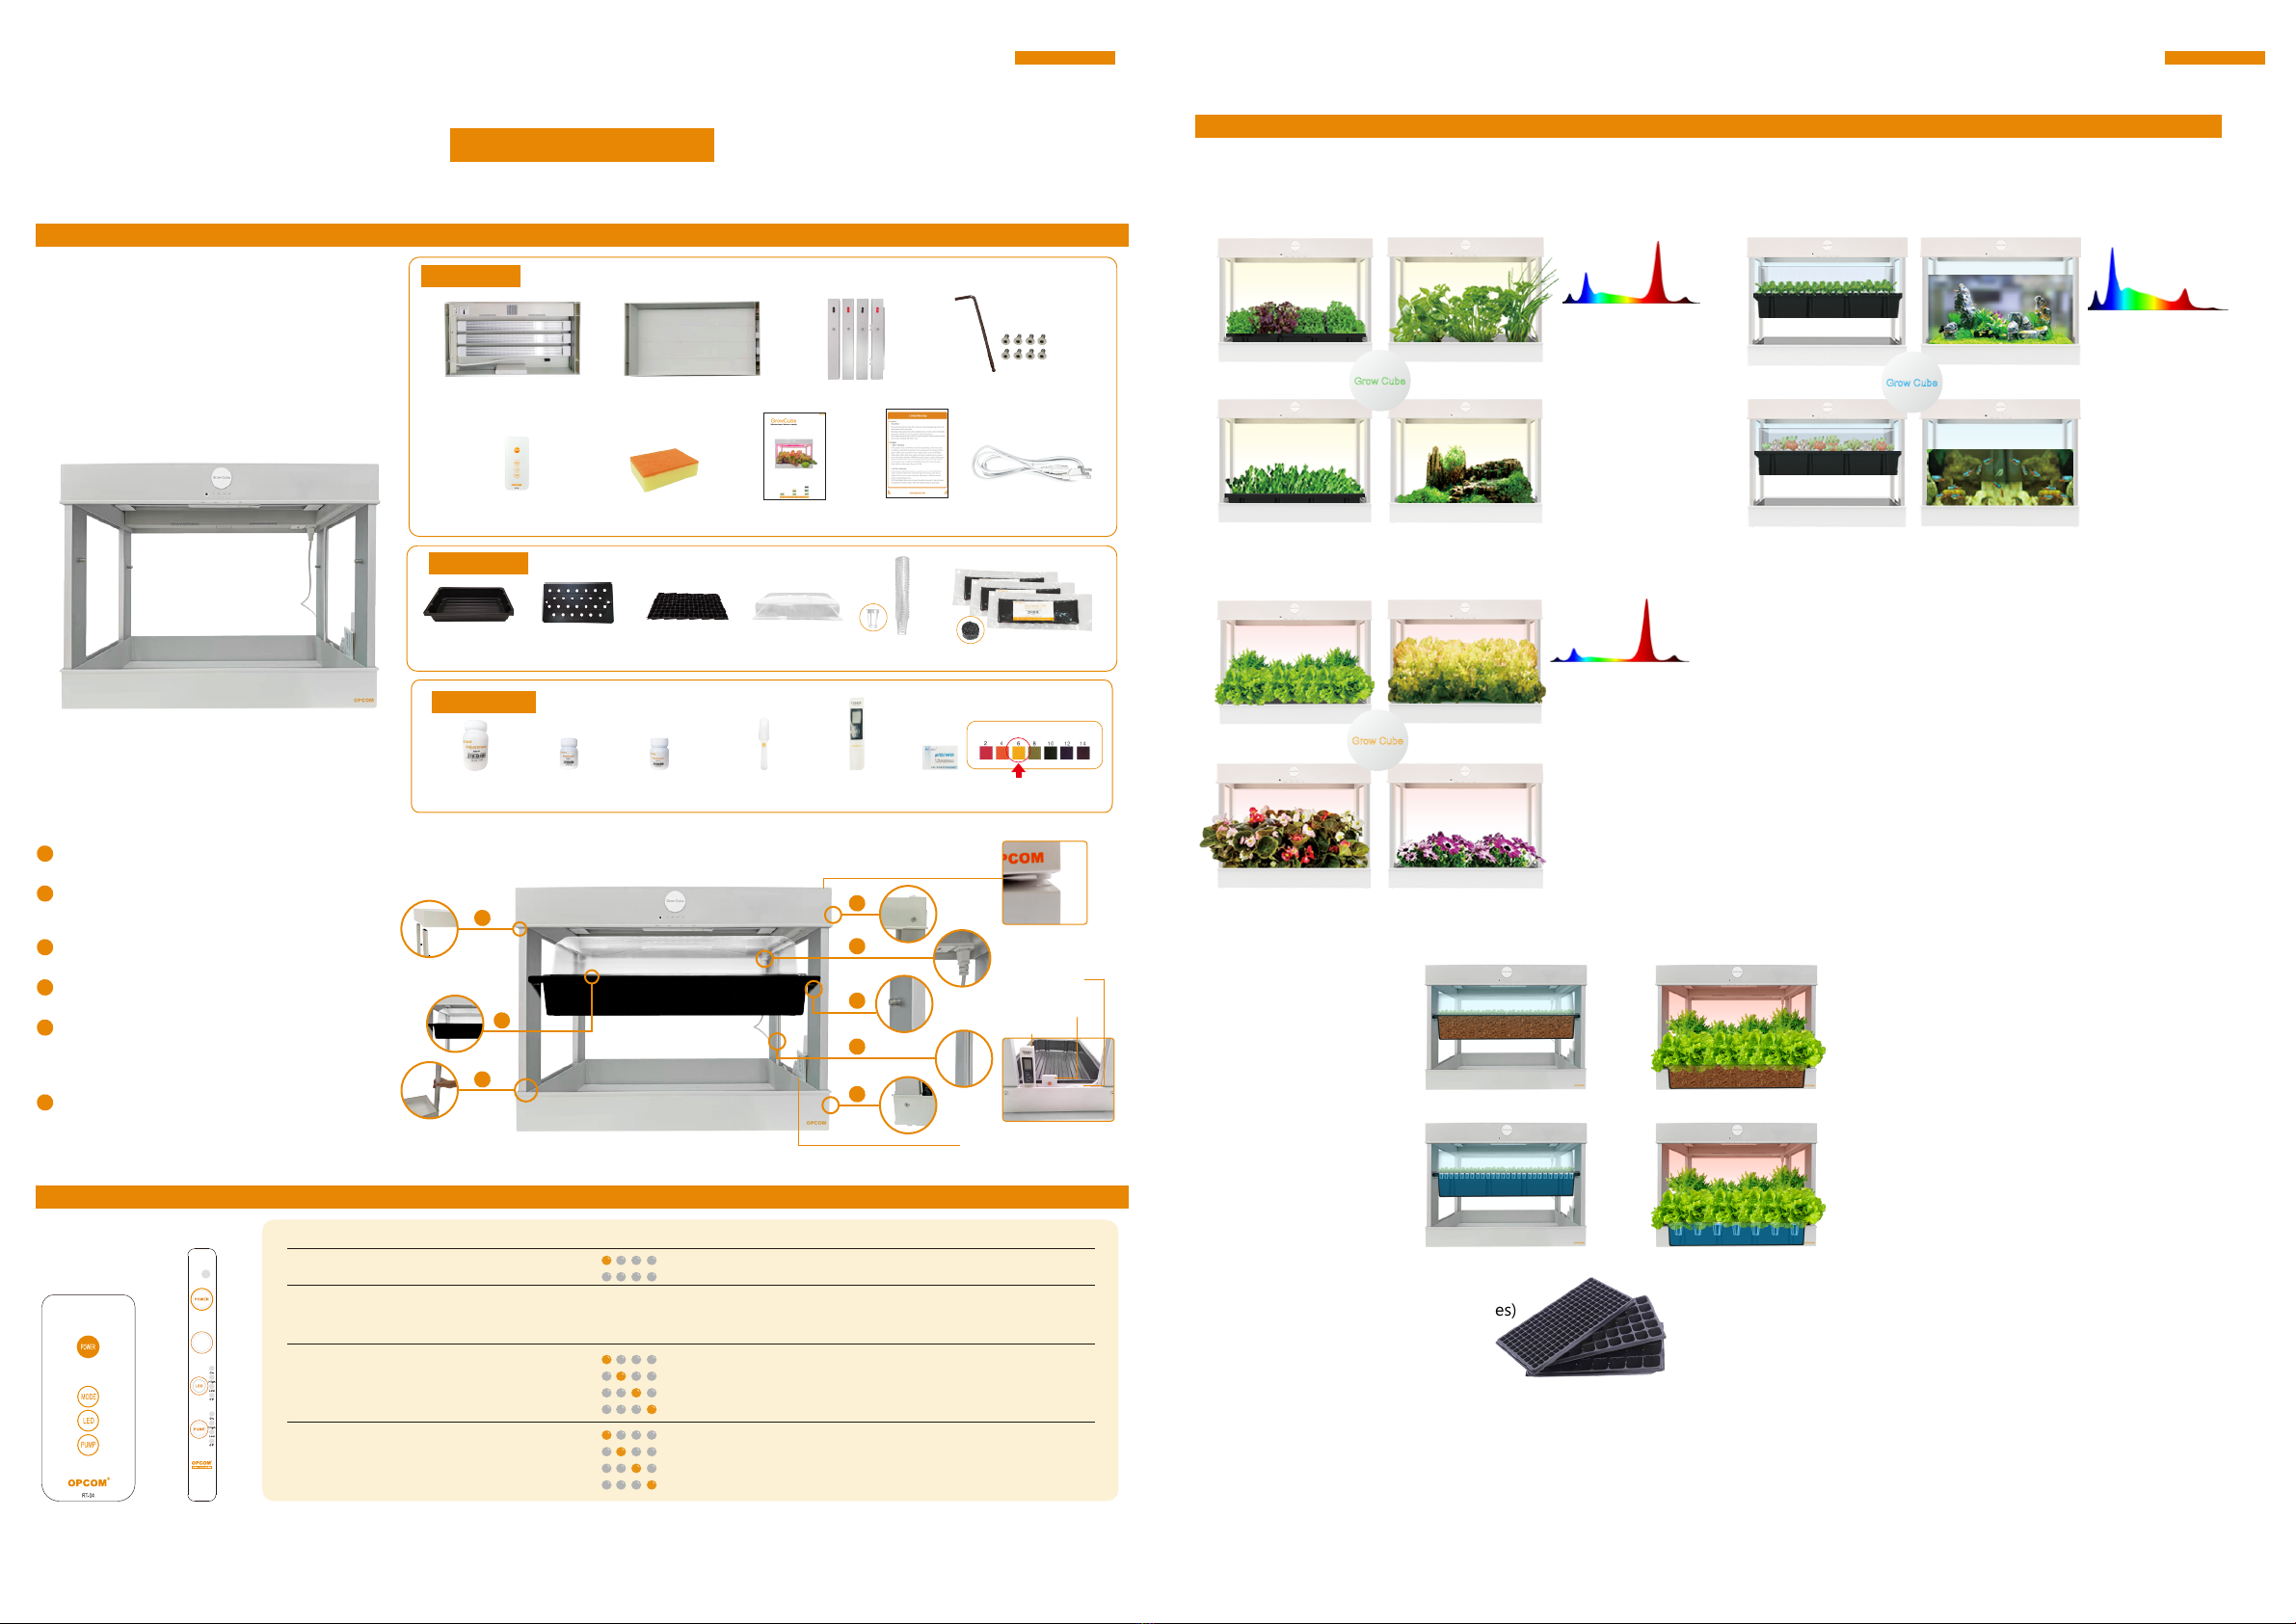
manuals.online logo
Brands
  1. Home
  2. •
  3. Brands
  4. •
  5. OPCOM
  6. •
  7. Lawn And Garden Equipment
  8. •
  9. OPCOM GrowCube OFG011P User manual

OPCOM GrowCube OFG011P User manual

OPCOM
GrowCube
Model:OFG011P
OPCOM
GrowCube
Ver: 220221
Minimum space, Maximum capacity
GrowCube
This product is designed for indoor farm. Without built-in temperature control,
our product works best within a temperature range of 18°C~30°C, specifically, 25°C.
Except for special plants that naturally grow in higher or lower temperatures, please adjust
the air circulating fans once the indoor temperature exceeds the range to sustain the plants’ growth.
Planting Environment Notification Feel free to visit the OPCOM website
for more details!.
Free Stackable for Various Farm and Garden
Indoor Farm Families
Grow Tank
Grow Cube GrowBox 2
Grow Wall 3Grow Wall
GrowBox
C4. Hydroponics Nutrition Solution:
1. pH:
2. EC:
Keep the pH within the 5.5-6.5 range (yellow-green color on pH test paper) to maintain the best hydroponics condition,
please do not use tap water, steam water, or drinking water.
Soda is for pH+ and Lemon is for pH-. You may test the water with the pH test paper provided.
Please grow the sprouts in the seedling trays and keep it in a dark and highly humid environment (better with a cover)
2-B. Young plant stage:
2-A. Sprout Stage:
Once 70% of the seeds sprout, move the seedling tray under LED/sunlight and add Salt #1 to keep the EC at 0.8.
Please spray water daily to keep a highly humid environment for young plants.
2-D. Remarks:
Salt #1 is a food grade nutrition and for the young plant stage and the leafy stage.
OPCOM sorts out the nutrients with clear identifications to simplify the planting process.
2-C. Leafy stage:
Please add Salt #1 to increase EC from 0.8 to 1.2 to grow larger leaves
E. Maintenance
D. Troubleshooting
igh
power Connectors are connected.
Timer off, 8hours/15hours off time, during 24-hour cycle.
Please follow the instructions in C4to renew the nutrients in the water. We recommend renewing the nutrients once in a couple
weeks.
Cover up the
when it’s not at use within an extended amount of time
when it’s not at use.
Soil plant:
Renewing Water Nutrition
A standard 54cm x 28cm seedling tray(21-200 slots) is optional according to the size of your plants before placing them in
the planting tank.
clean the electrode with regular water and keep it dry when stored.
intervals.
with ON, HIGH, and LOW modes, switeting the lamps
reach
Grow Cube
Quick Guide Manual
A1. Check all accessories first
A. Assembly
C. Planting
C1.Mode setting: Select between the preset modes through the buttons on the remote control to automatically grow
any plants you like.
C2.Soil and Hydroponic farming
Hydroponic farming
Soil farming
Turn off the pump when planting with soil.
Grow Sponge 30pk x3
2
Top COVER x 1 pc
L15T x 3 pcs
Remote Controller x1pc
Cleaning Sponge x1pc
Column x 4 pcs Screw pack x1pc
Hydroppnic Planting
Tray(26 holes) x 1 pc
Planting Tank
x1pc
Humidity Cover
x1pc
Assembly
Grow kit
1
L mode setting with high Red and IR wave lights
G mode setting with balance Red/ Blue white/ UV/ IR wave lights S mode setting with High Blue white and UV less Red and IR
OPCOM
GrowCube
Model:OFG011P
OPCOM
GrowCube
Thank you for purchasing OPCOM GrowCube, the indoor hydroponic soil growth system. It is designed to be easily installed as stackable walls.
Please read the manual in detail before setting up. For further information.
Manual Warranty Card power cable x1pc
B. Remote Control Button
Remote Control
Smart Control Box
Set up the Wake-up(automatically turns on everyday) and Sleeping(automatically turns off everyday) modes through lighting time setting.
Fan follow LEDon / off
A. Wake-up time setting: When Power On, press hold POWER button until 2 beep sound (About 5 second) to reset power on timeline.
B. Sleeping time setting: When Power Off, press hold POWER button until 2 beep sound (About 5 second) to reset power off timeline.
C3.Grow Kit:
OPCOM grow kit supplies approximately half years planting materials, including planting trays, baskets, and sponges.
#1:Seedling tray. (54x28cm, 21-200 holes)
#2:Keep the water level of 2 cm high in the water box, which can maintain long-term growth.
Please insert 3 seeds into the cross on each sponge 5mm in depth, then fill up the tray with drinking water until the
waterline covers half of the sponge. Cover the tray up and place it in a dark, humid place. It will sprout within a week.
When the number of sprouts exceeds 70% (young plant stage), expose the tray under LED light or sunlight for it to grow.
Once the plant reaches 3" in height, it's ready to be planted with OPCOM farm machines with automatic settings and
preset modes. Make sure each young plant has roots that extended out of the bottom of the sponge to absorb the
nutrition reflowing in the machine.
Leafy
Leafy
Mini Garden
Lettuce
Mini Flower
Young Plants
Sprout
Herbs
Microlandscape
Grow Cube
Seedling
Seedling
LeafySeedling
#1
#2
Succulents
Aquarium plants
Aquarium fish
Soda #1 (pH+)
50mlx1
Lemon #1 (pH-)
50mlx1
Salt #1 (Nutrition)
250mlx1
Scoop for Adjust
of Nutritio (5g)
EC Meter
x1pc
pH test paper
x1pc
Nutrition
A2. Easy Set up
Install 4 uprights in the upper and lower covers, and lock
the screws on the left and right sides.
EC meter, pH test papers,
air pump tube, and remote
control can be stored.
With the
stackable design.
EC meter.
pH test papers,
remote control.
Air pump tube.
Fix the air pump tube in the upper cover to the right slot
of the lower cover along the front side of right rear column
line groove.
2
1
Put the planting tray into the upper and lower covers and
start hydroponic or soil cultivation.
3
If it is hydroponics, place the air pump tube head made of
air stone into the center of the water basin to supply oxygen.
4
Insert the power cord into the female socket on the right
rear of the upper cover, fix the power cable in the 2 wire clips
along the rear side of the right rear column, and plug the
other end of the stream socket.
5
There is an AC socket on the side of the power socket of
the upper cover, which provides the power supply for the
expansion machine. (No more than 10A total power
consumption)
6
Soil Seedling Tray
(128 holes) x1pc
planting basket
(25mm) x26pcs
Alkaline Neutral Acidic
3
1
1
3
5
1
2
1
Bottom COVER x 1 pc
MODE
Status
Fuction
On
Off
L
G (Default)
S
Power
Mode
ON
High
Low
OFF
ON
High
Low
OFF
Operation
One Press
One Press
One Press
One Press
One Press
One Press
One Press
One Press
One Press
One Press
One Press
One Press
One Press
LED
Pump
Time
On (Follow last mode before turn off)
Off
18Hr/day ON mode of LED and 25mins/ 30mins ON mode of Pump
always ON mode of LED and 5mins/ 30mins ON mode of Pump
Panel Light
Grow Cube
Grow Cube
Grow Cube
Sound
BB
BB
BBB
BBBB
B 1sec
B 1sec
BBBB
BBB
BB
B 1sec
BB
B
BBB
always On
18Hr/day
9Hr/day
always Off
55mins/ 1Hr
25mins/ 30mins
5mins/ 30mins
always Off
ON HI LOW OFF
ON HI LOW OFF
ON HI LOW OFF
ON HI LOW OFF
ON HI LOW OFF
ON HI LOW OFF
ON HI LOW OFF
ON HI LOW OFF
ON HI LOW OFF
ON HI LOW OFF
Grow Cube
Grow Cube

Other OPCOM Lawn And Garden Equipment manuals

OPCOM GrowWall User manual

OPCOM

OPCOM GrowWall User manual

OPCOM Grow Wall3 User manual

OPCOM

OPCOM Grow Wall3 User manual

OPCOM Grow Wall3 User manual

OPCOM

OPCOM Grow Wall3 User manual

OPCOM GrowTank OFG005 User manual

OPCOM

OPCOM GrowTank OFG005 User manual

OPCOM OFG010 User manual

OPCOM

OPCOM OFG010 User manual

OPCOM Grow Wall 3 User manual

OPCOM

OPCOM Grow Wall 3 User manual

OPCOM OFG008G Assembly instructions

OPCOM

OPCOM OFG008G Assembly instructions

OPCOM Grow Wall3C User manual

OPCOM

OPCOM Grow Wall3C User manual

OPCOM GrowCube User manual

OPCOM

OPCOM GrowCube User manual

OPCOM O2 Garden User manual

OPCOM

OPCOM O2 Garden User manual

OPCOM Grow Wall 3 User manual

OPCOM

OPCOM Grow Wall 3 User manual

OPCOM OFG008 User manual

OPCOM

OPCOM OFG008 User manual

OPCOM O2 Garden User manual

OPCOM

OPCOM O2 Garden User manual

Popular Lawn And Garden Equipment manuals by other brands

DANA 4100-11 parts list

DANA

DANA 4100-11 parts list

Amadas 2110 user manual

Amadas

Amadas 2110 user manual

GRADEN CSI Mk 2 owner's manual

GRADEN

GRADEN CSI Mk 2 owner's manual

Parkside 331856 1907 instruction manual

Parkside

Parkside 331856 1907 instruction manual

The Handy THGTL-A manual

The Handy

The Handy THGTL-A manual

Costway GT4115 manual

Costway

Costway GT4115 manual

Craftsman 486.254072 owner's manual

Craftsman

Craftsman 486.254072 owner's manual

Makita DCU603 instruction manual

Makita

Makita DCU603 instruction manual

Garland ROLL&COMB 602 QG instruction manual

Garland

Garland ROLL&COMB 602 QG instruction manual

Ikra IGBS 3.6 USB operating instructions

Ikra

Ikra IGBS 3.6 USB operating instructions

VEVOR RA250200 user manual

VEVOR

VEVOR RA250200 user manual

DynaTrap DT1775 owner's manual

DynaTrap

DynaTrap DT1775 owner's manual

Snapper 1691852 installation instructions

Snapper

Snapper 1691852 installation instructions

Costway NP11081 Instruction booklet

Costway

Costway NP11081 Instruction booklet

Bush Hog TOUGH TD-1100 Specifications

Bush Hog

Bush Hog TOUGH TD-1100 Specifications

Bush Hog TOUGH CLR48 Specifications

Bush Hog

Bush Hog TOUGH CLR48 Specifications

Feider Machines FTDT511ZT owner's manual

Feider Machines

Feider Machines FTDT511ZT owner's manual

Gimenez Ganga saxun Bioclimatic Pergola P-150 CR Assembly instructions

Gimenez Ganga

Gimenez Ganga saxun Bioclimatic Pergola P-150 CR Assembly instructions

manuals.online logo
manuals.online logoBrands
  • About & Mission
  • Contact us
  • Privacy Policy
  • Terms and Conditions

Copyright 2025 Manuals.Online. All Rights Reserved.