manuals.online logo
Brands
  1. Home
  2. •
  3. Brands
  4. •
  5. OPCOM
  6. •
  7. Lawn And Garden Equipment
  8. •
  9. OPCOM OFG010 User manual

OPCOM OFG010 User manual

One
Press
Indoor Garden Families
Microgreens
Dome
Sky Garden
Light
Microgreens
Dome
O2 GardenAuto Grow Light
Tree
Remote Control Button
On
Button
Light On
Step Indicator SoundLED Level LED Description
Off
TIMER
Light OffB 1Sec.
16 hrs On / DailyBBB
9 hrs On / DailyBBBB
S (succulent)
B
G (garden)
MODE
BB
Press
White B
RedCOLOR BB
UV BBB
BB
#2
Low--L2
Hi--L4
G Mode: Dedicated for wet plants (fill the water tank with 80ml of water to circulate moisture within the glass terrarium).
S Mode: Dedicated for both Succulent and Aquarium plants (Do Not fill the water tank with water).
This product is designed for indoor gardening. Without built-in temperature control,
our product works best within a temperature range of 18°C~30°C, specifically, 25°C.
Except for special plants that naturally grow in higher or lower temperatures, please adjust
the air circulating fans once the indoor temperature exceeds the range to sustain the plants’ growth.
Main Device Single Button
On
Button
One
Press
Light On
Step Indicator SoundLED Level LED Description
Hi
TIMER
Light Off
B 1Sec.
Low
16 hrs On / Daily
BBB
Off
9 hrs On / Daily
Timmer setting
just for light control.
BBBB
#1 / #3
BB
Press
Control
Timmer setting
just for light control.
Hi
Low
One
Press
One
Press
Dimmer Level
L0
L1
L2
L3
L0 (B 1sec) turn off
L1 (B) Level 1
L2 (BB) Level 2
L3 (BBB) Level 3
L4 (BBBB) Level 4
and top Level
Long press:
Dimmer for 5 Levels
cycling
L4
Remark
Fan setting
Turns off for 5 minutes/hour for the fan’s maintenance.
Mode setting
Planting Environment Notification
Feel free to visit the OPCOM website
for more details!.
OPCOM
MicroGreen Dome
Model : OFG010
OPCOM
MicroGreen Dome
RT-02
TIMER
MODE
COLOR
MIST
Garden
Succulent
Blue White
Red
UV
3 Cycle / Day
1 Cycle / Day
1 Cycle / 2 Day
1 Cycle / 7 Day
On
Off
Beep Rule
On
Off
L1
L2
L3
L4
Push Rule
Short Sound
Long Sound (1 sec)
1 Push : Switch
Long Push : Dimmer
Confirm
On
Hi (On:16Hr/Day)
Low
Off
(On:09Hr/Day)
On
Off
1B
2
MIST
BB
3BBB
4BBBB
BB 1 Sec.
B 1 Sec.
3Times / Daily
1Times / Daily
1Times / 2 Days
1Times / 7 Days
On
Off
One
Press
It’s Time
To Create Your Own
Refreshing MicroGreen Landscape
#1. Double press to switch On/Off.
#2. Set up the Wake-up(automatically turns on everyday) and Sleeping(automatically turns off everyday) modes through lighting time setting.
A. Wake-up time setting: When light is on, press and hold for 5 seconds until it beeps.
B. Sleeping time setting: When light is off, press and hold for 5 seconds until it beeps.
#3. One short + One long pressing the Timer button resets the product to default settings.
default
Thank you for your interest having MicroGreen Dome. Hope you will like it very much.
The MicroGreen Dome has the conditions for precision planting,including light,air,water,etc. From the succulent plants to the mosses of wetland
and aquatic ecology,all that could get sufficient growth conditions in the intelligent mode without the special care. Its automatic mode provides
the function of photometric sensing,which is quite suitable for creative placement or hanging in the environment of restaurant,
balcony and indoor garden, and no need to worry about the lack of light at all.
The MicroGreen Dome produce fresh air and positive energy every day, as well as the living environment that changes and projects light and
shadow with the growth of plants. It provides the automatic On / Off mode. In the early morning, it can be awakened by the MicroGreen Dome
gradually as the phototherapy and to start the beautiful day; and at night, it can also help to fall asleep surrounded by the green andscaping.
When several MicroGreen Domes are hung alternately up and down,the indoor environment soon becomes a 3D ecological garden immediately,
with High Color Accuracy up to Ra90 grow light to display the true color of the garden and flood light.
Now,let's begin the wonderful planting journey....
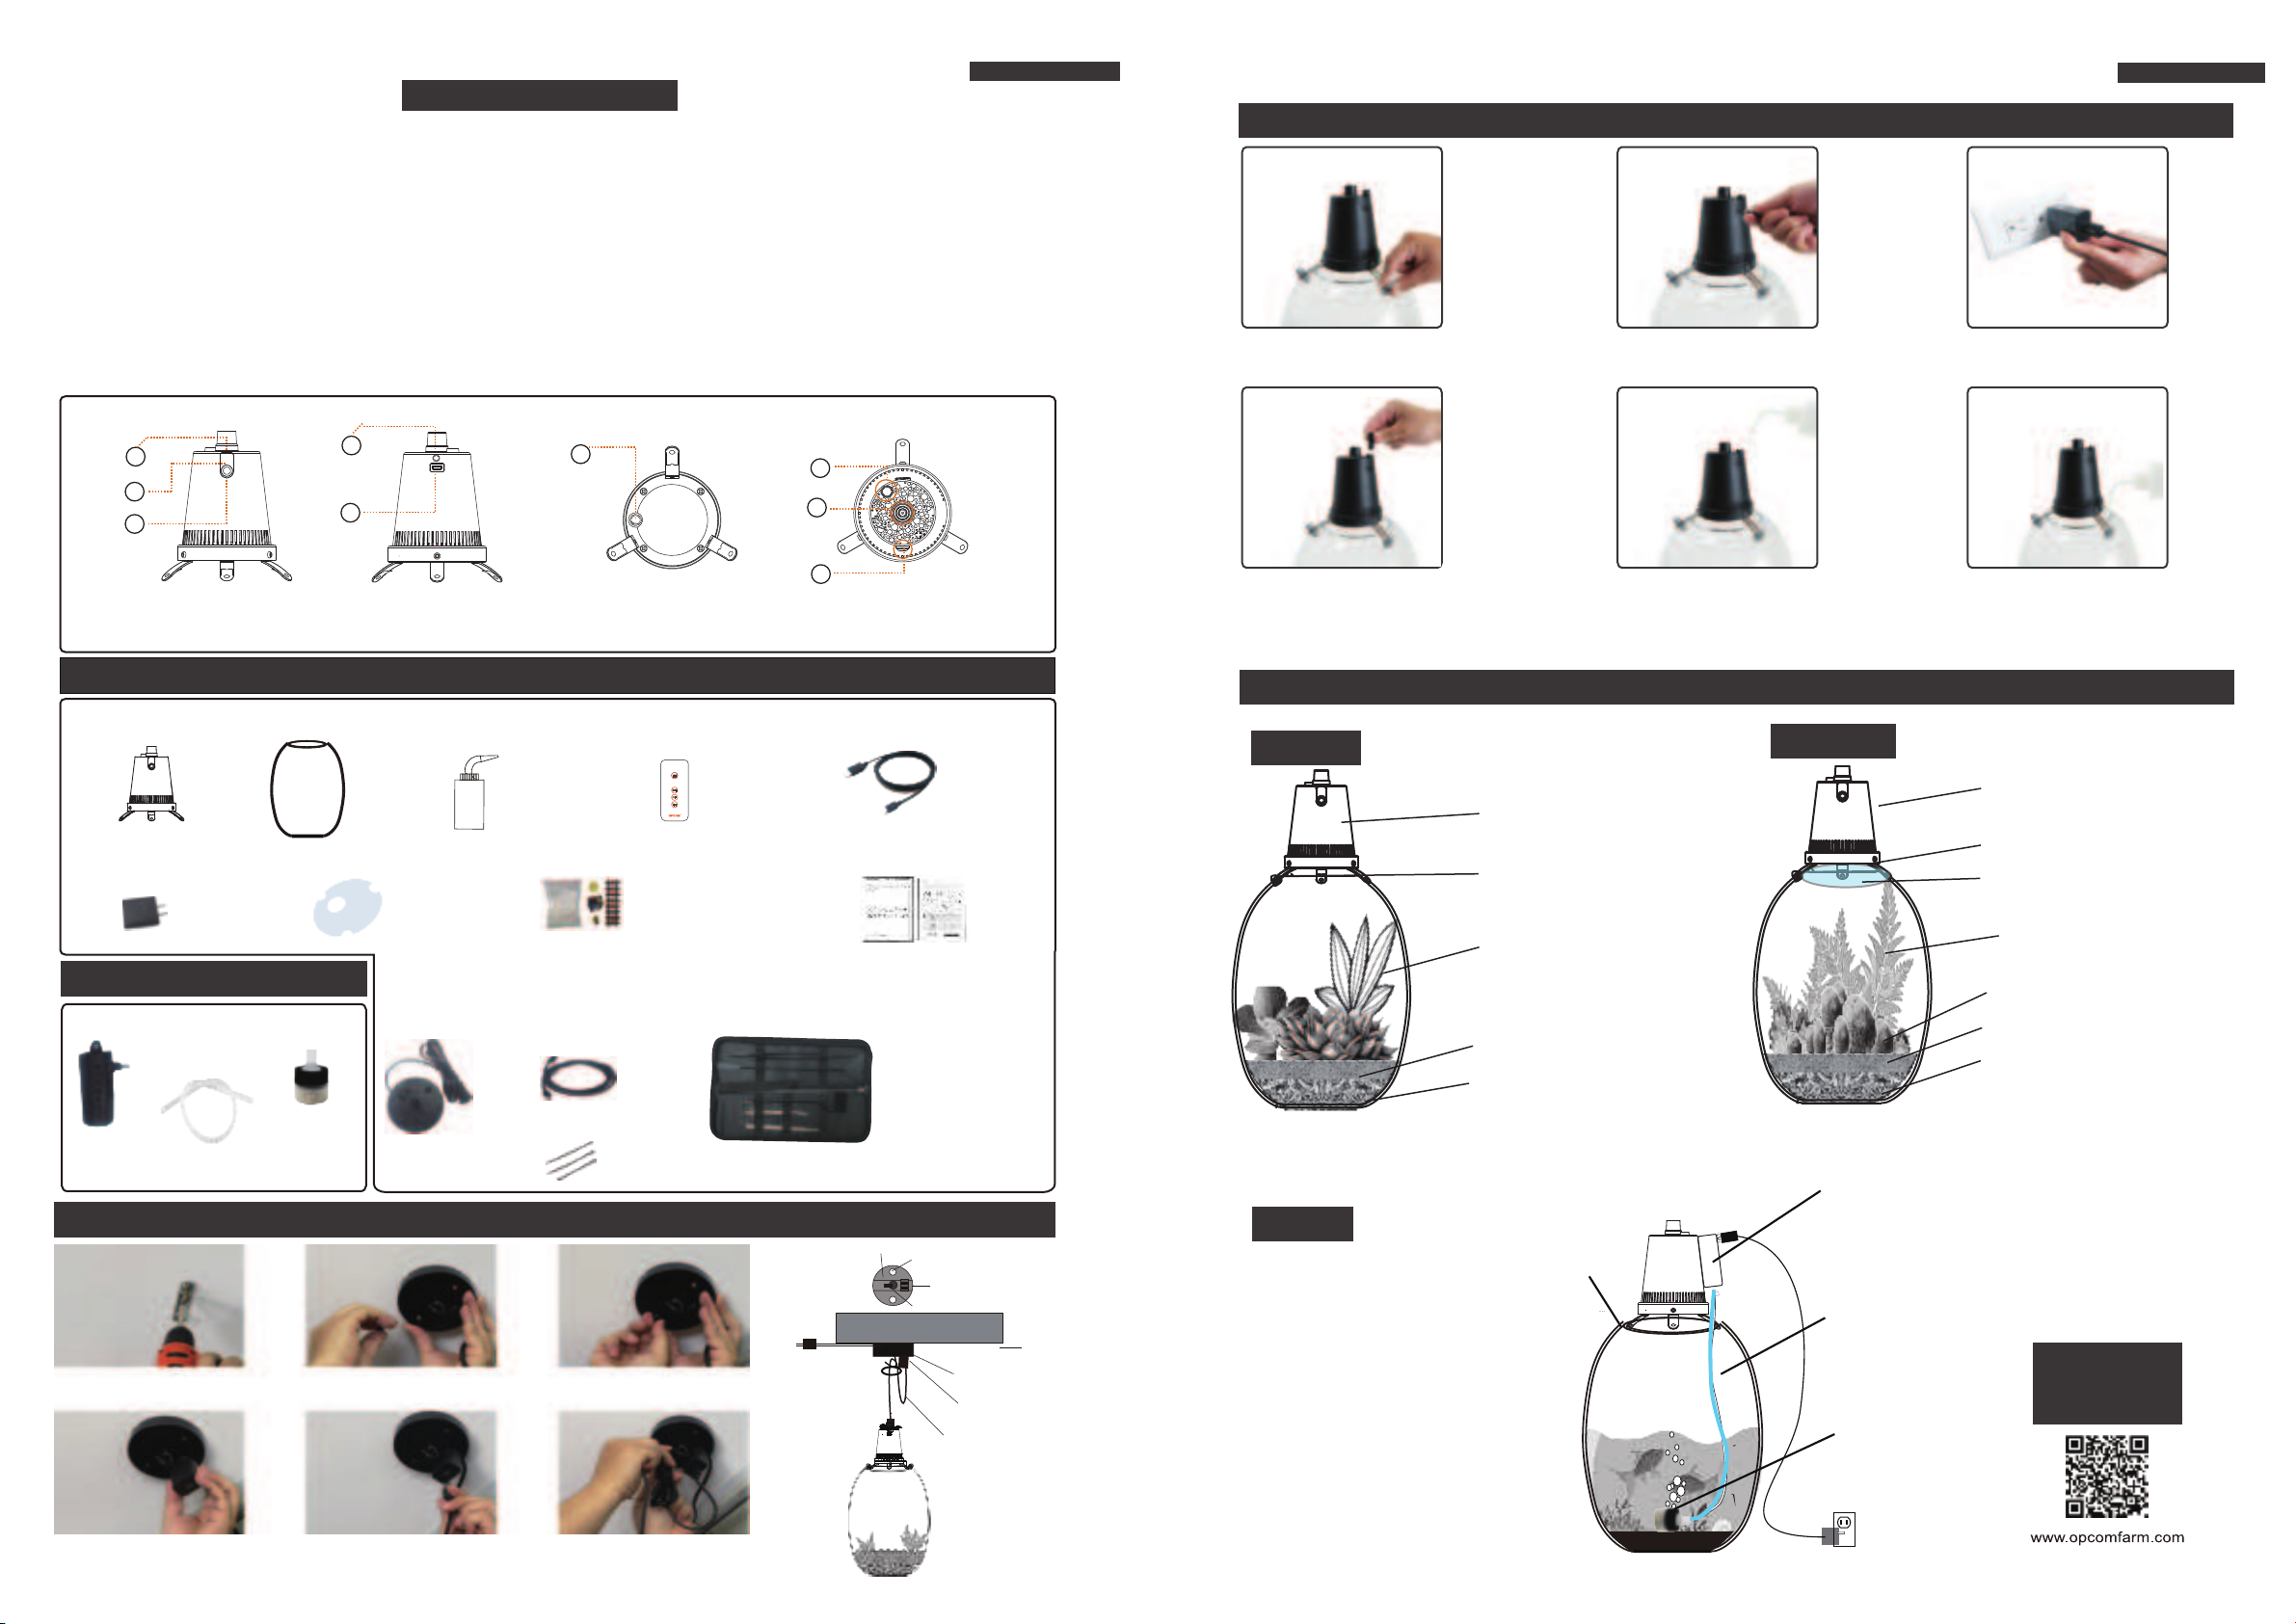
Step 1
Place the main device on the terrarium
by tightening 3 screws
Step 2
Plug in the USB cable
Step 3
Plug USB adapter to AC power outlet
Step 4
Unplug the stopper from the water port Step 5
Use the drop bottle to fill the water into
the opening (This step is only for Garden Mode,
not recommend for other modes, to maintain
the humidity of the moss and ferns)
Step 6
Drip the water into the glass terrarium
Step 1
Fasten the fixing piece to the
eiling with screws.
Step 2
Place the base on the fixing piece.
Step 2
Use screws to lock the base to
the fixing piece.
Step 4
Insert the transformer in the base.
Step 5
Plug the USB power cable into
the adapter.
Step 6
Adjust the lanyard to the proper
length.
A
G
H
D
E
C
A
B
F
A. Function button B. Function indicator C. Remote control receiver D. Remote control receiver
E. Power port (USB Type C) F. Air outlet G.Water port rubber H.Power port (DC Jack)
Front View Rear View Bottom View Top View
(1) Air Pump
(2) Buble Tube
(3) Water Filter
(2) Hanging wire
10kg weight capability
(3) Cable ties x3
Aquarium set
Air Pump(1)
Fixing screw
(1) Main Device (2) Terrarium (3) Water bottle (4) Remote controller (5) USB Power cord
(9) Manual / Warranty Card
(6) Transformer (7) Humidity Cover (8) Decoration accessories
OPCOM
MicroGreen Dome
Welcome to check our
planting videos from
www.opcomfarm.com
Model : OFG010
Quick Manual Guide
MicroGreen Dome
OPCOM
MicroGreen Dome
Standard Accessories
Aquarium set (Optional)
Microlandscape tool set
Model: OFA01A
(1)
Fix holder
● Scissors
● Short Clip
● Long handle clip
● Long handle brush
● Long handle scraper
● Leather case
Hanging set setup:Hanging set can handle weight up to 10kg and Win the 3D Sky Garden Art design around the room.
Hook Nut
AC Power
Ceiling
Hanging wire(2)
Cable tie (3)
AC Adapter(6)
Fix holder (1)
Nut
Installation
Planting
Drip water every 5-7 days.
Succulents garden design
with Decoration part(8).
Dirt Layer (1” Height)
Light stone Layer (1.5” Height)
Dirt Layer (1” Height)
Sphagnum moss Layer (1” Height)
Moss / Ferns / Microgreen wet plants
garden design with decoration parts(8).
Humidity Cover
If wet plants planted, the humidity cover could be
covered for moisture
Drip water against different plants nesessary.
Drip water into tank around every week
or water shortage red light on for wet air.
Step 1:
Unscrew the device to open
glass terrarium port and set up
Aquarium planting.
Step 2:
Plug Bubble tube(2)
into water filter(3) and
put into water bottom.
Step 3:
Plug Bubble Tube(2)
another end to Air Pump(1) ;
and screw device to glass terrarium.
Step 4:
Plug Power Code type C connector
to Air Pump(1) and plug Air Pump(1)
type C connector to device.
Press Air Pump(1) button to switch ON/OFF pump>
No water in tank.
Aquarium set
Bubble Tube(2)
Aquarium set
water filter(3)
Aquarium
Succulents Moss / Ferns
AC
Hanging set
RT-02
TIMER
TIMER
MODE
COLOR
MIST

Other OPCOM Lawn And Garden Equipment manuals

OPCOM O2 Garden User manual

OPCOM

OPCOM O2 Garden User manual

OPCOM Grow Wall 3 User manual

OPCOM

OPCOM Grow Wall 3 User manual

OPCOM OFG008 User manual

OPCOM

OPCOM OFG008 User manual

OPCOM GrowWall User manual

OPCOM

OPCOM GrowWall User manual

OPCOM Grow Wall3 User manual

OPCOM

OPCOM Grow Wall3 User manual

OPCOM O2 Garden User manual

OPCOM

OPCOM O2 Garden User manual

OPCOM Grow Wall3C User manual

OPCOM

OPCOM Grow Wall3C User manual

OPCOM GrowCube User manual

OPCOM

OPCOM GrowCube User manual

OPCOM GrowCube OFG011P User manual

OPCOM

OPCOM GrowCube OFG011P User manual

OPCOM OFG008G Assembly instructions

OPCOM

OPCOM OFG008G Assembly instructions

OPCOM Grow Wall3 User manual

OPCOM

OPCOM Grow Wall3 User manual

OPCOM Grow Wall 3 User manual

OPCOM

OPCOM Grow Wall 3 User manual

OPCOM GrowTank OFG005 User manual

OPCOM

OPCOM GrowTank OFG005 User manual

Popular Lawn And Garden Equipment manuals by other brands

juwel 20328 Assembly instructions

juwel

juwel 20328 Assembly instructions

Creekvine Designs Treated Pine 4x8 Cedar Inline Pergola manual

Creekvine Designs

Creekvine Designs Treated Pine 4x8 Cedar Inline Pergola manual

Redpath CLOC6 Assembly & Installation Guidelines

Redpath

Redpath CLOC6 Assembly & Installation Guidelines

Rewatec Modena 200 Installation & assembly instructions

Rewatec

Rewatec Modena 200 Installation & assembly instructions

Shelbourne Powerspread Dairy Operators manual and parts lists

Shelbourne

Shelbourne Powerspread Dairy Operators manual and parts lists

Makita UM164D Series technical information

Makita

Makita UM164D Series technical information

EINHELL GE-SA 1335 P Original operating instructions

EINHELL

EINHELL GE-SA 1335 P Original operating instructions

SPYKER 76-22 Operation guide service manual parts list

SPYKER

SPYKER 76-22 Operation guide service manual parts list

Gardman Gothic Arch 07730 Assembly instructions

Gardman

Gardman Gothic Arch 07730 Assembly instructions

Billy Goat DL2500SMM owner's manual

Billy Goat

Billy Goat DL2500SMM owner's manual

DIG G77AS installation instructions

DIG

DIG G77AS installation instructions

bannerman BA-4M Operations & parts manual

bannerman

bannerman BA-4M Operations & parts manual

Kress Robotik MISSION KR120E owner's manual

Kress Robotik

Kress Robotik MISSION KR120E owner's manual

Holman RGB663R user guide

Holman

Holman RGB663R user guide

Classen SC-12/5.5 Operator's & parts manual

Classen

Classen SC-12/5.5 Operator's & parts manual

P+L FLYZAP 16 manual

P+L

P+L FLYZAP 16 manual

Stihl STIHL PC 70 instruction manual

Stihl

Stihl STIHL PC 70 instruction manual

New England Arbors Cambridge Raised Planter Extension Kit Assembly instructions

New England Arbors

New England Arbors Cambridge Raised Planter Extension Kit Assembly instructions

manuals.online logo
manuals.online logoBrands
  • About & Mission
  • Contact us
  • Privacy Policy
  • Terms and Conditions

Copyright 2025 Manuals.Online. All Rights Reserved.