Optoma Optoma EP750 User manual

English
1
-- Usage Notice
------- Precautions ...........................................................................................2
Introduction
------- Product Features ...................................................................................3
------- PackageOverview .................................................................................4
------- ProductOverview ...................................................................................5
------- MainUnit ..........................................................................................5
------- PanelControl ....................................................................................6
------- Connection Ports ..............................................................................6
------- Remote Control with Mouse Function and Laser Pointer ....................7
------- Laser Pointer Caution........................................................................7
Installation
------- Connecting the Projector........................................................................8
------- Powering On/Off the Projector................................................................9
------- Power On the Projector .....................................................................9
------- Power Off the Projector.....................................................................10
------- Adjusting the Projected Image ...............................................................11
------- Adjusting the Projector Height...........................................................11
------- Adjusting the Projector Zoom/Focus .................................................12
------- Adjusting Projection Image Size .......................................................12
User Controls
------- Panel Control & Remote Control.............................................................13
------- On-ScreenDisplay Menus .....................................................................15
------- Howto Operate .................................................................................15
------- Image-I (Computer mode) .................................................................16
------- Image-I (Video mode) .......................................................................17
------- Image-II (Computer mode) ................................................................18
------- Image-II (Video mode) ......................................................................19
------- Audio ................................................................................................20
------- Language ..........................................................................................20
------- Management .....................................................................................21
Appendices
------- Troubleshooting .....................................................................................22
------- Changing the Lamp ................................................................................24
------- Specifications ........................................................................................25
------- Compatibility Modes...............................................................................26
Table of Contents
+
+
+
+

English
2
Usage Notice
Warning- Do not look into the lens. The bright light may hurt your eyes.
Warning- To reduce the risk of fire or electric shock, do not expose this
product to rain or moisture.
Warning- Please do not open or disassemble the product as this may cause
electric shock.
Warning- When changing the lamp, please allow unit to cool down, and follow
all changing instructions.
Warning- This product will detect the life of the lamp itself. Please be sure to
change the lamp when it shows warning messages.
Warning- After changing a new lamp, please reset the lamp life from OSD
menu.
Warning- Before switching off the product, please keep the cooling fan
running for a few minutes.
Warning- When connecting the projector to computer, please turn on the
projector first.
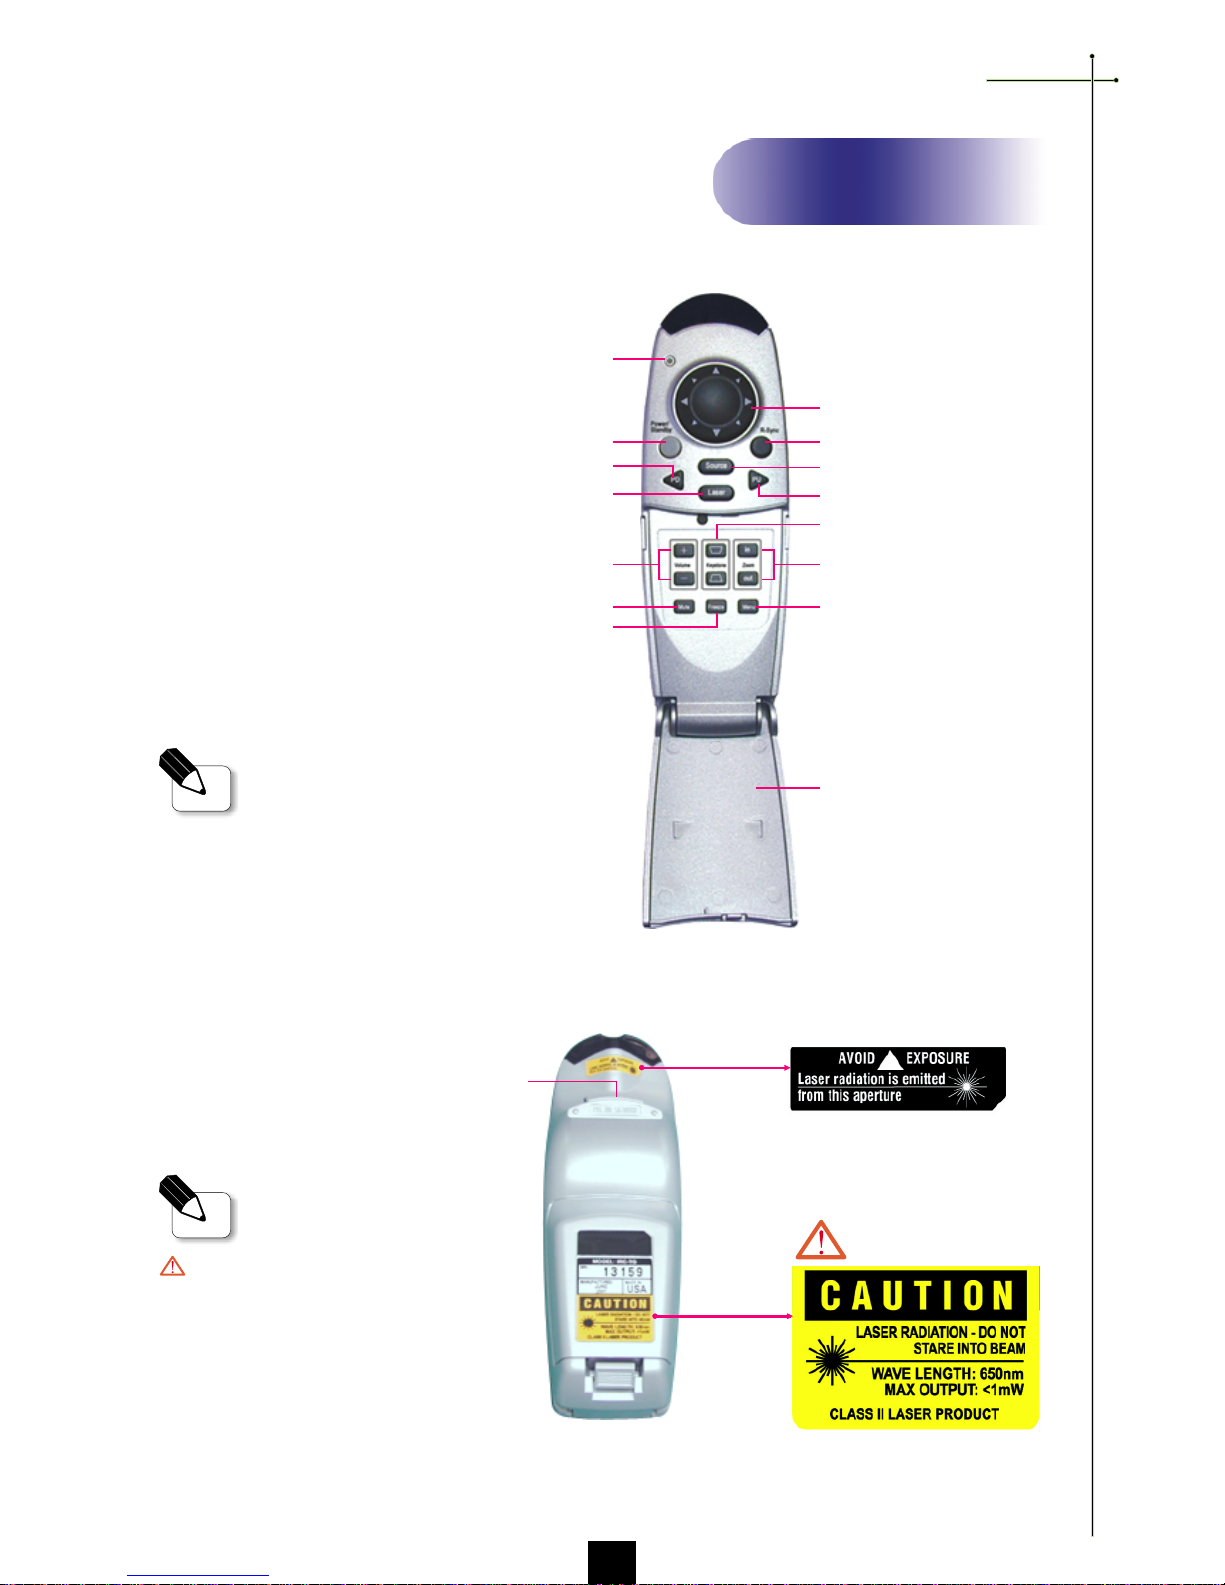
Warning- To reduce the risk of injury to the eyes, do not look directly into the
laser light on the remote control and do not point the laser light into
anyone’s eyes. This remote control is equipped with a Class II laser
that emits radiation.
Warning- When the lamp reaches the end of its life, it will burn out and may
make a loud popping sound. If this happens, the projector will not
turn back on until the lamp module has been replaced. To replace the
lamp, follow the procedures listed under “Changing the Lamp”.
Precautions
Follow all warnings, precautions and maintenance as recommended in
this user’s guide to maximize the life of your unit.
Do:
vTurn off the product before cleaning.
vUse a soft cloth moistened with mild detergent to clean the display
housing.
vDisconnect the power plug from AC outlet if the product is not being
used for a long period of time.
Don’t:
vBlock the slots and openings on the unit provided for ventilation.
vUse abrasive cleaners, waxes or solvents to clean the unit.
vUse under the following conditions:
- Extremely hot, cold or humid environment.
- In areas susceptible to excessive dust and dirt.
- Near any appliance generating a strong magnetic field.
- Place in direct sunlight.

English
3
Product Features
This product is an SVGA single chip 0.7” DLPTM projector. The
outstanding features of it are listed as follows:
uTrue SVGA, 800 x 600 addressable pixels
u6.4 lbs (2.9 kgs) compact design
uSingle chip DLPTM technology
uXGA compression and VGA, SVGA re-sizing
u200 Watts user replaceable UHP lamp
uMac compatible
uNTSC/NTSC4.43/PAL/PAL-M/PAL-N/SECAM and
HDTV compatible
uFull function remote with mouse control and laser
pointer
uHigh-tech DVI Connection for digital and analog video
connectivity
uHigh definition TV compatibility
uUser friendly Multilingual on-screen display menu
uAdvanced electronic keystone correction
uUser friendly control panel
uLuxurious carrying case included
Introduction

English
4
Package Overview
This projector comes with all the items shown below. Check to make sure
your unit is complete. Contact your dealer immediately if anything is
missing.
Power Cord
S-Video Cable
VGA Cable
Remote Control with Mouse
Function and Laser Pointer
Carrying Case
Warranty Card
Audio Cable Jack/RCA
Quick Start Card
DVI to D-Sub Cable
Battery x 2
User’s Guide
Introduction
Composite Video Cable
12
34 5
6
Projector with lens cap
Remote Mouse Y Cable
7

English
5
Main Unit
Product Overview
Introduction
1. Panel Control
2. Power Connector & Power Switch
3. Connection Ports
4. Focus Ring
5. Zoom Lens
6. Zoom Ring
7. Speaker
8. Remote ControlReceiver
9. Elevator Button
10. ElevatorFoot
1
2
3
45
8
6
7
910

English
6
Introduction
Panel Control
Connection Ports
1 RS232 Input Connector (RS232 is for after service purpose only)
2. Audio Input for Video
3. Composite Video Input Connector
4. S-Video Input Connector
5. Audio Input for DVI
6. DVI Input Connecter
7. Audio Input for Computer
8. PC Analog Signal/HDTV/Component Video Connector
9. Audio Output Connector
10. Monitor Loop-through Connector
11. Remote Mouse Input Connector
12. Power Switch
13. Power Connector
2
3
4
5
6
9
7
810 11
12
13
1. Lamp Warning LED
2. Temperature Warning LED
3. Volume
4. Mute
5. Menu(On/Off)
6. Four Directional Select Keys
7. Enter
8. Zoom
9. Re-sync
10. Source
11. Power /Standby
1
2
3
4
5
8
6
7
9
10
11
1

English
7
Remote Control with Mouse Function & Laser Pointer
Source
Re-sync
Freeze
KeystoneCorrection
Power / Standby
Volume ( + / - )
Mute
Multi-Directional Selector
EnterKey
Menu
Laser Pointer
Zoom In / Zoom Out
Page Up
Page Down
LED
Laser Pointer Caution
Introduction
Caution : To reduce the risk
of injury to the eyes, do not look
directly into the laser light on the
remote control and do not point
the laser light into anyone’s eyes.
This remote control is equipped
with a Class II laser that emits
radiation.
vClose the cover of the remote
control when you want to use the
remote mouse.
Cover

English
8
1. Power Cord
2. VGA Cable
3. S-Video Cable
4. Audio Cable Jack/RCA
5. Composite Video Cable
6. DVI to D-Sub Cable
7. Remote Mouse Y Cable
8. D-Sub to RCA Cable for
HDTV/Component (optional)
Connecting the Projector
Installation
vTo ensure the projector works well with your computer, please configure the
display mode of your graphic card to make it less than or equal to 800 X 600
resolution. Make sure timing of the display mode is compatible with the projector.
Refer to the “Compatibility Modes” section on page 26.
S-VideoOutput
VideoOutput
1
2
3
4
8
67
Digital Tuner Output
Antenna
RS232
AUDIO
VIDEO
S-VIDEO
AUDIO AUDIO AUDIO
DVI
COMPUTER
MONITOR
MOUSE
INPUT OUTPUT
RGB
RS232
USB
5

English
9
Lens cap
Power / Standby
Installation
Powering On the Projector
1. Remove the lens cap.
2. Ensure that the power cord and signal cable are securely connected.
3. Turn on the main power switch on the side of the projector and allow the
projector to warm up for 1-2 minutes.
4. Turn on the lamp by pressing “Power/Standby” button on the control
panel.
The startup screen will display and count down for 20 seconds and the
Power/Standby indicator will light solid amber.
The “LAMP” LED indicator will light solid green.
5. Turn on your source (computer, notebook, or video player ,etc.). The
projector will detect your source automatically.
vIf the screen displays “No Signal” , please make sure the signal cables are securely
connected.
vIf you connect multiple sources at the same time, use the “Source” button on the
Remote Control or Panel Control to switch.
Power On/Off the Projector
vTurn on the projector first and
then the computer.
Power Switch
1
2
3

English
10
Installation
Powering Off the Projector
1. Press the “Power/Standby” button to turn off the projector lamp.
2. After pressing the “Power/Standby” button, you will see a message
“Power off the lamp?” on the on-screen display. Press the “Power/
Standby” button again to confirm. Otherwise the message will disappear
after 5 seconds.
3. “Power/Standby” LED indicator will light solid amber for about 30
seconds. After the “Power/Standby” indicator starts flashing, you can
turn off the main power switch on the side of the projector.
If you want to turn on the projector again, you must press the “Power/
Standby”button within 90 seconds of the indicator flashing.
4. Do not turn on the projector immediately following a power off procedure.
vWhen the “LAMP” indicator flashs green for about 10 seconds, you will see a
message “Fan Fail” on the on-screen display. Please contact your local dealer or
Optoma service center.
vWhen the “TEMP” indicator lights solid orange, it indicates the projector
has been overheated. You will see a message “Over Temperature” on the on-screen
display. The projector will automatically shut itself down.
Under normal conditions, the projector can be switched on again for your
presentation. If the problem persists, you should contact your local dealer or
Optoma service center.

English
11
Elevator Button ElevatorFoot
Installation
The projector is equipped with an elevator foot for adjusting the projector
height.
To raise the projector:
1. Press the elevator button .
2. Raise the projector to the desired display angle , then release the button to
lock the elevator foot into position.
3. Use to fine-tune height adjustment.
To lower the projector:
1. Press the elevator button.
2. Lower down the projector, then release the button to lock the elevator foot
into position.
3. Use to fine-tune height adjustment.
Adjusting the Projected Image
Adjusting the Projector Height
1
2
3

English
12
Focus Ring
Zoom Ring
Screen
(Diagonal)
Distance
Screen
Size
Adjusting the Projector Zoom / Focus
You may adjust zoom ring to zoom in / out. Rotate the zoom ring counter-
clockwise to zoom in and clockwise to zoom out. To focus the image, rotate the
focus ring until the image is clear. The projector will focus at distances from 3.7
feet to 40.7 feet (1.1m to 12.4m).
Installation
Adjusting Projection Image Size
.xaM "82 "89 "321 "791 "642 "503
.niM"22"87"89"751"791"442
)HxW(.xaM "8.61x"4.22 "8.85x"4.87 "8.37x"4.89 "2.811x"6.751 "6.741x"8.691 "0.381x"0.442
)HxW(.niM"2.31x"6.71"8.64x"4.26"8.85x"4.87"2.49x"6.521"2.811x"6.751"4.641x"2.591
'7.3 '1.31 '4.61 '2.62 '8.23 '7.04
vThis graph is for user’s reference only.

English
13
Remote ControlPanel Control
User Controls
Panel Control & Remote Control
There are two ways for you to control the functions: Remote Control and
Panel Control.
Power / Standby
4Refer to the “Power On/Off the Projector” section on page 9~10.
Source
4Press “Source” to choose RGB, DVI-Digital, DVI-Analog, S-Video, Composite,
Component and HDTV sources.
Zoom
Use the Panel Control
4When you press “Zoom” button, the zoom icon appears in the screen. Press
or button to zoom in or zoom out of the image.
Re-Sync
Use the Remote Control
4Automatically synchronizes the projector to the input source, when you press
this button while the remote control cover is opened.
4If the remote control cover is closed, the Mouse/Re-Sync button functions
like the right mouse button.
Use the Panel Control
4Automatically synchronizes the projector to the input source.

English
14
Four Directional Select Keys
4When you close the cover of remote control, this key can be used as a mouse
to control direction.
vThe above function is only enabled with the connection between computer
and projector by remote mouse Y cable.
4When the cover of remote control is opened, this key can be used for the
operation for OSD display.
Page Up (Computer mode only)
4Use this button to page up.
Page Down (Computer mode only)
4Use this button to page down.
Laser
4Aim the remote at the viewing screen, press and hold this button to activate
the laser pointer.
Menu
4Press “Menu” to open the on-screen display (OSD) menus and press
key to select menu items. To exit OSD, press the “Menu” button again. The
projector will save any change you made automatically.
Freeze
4Press the “Freeze” button to still the screen image.
Mute
4Use to mute sound.
Volume + / -
4Increases/decreases speaker volume.
Keystone + / -
4Adjust image distortion caused by tilting the projector. (±16 degrees)
Zoom In / Out (Computer mode only)
4Magnifies an image up to a factor of 32 times on the projection screen.
4Diminishes the zoom in image.
Enter
Use the Remote Control
4Confirm your selection of items, when you open the front cover of remote
control.
4If the remote control cover is closed, the Enter button functions like the left
mouse button.
Use the Panel Control
4Confirm your selection of items.
User Controls
vPage Up / Page Down : Under
remote mouse connected status
only.

English
15
How to operate
4The Projector has multilingual On-Screen Display(OSD) menus that allow you
to make image adjustments and change a variety of settings. In computer
source, the OSD will be the “Computer OSD”. In video source, the OSD will be
the “ Video OSD”. The projector will detect the source automatically.
4To open the OSD menu, press the “Menu” button on the Remote Control or
Panel Control.
4When OSD is displayed, press key to select menu items.
E.g.: Image-IgImage-IIgAudiogLanguagegManagementgImage-I...
While making selection on a particular page, press “Enter” key to go into sub-
menu.
4Press key to select the required item and adjust the settings by
key. When a specified item is selected, the color of the item will change
from yellowish brown to blue.
E.g.:BrightnessgContrastgColor Temp.gZoomgKeystoneg
Brightness...
4While using key to adjust the parameter or required function in the
items of the submenu, confirm all the functions of the main menu by pushing
“Enter” button after all/part of the items have been modified. Press “Enter”
button to confirm, and the screen will be back to the main menu at once. Only
key is enabled now.
4To exit the OSD, press the “Menu” button again.
User Controls
On-Screen Display Menus

English
16
Brightness
Adjusting the brightness of the image.
4Press the to darken the image.
4Press the to lighten the image.
Contrast
The contrast controls the degree of difference between the lightest and darkest
parts of the picture. Adjusting the contrast changes the amount of black and
white in the image.
4Press the to decrease the contrast.
4Press the to increase the contrast.
Color Temperature
Adjust the color temperature. The range is from 6000K to 9000K . The factory
default is 7500K. With the higher temperature, the screen looks colder; with the
lower temperature, the screen looks warmer.
Zoom
4Press the to Magnify an image up to a factor of 32 times on the projection
screen.
4Press the to Diminish the zoom in image.
Keystone (Keystone Correction)
Adjust image distortion caused by tilting projection. (±16 degrees)
Image-I (Computer mode)
User Controls
AudioImage-I Image-II
Language Management
Brightness
Contrast
Color Temp.
Zoom
Keystone
Computer mode

English
17
Image-I (Video mode)
User Controls
Brightness
Adjusting the brightness of the image.
4Press the to darken the image.
4Press the to lighten the image.
Contrast
The contrast controls the degree of difference between the lightest and darkest
parts of the picture. Adjusting the contrast changes the amount of black and
white in the image.
4Press the to decrease the contrast.
4Press the to increase the contrast.
Color
The color setting adjusts a video image from black and white to fully saturated
color.
4Press the to decrease the amount of color in the image.
4Press the to increase the amount of color in the image.
Tint
The tint adjusts the color balance of red and green.
4Press the to increase the amount of green in the image.
4Press the to increase the amount of red in the image.
Sharpness
Adjusting the sharpness of the image.
4Press the to decrease the sharpness.
4Press the to increase the sharpness.
Video mode
AudioImage-I Image-II
Language Management
Brightness
Contrast
Color
Tint
Sharpness

English
18
Frequency
“Frequency” is for changing the display data frequency to match the frequency
of your computer’s graphic card. When you experience a vertical flickering bar,
use this function to make an adjustment.
Tracking
Choose “Tracking” item to synchronize the signal timing of the display with
that of the graphic card. When you experience an unstable or flickering image,
use this function to correct it.
16 : 9 / 4 : 3
You can use this function to fit your desired aspect ratio type.
Horizontal Position
4Press the to move the image left.
4Press the to move the image right.
Vertical Position
4Press the to move the image up.
4Press the to move the image down.
Reset
Choose “Yes” to return the display parameters back to its factory default.
Image-II (Computer mode)
User Controls
AudioImage-I Image-II
Language Management
Frequency
Tracking
16:9 / 4:3
H. Position
V. Position
Reset
Yes No
Computer mode
vReset : Reset items include both
Image-I and Image-II settings.

English
19
Image-II (Video mode)
Keystone Correction
Adjust image distortion caused by tilting the projector. (±16 degrees)
16 : 9 / 4 : 3
You can use this function to fit your desired aspect ratio type.
Color Temperature
Adjust the color temperature. The range is from 6000K to 9000K . The factory
default is 7500K. With the higher temperature, the screen looks colder; with the
lower temperature, the screen looks warmer.
Reset
Choose “Yes” to return the display parameters back to its factory default.
User Controls
AudioImage-I Image-II
Language Management
Keystone
16:9 / 4:3
Color Temp.
Reset
Yes No
Video mode
vReset : Reset items include both
Image-I and Image-II settings.

English
20
Volume
4Press the to decrease the volume.
4Press the to increase the volume.
Treble
The treble setting controls the higher frequencies of your audio source.
4Press the to decrease the treble.
4Press the to increase the treble.
Bass
The Bass setting controls the lower frequencies of your audio source.
4Press the to decrease the bass.
4Press the to increase the bass.
Stereo / Mono
4Mono : Mono sound effect.
4Stereo : Stereo sound effect.
Mute
4Choose the left icon to turn mute on.
4Choose the right icon to turn mute off.
Audio
Language
Language
You can display the multilingual OSD menu . Use the and key to select
your prefered language.
User Controls
Computer / Video mode
AudioImage-I Image-II
Language Management
Volume
Treble
Bass
Stereo / Mono
Mute
Computer / Video mode
AudioImage-I Image-II
Language Management
Other manuals for Optoma EP750
3
Table of contents
Other Optoma Projector manuals

Optoma
Optoma TWR1693 Installation manual

Optoma
Optoma ES522 Administrator guide

Optoma
Optoma Optoma EP721 User manual

Optoma
Optoma Pico PK301+ User manual

Optoma
Optoma TX771 Owner's manual

Optoma
Optoma PT100 User manual

Optoma
Optoma TX7156 User manual

Optoma
Optoma DS316 User manual

Optoma
Optoma EP729 User manual

Optoma
Optoma EP773 User manual

Optoma
Optoma DLP User manual

Optoma
Optoma Optoma EP771 User manual

Optoma
Optoma H76 User manual

Optoma
Optoma PRO8000 Technical manual

Optoma
Optoma X304M User manual

Optoma
Optoma HD67 User manual

Optoma
Optoma TX665UTI-3D User manual

Optoma
Optoma EH2060 User manual

Optoma
Optoma Optoma EP721 User manual

Optoma
Optoma PRO350W User manual