OPUS aeroPOUCH 9 Pro Instrukcja obsługi
4. INSTALACJA FOLII
•Podłącz przewód zasilający do urządzenia.
•Zamontuj rolkę z folią.
oPrzytnij folię nożyczkami w prawym dolnym rogu
przed umieszczeniem jej w urządzeniu, rys. 2.
W przypadku folii z osobnym kanałem na dyszę nie
ma konieczności przycinania narożnika.
oPrawidłowo umieść rolkę folii na wałku podającym. Wałek posiada wystającą
prowadnicę, która powinna pokryć się z wycięciem wewnątrz roli folii rys. 3.
oZwróć uwagę na kierunek założenia folii na rolkę napinającą patrz rys. 4.
oPrzeprowadź folię przez dyszę powietrzną rys. 5.
oUpewnij się, że folia znajduje się dokładnie pomiędzy wałkiem zimnym
a wałkiem grzewczym tak, aby po włączeniu przycisku start rozpocząć płynne
zgrzewanie rys. 6.
5. OBSŁUGA
zmniejszenia
Przycisk zwiększenia
wartości
Przycisk wyboru funkcji. Podwójne
naciśniecie przycisku powoduje
wejście w tryb programowania,
kolejne naciśnięcie to wybór
żądanej funkcji, która miga
w trakcie edycji.
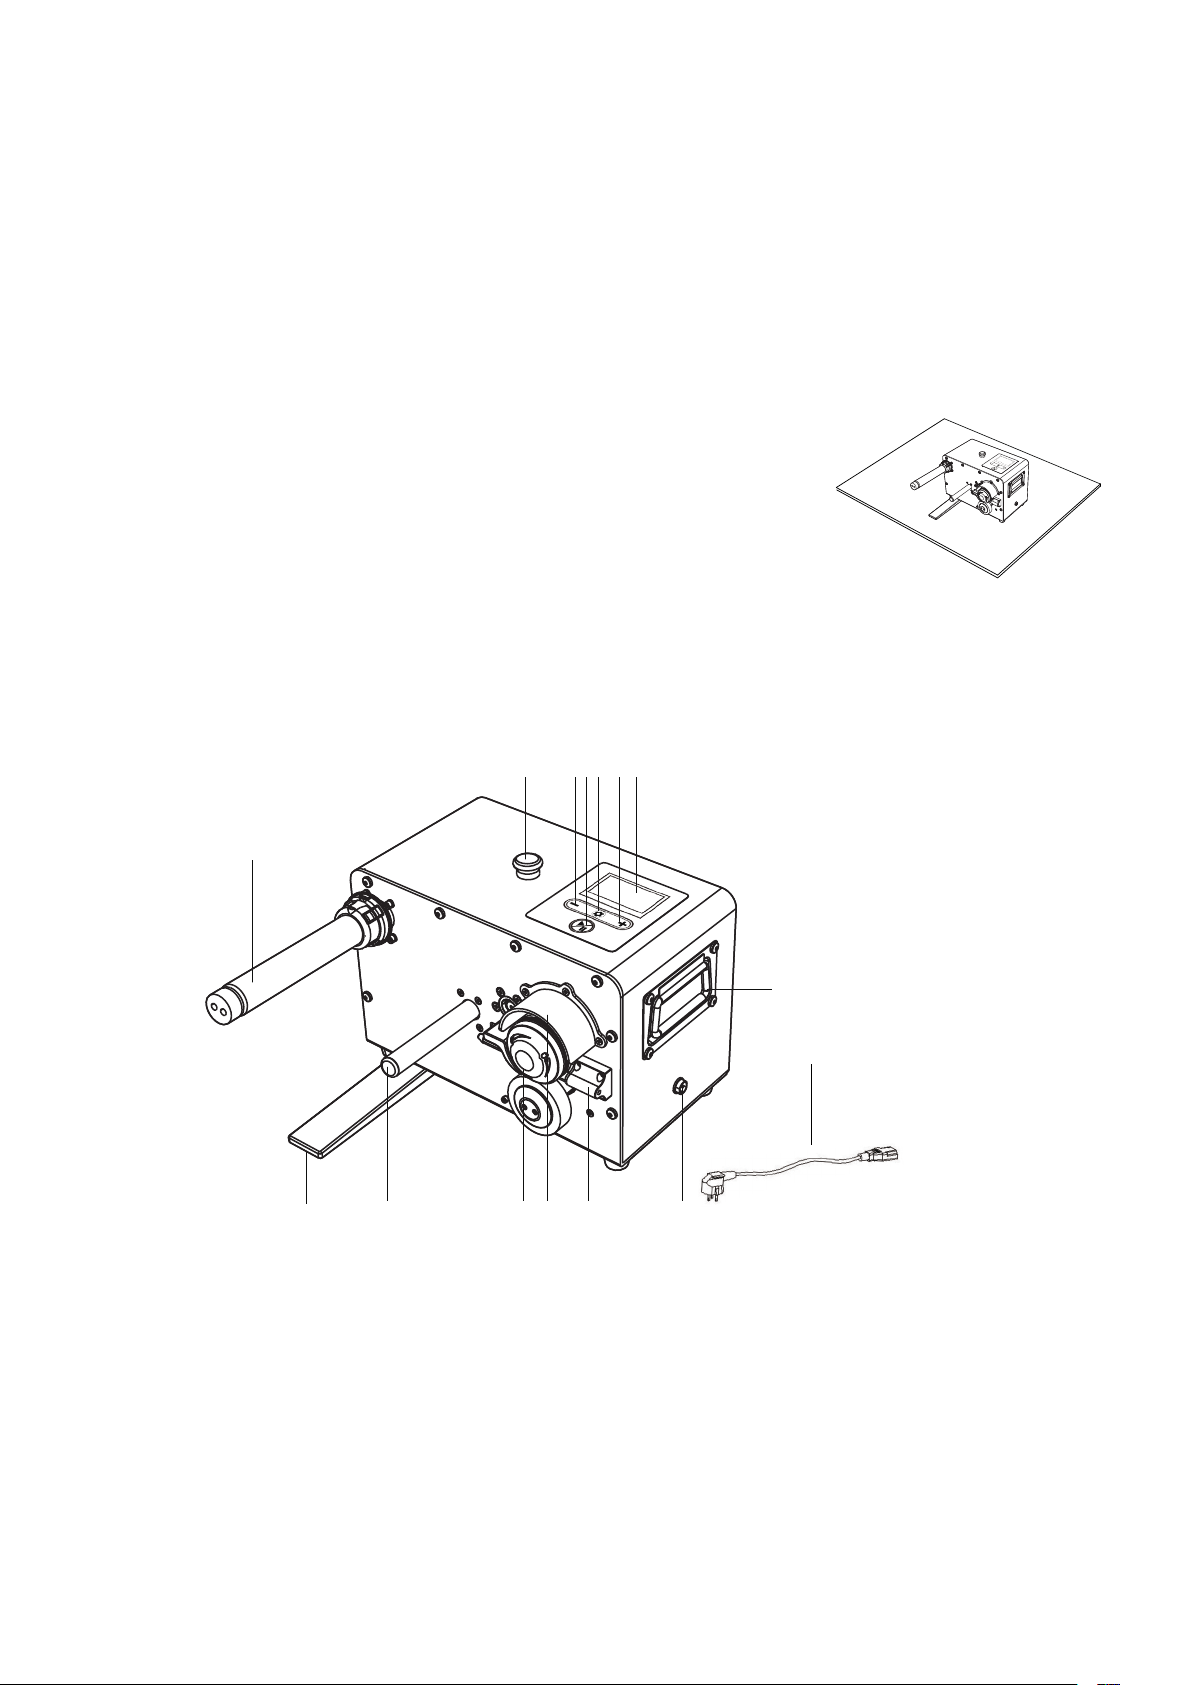
A. Feeding roller
B. Foot stand
C. Tension column
D. Heating roller
E. Roller cover
F. Air nozzle
G. Optional outlet
H. Enmergency stop
I. Decrease setting button
J. Start/Pause button
K. Function setting button
L. Increase setting button
M. Screen display
N. Hand hold
O. Electrical Cable
Please read carefully before use.
1.1 Remove the machine from the package box carefully.
1.2 Put the machine in the clean and flat working table, close to edge as well.
Refer fig.A.
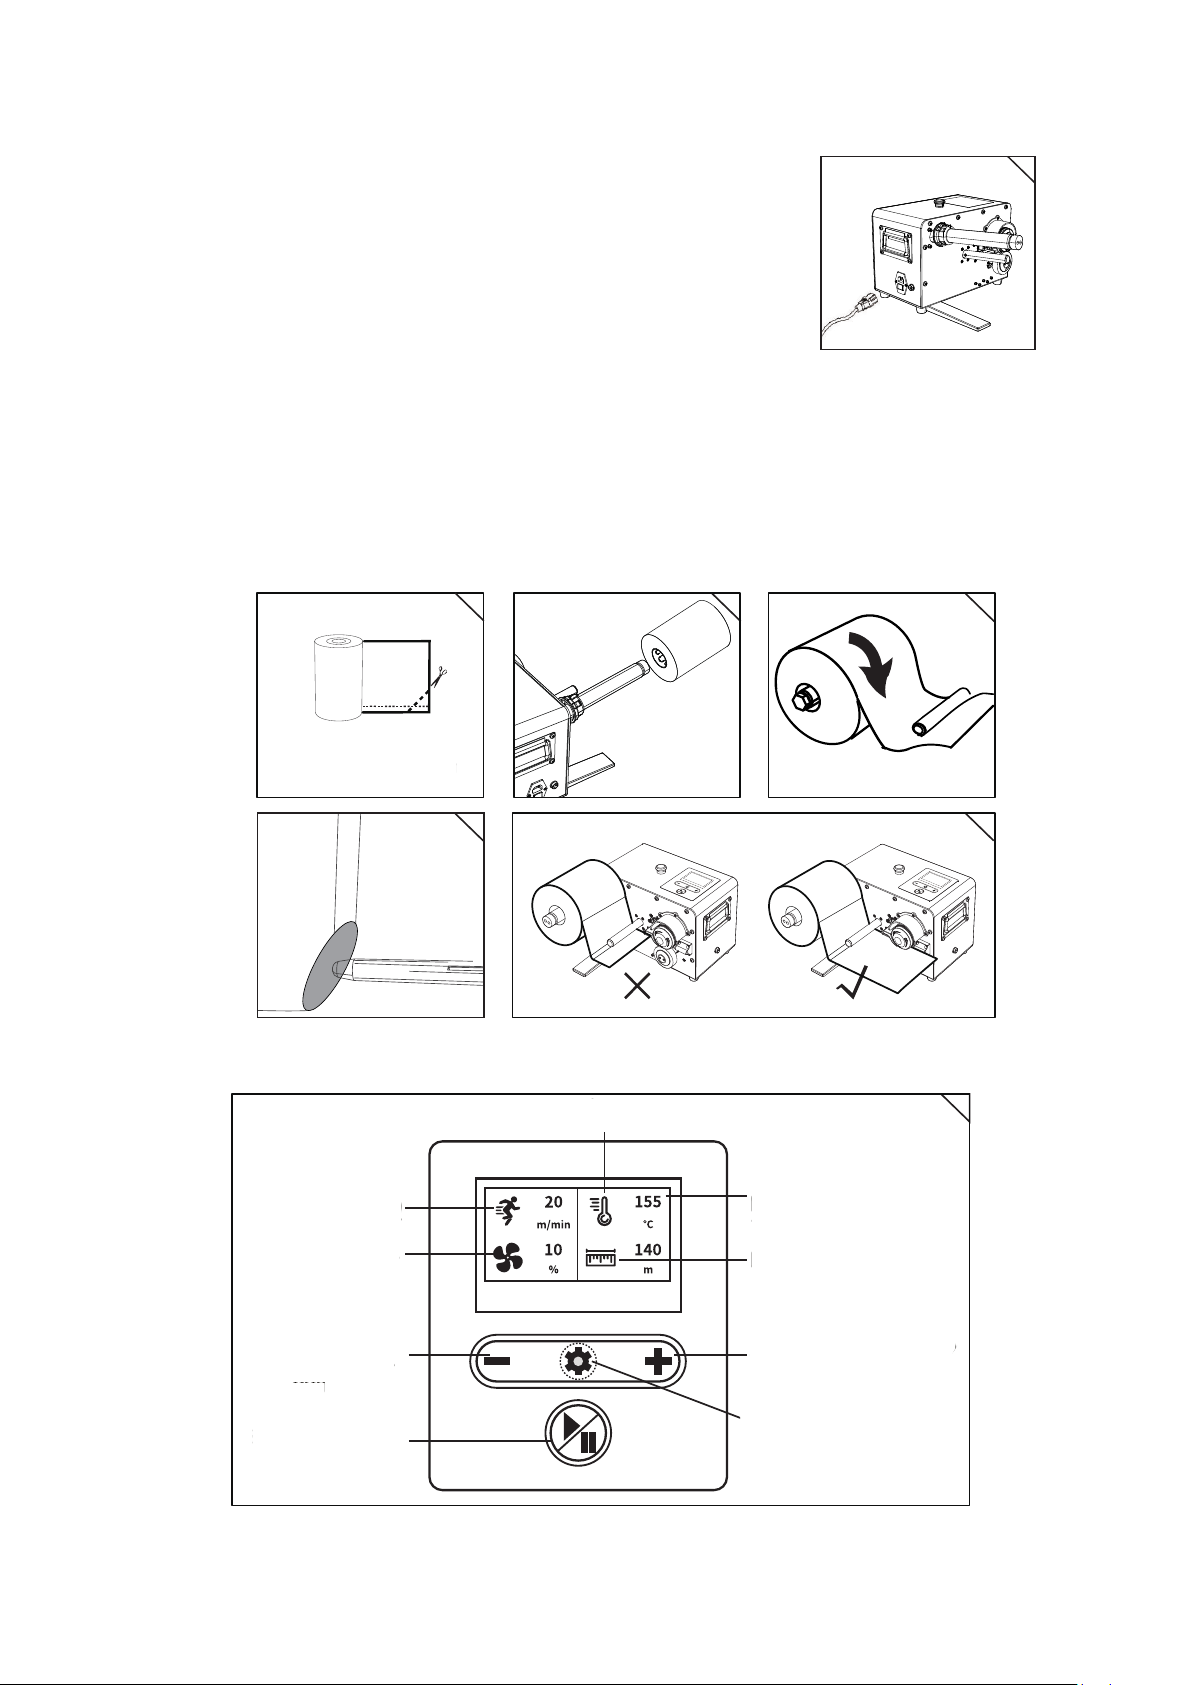
2.1 Connect the correct electrical power. Refer fig.1.
2.2 Installation of film roll.
2.2.3 The roll feeding direction to pass through to the tension column, Refer fig.4.
2.2.1 The bubble film should be cut with a scissorsin the lower right corner before
loading the film, Refer fig.2.
2.2.2 Put the roll film on the feeding roller properly. There is a groove inside the roll film
header should align and feed into feeding roller’s protrusion part. Refer fig.3.
2.2.4 Threading roll film pass through the air nozzle. Refer fig.5.
2.2.5 Pulling the roll film to close enough and touch just right between the hot sealing
wheels to ensure when push start button the machine can pull out film till out of
the roller wheels, and start making air cushion smoothly. Refer fig.6.
2.3 Operations
2.3.1 Connecting the electrical power, and turn on the power switch near by power
socket, make sure the enmergency stop switch turn clockwise to its normal position.
2.3.2 After power on the display screen will indicating previous setting,and ready
for a newsetting or start to work as last time,press start/hold button the
temperature symbol will flashing and machine start to warm up,it takes
around 2~3 mins to go.
2.3.3 When temperature symbol stop flashing machine will start to making air cushions.
2.3.4 When finish making air cushion, press the start/hold button again,machine will
stop immediately. There is a perforation line on the film to tear off the necessary
length for your requirement.
2.3.5 Air density setting: Various cushion sizes are available to meet different
packaging requirements, You can press twice of function setting button in to the
set up manual, press again will shift the symbol flashing movement from one
place to another clockwise, till you move up to fan symbol, you can set the air
density volume to meet your equirements, the output range is 0~100% please
adjust the suitable air pressure to get best air cushion result, too much or too
less air pressure will result in jam or bad air cushion performance (Remark:
"5~35%" output is recommend for 200mm width film and "35~95%" output is for
400mm width film).
2.3.6 Press the start/pause button for each use of the air cushion machine.
2.3.7 If press stop button without touch any other button for more than 30 mins,
machine will going to a hibernation status, the temperature will drop to 80 ℃
until you press any button interrupt the internal timer to wake up machine for
the next use.
2.3.8 Speed setting: click twice on function button, and move the function symbol to
the ruler symbol by each click accordingly while the symbol is still flashing, speed
range is from 3~20 level, the maximum speed is about 20m/min.
2.3.9 Temperature setting: click twice on function button, and move the function symbol
to the temp. symbol by each click accordingly while the symbol is still flashing,
temperature range is from room temp.~180℃.
2.3.10 Length setting: click twice on function button, and move the function symbol to the
ruler symbol by each click accordingly while the symbol is still flashing.
2.3.11 Due to individual machine differences, above setting value is not equal to the
actual output value.
2.3.12 If want to poweroff, please make sure machine is stop, tear off the film ahead the
air nozzle, and turn off the power switch.
1. Caution
2. Installation Steps
3. Electric Safety
5. Machine Maintenance
6. Specification
3.1 Place the machine close to power socket.
3.2 Make sure the voltage meets machine’s electricity requirements.
3.3 Any extension cord used should meet the power rating of the machine.
3.4 Do not operate if the power cord is damaged.
3.5 Repair and service should be done by a qualified service technician.
5.1 Unplug the power cord during maintenance.
5.2 Clean hot seals and rollers regularly.
5.3 Ensure there is no jammed film and dirt at the air nozzle or cutter blade.
5.4 Check the blade and rollers regularly.
5.5 Replace the cutter blade when blade is not sharp.
Air nozzle cutter blade replacement steps
4.1 Use the screw driver to remove the fix air nozzle screws. Refer fig.8A.
4.2 Pulling out the air nozzle. Refer fig.8B.
4.3 Remove the air nozzle fix screws. Refer fig.9.
4.4 Renew the new cutter blade (Caution: Be care of sharp blade may cut you fingers).
4.5 Put the air nozzle back and use the screw driver to fix tightly of the 2 fix-screws.
Refer fig.9,10.
Caution: Blade might blunt after a longer use, please check or replace the
blade every 200 rolls (300m/roll).
4. Cutter replacement
5
4
2
Approximately
3cm (1-1/2”)cut off corner.
3
20m/min±10%(adjustable)Sealing speed
Adjustable (200/400mm inadifferent
setting and operation range)
Air density control
Film roll size
200x80mm、200x100mm、200x130mm
200x150mm、200x200mm、
400x250mm、400x290mm
Power voltage 220-240VAC 50/60Hz
Machine size 385×270×280(mm)
Machine weight 17kg
Max. Film roll length
(W: Film width)
(L: Film length)
Power rate 300W
200mm ≤800M 400mm ≤500M
W L W L
1
fig.A
working table
6
7
Function setting button
Decrease Setting
button
Speed Symbol
Temperature symbol
Start/Pause button
Increase setting button
Length Symbol
Double click the function setting
button to start Choose a symbol
that you will work with until it
flashes which you can now set in
the required to function with.
Air Volume
No. Or Figures for
illustration
B
8 9
O
Air Cushion Machine
3800
A
HMJ KI L
CB D E F G
N
A
OPUS aeroPOUCH 9 Pro Instrukcja
obsługi / User guide
OPUS
aeroPOUCH 9 Pro
PL Instrukcja obsługi
A. Feeding roller
B. Foot stand
C. Tension column
D. Heating roller
E. Roller cover
F. Air nozzle
G. Optional outlet
H. Enmergency stop
I. Decrease setting button
J. Start/Pause button
K. Function setting button
L. Increase setting button
M. Screen display
N. Hand hold
O. Electrical Cable
Please read carefully before use.
1.1 Remove the machine from the package box carefully.
1.2 Put the machine in the clean and flat working table, close to edge as well.
Refer fig.A.
2.1 Connect the correct electrical power. Refer fig.1.
2.2 Installation of film roll.
2.2.3 The roll feeding direction to pass through to the tension column, Refer fig.4.
2.2.1 The bubble film should be cut with a scissorsin the lower right corner before
loading the film, Refer fig.2.
2.2.2 Put the roll film on the feeding roller properly. There is a groove inside the roll film
header should align and feed into feeding roller’s protrusion part. Refer fig.3.
2.2.4 Threading roll film pass through the air nozzle. Refer fig.5.
2.2.5 Pulling the roll film to close enough and touch just right between the hot sealing
wheels to ensure when push start button the machine can pull out film till out of
the roller wheels, and start making air cushion smoothly. Refer fig.6.
2.3 Operations
2.3.1 Connecting the electrical power, and turn on the power switch near by power
socket, make sure the enmergency stop switch turn clockwise to its normal position.
2.3.2 After power on the display screen will indicating previous setting,and ready
for a newsetting or start to work as last time,press start/hold button the
temperature symbol will flashing and machine start to warm up,it takes
around 2~3 mins to go.
2.3.3 When temperature symbol stop flashing machine will start to making air cushions.
2.3.4 When finish making air cushion, press the start/hold button again,machine will
stop immediately. There is a perforation line on the film to tear off the necessary
length for your requirement.
2.3.5 Air density setting: Various cushion sizes are available to meet different
packaging requirements, You can press twice of function setting button in to the
set up manual, press again will shift the symbol flashing movement from one
place to another clockwise, till you move up to fan symbol, you can set the air
density volume to meet your equirements, the output range is 0~100% please
adjust the suitable air pressure to get best air cushion result, too much or too
less air pressure will result in jam or bad air cushion performance (Remark:
"5~35%" output is recommend for 200mm width film and "35~95%" output is for
400mm width film).
2.3.6 Press the start/pause button for each use of the air cushion machine.
2.3.7 If press stop button without touch any other button for more than 30 mins,
machine will going to a hibernation status, the temperature will drop to 80 ℃
until you press any button interrupt the internal timer to wake up machine for
the next use.
2.3.8 Speed setting: click twice on function button, and move the function symbol to
the ruler symbol by each click accordingly while the symbol is still flashing, speed
range is from 3~20 level, the maximum speed is about 20m/min.
2.3.9 Temperature setting: click twice on function button, and move the function symbol
to the temp. symbol by each click accordingly while the symbol is still flashing,
temperature range is from room temp.~180℃.
2.3.10 Length setting: click twice on function button, and move the function symbol to the
ruler symbol by each click accordingly while the symbol is still flashing.
2.3.11 Due to individual machine differences, above setting value is not equal to the
actual output value.
2.3.12 If want to poweroff, please make sure machine is stop, tear off the film ahead the
air nozzle, and turn off the power switch.
1. Caution
2. Installation Steps
3. Electric Safety
5. Machine Maintenance
6. Specification
3.1 Place the machine close to power socket.
3.2 Make sure the voltage meets machine’s electricity requirements.
3.3 Any extension cord used should meet the power rating of the machine.
3.4 Do not operate if the power cord is damaged.
3.5 Repair and service should be done by a qualified service technician.
5.1 Unplug the power cord during maintenance.
5.2 Clean hot seals and rollers regularly.
5.3 Ensure there is no jammed film and dirt at the air nozzle or cutter blade.
5.4 Check the blade and rollers regularly.
5.5 Replace the cutter blade when blade is not sharp.
Air nozzle cutter blade replacement steps
4.1 Use the screw driver to remove the fix air nozzle screws. Refer fig.8A.
4.2 Pulling out the air nozzle. Refer fig.8B.
4.3 Remove the air nozzle fix screws. Refer fig.9.
4.4 Renew the new cutter blade (Caution: Be care of sharp blade may cut you fingers).
4.5 Put the air nozzle back and use the screw driver to fix tightly of the 2 fix-screws.
Refer fig.9,10.
Caution: Blade might blunt after a longer use, please check or replace the
blade every 200 rolls (300m/roll).
4. Cutter replacement
5
4
2
Approximately
3cm (1-1/2”)cut off corner.
3
20m/min±10%(adjustable)Sealing speed
Adjustable (200/400mm inadifferent
setting and operation range)
Air density control
Film roll size
200x80mm、200x100mm、200x130mm
200x150mm、200x200mm、
400x250mm、400x290mm
Power voltage 220-240VAC 50/60Hz
Machine size 385×270×280(mm)
Machine weight 17kg
Max. Film roll length
(W: Film width)
(L: Film length)
Power rate 300W
200mm ≤800M 400mm ≤500M
W L W L
1
fig.A
working table
6
7
Function setting button
Decrease Setting
button
Speed Symbol
Temperature symbol
Start/Pause button
Increase setting button
Length Symbol
Double click the function setting
button to start Choose a symbol
that you will work with until it
flashes which you can now set in
the required to function with.
Air Volume
No. Or Figures for
illustration
B
8 9
O
Air Cushion Machine
3800
A
HMJ KI L
CB D E F G
N
A
OPUS aeroPOUCH 9 Pro Instrukcja obsługi / User guide
4. INSTALACJA
•Podłącz przewód zasilający do urządzenia.
•Zamontuj rolkę z folią.
oPrzytnij folię nożyczkami w prawym dolnym rogu
przed umieszczeniem jej w urządzeniu, rys. 2.
oPrawidłowo umieść rolkę folii na wałku podającym.
Wałek posiada wystającą prowadnicę, która
powinna pokryć się z wycięciem wewnątrz roli folii rys. 3.
oZwróć uwagę na kierunek założenia folii na rolkę napinającą patrz rys. 4.
oPrzeprowadź folię przez dyszę powietrzną rys. 5.
oUpewnij się, że folia znajduje się dokładnie pomiędzy wałkiem zimnym a
wałkiem grzewczym tak, aby po włączeniu przycisku start rozpocząć płynne
zgrzewanie rys. 6.
5. OBSŁUGA
Przycisk zwiększenia
wartości
Przycisk wyboru funkcji. Podwójne
naciśniecie przycisku powoduje
wejście w tryb programowania,
kolejne naciśnięcie to wybór
żądanej funkcji, która miga
w trakcie edycji.
OPUS aeroPOUCH 9 Pro Instrukcja obsługi / User guide
4. INSTALACJA
•Podłącz przewód zasilający do urządzenia.
•Zamontuj rolkę z folią.
oPrzytnij folię nożyczkami w prawym dolnym rogu
przed umieszczeniem jej w urządzeniu, rys. 2.
oPrawidłowo umieść rolkę folii na wałku podającym.
Wałek posiada wystającą prowadnicę, która
powinna pokryć się z wycięciem wewnątrz roli folii rys. 3.
oZwróć uwagę na kierunek założenia folii na rolkę napinającą patrz rys. 4.
oPrzeprowadź folię przez dyszę powietrzną rys. 5.
oUpewnij się, że folia znajduje się dokładnie pomiędzy wałkiem zimnym a
wałkiem grzewczym tak, aby po włączeniu przycisku start rozpocząć płynne
zgrzewanie rys. 6.
5. OBSŁUGA
Przycisk
zmniejszenia
wartości
Przycisk zwiększenia
wartości
Przycisk wyboru funkcji. Podwójne
naciśniecie przycisku powoduje
wejście w tryb programowania,
kolejne naciśnięcie to wybór
żądanej funkcji, która miga
w trakcie edycji.
OPUS aeroPOUCH 9 Pro Instrukcja obsługi / User guide
4. INSTALACJA
•Podłącz przewód zasilający do urządzenia.
•Zamontuj rolkę z folią.
oPrzytnij folię nożyczkami w prawym dolnym rogu
przed umieszczeniem jej w urządzeniu, rys. 2.
oPrawidłowo umieść rolkę folii na wałku podającym.
Wałek posiada wystającą prowadnicę, która
powinna pokryć się z wycięciem wewnątrz roli folii rys. 3.
oZwróć uwagę na kierunek założenia folii na rolkę napinającą patrz rys. 4.
oPrzeprowadź folię przez dyszę powietrzną rys. 5.
oUpewnij się, że folia znajduje się dokładnie pomiędzy wałkiem zimnym a
wałkiem grzewczym tak, aby po włączeniu przycisku start rozpocząć płynne
zgrzewanie rys. 6.
5. OBSŁUGA
Przycisk zwiększenia
wartości
Przycisk wyboru funkcji. Podwójne
naciśniecie przycisku powoduje
wejście w tryb programowania,
kolejne naciśnięcie to wybór
żądanej funkcji, która miga
w trakcie edycji.