manuals.online logo
Brands
  1. Home
  2. •
  3. Brands
  4. •
  5. orfit
  6. •
  7. Medical Equipment
  8. •
  9. orfit DYNASYST ORFITUBE User manual

orfit DYNASYST ORFITUBE User manual

Page 1 of 4
INSTRUCTIONS FOR USE
DYNASYSTTM ORFITUBETM ADJUSTER KIT
A. GENERAL PRODUCT INFORMATION
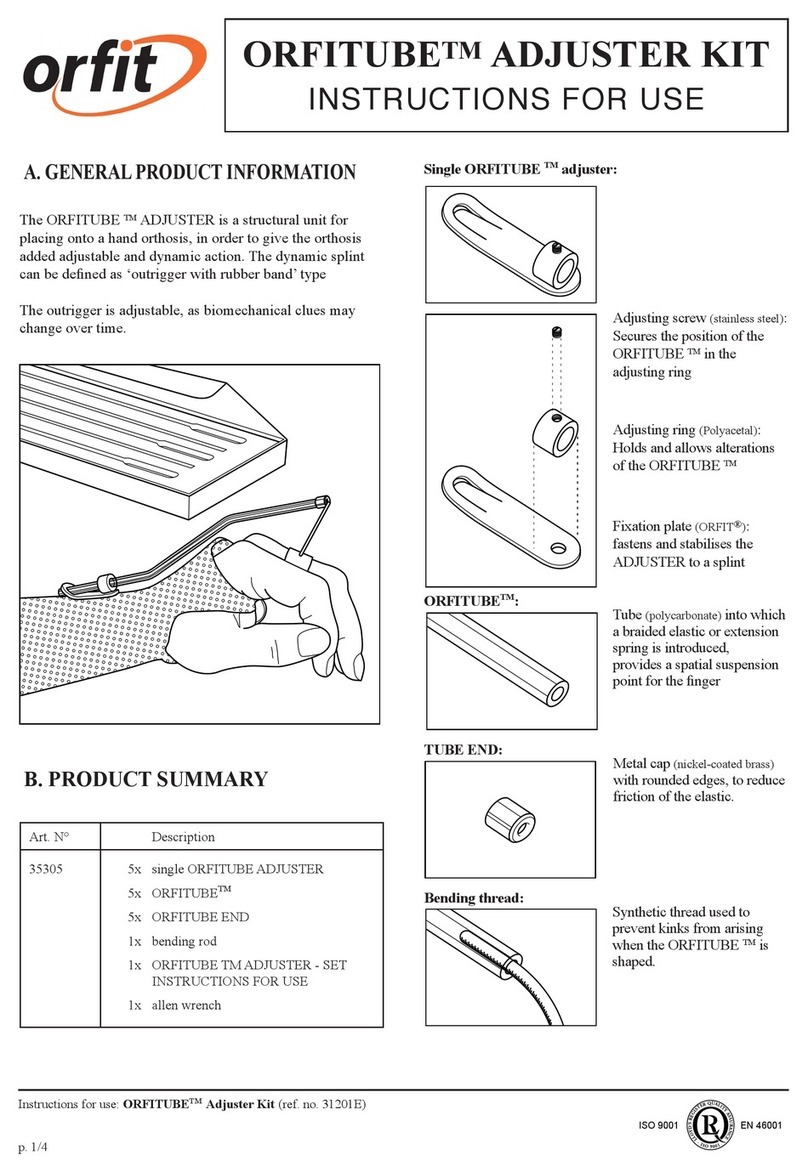
The ORFITUBE ADJUSTER is a structural unit for
placing onto a hand orthosis, in order to give the
orthosis added adjustable and dynamic action. The
dynamic orthosis can be defined as ‘outrigger with
rubber band’ type.
The outrigger is adjustable, as biomechanical clues
may change over time.
B. PRODUCT SUMMARY
SINGLE ORFITUBE ADJUSTER:
Adjusting screw
(stainless steel):
Secures the position of
the ORFITUBE in the
adjusting ring.
Adjusting ring
(Polyacetal): Holds and
allows alterations of
the ORFITUBE.
Fixation plate (ORFIT):
fastens and stabilises
the ADJUSTER to an
orthosis.
Tube (polycarbonate)
into which a braided
elastic or extension
spring is introduced,
provides a spatial
suspension point for
the finger.
Metal cap (nickel-
coated brass) with
rounded edges, to
reduce friction of the
elastic.
Synthetic thread used
to prevent kinks from
arising when the
ORFITUBE is shaped.
Art. N°
Description
35305
5x
single ORFITUBE ADJUSTER
5x
ORFITUBE
5x
ORFITUBE END
1x
bending rod
1x
ORFITUBE ADJUSTER - SET
INSTRUCTIONS FOR USE
1x
allen wrench
C. APPLICATION TECHNIQUE
1. Put a basic orthosis on the patient.
2. Determine in which plane the suspension point
needs to be adjustable (A).
3. Find a location on the orthosis that is ± parallel
to this plane (A’).
4. Feed the ORFITUBE through the ADJUSTER over
the anticipated setting distance and fasten the
screw of the adjusting ring.
5. If the ORFITUBE fits the orthosis without
bending, then continue with item 10.
6. In order to bend the ORFITUBE, first introduce
the bending rod till beyond the adjusting ring.
7. Bend the ORFITUBE to the desired angle.
8. Remove the bending rod from the angle and if
necessary make additional bends to end up in
the adjusting plane again.
9. Completely remove the bending rod from the
tube.
A
A'
10. Now slide the ORFITUBE into the ADJUSTER up
to its most distal position.
11. For a few seconds, heat the underneath of the
ORFITUBE ADJUSTER as well as the attachment
location on the orthosis with a heat gun (be
careful for overheating).
12. Firmly press the ADJUSTER onto the orthosis in
the desired position and allow it to cool down
completely.
Note:
After heating, the ADJUSTER can be adhered to the
following orthotic fabrication materials:
A:All Orfit splinting material, in case of an NS
product scratch the surface with scissors to
ensure adhesion
B: it is possible to attach the ORFITUBE
ADJUSTER onto other, non-adherent orthotic
fabrication materials, by using suitable
adhesives
D: In some cases, it may be possible to detach
the adjusting ring and screw it directly to the
orthosis.
13. Cut the ORFITUBE to length using heavy scissors
(or by incision and breaking).
Press the TUBE END firmly onto the ORFITUBE.
14. Introduce a braided elastic (ref. 35312 - 35313 -
35314) equipped with a finger cuff.
15. Give the required tension to the elastic.
Note:
It is prohibited to make alterations to this text without prior approval from Orfit Industries.
DYNASYST™ and ORFITUBE™ ADJUSTER KIT are trademarks from ORFIT INDUSTRIES N.V.
www.orfit.com
Ref. No. 31201
VERSION 6
LAST UPDATE: 05/05/2021
REVISION DATE: 05/05/2023
Page 4 of 4
D. ADJUSTING THE ORFITUBE
As it should remain possible to vary the elastic’s
suspension point during the course of rehabilitation,
the ORFITUBE can be accurately adjusted.
By loosening the adjusting screw, the ORFITUBE can
be rotated and/or translated.
E. MAINTENANCE
The ORFITUBE ADJUSTER does not require
maintenance. It can be cleaned with lukewarm water
and soap.
It is not possible to sterilize an ORFITUBE ADJUSTER in
an autoclave, although it can be sterilized using gas
sterilization. It can be disinfected using alcohol.
F. WARNINGS
Draw patients’ attention to possible consequences
of the incorrect action of dynamic orthoses.
-accidental modification of the ORFITUBE
set-up.
-fixation plate or tube-end loosening.
Do not use an open flame to heat the ADJUSTER
fixation plate.
Only trained medical personnel should make and
apply dynamic orthosis using the ORFITUBE
ADJUSTER.
G. STORAGE TEMPERATURE
Store at
minimum temperature +10°C / +50°F
maximum temperature +30°C / + 95°F

Other orfit Medical Equipment manuals

orfit RAYCAST User manual

orfit

orfit RAYCAST User manual

orfit AIO SOLUTION AC-LS-L User manual

orfit

orfit AIO SOLUTION AC-LS-L User manual

orfit HP PRO 25000/33 User manual

orfit

orfit HP PRO 25000/33 User manual

orfit RAYCAST 33109 User manual

orfit

orfit RAYCAST 33109 User manual

orfit Raycast User manual

orfit

orfit Raycast User manual

orfit 32301/HX User manual

orfit

orfit 32301/HX User manual

orfit Classic Stiff User manual

orfit

orfit Classic Stiff User manual

orfit ORFITUBE ADJUSTER KIT User manual

orfit

orfit ORFITUBE ADJUSTER KIT User manual

orfit HP Pro 25000/26 User manual

orfit

orfit HP Pro 25000/26 User manual
orfit CRYSTAL NS User manual

orfit

orfit CRYSTAL NS User manual

orfit AIO SOLUTION AC-LS User manual

orfit

orfit AIO SOLUTION AC-LS User manual

orfit HP PRO User manual

orfit

orfit HP PRO User manual

orfit AIO SOLUTION AC-BG User manual

orfit

orfit AIO SOLUTION AC-BG User manual
orfit AIO 3.0-SBRT User manual

orfit

orfit AIO 3.0-SBRT User manual

orfit RAYCAST 32126 User manual

orfit

orfit RAYCAST 32126 User manual

orfit RAYCAST User manual

orfit

orfit RAYCAST User manual

orfit RAYCAST User manual

orfit

orfit RAYCAST User manual

orfit RAYCAST 33221 User manual

orfit

orfit RAYCAST 33221 User manual

orfit 35830 User manual

orfit

orfit 35830 User manual

orfit AIO SOLUTION P-LD-PED User manual
orfit

orfit AIO SOLUTION P-LD-PED User manual

Popular Medical Equipment manuals by other brands

Stryker The Go BED FL17E Maintenance manual

Stryker

Stryker The Go BED FL17E Maintenance manual

Gima 28342 user manual

Gima

Gima 28342 user manual

Pari 041G0500 Instructions for use

Pari

Pari 041G0500 Instructions for use

Mortara Surveyor S2 user manual

Mortara

Mortara Surveyor S2 user manual

SmartLine RotaScope Classic Series Installation and user instructions

SmartLine

SmartLine RotaScope Classic Series Installation and user instructions

BONVISI ENDO P SYSTEM Quick manual

BONVISI

BONVISI ENDO P SYSTEM Quick manual

B.A. International Optima EOS350 Instructions for use and installation

B.A. International

B.A. International Optima EOS350 Instructions for use and installation

Dornoch UL-EV100 Technical manual

Dornoch

Dornoch UL-EV100 Technical manual

laerdal VitalsBridge Directions for use

laerdal

laerdal VitalsBridge Directions for use

Prism Medical UK Easy Fit user manual

Prism Medical UK

Prism Medical UK Easy Fit user manual

Mindray Resona 7 Service manual

Mindray

Mindray Resona 7 Service manual

KCI V.A.C.Via Instructions for use

KCI

KCI V.A.C.Via Instructions for use

Mindray VS-900 quick guide

Mindray

Mindray VS-900 quick guide

Moog curlin 6000 series user manual

Moog

Moog curlin 6000 series user manual

PRC-Saltillo Accent 1000 Hardware manual

PRC-Saltillo

PRC-Saltillo Accent 1000 Hardware manual

laerdal Mini Anne Plus Important product information

laerdal

laerdal Mini Anne Plus Important product information

Omron Total Power + Heat PM800 instruction manual

Omron

Omron Total Power + Heat PM800 instruction manual

bort medical SellaTex Plus quick guide

bort medical

bort medical SellaTex Plus quick guide

manuals.online logo
manuals.online logoBrands
  • About & Mission
  • Contact us
  • Privacy Policy
  • Terms and Conditions

Copyright 2025 Manuals.Online. All Rights Reserved.