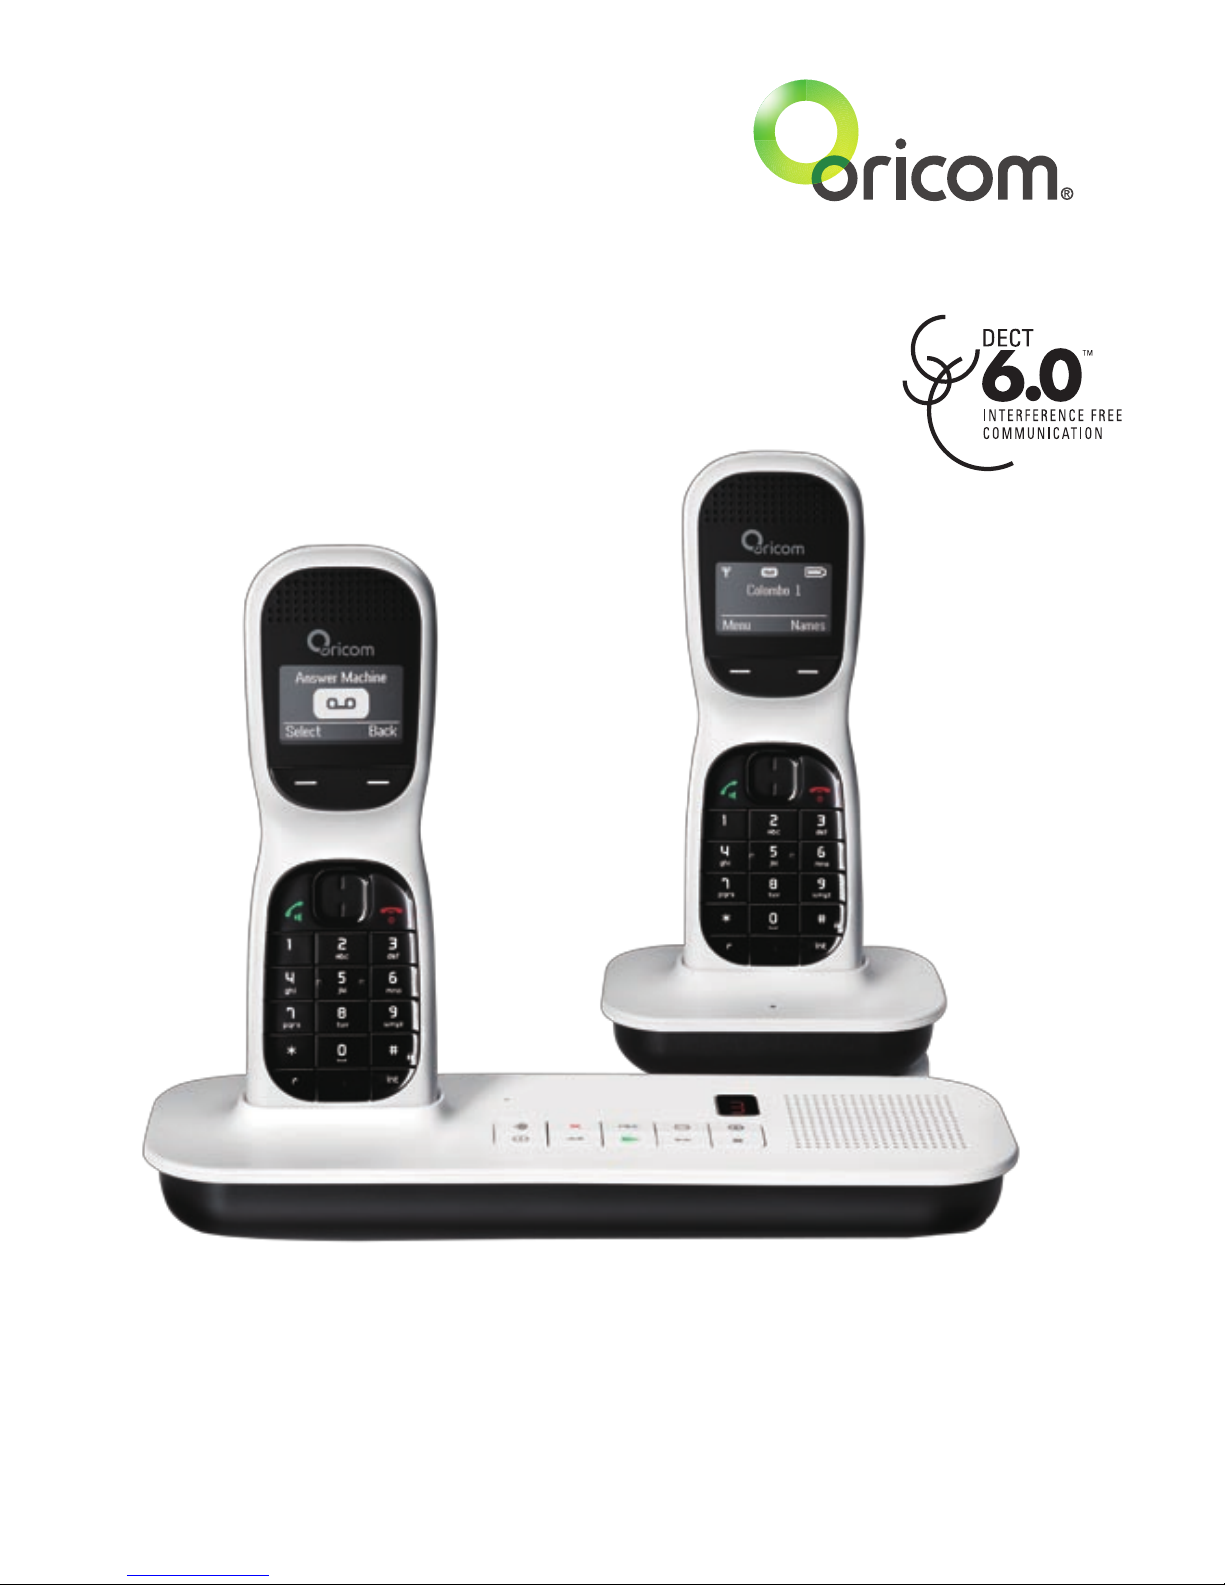
Oricom Colombo one User manual

Colombo one
Digital Cordless Phone with Answering System
Keep this user guide for future reference.
User Manual


3
CONTENTS
CONTENTS.......................................................................................................................... 3
IMPORTANT SAFETY INFORMATION........................................................................................ 4
GETTING STARTED ............................................................................................................... 5
GETTING TO KNOW YOUR PHONE .......................................................................................... 9
USING THE PHONE ............................................................................................................. 14
PHONEBOOK ..................................................................................................................... 16
CALLS LIST ....................................................................................................................... 19
AGENDA ........................................................................................................................... 21
CLOCK & ALARM ............................................................................................................... 23
HANDSET SETTINGS........................................................................................................... 24
BASE SETTINGS................................................................................................................. 26
TEXT MESSAGING .............................................................................................................. 28
REGISTRATION................................................................................................................... 32
THE ANSWERING MACHINE ................................................................................................. 34
TROUBLESHOOTING ........................................................................................................... 40
WARRANTY INFORMATION (AUSTRALIA) ............................................................................... 42

4
IMPORTANT SAFETY INFORMATION
Important
• Avoidexposureofthistelephonetomoisture
orliquid.
• Topreventelectricshock,donotopenthe
handsetorbasecabinet.
• Avoidmetalliccontact(e.g.metalclips,keys)
betweenthebatterycontactsandcharging
conductors.
• Thereisaslightchancethatthetelephone
couldbedamagedbyanelectricalstorm.Itis
recommendedthatusersunplugthephonefrom
themainssupplyandtelephonesocketduringa
storm.
• Donotusethehandsetinanexplosive
hazardareasuchaswherethereisgas
leaking.
• Followthelocalregulationsregarding
thedisposalofyourpackingmaterials,
exhaustedbatteriesandusedphone.
Whereverpossible,recyclethosematerials.
• Thisphoneshouldnotbeusednear
intensivecaremedicalequipment.Persons
withpacemakersshouldconsulttheirDoctor
orcardiologistbeforeusingthisphone.
• Cleanwithadry,soft,lint-freecloth.Never
usecleaningagents,particularlyaggressive
solvents.
• Becausethephoneworksbysendingradio
signalsbetweenbasestationandhandset,
wearersofhearingaidsmayexperience
interferenceintheformofahummingnoise.
• Yourphonecaninterferewithelectrical
equipmentsuchasansweringmachines,TV
andradiosets,clockradiosandcomputers
ifplacedtooclose.Itisrecommendedthat
youpositionthebaseunitatleastonemetre
fromsuchappliances.
• Thistelephonecomplieswithapplicablesafety
requirementsforexposuretoradiowaves
(EMR).Themeanpowerofthistelephonedoes
notexceed20mWlimitatwhichpointtesting
isrequired.
• Privacyofcommunicationsmaynotbe
ensuredwhenusingthistelephone.
• Theearpieceofthehandsetmayattract
smallmetalobjectssuchasstaplesand
pins.Careshouldbetakenwhenplacingthe
handsetneartheseitems.
• Thistelephoneisnotdesignedformaking
emergencytelephonecallswhenthemains
powerfails.Alwayshaveacordedphone
availabletobeabletomakeandreceive
callstoemergencyservicesifthemains
powerfails.
• Donotuseyourtelephoneduringan
electricalstormthunderstormasitis
possibletogetanelectricshock.Referto
informationcontainedinWhitepagesdirectory.
•
ThisphoneisdesignedforconnectiontoaPSTN
telephonelineorananalogueextensionportof
aPBXsystem.Ifyouconnectthisdevicetoa
digitalextensionofaPBX,damagemayresultto
thePBX.
CAUTION
Use only the mains adaptors supplied with this product.
Incorrect adaptor polarity or voltage can seriously
damage the unit.
Adaptor for base unit and charger:
Base Unit power supply – Input: 230-240VAC 50Hz
Output: 7.5V 300mA
Ext Charger power supply – Input 230-240VAC 50Hz
Output: 7.5V 200mA

5
GETTING STARTED
Gettingstarted
Location
YouneedtoplaceyourColomboonebase
within2metresofthemainspowersocketand
telephonesocketsothatthecableswillreach.
Makesureitisatleast1metreawayfrom
otherelectricalappliancestoavoidinterference.
YourColomboworksbysendingradiosignals
betweenthehandsetandbase.Thestrengthof
thesignaldependsonwhereyousitethebase.
Puttingitashighaspossibleensuresthebest
signal.
Handset range
TheColombohasarangeof300metres
outdoorswhenthereisaclearlineofsight
betweenthebaseandhandset.Anyobstruction
betweenthebaseandhandsetwillreducethe
rangesignicantly.Withthebaseindoorsand
handseteitherindoorsoroutdoors,therange
willnormallybeupto50metres.Thickstone
wallscanseverelyaffecttherange.
Signal strength
The icononyourhandsetindicateswhenyou
areinrange.Whenoutofrangeofthebasethe
iconashesandthehandsetgivesanout-of-
rangewarningtoneeveryminute.Thistoneis
repeateduntilyoumovebackintorange.
Ifyoumoveoutofrangeduringacall,the
telephonecallwillbedisconnected.Moveback
withinrangebeforeyoumakeanyfurthercalls.
Thehandsetwillautomaticallyre-connecttothe
base.
IMPORTANT
The base station must be plugged into the mains power
at all times. Do not plug the telephone line cord into
the wall socket until the handset is fully charged. Only
use the power and telephone cables supplied with the
product.
Which power adaptor?
Thepoweradaptorwithaclearconnectorisfor
thebaseunitandthepoweradaptorwithared
colourconnectorisforthechargerunit(multi-
handsetpacksonly).
Connecting up the base
Plugthemainspowercablewithclearconnector
intothesocketmarked ontheundersideof
thebaseandplugtheotherendintothemains
powerwallsocketandswitchthepoweron.
Connecting the handset
1. Insertthe2xAAANiMHrechargeable
batteries(supplied)intothehandset.Then
slidethecompartmentcoverintoplace.
2. Placethehandsetonthebasetochargefor
atleast15hours.Whenthehandsetisfully
chargedthe iconwillindicatethis.
3. After15hours,connectthetelephoneline
cordintothetelephonewallsocket.

6
Connecting multipacks
Ifyouhavepurchasedamultiplepack,this
processwillneedtobecarriedoutforall
handsetsandchargers
1. Plugthemainspowercablewiththered
connectorintothesocketmarked on
theundersideofthecharger.
Battery low warning
Ifthe iconashesinthedisplay,youwill
needtorechargethehandsetbeforeyoucan
useitagain.
Duringcharging,the iconinthedisplaywill
scroll.
Battery performance
Inidealconditions,fullychargedbatteriesshould
giveabout10hourstalktimeor100hours
standbytimefromasinglecharge.
Notethatnewbatteriesdonotreachfull
capacityuntiltheyhavebeeninnormalusefor
severaldays.
Thechargecapacityofrechargeablebatteries
willreducewithtimeastheywearout,giving
thehandsetlesstalk/standbytime.Eventually
theywillneedtobereplaced.
Batteriesandhandsetsmaybecomewarm
duringcharging.Thisisnormal.
Tip!
It is good practice to put the cordless handset on the
charging cradle when it is not in use to ensure that the
handset is always fully charged.
WARNING
DO NOT USE STANDARD/ALKALINE BATTERIES IN THIS
PRODUCT, AS THERE IS A RISK OF EXPLOSION AND/
OR INJURY. ONLY USE THE Ni-MH RECHARGEABLE
BATTERIES SPECIFIED IN THIS USER GUIDE. CONTACT
ORICOM FOR REPLACEMENT BATTERIES.
RISK OF EXPLOSION IF BATTERY IS REPLACED BY AN
INCORRECT TYPE.
Never use non-rechargeable batteries. Use
recommended type supplied with this product.
• Neverusealkalineorlithiumbatteries.
• Donotdisposeofthebatteriesinare,astheycan
explode.
• Donotopenormutilatethebattery.Released
electrolyte is corrosive and can cause damage to the
eyes or skin. It can be toxic if swallowed.
• Avoidcontactwithmetalobjectswhenhandlingthe
battery.Theseobjectscouldshortoutthebatteries
or cause the conductor to overheat resulting in
burns.
• Donotattempttorechargethebatterycellby
heating it. Sudden release of battery electrolyte can
cause burns or irritation to the eyes or skin.
• Observetheproperpolarity,ordirection,ofany
battery. Reverse insertion of the battery cell can
result in leakage or explosion.
• Removethebatteriesifyoudonotplantousethe
product for several months at a time.
GETTING STARTED

7
• Followthelocalregulationsregardingthedisposal
of your packing materials, exhausted batteries
and used phone. Wherever possible, recycle those
materials.
Pack contents
Dependingonthemodelyouhavepurchased
thispackshouldcontainthefollowingitems:
Ifanyofthesearemissing,pleasecontact
Oricomdirectly.
Twin Triple
Baseunit 1 1
Cordlesshandsets 2 3
Chargingcradle 1 2
Poweradaptors 2 3
Linecord 1 1
Userguide 1 1
HandsetRechargeableNi-MH
Batteries1.2V550mAh 4 6
Purchasing additional handsets
YoumayexpandyourColombobyaddingmore
handsets(CB050WH).Thesecanbepurchased
separatelyfromtheretailerwhereyou
purchasedtheproduct,ordirectlyfromOricom
(Australia)
www.oricom.com.au.
TheColombocanaccommodateatotalof5
cordlesshandsets.
If you have a Broadband line
If you connect your telephone to a line with a broadband
connection,youmustconnectaninlinelter(not
supplied) between the telephone socket and your phone
base to ensure that your broadband and Slim will work
properly.
Ifyoudonotinstallthelteryouwillexperience
interference on the cordless phone and your Broadband
may suffer dropouts. Please refer to the user guide of
theinlinelterforinstallation.
In a home with broadband, every telephone, fax or
answeringsystemmusthaveain-linelterconnected,
notjusttheoneatthetelephonepointthatyourmodem
is connected to.
Additionalin-linelterscanpurchasefromelectronic
stores.
GETTING STARTED
TELEPHONE
WALLSOCKET
MICROFILTER

8
Date and time
Providingyouhavesubscribedtoyournetwork’s
CallerDisplayservice,thedateandtimeisset
automaticallyforallhandsetseverytimeacallis
received.
IfyoudonotsubscribetotheCallerDisplay
serviceyoucansetthedateandtimemanually.
Set date and time manually
1. Press‘MENU’andscroll toCLOCK&
ALARMandpressSELECT.DATE&TIMEis
highlighted,pressSELECT.
2. EnterthedateusingtheformatDD/MM/YY
andpressSAVE.
3. PressBACKtoreturntothepreviousmenu
level.
Set the alarm
1. Press‘MENU’andscroll toCLOCK&
ALARMandpressSELECT.
2. Scroll toALARMandpressSELECT.
3. Press or toselectONandpress
SELECT.
4. Press or toselectONCE,MON-FRIor
ONDAILYandpressSELECT.
5. Enterthetimeforthealarmtosoundand
pressSAVE.
6. PressBACKtoreturntothepreviousmenu
level.
Alarm on/off
1. Press‘MENU’andscroll toCLOCK&
ALARMandpressSELECT.
2. Scroll toALARMandpressSELECT.
3. Press or toselectONorOFFandpress
SELECT.
4. PressBACKtoreturntothepreviousmenu
level.
Time format
Setthetimeformatto12or24hoursetting.
1. Press‘MENU’andscroll toCLOCK&
ALARMandpressSELECT.
2. Scroll toTIMEFORMATandpressSELECT.
3. Press or toselect12HOURor24HOUR
andpressSELECT.
4. PressBACKtoreturntothepreviousmenu
level.
Switch off alarm ring
1. Whenthealarmsounds,pressSTOP.
GETTING STARTED

9
GETTING TO KNOW YOUR PHONE
Overview of your handset
Earpiece
Option button (left)
PresstoopentheMenu.
Presstoselectoptions
displayedonthescreen.
Scroll Down / Phonebook
Instandby,presstoopenand
scrollthroughtheNameslist.
Intalkmode,presstoreduce
volume.
Inmenumode,pressto
scrollthroughtheoptions.
Talk / Handsfree
Instandbymode,pressto
makeandreceivecalls.
Intalkmode,presstoswitch
handsfreeonandoff.
R (Recall)
Forusewithswitchboard/
PBXandsomenetwork
services.
0
Toinsertaspace.
Option button (right)
Presstoselectoptions
displayedonthescreen.
Inmenumode,presstostep
backonescreen.
Instandbymode,press
NAMEStoopenthephone
bookmenu.
Redial / Scroll Up / Pause
Instandby,presstoopenand
scrollthroughtheRediallist.
Intalkmode,pressto
increasethevolume.
Inmenumode,pressto
scrollthroughtheoptions.
Whenstoringanentryinthe
phonebook,pressandhold
toenteraPause.
End Call / Power on/off
Presstoendacall.
Inmenumode,pressto
returntostandby.
Instandby,pressandholdto
switchthehandsetoff.
Whenoff,presstoswitchthe
handsetbackon.
# / Lock
Pressandholdtolockthe
keypad.
Tounlock,selectUNLOCK
thenpress"#".
Intercom
Usedforinternalcalls.
Microphone

10
GETTING TO KNOW YOUR PHONE
Handset display
Handset Battery Level
Displaysthecurrentpowerlevelsofyourhandsetbattery.
Missed Calls*
Displayedwhenyouhavemissedcallsandnewnumber(s)intheCallslist.
Answering machine messages
Youhavenewansweringmachinemessages
Text messages*
YouhavenewSMStextmessages
Alarm
Thealarmhasbeenset.
Handsfree
Displayedwheninhandsfreemode
Silent
Handsetringerisoff:settosilent
Answering machine
Displayedwhentheansweringmachineison.
Signal
Steadywhenthehandsetisregisteredandwithinrangeofthebase.Flasheswhen
thehandsetisoutofrangeorsearchingforthebase.
UP and Down
Press or toscrollthroughtheoptionsinamenu,toopenthephonebookor
rediallistwheninstandby.
*Forthisfeaturetoworkyoumustsubscribetoyournetworkprovider’sCallerdisplayservice.A
quarterlyfeemaybepayable.

11
GETTING TO KNOW YOUR PHONE
Overview of the base
Find Handset/Page
Presstoringall
registeredhandsets,
usefulifyouhave
mislaidahandset.
Answer on/off
Switchesthe
answeringmachine
onoroff.
Delete
Pressoncetodeletethecurrent
message.
Attheendofallmessage
playback,pressoncewithin8
secondstodeleteallmessages.
<< Skip
Pressoncetorepeat
thecurrentmessage,
twicetoplaythe
previousmessage.
OGM
Usetogetherwiththe
twoSkipbuttonsto
selectandlistentoyour
outgoingmessage.
Play/Pause
Play/pause
messages.
Vol + / Vol -
Increaseordecrease
thespeakervolume
duringplayback.
Skip >>
Skipforwardto
thenextmessage.
Stop
Stopmessage
playback.

12
ANSWER MACHINE
PLAY
PLAYALL
ANSWERON/OFF
RECORDMEMO
OUTGOINGMESSAGE
DELETEMESSAGES
ANSWERSETTINGS
TEXT MESSAGING
WRITEMESSAGE
INBOX
DRAFTS
OUTBOX
TEMPLATES
DELETEMESSAGES
TEXTSETTINGS
CALLS LISTS
MISSEDCALLS
RECEIVEDCALLS
DIALLEDCALLS
DELETECALLS
AGENDA
Thefollowing
‘Options’willonly
bedisplayedonce
aneventhasbeen
stored:
ADDEVENT
SHOWDETAILS
EDITEVENT
SENDASATEXT
DELETEEVENT
DELETEALLEVENTS
CLOCK & ALARM
DATE&TIME
ALARM
TIMEFORMAT
GETTING TO KNOW YOUR PHONE
Menu map

13
SETTINGS
SETHANDSET
RINGTONE
RINGERVOLUME
RECEIVERVOLUME
HANDSETNAME
LANGUAGE
SCREENSAVER
LIGHTTIMEOUT
AUTOTALK
KEYBEEP
PBXACCESSCODE
SETBASE
RINGTONE
RINGERVOLUME
DIALLINGMODE
RECALLMODE
SYSTEMPIN
MASTERRESET
ECOMODE
REGISTRATION
REGISTERHANDSET
SELECTBASE
DE-REGISTER
NAMES menu
Fromstandby:
SEARCH
ADDENTRY
COPYPHONEBOOK
MEMORYSTATUS
DELETEPHONEBOOK
Press instandby:
PHONEBOOKEMPTYwill
bedisplayedifnoentries
arestored.
SelectOPTIONSandthe
followinglistisdisplayed:
SHOWDETAILS
SENDMESSAGE
EDITENTRY
COPYENTRY
RINGTONE
DELETEENTRY
FASTCALL
Press NAMES during a call
ThePhonebooklistis
displayed.
ADDENTRY
COPYPHONEBOOK
MEMORYSTATUS
DELETEPHONEBOOK
Press inSelect
OPTIONSandthefollowing
listisdisplayed:
ADDENTRY
SHOWDETAILS
EDITENTRY
DELETEENTRY
GETTING TO KNOW YOUR PHONE
Menu map

14
USING THE PHONE
Usingthe
phone
To switch handset on/off
1. Pressandhold untilthehandset
switchesoff.
2. Pressandhold againtoswitchthe
handsetbackon.
To Make a call
1. Press .
2. Waitfordialtoneandthendialthetelephone
number.
To Make a call by Pre-dialling
1. Enterthephonenumber.Ifyoumakea
mistakepressCLEAR.
2. Press todialthephonenumberentered.
To end a call
1. Press .
Afteryouhangup,thedurationofyourcallis
displayedfor5seconds.
NOTE
If auto hang-up is on, replace the handset on the base
to end the call.
Receive a call
Whenyoureceiveanexternalcall,thephone
rings.
ThedisplayshowsEXTERNALCALLandthe
caller’snumberor,ifthenumbermatchesan
entrystoredinthephonebook,thenameis
displayed.
1. Whenthephonerings,press toWhen
answeringthehandsetfromthebasewith
‘AutoPickupmode’settoOn,nothingneeds
tobepressed.
TIP
If Auto Pick up mode is on, simply lift up the handset
from its base to answer the call. The default setting is
On. If you have changed Auto Pick up mode to Off, you
will need to press to answer a call.
NOTE
An incoming call has priority over other events.
Whenever there is an incoming call, other operations in
progress such as phone settings, menu navigation, etc.
will be ended.
To adjust the volume
1. Duringacall,press or toadjustthe
earpieceorloudspeakervolume.-Thelevel
isshowninthehandsetdisplay.
Secrecy
WithSecrecyonyoucantalktosomeoneelsein
theroomwithoutyourcallerhearingyou.
1. Duringacall,pressSECRECY.Thedisplay
showsSECRECYON.
2. PressOFFtospeaktoyourcalleragain.

15
USING THE PHONE
Make a handsfree call
1. Dialthenumberandpress twice.You
cannowhearyourcalloverthehandset
loudspeaker.
2. Press toswitchthecallbetweenthe
earpieceandtheloudspeaker.
3. Press .
Answer a call handsfree
1. Whenthephonerings,press twice.
Switch to handsfree during a call
1. Duringacallpress toswitchthecallto
handsfree.Press againtoreturnthecall
totheearpiece.
Redial a number from the redial list
1. Press ,thelastnumberyoucalledis
highlighted.
2. Press or ,toscrolltothenumbertocall.
3. Press todial.
To lock the keypad
1. Pressandhold‘#’KEYPADLOCKEDis
displayed.
To unlock the keypad
1. PressUNLOCK,followedby‘#’withina
second.
KEYPADUNLOCKEDisdisplayed.
IMPORTANT
With the keypad locked, you can still dial the emergency
numbers 112 and 999 as well as answer incoming calls.
Paging/Find handset
1. Press onthebase.Allhandsetsregistered
tothebasewillringanddisplayPAGING
CALL.
2. Press onthebaseagaintostopthe
ringingor,onanyhandsetpressSTOP,orany
buttononthehandsettostopallhandsets
ringing.

16
PHONEBOOK
Phonebook
TheColomboonehandsetphonebookcanstore
upto250namesandnumbers.
NOTE
Numbers can be up to 24 digits long and names up to
12 characters long. Entries are stored in alphabetical
order.
To view and dial phonebook entries
1. Press .Displayshowstherstentry.
2. Scroll or totheentryyouwant.OrTo
searchalphabetically,press thenpress
thekeywiththerstletterofthename,e.g.
ifthenamebeginswithN,press6twice.The
displayshowstherstentrybeginningwith
N.Ifrequired,press or toscrolltothe
exactentry.
3. Press todialtheentrydisplayed.
To store an entry
1. PressNAMES.Thephonebookmenuis
displayed.
2. SEARCHishighlighted.Scroll toADD
ENTRYandpressSELECT.
3. EnteranameandpressOK.
4. EnteranumberandpressSAVE.Scroll or
totheringtoneyouwantforthisentryand
pressSELECT.Thedisplayshows<NAME>
SAVEDandreturnstothephonebookmenu.
5. Press toreturntostandby.
NOTE
Cancel storing an entry by pressing at any time
during the process.
Entering names
Usethealphanumerickeypadtoenternamesin
thephonebook.
ForinstancetoenterthenamePaul
P Press once
A Press once
U Press twice
L Press threetimes
Toenteraspacepress0.
Use1forpunctuationcharacters.
Press or tomovebackwardsor
forwardsthroughcharacters/digits.
Press#toswitchbetweenupperandlower
caselettersandnumbers
PressCLEARtodeleteacharacterordigit.

17
PHONEBOOK
Enter a pause
IfyourColombooneisconnectedtoa
switchboard,youmayneedtoenterapauseina
storednumber.
Thisgivestheswitchboardtimetondan
outsideline.APauseisnormallystoredafterthe
switchboardaccesscode(e.g.9)
1. Whenstoringanumber,pressandhold
untilthedisplayshowsP.Youcanthen
continuestoringthephonenumber.
To view an entry
Instandby:
1. Press .
2. Entertherstletterofthenametosearch
alphabeticallythenscroll or totheexact
entry.Thenameisdisplayed.
3. PressOPTIONS.ThedisplayhighlightsSHOW
DETAILS.PressSELECTtodisplaythename,
numberandringtone.
4. Press toreturntostandby.
Duringacall:
1. PressNAMES.
2. Entertherstletterofthenameyouwant
thenscroll or ifnecessarytothe
exactname.PressOPTIONStodisplaythe
phonebookmenu.
3. Scroll toSHOWDETAILSandpress
SELECT.
4. Press tocancelthephonebookdisplay.
5. Press againtoendthecall.
To edit an entry
1. Press .
2. Scroll or totheentryyouwanttoedit
andpressOPTIONS.Scroll toEDITENTRY
andpressSELECT.
3. PressCLEARtodeletecharacters,usethe
keypadtoenternewonesthenpressOK.
4. PressCLEARtodeletedigits,usethekeypad
toenternewonesthenpressSAVE.
5. Scroll or totheringtoneyouwantand
pressSELECTtosavetheentry.
6. PressBACKtoreturntothepreviousmenu
level.
To delete an entry
1. Press .
2. Scroll or totheentryyouwanttodelete
andpressOPTIONS.Scroll toDELETE
ENTRYandpressSELECT
3. PressYEStoconrmorNOtocancel.
5. PressBACKtoreturntothepreviousmenu
level.
To delete all entries
1. PressNAMES.
2. Scroll toDELETEPHONEBOOKandpress
SELECT.
3. DisplayshowsDELETEALLENTRIES?.Press
YEStoconrmorNOtocancel.
4. PressBACKtoreturntothepreviousmenu
level.

18
PHONEBOOK
To copy a phonebook entry to another
handset
1. Press .
2. Scroll or totheentryyouwanttocopy.
PressOPTIONSandscroll toCOPYENTRY
andpressSELECT.
3. TOHANDSETisdisplayed.PressSELECT.
4. Availablehandsetsaredisplayed.Scroll
or tothehandsetyouwantandpress
SELECT.COPYPHONEBOOK?ispromptedon
thereceivinghandset.PressYEStoaccept
orNOtocancel.Whencompletedthedisplay
shows1ENTRYCOPIED.
5. PressBACKtoreturntothepreviousmenu
level.
NOTE
If an entry with the same name and number is already
stored in the receiving handset, it will not be copied
across.
To copy the entire phonebook to
another handset
1. PressNAMES.
2. Scroll toCOPYPHONEBOOKandpress
SELECT.
3. TOHANDSETisdisplayed.PressSELECT.
4. Availablehandsetsaredisplayed.Scroll
or tothehandsetyouwantandpress
SELECT.COPYPHONEBOOK?ispromptedon
thereceivinghandset.PressYEStoaccept
orNOtocancel.Whencompletedthedisplay
showsthenumberofentriescopied.
5. PressBACKtoreturntothepreviousmenu
level.

19
CALLS LIST
Callslist
IfyouhavesubscribedtoyournetworkCaller
NumberDisplay(CND),andprovidedthenumber
ofthecallerisnotwithheld,thenumberofthe
callerwillbedisplayed.
NOTE
If the caller’s number is stored in your phonebook along
with a name, the name will also be displayed.
If the telephone number is not available for incoming
calls, the handset will display UNAVAILABLE.
Information about incoming calls will vary by country
and network operator. Some operators may charge a
subscriptionfortheirCallerLineIdenticationservice.
The calls list contains details of missed, received and
dialled calls. Details include the date and time of the
call. Entries are displayed in chronological order with the
most recent call at the top of the list.
When the calls list is full, a new call replaces the oldest
in the list.
Each handset can hold details of up to 30 answered or
unanswered calls and 20 dialled calls.
If you receive more than one call from the same number,
only the most recent call is kept in the calls list.
Whenyouhavemissedcalls(incomingcallsthatyou
haven’t answered) the display shows YOU HAVE X
MISSED CALLS. If you press BACK, the screen returns to
standby and the icon is displayed.
If one handset is used to view the calls log, the other
handsets will continue to display the number of missed
calls(Multipackusersonly).
To view the calls list
1. Whenyouseethatyouhavemissedcalls,
pressVIEW.Youcannowscroll or
throughtheMISSEDCALLSLIST.
2. PressOPTIONS,SHOWDETAILSis
highlighted.PressSELECTtoseethedetails.
3. PressBACKtoreturntothepreviousmenu
level.
To dial from the calls list
1. PressMENU,scroll toCALLSLISTSand
pressSELECT,MISSEDCALLSishighlighted.
Scroll or tochooseMISSEDCALLS,
RECEIVEDCALLSorDIALLEDCALLS.
2. PressSELECT.Youcannowscrollorthrough
thelist.
3. PressOPTIONS,SHOWDETAILSis
highlighted.PressSELECTtoseetheCaller’s
details.
4. PressDIALtocallthenumber.
5. PressBACKtoreturntothepreviousmenu
level.

20
CALLS LIST
To save a number from the calls list to
the phonebook
1. PressMENU,scroll toCALLSLISTS,then
pressSELECT,MISSEDCALLSishighlighted.
Ifrequired,scroll or toRECEIVEDOR
DIALLEDCALLSthenpressSELECT.
2. Scroll or totheentryyouwantand
pressOPTIONS.
3. Scroll toSAVENUMBERandpressSELECT.
4. EnteranameandthenpressOK.The
numberisdisplayed.PressSAVE.
5. Scroll or totheringtoneyouwantand
pressSELECT.
6. PressBACKtoreturntothepreviousmenu
level.
Send a text message to a Calls list
number
1. PressMENU,scroll toCALLSLISTS,then
pressSELECT,MISSEDCALLSishighlighted.
Ifrequired,scrollortoRECEIVEDORDIALLED
CALLSthenpressSELECT.
2. Scroll or totheentryyouwantand
pressOPTIONS.
3. Scroll toSENDMESSAGEandpress
SELECT.
4. WritethemessagethenpressOPTIONS.
5. SENDishighlighted.ThenpressSELECT.
(Youcansave,insertasymbol,emoticonor
template).
6. Thenumberispre-enteredontheSendto
screen,pressSENDtosendthemessage.
7. PressBACKtoreturntothepreviousmenu
level.
IMPORTANT
You must subscribe to your Network Provider’s Caller
Display service so that you can use text messaging and
you must not withhold your telephone number.
To delete a calls list entry
1. PressMENU,scroll toCALLSLISTS
andthenpressSELECT.MISSEDCALLSis
highlighted.Ifrequired,scroll or to
RECEIVEDORDIALLEDCALLSthenpress
SELECT.
2. Scroll or totheentryyouwantand
pressOPTIONS.
3. Scroll toDELETECALL.PressSELECT.
4. PressBACKtoreturntothepreviousmenu
level.
To delete the entire calls list
1. PressMENU,scroll toCALLSLISTS
andthenpressSELECT.MISSEDCALLSis
highlighted.Scroll toDELETECALLSand
pressSELECT.
2. MISSEDCALLSishighlighted.Scroll to
ALLCALLSandpressSELECT.
3. DisplayshowsDELETEALLCALLS?.Press
YEStoconrmorNOtocancel.
4. PressBACKtoreturntothepreviousmenu
level.
Table of contents
Other Oricom Cordless Telephone manuals

Oricom
Oricom DECT MI40 User manual

Oricom
Oricom M800 Series User manual

Oricom
Oricom SLIM-9000 User manual

Oricom
Oricom ECO60-1 User manual

Oricom
Oricom P100 User manual

Oricom
Oricom 8000 User manual

Oricom
Oricom pro600 DECT User manual

Oricom
Oricom M4000 User manual

Oricom
Oricom P700 Series User manual

Oricom
Oricom ECO3400 User manual

Oricom
Oricom Professional Series PRO910 User manual

Oricom
Oricom P900 Series User manual

Oricom
Oricom eco50 Series User manual

Oricom
Oricom IP-7 User manual

Oricom
Oricom M800 Series User manual

Oricom
Oricom M5500 Series User manual

Oricom
Oricom Pro810 User manual

Oricom
Oricom eco5100 Series User manual

Oricom
Oricom ECO800 User manual

Oricom
Oricom W1 User manual