Oricom eco71 User manual

USER GUIDE
Keep this user guide for future reference. Always retain your proof of purchase in case of
warranty service and register your product on line at: AUSTRALIA: www.oricom.com.au
Oricom DECT Digital
Cordless Telephone
eco71 eco710
DECT Digital Cordless Phone
with answering system
DECT Digital Cordless Phone

TABLE OF CONTENTS
SAFETY INFORMATION 1
GETTING STARTEd 3
PhONE FuNCTION KEYS 7
WhAT ThE ICONS MEAN? 10
YOuR TELEPhONE OPERATIONS 11
uSING YOuR PhONEBOOK 17
uSING ThE REdIAL LIST 20
uSING ThE CALL LOG 21
ANSWERING MAChINE OPERATION BY hANdSET 22
uSING ThE INTERCOM 24
AdvANCEd uSE OF YOuR TELEPhONE 26
ANSWERING MAChINE SETTINGS 29
TROuBLEShOOTING 31
WARRANTY 34
CuSTOMER SuPPORT 36

1
TABLE OF CONTENTS
• Becausethephoneworksbysendingradio
signalsbetweenbasestationandhandset,
wearers of hearing aids may experience
interference in the form of a humming noise.
• Yourphonecaninterferewithelectrical
equipmentsuchasansweringmachines,TV
andradiosets,clockradiosandcomputersif
placed too close. It is recommended that you
positionthebaseunitatleastonemetrefrom
such appliances.
• Thistelephonecomplieswithapplicable
safety requirements for exposure to radio
waves (EMR). The mean power of this
telephone does not exceed 20mW limit at
which point testing is required.
• Privacyofcommunicationsmaynotbe
ensured when using this telephone.
• Theearpieceofthehandsetmayattractsmall
metalobjectssuchasstaplesandpins.Care
shouldbetakenwhenplacingthehandset
near these items.
• Thistelephoneisnotdesignedformaking
emergency telephone calls when the mains
power fails. Always have a corded phone
availabletobeabletomakeandreceivecalls
to emergency services if the mains power fails.
SAFETY INFORMATION
IMPORTANT
• Avoidexposureofthistelephonetomoisture
or liquid.
• Topreventelectricshock,donotopenthe
handsetorbasecabinet.
• Avoidmetalliccontact(e.g.metalclips,keys)
betweenthebatterycontactsandcharging
conductors.
• Thereisaslightchancethatthetelephone
couldbedamagedbyanelectricalstorm.Itis
recommended that users unplug the phone
fromthemainssupplyandtelephonesocket
during a storm.
• Donotusethehandsetinanexplosivehazard
areasuchaswherethereisgasleaking.
• Followthelocalregulationsregardingthe
disposalofyourpackingmaterials,exhausted
batteriesandusedphone.Whereverpossible,
recycle those materials.
• Thisphoneshouldnotbeusednearintensive
care medical equipment. Persons with
pacemakersshouldconsulttheirDoctoror
cardiologistbeforeusingthisphone.
• Cleanwithadry,soft,lint-freecloth.Never
usecleaningagents,particularlyaggressive
solvents.

2
• Donotuseyourtelephoneduringanelectrical
stormthunderstormasitispossibletogetan
electricshock.Refertoinformationcontained
in White pages directory.
• Thisphoneisdesignedforconnectionto
aPSTNtelephonelineorananalogue
extensionportofaPBXsystem.Ifyou
connect this device to a digital extension of a
PBX,damagemayresulttothePBX.
Use only the mains adaptors supplied with this
product. Incorrect adaptor polarity or voltage can
seriously damage the unit.
Adaptorforbaseunitandcharger:
BaseUnitpowersupply–Input:100-240VAC
50/60HzOutput:6V0.5A
ExtChargerpowersupply–Input100-240VAC
50HzOutput:6V150mA
CAUTION
!
SAFETY INFORMATION

3
Getting started
Location
Youneedtoplacethebaseunitwithin2metresofthe
mainspowersocketandtelephonesocketsothatthe
cableswillreach.Makesureitisatleast1metreaway
from other electrical appliances to avoid interference.
Yourcordlessphoneworksbysendingradiosignals
betweenthehandsetandbase.Thestrengthofthe
signaldependsonwhereyousitethebase.Puttingit
ashighaspossibleensuresthebestsignal.
Handset range
The range is up to 300 metres outdoors when there
isaclearlineofsightbetweenthebaseandhandset.
Anyobstructionbetweenthebaseandhandsetwill
reducetherangesignicantly.Withthebaseindoors
andhandseteitherindoorsoroutdoors,therangewill
normallybeupto50metres.Thickstonewallscan
severely affect the range.
Signal strength
The icon on your handset indicates when you are in
range.Whenoutofrangeofthebasetheiconashes
andthehandsetgivesanout-ofrangewarningtone
every minute. This tone is repeated until you move
backintorange.
Ifyoumoveoutofrangeduringacall,thetelephone
callwillbedisconnected.Movebackwithinrange
beforeyoumakeanyfurthercalls.Thehandsetwill
automaticallyre-connecttothebase.
Thebasestationmustbepluggedintothe
mains power at all times. Do not plug the
telephonelinecordintothewallsocketuntil
thehandsetisfullycharged.Onlyusethe
powerandtelephonecablessuppliedwith
the product.
IMPORTANT
!
Battery low warning
If the iconashesinthedisplay,youwillneedto
rechargethehandsetbeforeyoucanuseitagain.
Duringcharging,the icon in the display will scroll.
Battery performance
Inidealconditions,fullychargedbatteriesshouldgive
about10hourstalktimeor100hoursstandbytime
from a single charge.
Notethatnewbatteriesdonotreachfullcapacityuntil
theyhavebeeninnormaluseforseveraldays.
Thechargecapacityofrechargeablebatterieswill
reducewithtimeastheywearout,givingthehandset
lesstalk/standbytime.Eventuallytheywillneedtobe
replaced.
Batteriesandhandsetsmaybecomewarmduring
charging. This is normal.
SAFETY INFORMATION GETTING STARTEd

4
Tip!
It is good practice to put the cordless handset on the
charging cradle when it is not in use to ensure that
the handset is always fully charged.
DONOTUSESTANDARD/ALKALINE
BATTERIESINTHISPRODUCT,AS
THEREISARISKOFEXPLOSIONAND/
ORINJURY.ONLYUSETHENi-MH
RECHARGEABLEBATTERIESSPECIFIED
INTHISUSERGUIDE.CONTACTORICOM
FORREPLACEMENTBATTERIES.
RISKOFEXPLOSIONIFBATTERYIS
REPLACEDBYANINCORRECTTYPE.
Neverusenon-rechargeablebatteries.
Use recommended type supplied with this
product.
• Neverusealkalineorlithiumbatteries.
• Donotdisposeofthebatteriesinare,as
they can explode.
• Donotopenormutilatethebattery.
Released electrolyte is corrosive and can
causedamagetotheeyesorskin.Itcan
betoxicifswallowed.
• Avoidcontactwithmetalobjectswhen
handlingthebattery.Theseobjects
couldshortoutthebatteriesorcausethe
conductortooverheatresultinginburns.
• Donotattempttorechargethebatterycell
byheatingit.Suddenreleaseofbattery
electrolytecancauseburnsorirritationto
theeyesorskin.
WARNING
• Observetheproperpolarity,ordirection,
ofanybattery.Reverseinsertionof
thebatterycellcanresultinleakageor
explosion.
• Removethebatteriesifyoudonotplanto
use the product for several months at a time.
• Followthelocalregulationsregarding
thedisposalofyourpackingmaterials,
exhaustedbatteriesandusedphone.
Whereverpossible,recyclethosematerials.
WARNING
!
Pack contents
Depending on the model you have purchased this
packshouldcontainthefollowingitems:
Ifanyofthesearemissing,pleasecontactOricom
directly.
Single Twin Triple
Baseunit 1 1 1
Cordless handsets 1 2 3
Charging cradle 0 1 2
Power adaptors 1 2 3
Line cord 1 1 1
User guide 1 1 1
HandsetRechargeable
Ni-MH1.2V400mAh
Batteries
246
!
GETTING STARTEd

5
Purchasing additional handsets
Youmayexpandyourcordlesssystembyadding
morehandsets(eco7150).Thesecanbepurchased
separately from the retailer where you purchased the
product,ordirectlyfromOricom(Australia)
www.oricom.com.au.
Theeco71andeco710canaccommodateatotalof4
cordless handsets.
If you have a Broadband line
If you connect your telephone to a line with a
broadband conne ction, you must connect an in
line filter (not supplied) between the telephone
socket and your phone base to ensure that your
broadband and eco71&eco710 will work properly.
If you do not install the filter you will experience
interference on the cordless phone and your
Broadband may suffer dropouts. Please refer to
the user guide of the in line filter for installation.
In a home with broadband, every telephone, fax
or answering system must have a in-line filter
connected, not just the one at the telephone point
that your modem is connected to.
Additional in-line filters can be purchased from
electronic stores.
TELEPHONE
WALLSOCKET
MICROFILTER
Connecting the base station
Connectthebasestationasillustratedinthe
diagram.Forreasonsofsafety,onlyusethepower
adaptor and telephone connection line cord supplied.
Inserting the batteries
1) Openthebattery compartment cover. Install
theAAArechargeablebatteriesintohandset
inaccordancewiththepolaritymarkedinthe
batterycompartment.
2) Closethebatterycompartmentcover,sliding
itintoplaceandpressingrmlytomakesure
it is secure.
D
C
V
GETTING STARTEd GETTING STARTEd

PACK CONTENTS
6
Interference
If the sound quality gets worse as you move around
whileonacall,thisisprobablycausedbyinterference
betweenthehandsetandthebaseunit,perhaps
becauseyouaretooneartoanotherphoneorother
electrical equipment. Move to a different position to
cleartheinterference.Ifyoudonotmove,itmight
causeashortbreakoryourcallmaybecutoff.
Checking your answering machine
messages remotely
1. Fromanotherphone,dialhome.The
answering machine answers and starts playing
your greeting message.
2. Whilethegreetingisplaying,press#key
on the phone you used to dial and enter the
remote access code* (which is the same as
yourmasterPINcode).
• Iftheansweringmachineisturnedoff,youmust
changeyourmasterPINfromitsdefault0000,
beforeyoucanusetheremoteaccessfeature.
3. Iftheremoteaccesscodeiscorrect,a
conrmationbeepcanbeheard.
4. Presskey2tostartmessageplayback.
5. When you are finished listening to your
messages,presstheHangup/exitbuttontoexit.
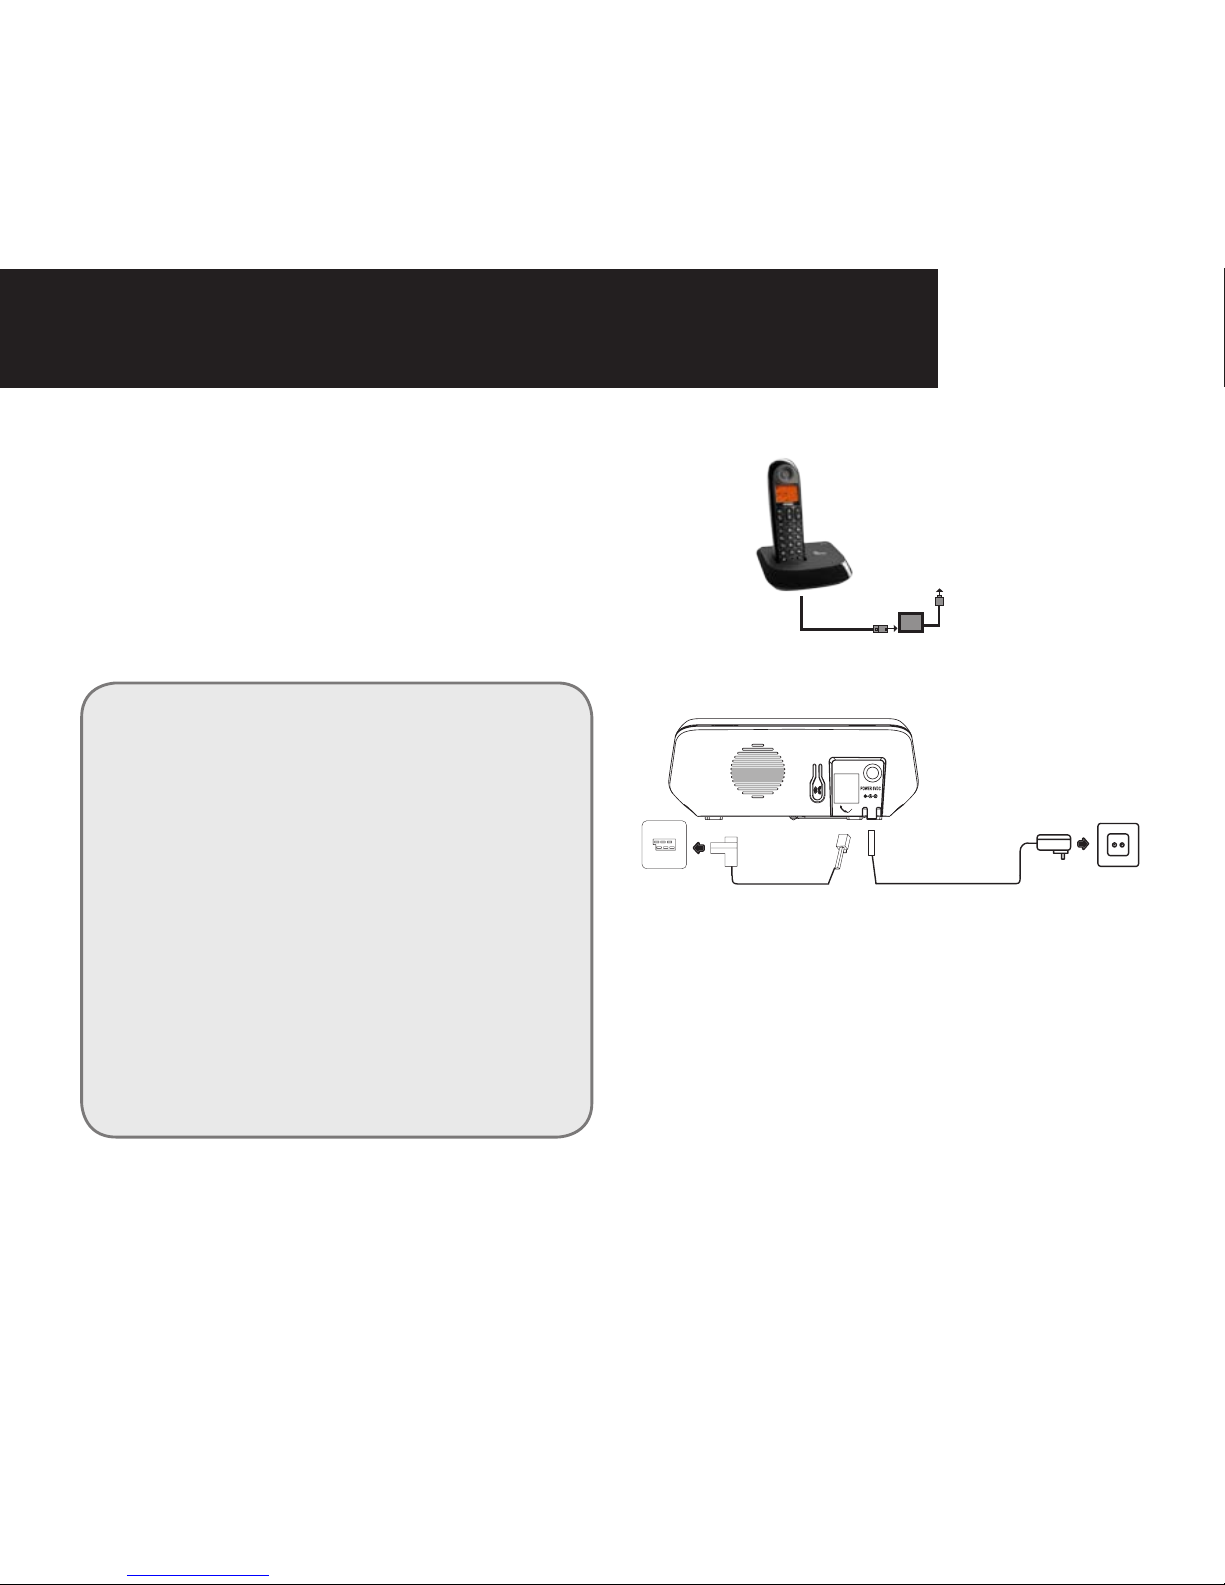
Charging the batteries
Beforethehandsetisusedforthersttime,insertit
inthebase/chargingstationforatleast14hours.
The handset warms up during the charging process.
Thisisnormalanddoesnotrepresentarisk.Donot
charge the handset with charging units from other
manufacturers.Thebatterychargestatusisindicated
inthedisplay.Whenthebatterychargehasreachedits
lowerlimitvalue,thebatteryicon ashesinthedisplay.
Setting the time and date on the
handset
Whenusedupforthersttime,thehandsetdoesnot
show the correct time (e.g. for entries in the call list/
answering machine). The date and time are set using
the DATE TIME menu option.
Setting the display language
Thedisplaylanguagecanbesettooneofthe9
differentlanguagesavailable.Whendelivered,the
languageissettoENGLISH.Changethesetting
using the HANDSET > LANGUAGE menu option.
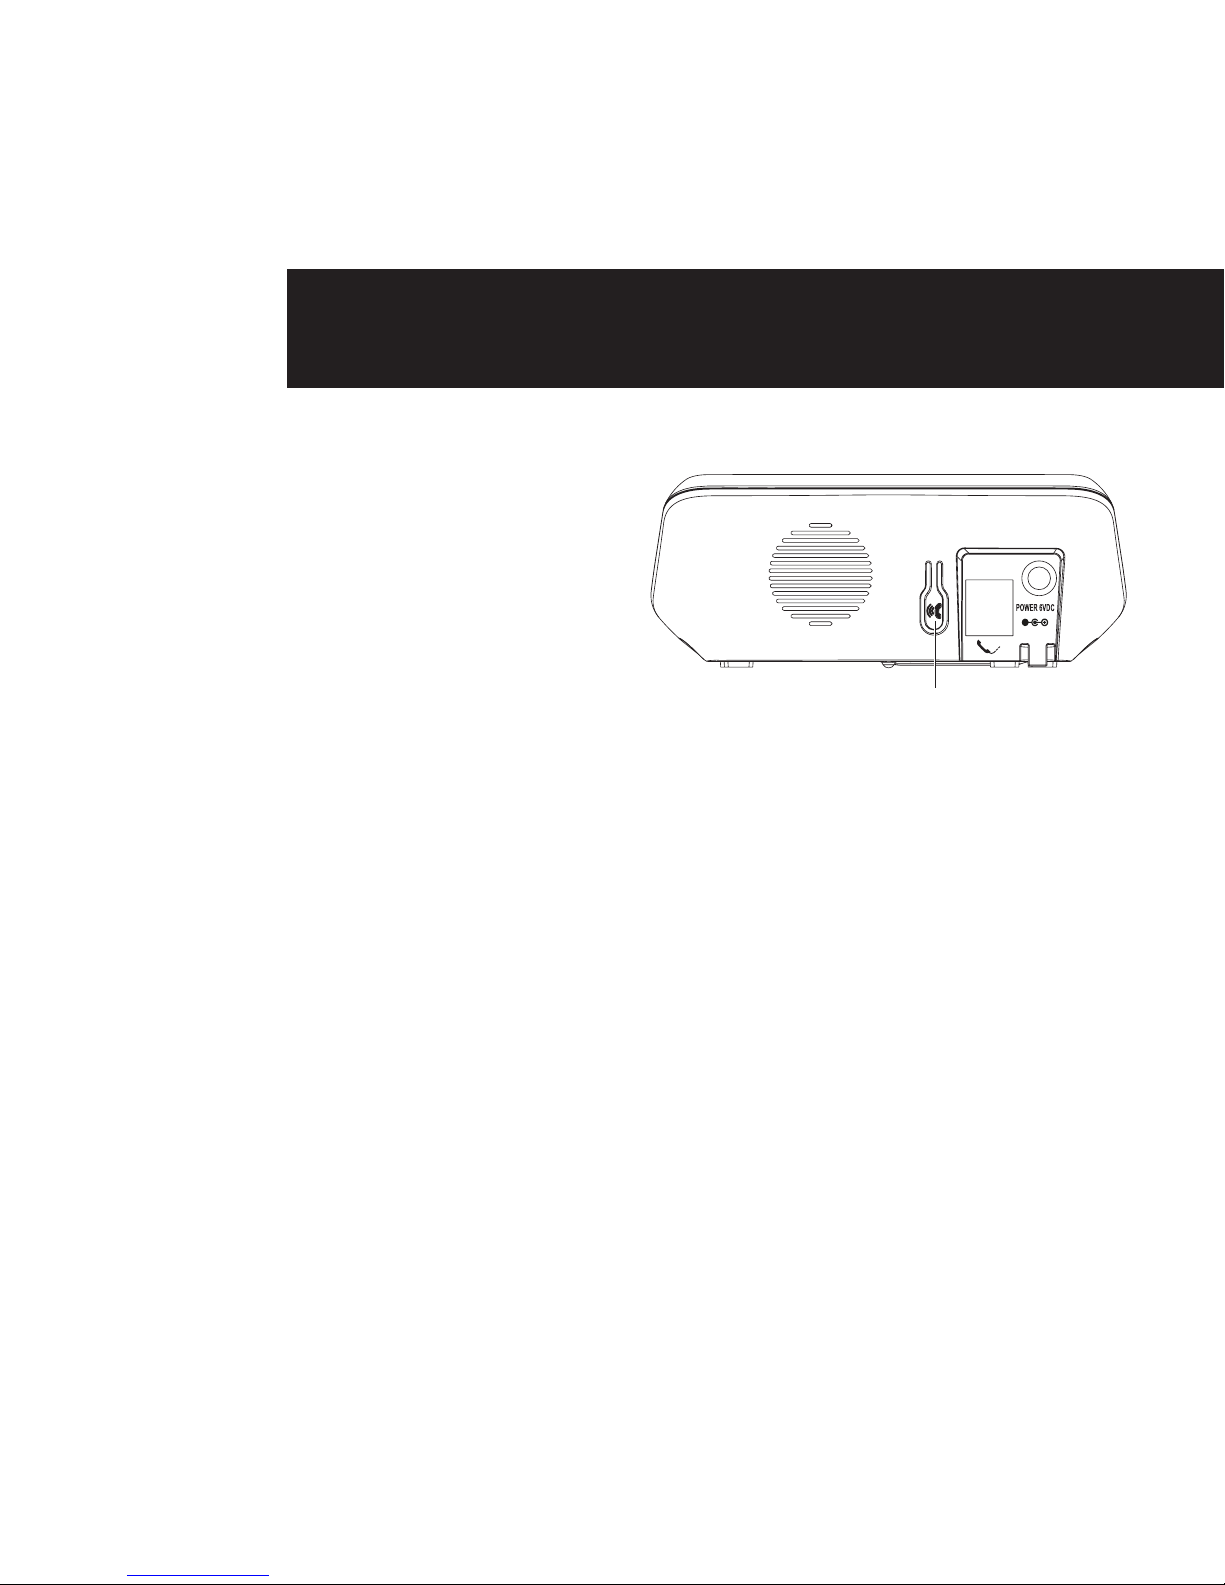
Radio signals between handset and
base unit
Touseyourhandsetandbaseunittogether,youmust
beabletomaintainaradiolinkbetweenthem.Be
awarethatanylargemetalobjects,likearefrigerator,
amirror,lingcabinet,etc,betweenthehandsetand
thebaseunitmayblocktheradiosignal.Othersolid
structures,likewalls,mayreducethesignalstrength.
GETTING STARTEd

PACK CONTENTS 7
Phone Function Keys
Thebuttonsinthisoperatingmanualaredepicted
withauniformcontour.Therefore,slightdeviations
intheappearanceofthesymbolsonthetelephone
buttonscomparedtothoseshownherearepossible.
Handset
1 Earpiece
2 OKbutton
- Selectamenuentry
3 NAVIGATIONbutton
- UptoincreasevolumeandviewCID
- Downtodecreasevolumeandaccess
Phonebook
4 TALKbutton
- Makeacall
- Acceptacall
5
Menubutton
- Accesstomainmenu
6 [*]button
- Longpresstoactivateordeactivatethekeylock
7 Mutebutton
- Mute/unmutethemicrophone
8 Display
9 BACKbutton
- Cancelamenuentry
- Backspacethedigit(s)orcharacter(s)
- Pressandholdtotogglebetweenhandset
nameanddate/timeinstandbymode
14
12 11
1
2
8
9
34
5
6
7
10
15
13
GETTING STARTEd PhONE FuNCTION KEYS

8
10 ENDbutton
- Endacall
- Pressandholdtoturnthehandseton/off
- Exitthemenu/operation
11 Rbutton
12 Redialbutton
- Enterrediallistanddialtherecentnumber
13 [#]button
- Insertapause.
- Longpresstoturntheringeron/off
14 INTbutton
- Makeanintercomcall
- Makeaconferencecall
15 Microphone
D
C
V
handsetlocatorbutton
PhONE FuNCTION KEYS

9
1 Answering machine /in use indicator
2 Turn the answering machine on/off
3 Deletecurrentmessage,longpress
to delete all read messages
4 Increasespeakervolume
2
3
4
8
5
6
7
1
Answering machine operation (eco710 ONLY)
Youcanusethekeysonthebasestationtoperformthebasicfunctionsoftheansweringmachine.
5 Skiptonextmessage
6 Decreasespeakervolume
7 Play/Stopmessageplayback
8 Gobacktopreviousmessageorreplaycurrent
message
PhONE FuNCTION KEYS PhONE FuNCTION KEYS

10
What the icons mean?
Icon Name Description
BatteryChargeLevel Indicatesbatteryisfullydischarged.
BatteryChargeLevel Indicatesbatteryisfullycharged.
Call Indicates that an external call is connected or held.
Iconblinkswhenreceivinganincomingcall.
Message IndicatesyouhaveanewVoiceMailmessage.
Caller display Indicatesyouhavenewmissedcalls,orthecalllogisbeingviewed.
Phonebook Displayswhenthephonebookisaccessed.
Alarm Displayswhenthealarmclockisactivated.
RingerOff Displays when ringer volume is turned off.
Signal Level
Indicatesthatthehandsetisregisteredandwithinrangeofthebasestation.
Iconblinkswhenthehandsetisoutofrangeorissearchingforabase.
Tam
SlowlyBlinkingtoindicatenewTAMmessage(s)
FastblinkingtoindicateTAMisfull
Tam off to indicate TAM off
WhAT ThE ICONS MEAN?

11
Your Telephone Operations
Switching on/off
Press and hold the ENDbuttonformorethan2
secondstoswitchon/offthehandsetinstandbymode.
Youcanswitchthehandsetoffandsavebattery
charge.
To lock/unlock the keypad
Press and hold the STARkeyfor1secondtolock/
unlockthekeypadinstandbymode.
Set time and date
1. Press
MENUkeytoentermenuselection.
2. Press the Navigationkeytoselect
CLOCK&ALARMandthenpressOKkeyto
select.
3. Press
OKkeytoselectDATE/TIME.Thelast
stored date is displayed. Enter the current
date(YY-MM-DD),pressOK,thenenterthe
time(HH-MM).
4. PresstheNavigationkeytoselectAMorPM
(ifthetimeisin12HOURSformat)andthen
press OKkeytoconrm.Aconrmationbeep
is played.
Change your handset’s name
1. Press
MENUkeytoentermenuselection.
2. Press the Navigationkeytoselect
PERSONALSETandthenpressOKkeyto
select.
3. Press the NavigationkeytoselectHANDSET
NAMEandthenpressOKkeytoselect.The
current handset name is displayed.
Note:
WhenthehandsetisOFF,itcannotbeused
formakingcallsincludingemergencycalls.
Therewillbenoringingduringanincoming
call.Toansweracall,youwillneedtoswitch
itbackon.Itmaytakesometimeforthe
handsettore-establisharadiolinkwiththe
baseunit.
Note:
Incomingcallscanstillbeansweredeven
ifthekeypadwaslocked.
Note:
IfyousubscribetotheCallerDisplayservice,
thetimeanddatewillbesetautomatically
whenyoureceiveacall,butyoumaystillneed
to set the correct year.
WhAT ThE ICONS MEAN? YOuR TELEPhONE OPERATIONS

12
4. PressBACK/CLEARkeytodeletethe
charactersonebyone.
Enter the new name (maximum 10 characters) and
pressOKkeytoconfirm.Aconfirmationbeepis
played.
Change the display language
1. Press
MENU keytoentermenuselection.
2. Press the Navigationkeytoselect
PERSONALSETandthenpressOKkeyto
select.
3. Press the Navigationkeytoselect
LANGUAGEandthenpressOKkeytoselect.
4. PresstheNavigationkeytoyourdesired
language and press OKkeytoconfirm.A
conrmationbeepisplayed.
• Oncethedisplaylanguageisset,theoptionmenus
on the handset will switch to display in the selected
language immediately.
Make and answer calls
Make a call
Pre-dialling
Dialthenumber(maximum24digits)andthenpress
TALKkey.
Direct dialling
Press TALKkeytotakethelineandthendialthe
number(maximum24digits).
Call from redial list
Press REDIALkeyinstandbymode.
Press the Navigationkeytoanentryintherediallist
and then press TALKkey.
Call from the call log
Press CALL LOG(UP)keyinidlemode.
Press the Navigationkeytoanentryinthecalllist
and then press TALKkey.
Call from the phonebook
Press PHONEBOOK(DOWN)keyinidlemode.
Press the Navigationkeytoanentryinthe
phonebookandthenpressTALKkey.
Note:
YouneedtosubscribetoCallerLineIdentication
servicetobeabletoseethecaller’snumberor
name in the call log.
YOuR TELEPhONE OPERATIONS

13
Answer and end a call
1. Whenthephonerings,pressTALKkey.
2. Toendaconversation,pressENDbutton.
When the handset rings during an
incomingcall,pleasedonothold
the handset too close to your ear as
the volume of the ringing tone may
damage your hearing.
WARNING:
!
IMPORTANTNOTE:Youcansimplyplacethe
handsetbackonitsbasestationorchargerpodto
end the call.
Makesurethatyouhavenotdeactivatedtheauto
hang-upfeature.
Adjust the earpiece volume
Duringacall,presstheNavigationkeytoselectfrom
VOLUME1toVOLUME3.
Mute/unmute microphone
Whenthemicrophoneismuted,thehandsetdisplays
MUTEON,andyourcallercannothearyou.
During a call,presstheMUTEkeytoturnon/offthe
microphone.
Paging
The paging featureenablesyoutolocateamissing
handset if the handset is in range and contains
chargedbatteries.
Press HANDSET LOCATORkeylocatedattheback
ofthebasestation.Alltheregisteredhandsetsstart
to ring.
Onceretrieved,pressanykeyonthe handset or the
HANDSET LOCATORkeyagaintoendthepaging.
Call waiting
IfyouhavesubscribedtoCallWaitingservice,the
earpiecewillemitabeep tone to inform you that
thereisasecondincomingcall.Thenumberorname
ofthesecondcallerwillalsobedisplayedonyour
phoneifyouhavesubscribedtoCallerID. Please
contactyournetworkproviderformoreinformation
on this service.
Handset Tone
Set the ring volume
Thereare5ringervolumeoptions(OFF,LEVEL1,
LEVEL2,LEVEL3andLEVEL4).Thedefaultlevel
isLEVEL2.
YOuR TELEPhONE OPERATIONS YOuR TELEPhONE OPERATIONS

14
1. Press
MENUkeytoentermenuselection.
2. Press the Navigationkeytoselect
PERSONALSETandthenpressOKkeyto
select.
3. Press the NavigationkeytoselectHANDSET
TONEandthenpressOKkeytoselectand
showRINGVOLUME.PresstheOKkeyagain
to select.
4. PresstheNavigationkeytoyourdesired
volume level and then press OKkeyto
conrm.Aconrmationbeepisplayed.
Set the ring melody
Thereare10ringmelodiesavailableonyour
handset.
1. Press
MENUkeytoentermenuselection.
2. Press the Navigationkeytoselect
PERSONALSETandthenpressOKkeyto
select.
3. Press the NavigationkeytoselectHANDSET
TONEandthenpressOKkeytoselect.
4. PresstheNavigationkeytoselectRING
TONESandthenpressOK to select.
5. Press the Navigationkeytoyourdesired
melody and then press OKkeytoconrm.A
conrmationbeepisplayed.
Activate/deactivate key tone
Asingletoneisemittedwhenakeyispressed.You
canenableordisablethekeytone.Bydefault,the
keytoneisON.
1. Press
MENUkeytoentermenuselection.
2. Press the NavigationkeytoselectPERSONAL
SET and then press OKkeytoselect.
3. Press the NavigationkeytoselectHANDSET
TONEandthenpressOKkeytoselect.
4. PresstheNavigationkeytoselectKEYBEEP
and then press OK to select.
5. Press the NavigationkeytoselectONor
OFFandthenpressOKkeytoconfirm.A
conrmationbeepisplayed.
Activate/deactivate auto hang-up
Thisfunctionenablesyoutoendacallautomatically
bysimplyplacingthehandsetonthebasestation.By
default,theAutoHangupfeatureisON.
1. Press
MENUkeytoentermenuselection.
2. Press the NavigationkeytoselectPERSONAL
SET and then press OKkeytoselect.
Set date/time format
Youcansetyourpreferreddate/timeformatforyour
phone.ThedefaultformatisDD/MMand24HOURS.
YOuR TELEPhONE OPERATIONS

15
Set time format
1. Press
MENUkeytoentermenuselection.
2. Press the Navigationkeytoselect
CLOCK&ALARMandthenpressOKkeyto
select.
3. Press the NavigationkeytoselectSET
FORMATandthenpressOKkeytoselect.
4. PressOKkeytoenterTIMEFORMAT.The
current setting is displayed.
5. Press the Navigationkeytoselect12HOURS
or24HOURSandthenpressOKkeyto
conrm.Aconrmationbeepisplayed.
Set date format
1. Press
MENUkeytoentermenuselection.
2. Press the Navigationkeytoselect
CLOCK&ALARMandthenpressOKkeyto
select.
3. Press the NavigationkeytoselectSET
FORMATandthenpressOKkeytoselect.
4. PresstheNavigationkeytoselectDATE
FORMATandthenpressOKkeytoselect.
The current setting is displayed.
5. Press the NavigationkeytoselectDD/MM
or MM/DD and then press OKkeytoconrm.
Aconrmationbeepisplayed.
Set alarm
Thehandsethasanalarmclockfeature,andwhen
thealarmisset,itisshownonthehandsetdisplay.
Whenthealarmtimeisreached,thedisplayashes
--ALARM--andthealarmmelodyisplayedfor1
minuteoruntilanyhandsetkeyispressed.
IfthealarmissetforONDAILYandthealarmwill
sound again on the next day.
IfthealarmwassetforONONCE,thewillbeturned
off.
1. Press
MENUkeytoentermenuselection.
2. Press the Navigationkeytoselect
CLOCK&ALARMandthenpressOKkeyto
select.
3. Press the NavigationkeytoselectALARM
and then press OKkeytoselect.
4. PresstheNavigationkeytoselectOFF,ON
ONCEorONDAILYandthenpressOKkey
toconrm.
IfyouselectONONCEorONDAILY,enter
thetime(HH-MM)forthealarmandpressthe
UP/DOWNkeytoselectAMorPMifthetime
isin12HOURSformat.
5. Press
OKkeytoconrm.Aconrmationbeep
is played.
YOuR TELEPhONE OPERATIONS YOuR TELEPhONE OPERATIONS

16
Set alarm tone
1. Press
MENUkeytoentermenuselection.
2. Press the Navigationkeytoselect
CLOCK&ALARMandthenpressOKkeyto
select.
3. Press the NavigationkeytoselectALARM
TONEandthenpressOKkeytoselect.
4. PresstheNavigationkeytoselectMELODY
1,MELODY2orMELODY3andthenpress
OKkeytoconfirm.Aconfirmationbeepis
played.
YOuR TELEPhONE OPERATIONS

17
uSING YOuR PhONEBOOK
Using your phonebook
Yourphonecanstoreupto20phonebookmemories.
Eachphonebookentrycanhaveamaximumof24
digitsforthephonenumberand12charactersfor
name.
How to enter characters?
Whenyouselectaeldinwhichyoucanentertext,
youcanenterthelettersthatareprintedonthekeys
bypressingtherelevantkeyonceorseveraltimes.
Forexample,press2oncetoinserttheletter‘A’,
press2twicetoinserttheletterB,andsoon...
Spacesandothersymbolscanbeenteredusingthe
1or0key.
Store a contact in the phonebook
1. Press
MENUkeytoentermenuselection.
2. Press the Navigationkeytoselect
PHONEBOOKandthenpressOKkeyto
select.
3. Press
OKkeyagaintoenterNEWENTRY.
4. Enterthenameofthecontact(maximum12
characters).
Toedit,pressBACKkeytodeletethelast
character entered.
Press
OKkeytoconrmthenameentry.
5. Enterthenumberofthecontact(maximum
24digits)andthenpressOKkeytoconrm.
Aconrmationbeepisplayed.
• Youcannotstoreanewphonebookentrywhen
thememoryisfull.Inthiscase,youhavetodelete
existingentriestomakespacefornewentries.
• Whenstoringthenumber,enterthefullnumber
includingtheSTD(area)codeifyousubscribeto
callerdisplay,otherwiseitwillnotdisplaythename
when there is an incoming call.
Access phonebook
1. Press
PHONEBOOK(DOWN)keyinstandby
modetobrowsethephonebookentries.
Alternatively,youcanpresstheMENUkey,
todisplayPHONEBOOKandthenpressOK
keytoselect.
2. Press the Navigation keytoselectLISTand
then press OKkeytoconrm.
Thephonebookentrieswillbelistedin
alphabeticalorder,andyoucanpress
Navigationkeytoscrollthroughthestored
entries.
3. Press
OKkeytoviewthedetailsofthe
selected entry.
YOuR TELEPhONE OPERATIONS

18 uSING YOuR PhONEBOOK
3. Press the NavigationkeytoselectDELETE
and then press OKkeytoselect.
4. PresstheNavigationkeytoselectanentry
to delete and then press OKkey.
5. Press
OKkeyagaintoconfirm.A
conrmationbeepisplayed.
Delete all entries from the phonebook
list
1. Press
MENUkeytoentermenuselection.
2. Press the Navigationkeytoselect
PHONEBOOKandthenpressOKkeytoselect.
3. Press the NavigationkeytoselectDELETE
ALL and then press OKkeytoselect.
4. PressOKkeyagaintoconrm.Aconrmation
beepisplayed.
Direct access memory
There are 2 direct access memories (Keys 1&2) in
additiontothephonebookmemory.Alongpresson
thekeysinstandbymodewillautomaticallydialthe
storedphonenumber.
• InsteadofpressingtheNavigationkeytobrowse
thephonebookentries,youcanpressthenumeric
keycorrespondingtotherstletteroftheentryyou
wishtolocate.Forexample,pressing2will show
the entries starting with A.
• Pressing 2again will show the entries starting with
B,andsoon...
Modify a phonebook entry
1. Press
MENUkeytoentermenuselection.
2. Press the Navigationkeytoselect
PHONEBOOKandthenpressOKkeytoselect.
3. Press the NavigationkeytoselectEDIT
ENTRYandthenpressOKkeytoselect.
4.PresstheNavigationkeytoselectanentry
to edit and then press OKkey.
The current name is displayed.
Edit the name and then press OKkeyto
conrm.
5. EditthenumberandthenpressOKkeyto
conrm.Aconrmationbeepisplayed.
Delete a phonebook entry
1. Press
MENUkeytoentermenuselection.
2. Press the Navigationkeytoselect
PHONEBOOKandthenpressOKkeyto
select.
This manual suits for next models
1
Table of contents
Other Oricom Cordless Telephone manuals

Oricom
Oricom M2400 Series User manual

Oricom
Oricom IP800 User manual

Oricom
Oricom eco50 Series User manual

Oricom
Oricom ECO600 User manual

Oricom
Oricom P100 User manual

Oricom
Oricom S6000 Series User manual

Oricom
Oricom M4000 User manual

Oricom
Oricom ECO800 User manual

Oricom
Oricom M500 User manual

Oricom
Oricom BB100 User manual

Oricom
Oricom ECO90 User manual

Oricom
Oricom DECT MI40 User manual

Oricom
Oricom eco700 User manual

Oricom
Oricom eco5200 Series User manual

Oricom
Oricom P900 Series User manual

Oricom
Oricom W1 User manual

Oricom
Oricom ULTRA 9800 User manual

Oricom
Oricom pro600 DECT User manual

Oricom
Oricom SLIM-9000 User manual

Oricom
Oricom eco85 DECT User manual