Ortur Aufero Laser 1 User manual

1
Dongguan Ortur Intelligent Technologies Co., Ltd.
https://ortur.tech/auferolaser1
No.1 Building, Ruijin Science and Technology Industrial Park, Changping, Dongguan 523558, Guandong Province, China
By
Firmware Update Instructions v1.87
15 December 2021
Aufero Laser 1

2
Dongguan Ortur Intelligent Technologies Co., Ltd.
https://ortur.tech/auferolaser1
No.1 Building, Ruijin Science and Technology Industrial Park, Changping, Dongguan 523558, Guandong Province, China
By
Aufero Laser 1 Firmware
Your Aufero Laser 1 rmware is the operating system that resides inside the
motherboard and controls all operations of the machine as well as the interactions
between the motherboard and the host computer.
In some circumstances, a rmware update is required to improve the Aufero
Laser 1 performance or x discovered issues. In some less common situations, a
rmware upgrade might be required to clear issues caused by user error. Please
read the instructions below carefully.
When NOT to upgrade or reinstall the rmware
• Not yet contacted support at https://ortur.tech/support to resolve an issue
• Aufero Laser 1 is working correctly and showing no problems
When TO upgrade the rmware
• Advised to do so by Ortur or Ortur Customer Support
• A new version of the rmware is posted at https://ortur.tech/latest-rmware
advising a rmware update to x a discovered problem or enhancing Aufero
Laser 1 functionality
Requirements to upgrade the rmware safely
• This guide covers updating procedure on Microsoft Windows, MacOs and
Linux. (This procedure was already validated in Windows 11)
• Direct Connection from the Aufero Laser 1 to your computer USB port. Note:
Some users reporting the use of USB Hubs may cause problems.
• Have access to software that allows decompressing a .zip le. (Note:
Windows, MacOs and Linux will natively perform this operation. However 3rd
party extractors are also usable)
• Disable temporally any 3rd party Antivirus Software. Although normally not
required it is still a recommendation.
General Recommendations;

3
Dongguan Ortur Intelligent Technologies Co., Ltd.
https://ortur.tech/auferolaser1
No.1 Building, Ruijin Science and Technology Industrial Park, Changping, Dongguan 523558, Guandong Province, China
By
Basic Troubleshooting
Firmware Write Fail
In some operating systems, specially Windows, security software as Anti-virus or
AntiMalware can prevent the complete copy of the BIN rmware le to your Aufero
Laser 1 motherboard, causing the machine to become unresponsive. These events
are rare but can happen, specially on Pre Windows 8 Operating systems.
Solution:
1. Please temporarelly disable the security software and attempt rmware
upgrade procedures a second time;
2. Use a dierent computer. Many users that experience the above issue reported
that simply using a dierent computer allowed for the rmware update process
to nalize without problems.
3. If neither solution above was successful, please get in touch via our Ticketing
system at https://ortur.tech/support. Ortur Support team will most likely suggest
a remote session to your computer to allow an untouched le transfer to your
Aufero Laser 1 motherboard.
Wrong Firmware le
Your Aufero Laser 1 is expecting a particularly type of le when you try a rmware
update. If the motherboard identies a wrong le format or type it will automatically
reject this le and turn o. This will result in the following errors:
Windows: “Error 0x800701B1: A Device which does not exist was Specied”
Mac: “The operation can’t be complete because an unexpected error occurred (error 100006)
Linux: “Error While Copying. Error When getting information from le. No such le or directory”
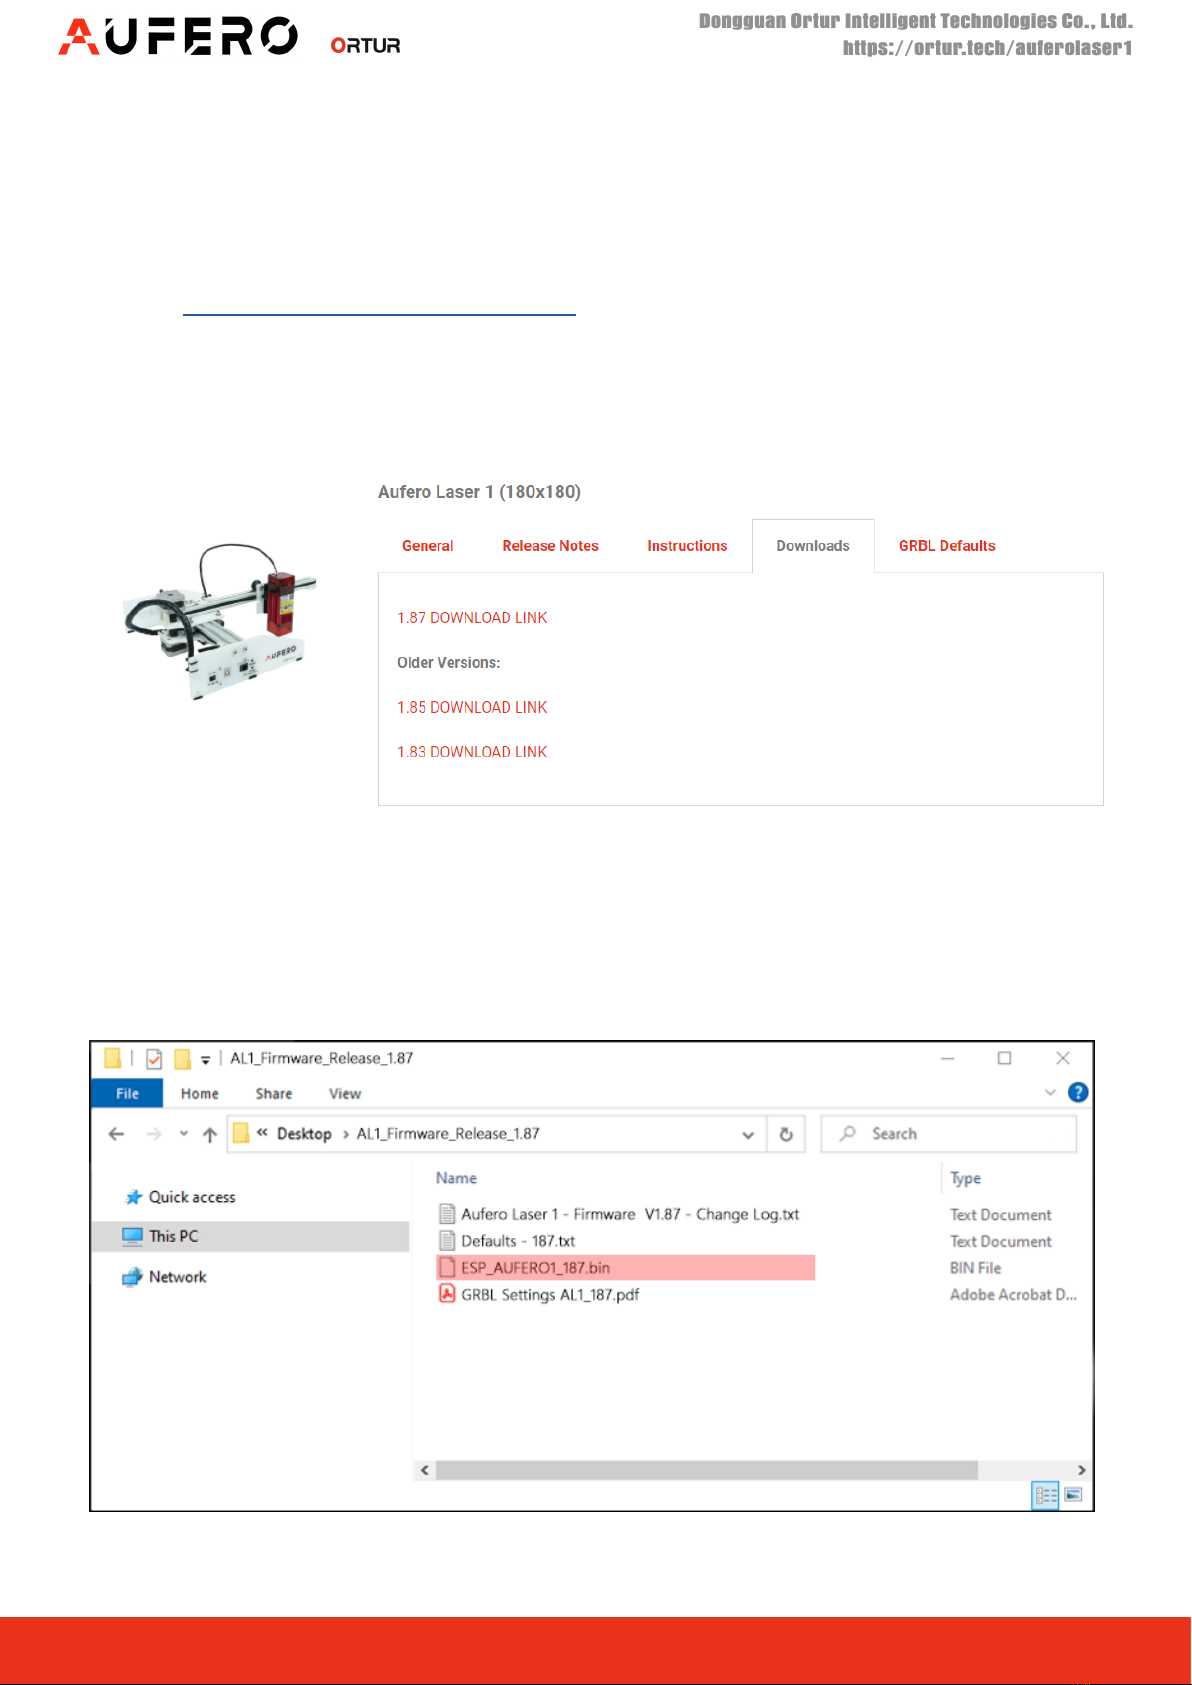
Solution: Please verify that the rmware le is the correct series for your Aufero
Laser 1. Only 1.8x series rmware les are accepted.
There are a few rare circunstances on which applying a new rmware to your
Aufero Laser 1 might lead to some problems. Below we will list a few of these
known issues and how to best address them:

4
Dongguan Ortur Intelligent Technologies Co., Ltd.
https://ortur.tech/auferolaser1
No.1 Building, Ruijin Science and Technology Industrial Park, Changping, Dongguan 523558, Guandong Province, China
By
Update Procedure - Windows
Step 1 - Retrieve Latest Firmware Files
1. Visit https://ortur.tech/latest-rmware
2. Browse through the web-page until you nd Aufero Laser 1;
3. Select the Download Tab and click DOWNLOAD LINK;
4. Save the .Zip le to your desktop;
5. Unzip the downloaded le using Windows, WinRar, 7-zip, WinZip or any unpacker
program compatible with your computer;

5
Dongguan Ortur Intelligent Technologies Co., Ltd.
https://ortur.tech/auferolaser1
No.1 Building, Ruijin Science and Technology Industrial Park, Changping, Dongguan 523558, Guandong Province, China
By
3. Depending on how accurate the button presses are performed, this operation
might need to be repeated.
4. The press buttons are successful when “AuferoLaser” device appears in “This
PC” as a drive. (The drive letter might be dierent than F:)
Step 2 - Enable Firmware mode on your Aufero
1. Connect your Aufero Laser 1 via USB directly to your computer - do not use USB
Hubs. Keep the Aufero Laser 1 in O State;
2. On the front of your Aufero Laser 1 motherboard press the following sequence of
buttons:
• Press and Hold the POWER button for 5 seconds
• Without releasing the held POWER button, after 5 seconds elapse, tap
RESET button once.
OLM-ESP-PRO_V1.2 Motherboard

6
Dongguan Ortur Intelligent Technologies Co., Ltd.
https://ortur.tech/auferolaser1
No.1 Building, Ruijin Science and Technology Industrial Park, Changping, Dongguan 523558, Guandong Province, China
By
5. From the extracted/unzipped folder drag and drop onto the “AuferoLaser”
drive the le ESP_AUFERO1_187.bin. Alternatively, right click the ESP_
AUFERO1_187.bin le and press copy. Navigate to “AuferoLaser” drive and right
click and press paste;
Note: The le will have the version number. At the time of writing of this guide is
ESP_AUFERO1_187.bin. Any other les included in the ZIP le should be ignored
and not copied over to the “AuferoLaser”drive.
6. Wait a few moments to be sure the le is copied properly;
7. Wait 5 seconds. Aufero Laser 1 will power o automatically;
8. Conrm that your Power Adapter is plugged in and its receiving Mains Power;
9. Power on your Aufero Laser 1 by pressing Power Button for 5 seconds;
10. Monitor your Aufero Laser 1, making sure it performs the homing cycle correctly.
Step 3 - Conrm Firmware was written correctly
In order to conrm the Firmware was written successfully to your Aufero Laser 1
Motherboard, is necessary to connect your machine to one of the following software:
LaserGRBL or Lightburn.
Additionally is required to restore Factory Default settings on the Motherboard to
clear the EEPROM ( Electrically Erasable Programmable Read-Only Memory) -
internal motherboard memory.
Important to NOTE: any customization on the GRBL settings will be
overwritten.

7
Dongguan Ortur Intelligent Technologies Co., Ltd.
https://ortur.tech/auferolaser1
No.1 Building, Ruijin Science and Technology Industrial Park, Changping, Dongguan 523558, Guandong Province, China
By
LaserGRBL
1. Launch LaserGRBL software;
Note: We would recommend updating to the latest version as well. LaserGRBL
4.6.0 is the latest version at the time of writing of this guide
2. Select the appropriate COM port for your Aufero Laser 1 and press Connect
button;
3. Once connection is established, console window will show the welcome
message;
4. Conrm that the welcome message shows OLF 187 as latest rmware. This
conrms the update procedure was successful.
5. Although probably not necessary, click the “Padlock” button to clear any possible
errors and set the motherboard into listening mode;
6. Above console window, where LaserGRBL has a input box saying (Type Gcode
Here) enter the following command: $RST=* and press the Enter key;

8
Dongguan Ortur Intelligent Technologies Co., Ltd.
https://ortur.tech/auferolaser1
No.1 Building, Ruijin Science and Technology Industrial Park, Changping, Dongguan 523558, Guandong Province, China
By
7. A response is given by the Aufero Laser 1 motherboard, acknowledging the
command by sending a [MSG: Restoring defaults]
The rmware update procedure is now complete!
The Aufero Laser 1 is ready to be used normally.
Important Note:
Any customization of the GRBL settings prior to rmware update was overwritten.
If they are necessary by any reason they should be introduced again.
Possible reminders for GRBL settings customizations:
• For the use of the Ortur YRR and Ortur YRR 2.0;
• Installation of a 3rd party Z-axis adjuster (Y Max Travel setting);
• Gshock Sensor sensitivy changes;
• Any other GRBL setting personalization;

9
Dongguan Ortur Intelligent Technologies Co., Ltd.
https://ortur.tech/auferolaser1
No.1 Building, Ruijin Science and Technology Industrial Park, Changping, Dongguan 523558, Guandong Province, China
By
LightBurn
1. Launch LightBurn software;
Note: We would recommend updating to the latest version as well. Lightburn
1.0.06 is the latest version at the time of writing of this guide
2. Select the appropriate COM port for your Aufero Laser 1 and wait for the
Connection status “READY”;
3. Once connection is established, console window will show the welcome
message. If Console is not visible go to Window menu - Console.
4. Conrm that the welcome message shows [OLF 187] as latest rmware. This
conrms the update procedure was successful.
5. Below console window, where LightBurn has a input box saying (type
commands here) enter the following command: $RST=* and press the Enter key;

10
Dongguan Ortur Intelligent Technologies Co., Ltd.
https://ortur.tech/auferolaser1
No.1 Building, Ruijin Science and Technology Industrial Park, Changping, Dongguan 523558, Guandong Province, China
By
7. A response is given by the Aufero Laser 1 motherboard, acknowledging the
command by sending a [MSG: Restoring defaults]
The rmware update procedure is now complete!
The Aufero Laser 1 is ready to be used normally.
Important Note:
Any customization of the GRBL settings prior to rmware update was overwritten.
If they are necessary by any reason they should be introduced again.
Possible reminders for GRBL settings customizations:
• For the use of the Ortur YRR and Ortur YRR 2.0;
• Installation of a 3rd party Z-axis adjuster (Y Max Travel setting);
• Gshock Sensor sensitivy changes;
• Any other GRBL setting personalization;

11
Dongguan Ortur Intelligent Technologies Co., Ltd.
https://ortur.tech/auferolaser1
No.1 Building, Ruijin Science and Technology Industrial Park, Changping, Dongguan 523558, Guandong Province, China
By
Update Procedure - MacOs
Step 1 - Retrieve Firmware Files
1. Visit https://ortur.tech/latest-rmware
2. Browse through the web-page until you nd Aufero Laser 1;
3. Select the Download Tab and click DOWNLOAD LINK;
4. Save the .Zip le to your desktop;
5. Unzip the downloaded le using MacOs, The Unarchiver, i-zip, UnRarX or any
unpacker program compatible with your MacOs version;

12
Dongguan Ortur Intelligent Technologies Co., Ltd.
https://ortur.tech/auferolaser1
No.1 Building, Ruijin Science and Technology Industrial Park, Changping, Dongguan 523558, Guandong Province, China
By
3. Depending on how accurate the button presses are performed, this operation
might need to be repeated.
4. The press buttons are successful when “AuferoLaser” device appears in
“Locations” as a drive.
Step 2 - Enable Firmware mode on your Aufero
1. Connect your Aufero Laser 1 via USB directly to your computer - do not use USB
Hubs. Keep the Aufero Laser 1 in O State;
2. On the front of your Aufero Laser 1 motherboard press the following sequence of
buttons:
• Press and Hold the POWER button for 5 seconds
• Without releasing the held POWER button, after 5 seconds elapse, tap
RESET button once.
OLM-ESP-PRO_V1.2 Motherboard

13
Dongguan Ortur Intelligent Technologies Co., Ltd.
https://ortur.tech/auferolaser1
No.1 Building, Ruijin Science and Technology Industrial Park, Changping, Dongguan 523558, Guandong Province, China
By
5. From the extracted/unzipped folder drag and drop onto the “AuferoLaser”
drive the le ESP_AUFERO1_187.bin. Alternatively, Ctrl click the ESP_
AUFERO1_187.bin le and press copy. Navigate to “AuferoLaser” drive and ctrl
click and press Paste Item; (Command + C and Command +V will also work)
Note: The le will have the version number. At the time of writing of this guide is ESP_
AUFERO1_187.bin. Any other les included in the ZIP le should be ignored unless advised by
Ortur Support otherwise
6. Wait a few moments to be sure the le is copied properly;
7. Wait 5 seconds. Aufero Laser 1 will power o automatically;
8. Conrm that your Power Adapter is plugged in and its receiving Mains Power;
9. Power on your Aufero Laser 1 by pressing Power Button for 5 seconds;
10. Monitor your Aufero Laser 1, making sure it performs the homing cycle correctly.
Step 3 - Conrm Firmware was written correctly
In order to conrm the Firmware was written successfully to your Aufero Laser 1
Motherboard, is necessary to connect your machine to Lightburn.
Additionally is required to restore Factory Default settings on the Motherboard to
clear the EEPROM ( Electrically Erasable Programmable Read-Only Memory) -
internal motherboard memory.
Important to NOTE: any customization on the GRBL settings will be
overwritten.

14
Dongguan Ortur Intelligent Technologies Co., Ltd.
https://ortur.tech/auferolaser1
No.1 Building, Ruijin Science and Technology Industrial Park, Changping, Dongguan 523558, Guandong Province, China
By
LightBurn
1. Launch LightBurn software;
Note: We would recommend updating to the latest version as well. Lightburn
1.0.06 is the latest version at the time of writing of this guide
2. Select the appropriate serial port for your Aufero Laser 1 and wait for the
Connection status “READY”;
3. Once connection is established, console window will show the welcome
message. If Console is not visible go to Window menu - Console.
4. Conrm that the welcome message shows [OLF 187] as latest rmware. This
conrms the update procedure was successful.
5. Below console window, where LightBurn has a input box saying (type
commands here) enter the following command: $RST=* and press the Enter key;

15
Dongguan Ortur Intelligent Technologies Co., Ltd.
https://ortur.tech/auferolaser1
No.1 Building, Ruijin Science and Technology Industrial Park, Changping, Dongguan 523558, Guandong Province, China
By
7. A response is given by the Aufero Laser 1 motherboard, acknowledging the
command by sending a [MSG: Restoring defaults]
The rmware update procedure is now complete!
The Aufero Laser 1 is ready to be used normally.
Important Note:
Any customization of the GRBL settings prior to rmware update was overwritten.
If they are necessary by any reason they should be introduced again.
Possible reminders for GRBL settings customizations:
• For the use of the Ortur YRR and Ortur YRR 2.0;
• Installation of a 3rd party Z-axis adjuster (Y Max Travel setting);
• Gshock Sensor sensitivy changes;
• Any other GRBL setting personalization;

16
Dongguan Ortur Intelligent Technologies Co., Ltd.
https://ortur.tech/auferolaser1
No.1 Building, Ruijin Science and Technology Industrial Park, Changping, Dongguan 523558, Guandong Province, China
By
Step 1 - Retrieve Firmware Files
1. Visit https://ortur.tech/latest-rmware
2. Browse through the web-page until you nd Aufero Laser 1;
3. Select the Download Tab and click DOWNLOAD LINK;
4. Save the .Zip le to your desktop;
5. Unzip the downloaded le using Linux, PeaZip, 7-zip, File Roller or any unpacker
program compatible with your Linus distro;
Update Procedure - Linux

17
Dongguan Ortur Intelligent Technologies Co., Ltd.
https://ortur.tech/auferolaser1
No.1 Building, Ruijin Science and Technology Industrial Park, Changping, Dongguan 523558, Guandong Province, China
By
3. Depending on how accurate the button presses are performed, this operation
might need to be repeated.
4. The press buttons are successful when “AuferoLaser” device appears in
“Locations” as a drive.
Step 2 - Enable Firmware mode on your Aufero
1. Connect your Aufero Laser 1 via USB directly to your USB directly to your Linux
Machine - do not use USB Hubs. Keep the Aufero Laser 1 in O State;
2. On the front of your Aufero Laser 1 motherboard press the following sequence of
buttons:
• Press and Hold the POWER button for 5 seconds
• Without releasing the held POWER button, after 5 seconds elapse, tap
RESET button once.
OLM-ESP-PRO_V1.2 Motherboard

18
Dongguan Ortur Intelligent Technologies Co., Ltd.
https://ortur.tech/auferolaser1
No.1 Building, Ruijin Science and Technology Industrial Park, Changping, Dongguan 523558, Guandong Province, China
By
5. From the extracted/unzipped folder drag and drop onto the “AuferoLaser”
drive the le ESP_AUFERO1_187.bin. Alternatively, right click the ESP_
AUFERO1_187.bin le and press copy. Navigate to “AuferoLaser” drive and right
click and press paste; (Ctrl + C and Ctrl + V will also work)
Note: The le will have the version number. At the time of writing of this guide is ESP_
AUFERO1_187.bin. Any other les included in the ZIP le should be ignored unless advised by
Ortur Support otherwise
6. Wait a few moments to be sure the le is copied properly;
7. Wait 5 seconds. Aufero Laser 1 will power o automatically;
8. Conrm that your Power Adapter is plugged in and its receiving Mains Power;
9. Power on your Aufero Laser 1 by pressing Power Button for 5 seconds;
10. Monitor your Aufero Laser 1, making sure it performs the homing cycle correctly.
Step 3 - Conrm Firmware was written correctly
In order to conrm the Firmware was written successfully to your Aufero Laser 1
Motherboard, is necessary to connect your machine to Lightburn.
Additionally is required to restore Factory Default settings on the Motherboard to
clear the EEPROM ( Electrically Erasable Programmable Read-Only Memory) -
internal motherboard memory.
Important to NOTE: any customization on the GRBL settings will be
overwritten.

19
Dongguan Ortur Intelligent Technologies Co., Ltd.
https://ortur.tech/auferolaser1
No.1 Building, Ruijin Science and Technology Industrial Park, Changping, Dongguan 523558, Guandong Province, China
By
LightBurn
1. Launch LightBurn software;
Note: We would recommend updating to the latest version as well. Lightburn
1.0.06 is the latest version at the time of writing of this guide
2. Select the appropriate serial port for your Aufero Laser 1 and wait for the
Connection status “READY”;
3. Once connection is established, console window will show the welcome
message. If Console is not visible go to Window menu - Console.
4. Conrm that the welcome message shows [OLF 187] as latest rmware. This
conrms the update procedure was successful.
5. Below console window, where LightBurn has a input box saying (type
commands here) enter the following command: $RST=* and press the Enter key;

20
Dongguan Ortur Intelligent Technologies Co., Ltd.
https://ortur.tech/auferolaser1
No.1 Building, Ruijin Science and Technology Industrial Park, Changping, Dongguan 523558, Guandong Province, China
By
7. A response is given by the Aufero Laser 1 motherboard, acknowledging the
command by sending a [MSG: Restoring defaults]
The rmware update procedure is now complete!
The Aufero Laser 1 is ready to be used normally.
Important Note:
Any customization of the GRBL settings prior to rmware update was overwritten.
If they are necessary by any reason they should be introduced again.
Possible reminders for GRBL settings customizations:
• For the use of the Ortur YRR and Ortur YRR 2.0;
• Installation of a 3rd party Z-axis adjuster (Y Max Travel setting);
• Gshock Sensor sensitivy changes;
• Any other GRBL setting personalization;
Table of contents
Other Ortur Engraver manuals