Oster Golden A5 Maintenance manual

GROUP OF COMPANIES
A.C.N. 076 468 481
The Provet Group of Companies and The Australian Veterinary Association
PARTNERS IN PRACTICE
Provet Supplies Pty Ltd - Brisbane
Provet Pty Ltd - Brisbane
Provet Queensland Pty Ltd - Brisbane
Provet North Queensland - Townsville
Provet NSW Pty Ltd - Sydney
Provet IT Pty Ltd - Sydney
Provet VMS Pty Ltd - Newcastle
Provet Riverina Pty Ltd - Wagga Wagga
Provet Allhank Pty Ltd - Melbourne
Provet NZ Pty Ltd - Auckland
Oster Golden A5
Care and Maintenance
DO NOT!
• Attempt to work on the clipper with it connected to the main power supply.
• Attempt to clip a wet or perspiring animal.
• Touch the blades when moving!
• Switch the machine on with loose or missing blades.
• (In the interests of safety ensure that both blades are tightly seated.)
• Push the clipper through the hair in order to force it to clip, rather guide the machine
• In the direction you want to clip and let the machine do the work!
• Use if the voltage at your site is different to that on the clipper information data.
• Attempt to take apart or assemble the blades or any parts of the clipper over straw, shavings
or other materials. Only carry out such tasks on a specified area i.e. tables or workbench
otherwise essential parts may be lost.
• Immerse either the machine or cutter head in liquid (oil/diesel/lubricant) of any kind.

CLIPPER INFORMATION:
The Clipper is double insulated UL approved and CE rated
Do not attempt to operate this machine without first oiling the blades.
Do not use WD 40 or other similar solvents/scouring agents to clean the clipper or the blades.
Do not attempt to sharpen the blades yourself - they need a special machine.
A wide range of “snap-on” blades can be fitted to this clipper, including those made by Oster as well as the Wahl
range and others similar “snap-on” type blades.
The “snap-on” type blades should not be taken apart other than for sharpening purposes at the place of
sharpening.
Blades need to be regularly sharpened to keep a good cutting edge, and they must be constantly oiled during use.
Removing the blades:
Ensure that the clipper is not connected to the main power supply, if so,
disconnect before attempting to remove the blades
Hold the machine firmly in your hand (right or left) with the maker's name facing
you. (OSTER.) Now rotate the body casing 180 degrees until you are viewing the
underside of the clipper.
Immediately before the blade (comb) (See fig 1) you will see a “black” blade
release lever. With your thumb push this firmly upwards towards the blade above
and hold in position. With your other hand place your thumb on the rear edge of
the comb and your two index fingers on the front teeth. Pivot the blade in an
upward and backward angle until it clicks back in position. You can now slide the
blade off the blade ”tongue”. You can now release the "thumb" of your other
hand! The blade should now be fully removable from the clipper. (This is best
practised a few times over something soft such as a cushion rather than a
concrete floor!)
Fitting the blades:
Hold the machine firmly in your
hand (right or left) with the body
casing facing you (You should be
able to read the maker’s name!
(OSTER.)
Take the blade set in your other
hand and seat it upon the blade
latch tongue, which will slide
between the comb blade plate and
the tension spring assembly. (See
fig 2)
All you need to do to rectify this is to
insert a flat object (thin screwdriver
– best quality kitchen knife!)
between the two and gently twist
round to force open again. (See fig
3)

With the blade seated on the tongue and held in place with the fingers
of your other hand, press the upper portion of the blade towards the
clipper body - it should “snap” shut. (This can be done with the motor
running and will not effect the performance of the clipper - whilst
normally quiet a safe operation for adults NOT children! just exercise
care against possible personal injury). Check the blade is right home to
the clipper casing - a gap of about 0.5 - 1½ mm is normal.
The blade is now fitted! In some cases especially with new
blades/machines, the blade may requires a further degree of pressure
to make sure it is right home to the casing This soon ceases once the
blades have been used a few times.
However before you rush to switch on. Oil the blades before
commencing a test run with the clipper
(When operating for the first time after changing blades the machine
should be pointed away from you and/or any animal before switching on
to test.)
Now test the clipper.
Tensioning the blades:
One of the joys of the
“snap-on” blade is that
there is no tensioning to
be carried out!
However some blades,
especially those of other
manufacturers, may in
certain instances need
adjustment. In a normal
situation you should be
able to move the cutter
blade backwards and
forwards with moderate
pressure within the
"tension spring" hold. Do
not undo the blade
screws as this will affect
the blade alignment and
may cause the blade to
jam and not cut.
To make any adjustment (See Fig 4) simply place the blade flat on a table surface, (screws side down) with the
blade teeth pointing away from you. Next slide the cutter blade to the right, then place a flat headed screwdriver
between the blade spring and the comb, now with gentle pressure pry upwards only sufficiently to slightly slacken
the tension. If you over do it you will end up with the tension too loose!
Oiling:
Oiling of the blades should be carried out at regular intervals during the clipping application. Apply a small quantity
of oil on the ends of the blades whilst the trimmer is running. Only use clipper oil or light machine oil of good
quality
Attachment Combs:
Are not supplied with the clipper but can be obtained in various sizes. Their purpose is to allow a specific depth of
hair to be left on the body irrespective of the angle you may clip. They are easily attached by clipping over the
blade from front to back.

Routine Maintenance:
BEFORE carrying out any work on the clipper first disconnect from the mains power supply
Is important and should be carried regularly. Do not conducted maintenance tasks over straw, shavings, or other
types of bedding. Preferably use a flat table surface or work bench, otherwise you can risk small parts becoming
lost in the process.
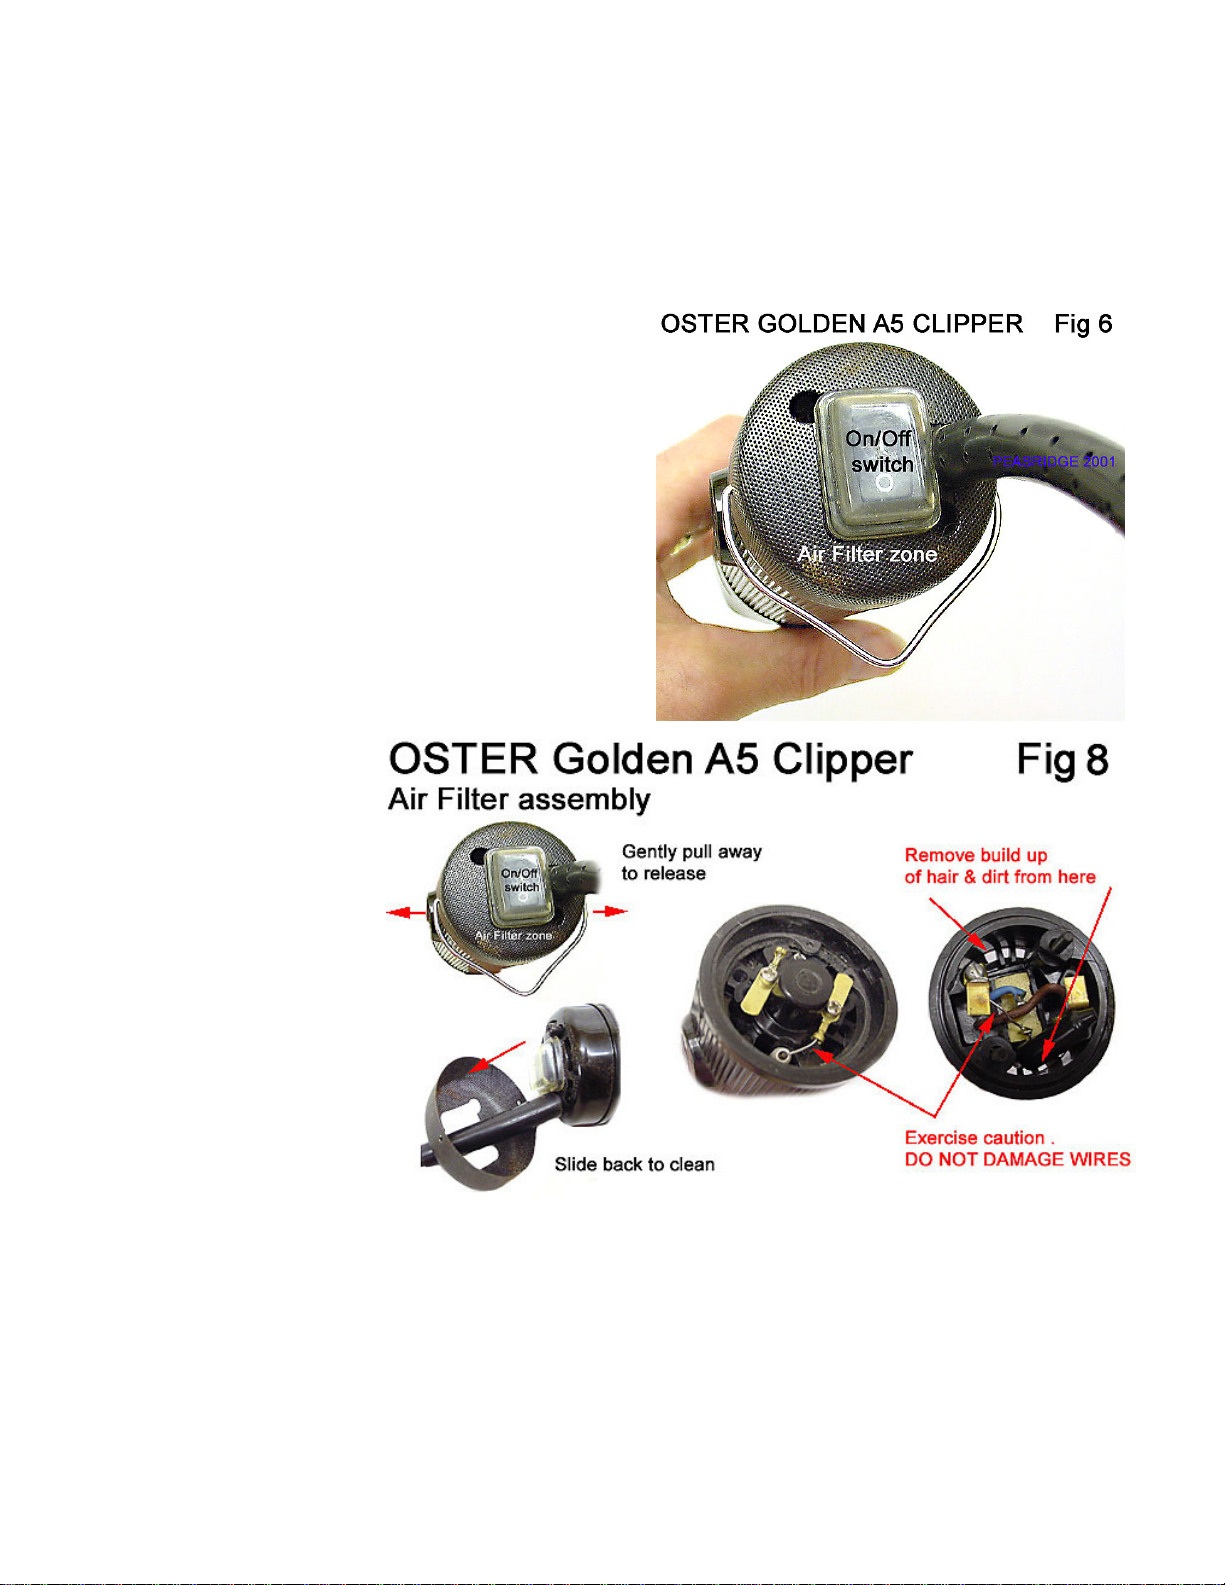
Air Filters: (See fig 6 & 8)
BEFORE carrying out any work on the clipper first disconnect
from the mains power supply
Oster A5 clippers have a track record especially in dog
grooming circles of overheating. Those machines with the
"on/off" switch located at the rear of the appliance appear to
be especially troubled with overheating. It is vital therefore
that the air filter zone is kept clear of any blockages at all
times and is cleaned daily especially in busy grooming
parlour situations
The air filter zone is a vital air cooling intake for the cooling
running of the clipper motor and it is natural that if this
becomes even partly blocked the motor will quickly become
starved of cool air with the result that it will rapidly start to
overheat.
Sadly the design of the air filter cover is not "over friendly"
to easy cleaning, and unlike most clippers of its type rather
laborious in its cleaning involvement. The removal of the
mesh cover is relatively easy,
- gently part the hang hook
wire so that each side is
withdrawn from the holes in
the casing and then you can
remove the mesh which slides
down the clipper cable for
cleaning. (See fig 8)
A surprisingly large amount of
hair and dirt which somehow
manages to get through the
filter mesh, will often collect
inside the rear compartment of
the clipper (beyond the area
covered by the air filter mesh).
If you unscrew the two screws
at the rear of the clipper either
side of the on/off switch you
can gently and carefully
withdraw the casing which will
then allow you to remove tufts
of collected hair and dirt which threaten to block the area. (I find a pair of small tweezers ideal for this job)
Exercise caution so as not to damage any of the wires in the area! (See fig 8)

Blade lever replacement: (See fig 5)
BEFORE carrying out any work on the clipper first
disconnect from the mains power supply
Replace the blade drive lever when it shows signs of
becoming worn or in the event of clipper's performance
starting to drop off, signs of tracking, when tapping or
clicking noises occurring. This maintenance task can be
easily undertaken by most operators and only requires
the clipper nameplate to be removed by undoing the
two screws and lifting off. Remove the plate to expose
the drive lever bar which should be gently raised to
remove it from it’s the two oval pins onto which it fits.
Be careful not to dislodge or lose the two "felt brushes"
positioned either side of the lever
When replacing the drive lever seat it gently into the
two pins using equal pressure. Grease lightly before
replacing the head plate and finally fixing back the two
screws. It is NOT necessary to use excessive amounts of
grease
Greasing:
BEFORE carrying out any work on the clipper first
disconnect from the mains power supply
Please note that over greasing can cause leakage and
reduce the operating efficiency of the machine. Check
monthly by removing the metal nameplate. Then
remove the nylon drive lever, metal link, and gear.
Insert grease tube nozzle into the hole on the top of the gear post. NOTE: If grease does not come through, clean
holes. Do NOT fill the cavity with grease. Replace the link and gear and add a small amount of grease to the teeth
of the gear & linkage. Use only Oster Grease, which is specially formulated for double insulated clippers.
Carbon Brushes

BEFORE carrying out any work on the clipper first disconnect from the mains power supply
These need to be inspected on a regular basis, and replaced periodically to insure maximum motor performance
and life expectancy. Remove the brush cap by unscrewing it - you will need a broad-based screwdriver - (See fig
7) Remove both the plastic cap and the brass cap using slight pressure on the side of the cap in a "finger picking"
action and withdraw the carbon brush and spring assembly. Check the length of the carbon, comparing both the
roundand square sections of the brush. When the square section has been reduced to the length of the round
section replacement is necessary to prevent possible damage to the motor armature. (expensive!)
Carbon brushes MUST be replaced as sets - not individually. Use ONLY Oster genuine Carbon Brushes Avoid
substitutes IMPORTANT! When ORDERING BRUSHES specify Model Number of clipper and voltage rating.
When reinstating the brush, make sure that the sharp pointed corners of the brush are aligned with the triangular
notches in the brass cap and then the nylon cap over the brush spring and pressing down to seat the brass cap into
the brush tube. Replace the outer housing cap and screw down tightly to prevent loosening
Cleaning:
BEFORE carrying out any work on the clipper first disconnect from the
mains power supply
Cleaning of the blades and inside of the clipper head (See fig 3) should be
thoroughly carried out after every clipping session to avoid a build up of
hair and dirt. Remove all traces of oil and hair with a small stiff brush and
wiped clean with a dry clean cloth. The use of an airline is ideal - if
available. Failing that, use a small oil paint brush – the stubby type – This
will enable you to remove most of the muck, after which a good “blow”
will usually do the rest! Try to avoid a build up of dirt and hair – it makes
cleaning easier!
When completely free from hair clippings and oil, re oil all working parts
within the head and likewise to the blades to prevent any occurrence of
rust. Remember even the smallest spots of rust can have an adverse
effect on the cutting performance of the blades - in some cases making
clipping impossible.
Storage:
When not in use, having been thoroughly cleaned and oiled, the machine should be stored in a dry place preferably
in your house. Do not leave in tack rooms, stables, damp grooming parlours, cowsheds and dairy parlours or
similar places. The same should apply to all blades. Keep oiled and dry at all times.

Table of contents
Other Oster Hair Clipper manuals

Oster
Oster 78123 User manual

Oster
Oster 76076 User manual

Oster
Oster 76077 User manual

Oster
Oster Large Animal Clipper & Electric... User manual

Oster
Oster Cordless Fast Feed User manual

Oster
Oster 76076CL-X User manual

Oster
Oster 076070-010 User manual

Oster
Oster 78005 User manual

Oster
Oster 97 User manual

Oster
Oster 078003 User manual