manuals.online logo
Brands
  1. Home
  2. •
  3. Brands
  4. •
  5. OttLite
  6. •
  7. Lighting Equipment
  8. •
  9. OttLite 15548BB8 User manual

OttLite 15548BB8 User manual

CONGRATULATIONS! You’ve
purchased the finest in natural lighting
technology with your new OttLite
product.
PRODUCT REGISTRATION FORM
Please complete the enclosed Product
Registration Form and return it today
by mail, or register online by going to:
http://warranty.OttLite.com.
WARNING: To prevent electric shock,
make sure the lamp is not plugged in
until all assembly steps are complete.
To avoid lamp tip over, position lamp
shade as shown in diagram.
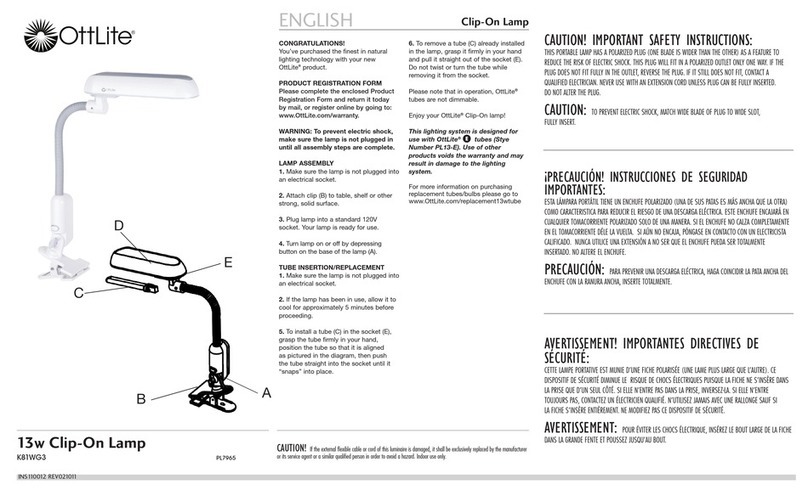
LAMP ASSEMBLY
1. Remove lamp from packing placing
the base (A) flat on a steady surface.
2. Thread pole (B) to base (A) by hand,
turning clockwise until snug. Excess
cord may be pulled through the base.
3. Attach counterbalance (C) to arm (E)
by turning clockwise until snug, then
finish threading arm (E) into pole (B).
4. Fit shade (H) over socket (G) then
thread socket ring (J) onto socket.
Turn socket ring (J) clockwise to tight-
en until finger tight and the shade (H)
is held securely.
5. Refer to BULB INSERTION/
REMOVAL to install bulb (K) in lamp.
6. Plug the cord into a standard 120Vac
outlet.
7. To turn the lamp ON or OFF rotate the
switch (M) clockwise.
8. To position the upper arm (E), turn
thumbscrew (D) counterclockwise to
loosen, reposition arm (E) then turn
thumbscrew (D) clockwise to tighten.
To avoid damage to the lamp, DO
NOT ATTTEMPT to move arm (E)
without loosening thumbscrew (D).
9. DO NOT try to rotate the shade side-
ways as the lamp maybe damaged.
DO NOT force thumbscrew as damage
to the lamp may occur.
BULB INSERTION/REMOVAL
1. Make sure the lamp is not plugged into
an electrical socket.
2. If the lamp has been in use, allow it to
cool approximately 5 minutes before
proceeding.
3. To install the bulb (K) in the socket (G),
thread the base of the bulb into the
socket turning clockwise until snug.
CAUTION: DO NOT overtighten the
bulb. Overtightening the bulb may
make removal difficult or damage
the lamp or bulb.
4. To remove a bulb (K) already installed
in the lamp, unthread the bulb from the
socket (G) turning counterclockwise to
loosen.
DO NOT allow glass part of the bulb to
strike the shade or any hard surface.
Please note that in operation, OttLite
bulbs are not dimmable.
Enjoy your OttLite Cambridge
Table Lamp!
This lighting system is designed
for use with OttLite type
(style number ED15-S). Use of other
products voids the warranty and
may result in damage to the lighting
system.
15w Cambridge Table Lamp
CAUTION! If the external flexible cable or cord of this luminaire is damaged, it shall be exclusively replaced by the manufac-
turer or its service agent or a similar qualified person in order to avoid a hazard. Indoor use only.
15w Cambridge Table Lamp
15548BB8 15548BZH 15548BZP S2471
CAUTION! IMPORTANT SAFETY INSTRUCTIONS:
THIS PORTABLE LAMP HAS A POLARIZED PLUG (ONE BLADE IS WIDER THAN THE OTHER) AS A FEATURE TO
REDUCE THE RISK OF ELECTRIC SHOCK. THIS PLUG WILL FIT IN A POLARIZED OUTLET ONLY ONE WAY. IF
THE PLUG DOES NOT FIT FULLY IN THE OUTLET, REVERSE THE PLUG. IF IT STILL DOES NOT FIT, CONTACT A
QUALIFIED ELECTRICIAN. NEVER USE WITH AN EXTENSION CORD UNLESS PLUG CAN BE FULLY INSERTED.
DO NOT ALTER THE PLUG.
CAUTION: TO PREVENT ELECTRIC SHOCK, MATCH WIDE BLADE OF PLUG TO WIDE SLOT,
FULLY INSERT.
AVERTISSEMENT! IMPORTANTES DIRECTIVES
DE SÉCURITÉ:
CETTE LAMPE PORTATIVE EST MUNIE D’UNE FICHE POLARISÉE (UNE LAME PLUS LARGE QUE L’AUTRE). CE
DISPOSITIF DE SÉCURITÉ DIMINUE LE RISQUE DE CHOCS ÉLECTRIQUES PUISQUE LA FICHE NE S’INSÈRE
DANS LA PRISE QUE D’UN SEUL CÔTÉ. SI ELLE N’ENTRE PAS DANS LA PRISE, INVERSEZ-LA. SI ELLE
N’ENTRE TOUJOURS PAS, CONTACTEZ UN ÉLECTRICIEN QUALIFIÉ. N’UTILISEZ JAMAIS AVEC UNE RALLONGE
SAUF SI LA FICHE S’INSÈRE ENTIÈREMENT. NE MODIFIEZ PAS CE DISPOSITIF DE SÉCURITÉ.
AVERTISSEMENT: POUR ÉVITER LES CHOCS ÉLECTRIQUE, INSÉREZ LE BOUT LARGE
DE LA FICHE DANS LA GRANDE FENTE ET POUSSEZ JUSQU’AU BOUT.
¡PRECAUCIÓN! INSTRUCCIONES DE
SEGURIDAD IMPORTANTES:
ESTA LÁMPARA PORTÁTIL TIENE UN ENCHUFE POLARIZADO (UNA DE SUS PATAS ES MÁS ANCHA QUE LA
OTRA) COMO CARACTERISTICA PARA REDUCIR EL RIESGO DE UNA DESCARGA ELÉCTRICA. ESTE ENCHUFE
ENCAJARÁ EN CUALQUIER TOMACORRIENTE POLARIZADO SOLO DE UNA MANERA. SI EL ENCHUFE NO CALZA
COMPLETAMENTE EN EL TOMACORRIENTE DÉLE LA VUELTA. SI AÚN NO ENCAJA, PÓNGASE EN CONTACTO
CON UN ELECTRICISTA CALIFICADO. NUNCA UTILICE UNA EXTENSIÓN A NO SER QUE EL ENCHUFE PUEDA
SER TOTALMENTE INSERTADO. NO ALTERE EL ENCHUFE.
PRECAUCIÓN: PARA PREVENIR UNA DESCARGA ELÉCTRICA, HAGA COINCIDIR LA PATA
ANCHA DEL ENCHUFE CON LA RANURA ANCHA, INSERTE TOTALMENTE.
ENGLISH
INS-14-0150 REV101314
CONGRATULATIONS! You’ve
purchased the finest in natural lighting
technology with your new OttLite®
product.
PRODUCT REGISTRATION FORM
Please complete the enclosed Product
Registration Form and return it today
by mail, or register online by going to:
http://warranty.OttLite.com.
WARNING: To prevent electric shock,
make sure the lamp is not plugged in
until all assembly steps are complete.
To avoid lamp tip over, position lamp
shade as shown in diagram.
LAMP ASSEMBLY
1. Remove lamp from packing placing
the base (A) flat on a steady surface.
2. Loosen, but do not remove, thumb-
screw (D) at the joint on arm (E).
3. To aid in assembly of step 6, rotate
the joint so that it points opposite to the
arm (E). Tighten thumbscrew (D) by hand
until snug.
4. Thread pole (B) to the joint of arm (E)
by hand carefully turning clockwise. DO
NOT tighten completely.
5. Hold arm (E) to steady pole (B) then
thread pole (B) to base (A) by hand care-
fully turning clockwise until snug. Arm (E)
will still be loose. Excess cord may be
pulled through the base (A).
6. Finish threading arm (E) to pole (B) by
hand turning clockwise until snug.
7. Attach shade (H) to socket housing (G)
using socket ring (J) to hold the shade in
place.
8. Thread socket ring (J) onto socket by
hand turning clockwise until tight enough
to hold the shade steady.
9. Thread arm (C) into joint of pole (E) by
hand turning clockwise until tight.
10. Refer to BULB INSTALLATION AND
REMOVAL to install bulb (K) in lamp.
11. Plug the cord into a standard 120Vac
outlet.
12. To turn the lamp on or off rotate the
power cord mounted switch (M)
clockwise.
13. To position arm (E) turn thumbnut (D)
counterclockwise to loosen, reposition
arm (E) then turn thumbnut (D) clockwise
to tighten. To avoid damage to the lamp
DO NOT ATTEMPT to move arm (E)
without loosening thumbnut (D).
14. DO NOT try to rotate the shade side-
ways as the lamp maybe damaged.
DO NOT force thumbscrew as damage
to the lamp may occur.
BULB INSERTION/REMOVAL
1. Make sure the lamp is not plugged into
an electrical socket.
2. If the lamp has been in use, allow it to
cool approximately 5 minutes before
proceeding.
3. To install the bulb (K) in the socket
(G), thread the base of the bulb into the
socket turning clockwise until snug.
CAUTION: DO NOT overtighten the
bulb. Overtightening the bulb may
make removal difficult or damage the
lamp or bulb.
4. To remove a bulb (K) already installed
in the lamp, unthread the bulb from the
socket (G) turning counterclockwise to
loosen.
Please note that in operation, OttLite®
bulbs are not dimmable.
Enjoy your OttLite®Cambridge Table
Lamp!
This lighting system is designed
for use with OttLite®type
(style number ED15-S). Use of other
products voids the warranty and
may result in damage to the lighting
system.
Cambridge Table Lamp
CAUTION! If the external flexible cable or cord of this luminaire is damaged, it shall be exclusively replaced by the manufac-
turer or its service agent or a similar qualified person in order to avoid a hazard. Indoor use only.
REV022111
15w Cambridge Table Lamp
15548BB8 ST10086
CAUTION! IMPORTANT SAFETY INSTRUCTIONS:
THIS PORTABLE LAMP HAS A POLARIZED PLUG (ONE BLADE IS WIDER THAN THE OTHER) AS A FEATURE TO
REDUCE THE RISK OF ELECTRIC SHOCK. THIS PLUG WILL FIT IN A POLARIZED OUTLET ONLY ONE WAY. IF
THE PLUG DOES NOT FIT FULLY IN THE OUTLET, REVERSE THE PLUG. IF IT STILL DOES NOT FIT, CONTACT A
QUALIFIED ELECTRICIAN. NEVER USE WITH AN EXTENSION CORD UNLESS PLUG CAN BE FULLY INSERTED.
DO NOT ALTER THE PLUG.
CAUTION: TO PREVENT ELECTRIC SHOCK, MATCH WIDE BLADE OF PLUG TO WIDE SLOT,
FULLY INSERT.
AVERTISSEMENT! IMPORTANTES DIRECTIVES
DE SÉCURITÉ:
CETTE LAMPE PORTATIVE EST MUNIE D’UNE FICHE POLARISÉE (UNE LAME PLUS LARGE QUE L’AUTRE). CE
DISPOSITIF DE SÉCURITÉ DIMINUE LE RISQUE DE CHOCS ÉLECTRIQUES PUISQUE LA FICHE NE S’INSÈRE
DANS LA PRISE QUE D’UN SEUL CÔTÉ. SI ELLE N’ENTRE PAS DANS LA PRISE, INVERSEZ-LA. SI ELLE
N’ENTRE TOUJOURS PAS, CONTACTEZ UN ÉLECTRICIEN QUALIFIÉ. N’UTILISEZ JAMAIS AVEC UNE RALLONGE
SAUF SI LA FICHE S’INSÈRE ENTIÈREMENT. NE MODIFIEZ PAS CE DISPOSITIF DE SÉCURITÉ.
AVERTISSEMENT: POUR ÉVITER LES CHOCS ÉLECTRIQUE, INSÉREZ LE BOUT LARGE DE LA
FICHE DANS LA GRANDE FENTE ET POUSSEZ JUSQU’AU BOUT.
¡PRECAUCIÓN! INSTRUCCIONES DE SEGURIDAD
IMPORTANTES:
ESTA LÁMPARA PORTÁTIL TIENE UN ENCHUFE POLARIZADO (UNA DE SUS PATAS ES MÁS ANCHA QUE LA
OTRA) COMO CARACTERISTICA PARA REDUCIR EL RIESGO DE UNA DESCARGA ELÉCTRICA. ESTE ENCHUFE
ENCAJARÁ EN CUALQUIER TOMACORRIENTE POLARIZADO SOLO DE UNA MANERA. SI EL ENCHUFE NO CALZA
COMPLETAMENTE EN EL TOMACORRIENTE DÉLE LA VUELTA. SI AÚN NO ENCAJA, PÓNGASE EN CONTACTO
CON UN ELECTRICISTA CALIFICADO. NUNCA UTILICE UNA EXTENSIÓN A NO SER QUE EL ENCHUFE PUEDA
SER TOTALMENTE INSERTADO. NO ALTERE EL ENCHUFE.
PRECAUCIÓN: PARA PREVENIR UNA DESCARGA ELÉCTRICA, HAGA COINCIDIR LA PATA
ANCHA DEL ENCHUFE CON LA RANURA ANCHA, INSERTE TOTALMENTE.
ENGLISH
A
C
L
M
B
K
J
G
H
E
D

FRANÇAIS Lampe de Table 15 W Cambridge
ATTENTION! Si le câble ou le cordon souple externe de ce lampadaire est endommagé, celui-ci doit être remplacé exclusive-
ment par le fabricant, son agent de service ou toute personne compétente afin d’éviter tout danger. Pour usage à l’intérieur seulement.
FÉLICITATIONS! Vous avez fait l’achat de la
plus innovatrice technologie naturelle et de
renom en éclairage avec votre produit OttLite.
FORMULAIRE D’ENREGISTREMENT DE
PRODUIT
Compléter le formulaire d’enregistrement qui
est inclus pour votre produit et nous le
retourner dès aujourd’hui par le retour du
courrier, ou enregistrez-vous en ligne en
allant à : http://warranty.OttLite.com.
AVERTISSEMENT : Pour éviter les chocs
électriques, assurez-vous que la lampe ne
soit pas branchée avant d’avoir effectué
toutes les étapes de montage. Pour éviter
que la lampe ne bascule, veuillez placer
l’abat-jour tel qu’illustré sur le diagramme.
ASSEMBLAGE DE LA LAMPE
1. Retirer la lampe de son empaquetage et
placer la base (A) sur une surface plane.
2. Enfiler la tige (B) sur la base (A) à la main,
en tournant dans le sens horaire jusqu’à
ce qu’elle soit bien serrée. Le cordon qui
dépasse peut être tiré à l’intérieur de la
base.
3. Fixer le contrepoids (C) au bras (E) en tour-
nant à la main dans le sens horaire jusqu’au
serrage complet, puis continuer de visser le
bras (E) à l’intérieur de la tige (B).
4. Placer l’abat-jour (H) sur la douille (G) et
visser ensuite l’anneau de la douille (J) sur
la douille. Tourner l’anneau de la douille (J)
dans le sens horaire jusqu’à ce que vous
ne puissiez plus les tourner davantage à la
main et que l’abat-jour (H) soit solidement
maintenu en place.
5. Se référer à INSERTION/DÉMONTAGE DE
L’AMPOULE pour installer l’ampoule (K)
dans la lampe.
6. Branchez le cordon d’alimentation dans une
prise murale CA de 120 V
7. Pour allumer (ON) ou éteindre (OFF) la
lampe, tourner le bouton de l’interrupteur
(M) dans le sens horaire.
8. Pour placer le bras (E) à la position voulue,
tourner la vis à oreilles dans le sens antiho-
raire pour la desserrer, repositionner le bras
(E), puis tourner la vis à oreilles (D) dans
le sens horaire pour resserrer. Pour éviter
d’endommager la lampe, NE PAS TENTER
DE BOUGER le bas (E) sans d’abord
desserrer la vis à oreilles (D).
9. NE PAS essayer de faire pivoter l’abat-jour
de côté, car cela pourrait endommager la
lampe.
NE PAS forcer la vis à oreilles, car vous
pourriez endommager la lampe.
INSERTION/DÉMONTAGE DE L’AMPOULE
1. Assurez-vous que la lampe n’est pas bran-
chée dans une prise de courant électrique.
2. Si la lampe a été utilisée, laissez-la refroidir
pendant environ cinq minutes avant de
continuer.
3. Pour installer une ampoule (K) dans la dou-
ille (G), visser la base de l’ampoule dans le
culot de la douille en tournant dans le sens
des aiguilles d’une montre jusqu’à ce qu’elle
soit bien en place.
ATTENTION : NE PAS trop serrer
l’ampoule. Une ampoule trop serrée vous
empêcherait de l’enlever facilement ou
risquerait d’endommager la lampe ou
l’ampoule.
4. Pour retirer une ampoule (K) déjà installée
dans la lampe, dévisser l’ampoule de la
douille (G) en tournant dans le sens con-
traire des aiguilles d’une montre jusqu’à ce
qu’elle soit dégagée.
PRENDRE GARDE à ce que la partie en
verre de l’ampoule ne frappe pas l’abat-jour
ou toute autre surface dure.
Veuillez noter qu’une fois en marche, l’intensité
des tubes OttLite ne peut pas être réglée.
Profitez bien de votre Lampe de table 15 W
Cambridge OttLite !
Ce système d’éclairage est conçu pour
être utilisé avec les tubes OttLite
type (numéro de style ED15-S).
L’utilisation d’autres produits
annule la garantie et risque
¡PRECAUCIÓN! Si el cable o cordón flexible externo de esta luminaria está dañado, debe ser exclusivamente reemplazado
por el fabricante o su agente de servicio o una persona calificada similar a fin de evitar un riesgo. Sólo para uso en interiores.
ESPAÑOL Lámpara de Mesa Cambridge de 15w
¡FELICITACIONES! Usted acaba de adquirir la
mejor tecnología de iluminación natural con su
nuevo producto OttLite.
FORMULARIO DE REGISTRO
Por favor, llene el Formulario de Registro
de Producto anexo y envíelo por correo
hoy mismo, o regístrese en línea visitando:
http://warranty.OttLite.com.
ADVERTENCIA: Para prevenir un choque
eléctrico, cerciórese de que la lámpara
no se conecte hasta que se complete el
ensamblaje y todos los pasos. Para evitar
que la lámpara se vuelque, coloque la
pantalla como se muestra en el diagrama.
ENSAMBLAJE DE LÁMPARA
1. Remueva la lámpara de su embalaje y
coloque la base (A) sobre una superficie
plana.
2. Enrosque a mano el poste (B) en la base (A),
en la dirección de las manecillas del reloj
hasta que quede apretado. El exceso de
cable puede halarse a través la base.
3. Enrosque el contrapeso (C) al brazo (E) en
la dirección de las manecillas del reloj hasta
que quede apretado, y después termine de
enroscar el brazo (E) en el poste (B).
4. Coloque la pantalla (H) sobre el
portalámpara (G) y enrosque el aro (J) a
mano en el portalámpara en la dirección de
las manecillas del reloj hasta que quede
bien apretado y la pantalla (H) quede bien
fija en su lugar.
5. Para instalar el bombillo (K), consulte
las instrucciones para INSTALACIÓN/
REEMPLAZO DEL BOMBILLO
6. Enchufe el cable en un tomacorriente
estándar de 120 voltios.
7. Para encender (ON) y apagar (OFF)
la lámpara, gire el interruptor (M) en la
dirección de las manecillas del reloj.
8. Para ajustar el brazo (E), afloje la tuerca
(D) en la dirección contraria a la de las
manecillas del reloj, coloque el brazo (E)
en la posición deseada, y apriete la tuerca
(D) en la dirección de las manecillas del
reloj. Para evitar daños a la lámpara, NO
intente mover el brazo (E) sin antes aflojar
la tuerca (D)
9. NO intente mover la pantalla hacia los lados
pues podría dañar la lámpara.
NO FUERCE las tuercas porque podría
dañar la lámpara.
INSTALACIÓN/RETIRO DEL BOMBILLO
1. Asegúrese de que la lámpara no esté
conectada a un tomacorriente.
2. Si la lámpara ha estado en uso, permita
que se enfríe durante aproximadamente
5 minutos antes de proceder.
3. Para instalar el bombillo (K) en el
portalámpara (G), enrosque la base
del bombillo dentro del portalámpara en
la dirección de las manecillas del reloj
hasta que quede ajustado.
ADVERTENCIA: NO ajuste demasiado el
bombillo, porque puede ser difícil retirarlo
después o podría dañar la lámpara o el
bombillo.
4. Para retirar el bombillo (K) de la lámpara,
desenrósquelo del portalámpara (G) girando
en la dirección contraria a las manecillas
del reloj.
Asegúrese de que la parte de vidrio
del bombillo NO pegue con la pantalla o
con cualquier superficie dura.
Por favor tenga en cuenta que durante
la operación, los bombillos OttLite no son
graduables.
¡Disfrute su Lámpara de Mesa Cambridge
de 15w OttLite!
Este sistema de iluminación está diseñado
para ser utilizado únicamente con
bombillo OttLite typo (
número de estilo
ED15-S
). El uso de otros productos anula
la garantía y pudiera resultar en daños al
sistema de iluminación.
15w Cambridge Table Lamp
15548BB8 15548BZH 15548BZP S2471
INS-14-0150 REV101314
CONGRATULATIONS! You’ve
purchased the finest in natural lighting
technology with your new OttLite®
product.
PRODUCT REGISTRATION FORM
Please complete the enclosed Product
Registration Form and return it today
by mail, or register online by going to:
http://warranty.OttLite.com.
WARNING: To prevent electric shock,
make sure the lamp is not plugged in
until all assembly steps are complete.
To avoid lamp tip over, position lamp
shade as shown in diagram.
LAMP ASSEMBLY
1. Remove lamp from packing placing
the base (A) flat on a steady surface.
2. Loosen, but do not remove, thumb-
screw (D) at the joint on arm (E).
3. To aid in assembly of step 6, rotate
the joint so that it points opposite to the
arm (E). Tighten thumbscrew (D) by hand
until snug.
4. Thread pole (B) to the joint of arm (E)
by hand carefully turning clockwise. DO
NOT tighten completely.
5. Hold arm (E) to steady pole (B) then
thread pole (B) to base (A) by hand care-
fully turning clockwise until snug. Arm (E)
will still be loose. Excess cord may be
pulled through the base (A).
6. Finish threading arm (E) to pole (B) by
hand turning clockwise until snug.
7. Attach shade (H) to socket housing (G)
using socket ring (J) to hold the shade in
place.
8. Thread socket ring (J) onto socket by
hand turning clockwise until tight enough
to hold the shade steady.
9. Thread arm (C) into joint of pole (E) by
hand turning clockwise until tight.
10. Refer to BULB INSTALLATION AND
REMOVAL to install bulb (K) in lamp.
11. Plug the cord into a standard 120Vac
outlet.
12. To turn the lamp on or off rotate the
power cord mounted switch (M)
clockwise.
13. To position arm (E) turn thumbnut (D)
counterclockwise to loosen, reposition
arm (E) then turn thumbnut (D) clockwise
to tighten. To avoid damage to the lamp
DO NOT ATTEMPT to move arm (E)
without loosening thumbnut (D).
14. DO NOT try to rotate the shade side-
ways as the lamp maybe damaged.
DO NOT force thumbscrew as damage
to the lamp may occur.
BULB INSERTION/REMOVAL
1. Make sure the lamp is not plugged into
an electrical socket.
2. If the lamp has been in use, allow it to
cool approximately 5 minutes before
proceeding.
3. To install the bulb (K) in the socket
(G), thread the base of the bulb into the
socket turning clockwise until snug.
CAUTION: DO NOT overtighten the
bulb. Overtightening the bulb may
make removal difficult or damage the
lamp or bulb.
4. To remove a bulb (K) already installed
in the lamp, unthread the bulb from the
socket (G) turning counterclockwise to
loosen.
Please note that in operation, OttLite®
bulbs are not dimmable.
Enjoy your OttLite®Cambridge Table
Lamp!
This lighting system is designed
for use with OttLite®type
(style number ED15-S). Use of other
products voids the warranty and
may result in damage to the lighting
system.
Cambridge Table Lamp
CAUTION! If the external flexible cable or cord of this luminaire is damaged, it shall be exclusively replaced by the manufac-
turer or its service agent or a similar qualified person in order to avoid a hazard. Indoor use only.
REV022111
15w Cambridge Table Lamp
15548BB8 ST10086
CAUTION! IMPORTANT SAFETY INSTRUCTIONS:
THIS PORTABLE LAMP HAS A POLARIZED PLUG (ONE BLADE IS WIDER THAN THE OTHER) AS A FEATURE TO
REDUCE THE RISK OF ELECTRIC SHOCK. THIS PLUG WILL FIT IN A POLARIZED OUTLET ONLY ONE WAY. IF
THE PLUG DOES NOT FIT FULLY IN THE OUTLET, REVERSE THE PLUG. IF IT STILL DOES NOT FIT, CONTACT A
QUALIFIED ELECTRICIAN. NEVER USE WITH AN EXTENSION CORD UNLESS PLUG CAN BE FULLY INSERTED.
DO NOT ALTER THE PLUG.
CAUTION: TO PREVENT ELECTRIC SHOCK, MATCH WIDE BLADE OF PLUG TO WIDE SLOT,
FULLY INSERT.
AVERTISSEMENT! IMPORTANTES DIRECTIVES
DE SÉCURITÉ:
CETTE LAMPE PORTATIVE EST MUNIE D’UNE FICHE POLARISÉE (UNE LAME PLUS LARGE QUE L’AUTRE). CE
DISPOSITIF DE SÉCURITÉ DIMINUE LE RISQUE DE CHOCS ÉLECTRIQUES PUISQUE LA FICHE NE S’INSÈRE
DANS LA PRISE QUE D’UN SEUL CÔTÉ. SI ELLE N’ENTRE PAS DANS LA PRISE, INVERSEZ-LA. SI ELLE
N’ENTRE TOUJOURS PAS, CONTACTEZ UN ÉLECTRICIEN QUALIFIÉ. N’UTILISEZ JAMAIS AVEC UNE RALLONGE
SAUF SI LA FICHE S’INSÈRE ENTIÈREMENT. NE MODIFIEZ PAS CE DISPOSITIF DE SÉCURITÉ.
AVERTISSEMENT: POUR ÉVITER LES CHOCS ÉLECTRIQUE, INSÉREZ LE BOUT LARGE DE LA
FICHE DANS LA GRANDE FENTE ET POUSSEZ JUSQU’AU BOUT.
¡PRECAUCIÓN! INSTRUCCIONES DE SEGURIDAD
IMPORTANTES:
ESTA LÁMPARA PORTÁTIL TIENE UN ENCHUFE POLARIZADO (UNA DE SUS PATAS ES MÁS ANCHA QUE LA
OTRA) COMO CARACTERISTICA PARA REDUCIR EL RIESGO DE UNA DESCARGA ELÉCTRICA. ESTE ENCHUFE
ENCAJARÁ EN CUALQUIER TOMACORRIENTE POLARIZADO SOLO DE UNA MANERA. SI EL ENCHUFE NO CALZA
COMPLETAMENTE EN EL TOMACORRIENTE DÉLE LA VUELTA. SI AÚN NO ENCAJA, PÓNGASE EN CONTACTO
CON UN ELECTRICISTA CALIFICADO. NUNCA UTILICE UNA EXTENSIÓN A NO SER QUE EL ENCHUFE PUEDA
SER TOTALMENTE INSERTADO. NO ALTERE EL ENCHUFE.
PRECAUCIÓN: PARA PREVENIR UNA DESCARGA ELÉCTRICA, HAGA COINCIDIR LA PATA
ANCHA DEL ENCHUFE CON LA RANURA ANCHA, INSERTE TOTALMENTE.
ENGLISH
A
C
L
M
B
K
J
G
H
E
D

This manual suits for next models

2

Other OttLite Lighting Equipment manuals

OttLite CSEQEG5Z-CA User manual

OttLite

OttLite CSEQEG5Z-CA User manual

OttLite 580083 User manual

OttLite

OttLite 580083 User manual

OttLite 979003 User manual

OttLite

OttLite 979003 User manual

OttLite WingShade User manual

OttLite

OttLite WingShade User manual

OttLite W22FS User manual

OttLite

OttLite W22FS User manual

OttLite 19047C User manual

OttLite

OttLite 19047C User manual

OttLite L13516 User manual

OttLite

OttLite L13516 User manual

OttLite B22FS User manual

OttLite

OttLite B22FS User manual

OttLite B2190Z User manual

OttLite

OttLite B2190Z User manual

OttLite K81WG3 User manual

OttLite

OttLite K81WG3 User manual

OttLite B22FS User manual

OttLite

OttLite B22FS User manual

OttLite B1FSB User manual

OttLite

OttLite B1FSB User manual

Popular Lighting Equipment manuals by other brands

Xiaomi Yunmai user manual

Xiaomi

Xiaomi Yunmai user manual

XanLite GRL5GUINRVB manual

XanLite

XanLite GRL5GUINRVB manual

Blue Lagoon 40.000 manual

Blue Lagoon

Blue Lagoon 40.000 manual

MJ LED LIGHTNING MJ-A380 user manual

MJ LED LIGHTNING

MJ LED LIGHTNING MJ-A380 user manual

Gavita DigiStar 400 manual

Gavita

Gavita DigiStar 400 manual

Pinegreen Lighting CL-TRL12RGB user manual

Pinegreen Lighting

Pinegreen Lighting CL-TRL12RGB user manual

lap BF3-1L12NC instruction manual

lap

lap BF3-1L12NC instruction manual

VANQ VQ-GLCP Series manual

VANQ

VANQ VQ-GLCP Series manual

Granit 7070010417 instructions

Granit

Granit 7070010417 instructions

Oase 45387 operating instructions

Oase

Oase 45387 operating instructions

Gifas ApolloLED 2 operating instructions

Gifas

Gifas ApolloLED 2 operating instructions

EUROM Sunrise 2500 instruction manual

EUROM

EUROM Sunrise 2500 instruction manual

ADJ ENCORE LP18IP user manual

ADJ

ADJ ENCORE LP18IP user manual

Spotlight MIDI FRESNEL CDM 250W user manual

Spotlight

Spotlight MIDI FRESNEL CDM 250W user manual

Cameo DROP B4 user manual

Cameo

Cameo DROP B4 user manual

maidenhead aquatics Aquatropic LED quick start guide

maidenhead aquatics

maidenhead aquatics Aquatropic LED quick start guide

Stilnovo linea light DIPHY quick start guide

Stilnovo

Stilnovo linea light DIPHY quick start guide

Chalmit NeoX Installation, operation and maintenance instructions

Chalmit

Chalmit NeoX Installation, operation and maintenance instructions

manuals.online logo
manuals.online logoBrands
  • About & Mission
  • Contact us
  • Privacy Policy
  • Terms and Conditions

Copyright 2025 Manuals.Online. All Rights Reserved.