manuals.online logo
Brands
  1. Home
  2. •
  3. Brands
  4. •
  5. OttLite
  6. •
  7. Lighting Equipment
  8. •
  9. OttLite L13516 User manual

OttLite L13516 User manual

ENGLISH
CONGRATULATIONS!  
You’ve purchased the finest in natural 
lighting technology with your new  
OttLite® product.
PRODUCT REGISTRATION FORM
Please complete the enclosed Product 
Registration Form and return it today  
by mail, or register online by going to: 
www.OttLite.com/warranty.
WARNING: To prevent electric shock,
make sure the lamp is not plugged in
until all assembly steps are complete.
LAMP ASSEMBLY
1. Make sure the lamp is not plugged into 
an electrical socket.
2. Attach clip to table, shelf or other 
strong, solid surface.
3. Plug lamp into a standard 120V sock-
et. Your lamp is ready for use.
4. Turn lamp on or off by depressing rock-
er switch on end of socket housing (A).
TUBE INSERTION/REPLACEMENT
1. Make sure the lamp is not plugged into 
an electrical socket.
2. If the lamp has been in use, allow it to 
cool for approximately 5 minutes before 
proceeding.
3. Rotate the shade (D) so that the notch 
in the base of the shade is positioned 
over the tab (C) located on the socket 
housing (A). Refer to the diagram for 
proper shade position.
4. Remove the shade (D) by pulling it 
straight out from the socket 
housing (A).
5. To install a tube in the socket (B), 
grasp the tube firmly in your hand, posi-
tion the tube so that it is aligned as pic-
tured in the diagram, then push the tube 
straight into the socket until it “snaps” 
into place.
6. To remove a tube already installed in 
the lamp, grasp it firmly in your hand  
and pull it straight out of the socket (B).  
Do not twist or turn the tube while
removing it from the socket.
7. To replace the shade (D), position it 
as indicated in the diagram, then push it 
back into the socket housing (A), making 
sure the shade “snaps” into place.
8. Rotate the shade (D) to the desired 
position for use.
Please note that in operation, OttLite® 
tubes are not dimmable.
Enjoy your OttLite® Clip-On lamp!
This lighting system is designed for
use with OttLite® tubes type (style
number PL13-E). Use of other prod-
ucts voids the warranty and may result
in damage to the lighting system.
For more information on purchasing
replacement tubes/bulbs please go to
www.OttLite.com/replacement13wtube
CAUTION! IMPORTANT SAFETY INSTRUCTIONS:
THIS PORTABLE LAMP HAS A POLARIZED PLUG (ONE BLADE IS WIDER THAN THE OTHER) AS A FEATURE TO
REDUCE THE RISK OF ELECTRIC SHOCK. THIS PLUG WILL FIT IN A POLARIZED OUTLET ONLY ONE WAY. IF THE
PLUG DOES NOT FIT FULLY IN THE OUTLET, REVERSE THE PLUG. IF IT STILL DOES NOT FIT, CONTACT A
QUALIFIED ELECTRICIAN. NEVER USE WITH AN EXTENSION CORD UNLESS PLUG CAN BE FULLY INSERTED.
DO NOT ALTER THE PLUG.
CAUTION: TO PREVENT ELECTRIC SHOCK, MATCH WIDE BLADE OF PLUG TO WIDE SLOT,
FULLY INSERT.
AVERTISSEMENT! IMPORTANTES DIRECTIVES DE
SÉCURITÉ:
CETTE LAMPE PORTATIVE EST MUNIE D’UNE FICHE POLARISÉE (UNE LAME PLUS LARGE QUE L’AUTRE). CE
DISPOSITIF DE SÉCURITÉ DIMINUE LE RISQUE DE CHOCS ÉLECTRIQUES PUISQUE LA FICHE NE S’INSÈRE DANS
LA PRISE QUE D’UN SEUL CÔTÉ. SI ELLE N’ENTRE PAS DANS LA PRISE, INVERSEZ-LA. SI ELLE N’ENTRE
TOUJOURS PAS, CONTACTEZ UN ÉLECTRICIEN QUALIFIÉ. N’UTILISEZ JAMAIS AVEC UNE RALLONGE SAUF SI
LA FICHE S’INSÈRE ENTIÈREMENT. NE MODIFIEZ PAS CE DISPOSITIF DE SÉCURITÉ.
AVERTISSEMENT: POUR ÉVITER LES CHOCS ÉLECTRIQUE, INSÉREZ LE BOUT LARGE DE LA FICHE
DANS LA GRANDE FENTE ET POUSSEZ JUSQU’AU BOUT.
¡PRECAUCIÓN! INSTRUCCIONES DE SEGURIDAD
IMPORTANTES:
ESTA LÁMPARA PORTÁTIL TIENE UN ENCHUFE POLARIZADO (UNA DE SUS PATAS ES MÁS ANCHA QUE LA OTRA)
COMO CARACTERISTICA PARA REDUCIR EL RIESGO DE UNA DESCARGA ELÉCTRICA. ESTE ENCHUFE ENCAJARÁ EN
CUALQUIER TOMACORRIENTE POLARIZADO SOLO DE UNA MANERA. SI EL ENCHUFE NO CALZA COMPLETAMENTE
EN EL TOMACORRIENTE DÉLE LA VUELTA. SI AÚN NO ENCAJA, PÓNGASE EN CONTACTO CON UN ELECTRICISTA
CALIFICADO. NUNCA UTILICE UNA EXTENSIÓN A NO SER QUE EL ENCHUFE PUEDA SER TOTALMENTE
INSERTADO. NO ALTERE EL ENCHUFE.
PRECAUCIÓN: PARA PREVENIR UNA DESCARGA ELÉCTRICA, HAGA COINCIDIR LA PATA ANCHA DEL
ENCHUFE CON LA RANURA ANCHA, INSERTE TOTALMENTE.
Clip-On Lamp
CAUTION! If the external flexible cable or cord of this luminaire is damaged, it shall be exclusively replaced by the manufacturer
or its service agent or a similar qualified person in order to avoid a hazard. Indoor use only.
INS110013 REV050511
13w Clip-On Lamp
L13516 L13339 GX7909
FÉLICITATIONS! Vous avez fait l’achat 
de la plus innovatrice technologie naturelle 
et de renom en éclairage avec votre  
produit OttLite.®
FORMULAIRE D’ENREGISTREMENT
DE PRODUIT
Compléter le formulaire d’enregistrement 
qui est inclus pour votre produit et nous le 
retourner dès aujourd’hui par le retour du  
courrier, ou enregistrez-vous en ligne en 
allant à :www.OttLite.com/warranty.
AVERTISSEMENT: Pour éviter les chocs
électriques, assurez-vous que la lampe
ne soit pas branchée avant d’avoir
effectué toutes les étapes de montage.
ASSEMBLAGE DE LA LAMPE
1. Assurez-vous que la lampe n’est pas 
branchée dans une prise de courant  
électrique.
2. Attachez le clip à une table, une étagère 
ou toute autre surface solide et stable. 
3. Branchez la lampe dans une prise stan-
dard de 120V. Votre lampe est prête à 
l’emploi.
4. Pour allumer ou éteindre la lampe, 
appuyez sur le commutateur à bascule situé 
à l’arrière du compartiment de douille (A).
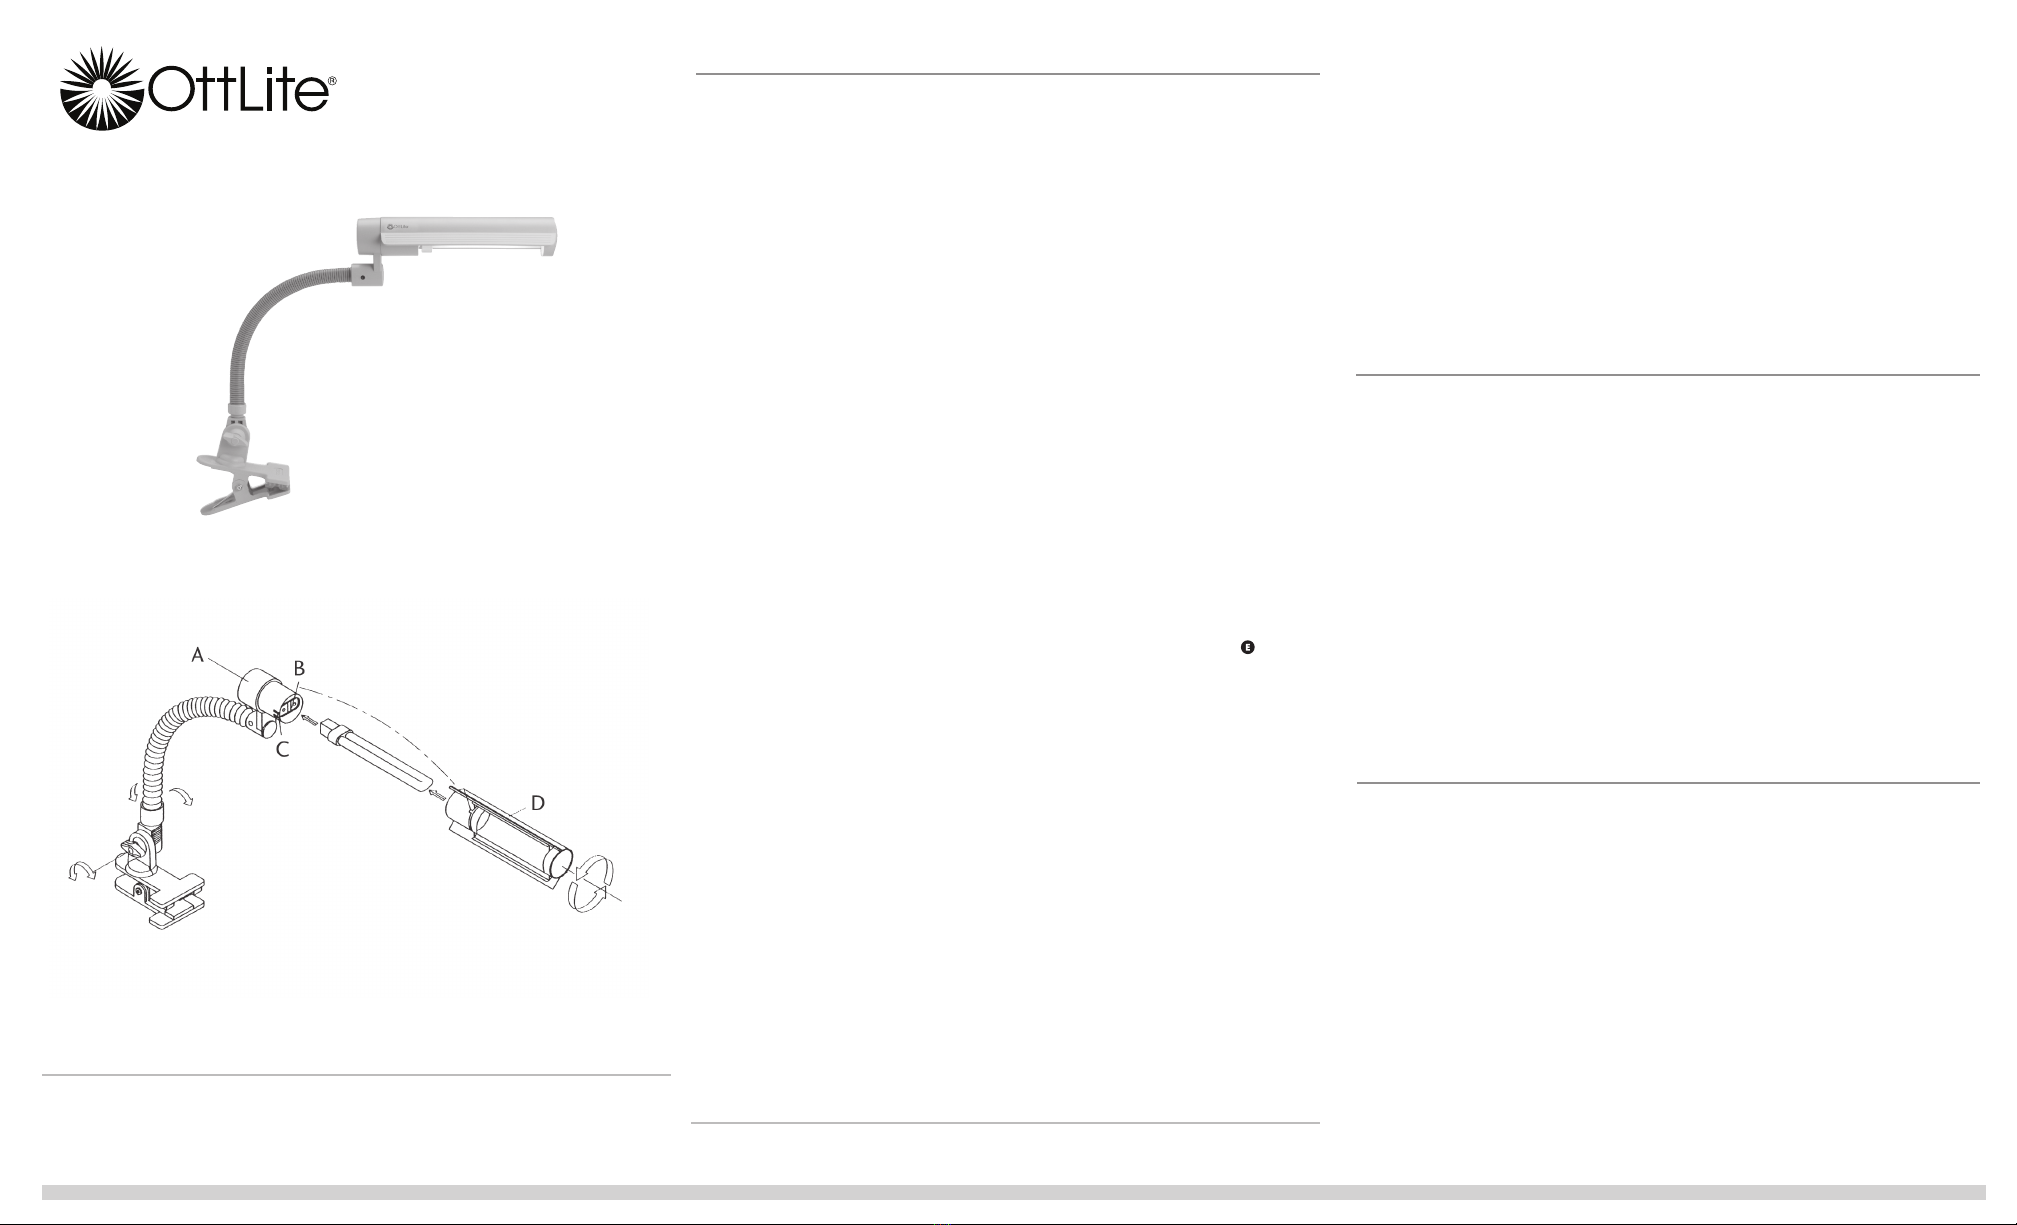
INSERTION/REMPLACEMENT DU TUBE
1. Assurez-vous que la lampe n’est pas 
branchée dans une prise de courant  
électrique.
2. Si la lampe a été utilisée, laissez-la refroi-
dir pendant environ 5 minutes avant  
de continuer.
3. Faites pivoter l’abat-jour (D) afin que 
l’encoche de la base de l’abat-jour soit 
positionnée sur la languette (C) située sur 
le compartiment de la douille (A). Consultez 
le schéma pour un placement correct de 
l’abat-jour.
4. Retirez l’abat-jour (D) en le sortant 
directement du compartiment de la  
douille (A).
5. Pour installer un tube dans la douille (B), 
attrapez-le fermement et placez-le de façon 
à ce qu’il soit positionné ainsi qu’indiqué 
sur le schéma, puis poussez le tube 
directement dans la douille jusqu’à ce qu’il 
s’enclenche en position.
6. Pour retirer un tube déjà installé dans la 
lampe, attrapez-le fermement et sortez-le 
directement de la douille (B). Ne faites pas
pivoter ou ne tournez pas le tube lorsque
vous le retirez de la douille.
7. Pour replacer l’abat-jour (D), placez-le 
de façon à ce qu’il soit positionné ainsi 
qu’indiqué sur le schéma, puis poussez 
l’abat-jour vers l’arrière dans le logement 
de la douille (A) en vous assurant qu’il 
s’enclenche en position.
8. Faites pivoter l’abat-jour (D) dans la 
position désirée.
Veuillez noter qu’une fois en marche, 
l’intensité des tubes fluorescents OTT-LITE® 
ne peut pas être réglée.
Profitez de votre lampe d’artisanat à clip 
d’OttLite® !
Ce système d’éclairage est conçu
pour être utilisé avec les tubes OttLite®
type (numéro de style PL13-E).
L’utilisation d’autres produits annule la
garantie et pourrait endommager le
système d’éclairage.
Pour plus d’information sur l’achat d’ampoules
ou de tubes de remplacement, visiter le
www.OttLite.com/replacement13wtube
¡FELICITACIONES!  Usted acaba de 
adquirir la mejor tecnología de iluminación 
natural con su nuevo producto OttLite.®
FORMULARIO DE REGISTRO
Por favor, llene el Formulario de Registro de 
Producto anexo y envíelo por correo hoy 
mismo, o regístrese en línea visitando: 
www.OttLite.com/warranty
ADVERTENCIA: Para prevenir un choque
eléctrico, cerciórese de que la lámpara
no se conecte hasta que se complete el
ensamblaje y todos los pasos.
ENSAMBLAJE DE LÁMPARA
1. Asegúrese que la lámpara no está
conectada a un tomacorriente.
2. Fije el sujetador a la mesa, estante u otra 
superficie fuerte y sólida. 
3. Conecte la lámpara en un tomacorriente 
estándar de 120V. Su lámpara está lista 
para usar.
4. Encienda y apague accionando el 
interruptor oscilante al final del receptáculo 
del soquete (A).
INSTALACIÓN/REEMPLAZO DE TUBO
1. Asegúrese que la lámpara no está 
conectada a un tomacorriente.
2. Si la lámpara ha estado en uso, permita 
que se enfríe durante aproximadamente  
5 minutos antes de proceder.
3. Gire la pantalla (D) de forma que la 
muesca en la base de la pantalla, quede 
sobre la pestaña (C) ubicada en el  
receptáculo del soquete (A). Refiérase al 
diagrama para ver una posición apropiada 
de la pantalla.
4. Retire la pantalla (D) halándola bien 
derecho hacia fuera del receptáculo del 
soquete (A).
5. Para instalar un tubo en el soquete (B), 
tome firmemente el tubo en su mano, 
posiciónelo de forma que esté alineado 
como se muestra en el diagrama, luego 
empuje el tubo bien derecho hacia dentro 
del soquete hasta que “encaje” en su lugar.
6. Para retirar un tubo ya instalado en la 
lámpara, tómelo firmemente en su mano y 
hálelo bien derecho hacia fuera del soquete 
(B). No doble o tuerza el tubo mientras lo
retira del soquete.
7. Para reemplazar la pantalla (D), 
posiciónela como se indica en el diagrama, 
luego empújela de regreso hacia el receptá-
culo del soquete (A), cerciorándose de que 
la pantalla “encaje” en su lugar.
8. Gire la pantalla (D) a la posición deseada 
para ser usada.
Por favor tenga en cuenta que durante la 
operación, los tubos OttLite® no son 
graduables.
¡Disfrute su lámpara de clip de OttLite®!
Este sistema de iluminación está
diseñado para ser utilizado únicamente
con tubos OttLite® tipo (número de
estilo PL13-E). El uso de otros productos
anula la garantía y pudiera resultar en
daños al sistema de iluminación.
Para más información acerca de la comprar de
tubos o bombillos de repuesto, favor visitar:
www.OttLite.com/replacement13wtube
FRANÇAIS
ESPAÑOL Lampe d’artisanat à clip
ATTENTION! Si le câble ou le cordon souple externe de ce lampadaire est endommagé, celui-ci doit être remplacé exclusive-
ment par le fabricant, son agent de service ou toute personne compétente afin d’éviter tout danger. Pour usage à l’intérieur seulement.
¡PRECAUCIÓN! Si el cable o cordón flexible externo de esta luminaria está dañado, debe ser exclusivamente reemplazado por
el fabricante o su agente de servicio o una persona calificada similar a fin de evitar un riesgo. Sólo para uso en interiores.
13w Clip-On Lamp
L13516 L13339 GX7909
INS110013 REV050511
Lámpara de clip
This product complies with Part 18 of FCC Rules, but may cause interference to radios,
televisions, wireless telephones, and remote controls. Avoid placing this product near these
devices. If interference occurs, move the product away from the device or plug either into a
different outlet. Do not install this product near maritime safety equipment or other critical
navigation or communication equipment operating between 0.45-30 MHz
Este producto cumple con la Parte 18 del Reglamento de la FCC, pero puede causar inter-
ferencias en radios, televisores, teléfonos inalámbricos y controles remotos. Evite colocar
este producto cerca de estos dispositivos. En caso de interferencia, mueva el producto lejos
del dispositivo o enchúfelo en otro tomacorriente. No instale este producto cerca de equipos
de seguridad marítima o equipos críticos para la navegación o la operación de comunicacio-
nes entre 0,45 y 30 MHz.
Ce produit est conforme à la partie 18 des règles de la Commission fédérale des communi-
cations (FCC) des États-Unis, mais il pourrait causer de l’interférence aux radios, aux télévi-
sions, aux téléphones sans fil et aux télécommandes. Éviter de placer le produit à proximité
de ces appareils. Si des interférences se produisent, éloigner le produit de l’appareil ou le
brancher dans une autre prise de courant. Ne pas installer le produit à proximité de matériel
de sécurité maritime ou de tout autre matériel essentiel à la navigation ou à la communica-
tion fonctionnant entre 0,45 et 30 MHz.

This manual suits for next models

1

Other OttLite Lighting Equipment manuals

OttLite WingShade User manual

OttLite

OttLite WingShade User manual

OttLite CSEQEG5Z-CA User manual

OttLite

OttLite CSEQEG5Z-CA User manual

OttLite W22FS User manual

OttLite

OttLite W22FS User manual

OttLite 979003 User manual

OttLite

OttLite 979003 User manual

OttLite B2190Z User manual

OttLite

OttLite B2190Z User manual

OttLite B22FS User manual

OttLite

OttLite B22FS User manual

OttLite 19047C User manual

OttLite

OttLite 19047C User manual

OttLite K81WG3 User manual

OttLite

OttLite K81WG3 User manual

OttLite 580083 User manual

OttLite

OttLite 580083 User manual

OttLite B1FSB User manual

OttLite

OttLite B1FSB User manual

OttLite B22FS User manual

OttLite

OttLite B22FS User manual

OttLite 15548BB8 User manual

OttLite

OttLite 15548BB8 User manual

Popular Lighting Equipment manuals by other brands

MOB MO6702 user manual

MOB

MOB MO6702 user manual

EVE Light Strip Get started

EVE

EVE Light Strip Get started

MOODLight HP-08 instruction manual

MOODLight

MOODLight HP-08 instruction manual

Premier R+G+B Flexkit user manual

Premier

Premier R+G+B Flexkit user manual

ShowPro PLUTO 600 PROFILE user manual

ShowPro

ShowPro PLUTO 600 PROFILE user manual

Fomei LED DMX 150B user manual

Fomei

Fomei LED DMX 150B user manual

Ecco EW5430 Series manual

Ecco

Ecco EW5430 Series manual

Pool Controls Chemigem D10 user manual

Pool Controls

Pool Controls Chemigem D10 user manual

Wheelock CH70-24MCWH Series installation instructions

Wheelock

Wheelock CH70-24MCWH Series installation instructions

Anslut 421365 User instructions

Anslut

Anslut 421365 User instructions

Plejd LED-10 installation manual

Plejd

Plejd LED-10 installation manual

SCANGRIP NOVA 10 CONNECT manual

SCANGRIP

SCANGRIP NOVA 10 CONNECT manual

Saxby Lighting IkonPRO CCT instruction manual

Saxby Lighting

Saxby Lighting IkonPRO CCT instruction manual

Foxfury Lighting Solutions SIDESLIDE SERIES product manual

Foxfury Lighting Solutions

Foxfury Lighting Solutions SIDESLIDE SERIES product manual

Artika OUT-BDC-HD2BL instruction manual

Artika

Artika OUT-BDC-HD2BL instruction manual

STA-RITE Calypso owner's manual

STA-RITE

STA-RITE Calypso owner's manual

SCHOTT KL 200 Instructions for use

SCHOTT

SCHOTT KL 200 Instructions for use

ML Accessories LEDFRA1 Installation & maintenance manual

ML Accessories

ML Accessories LEDFRA1 Installation & maintenance manual

manuals.online logo
manuals.online logoBrands
  • About & Mission
  • Contact us
  • Privacy Policy
  • Terms and Conditions

Copyright 2025 Manuals.Online. All Rights Reserved.