Otto Bock 4X156 User manual

4X156/4X157/4X158
Gebrauchsanweisung (Fachpersonal) ......................................... 3
Instructions for use (qualified personnel) ...................................... 8
Instructions d'utilisation (Personnel spécialisé) ............................. 14
Istruzioni per l’uso (Personale tecnico specializzato) ..................... 20
Instrucciones de uso (Personal técnico especializado) .................. 25
Manual de utilização (Pessoal técnico) ........................................ 31
Gebruiksaanwijzing (Vakmensen) ................................................ 37
Bruksanvisning (Fackpersonal) ................................................... 42
Brugsanvisning (Faguddannet personale) .................................... 48
Bruksanvisning (Fagpersonell) ................................................... 53
Käyttöohje (Ammattihenkilöstö) ................................................... 58
Instrukcja użytkowania (Personel fachowy) ................................... 64
Használati utasítás (szakszemélyzet) ............................................ 70
Návod k použití (Odborný personál) ............................................ 75
Návod na používanie (Odborný personál) ..................................... 80
Kullanma talimatı (Uzman personel) ............................................. 86

1 2
3 4
2 | Ottobock

1 Vorwort Deutsch
INFORMATION
Datum der letzten Aktualisierung: 2015-07-15
►Lesen Sie dieses Dokument vor Gebrauch des Produkts aufmerksam
durch.
►Beachten Sie die Sicherheitshinweise, um Verletzungen und Produkt
schäden zu vermeiden.
►Weisen Sie den Benutzer in den sachgemäßen und gefahrlosen Ge
brauch des Produkts ein.
►Bewahren Sie dieses Dokument auf.
Das Produkt „Ladekabelverlängerung - Knöchel 4X156“ wird im Folgenden
Produkt/Ladekabelverlängerung - Knöchel genannt.
Das Produkt „Ladekabelverlängerung - Kniekopf 4X157“ wird im Folgenden
Produkt/Ladekabelverlängerung - Knie genannt.
Das Produkt „Ladekabelverlängerung - Knöchel, lang 4X158“ wird im Fol
genden Produkt/Ladekabelverlängerung - Knöchel, lang genannt.
Diese Gebrauchsanweisung gibt Ihnen wichtige Informationen zur Verwen
dung, Einstellung und Handhabung des Produkts.
Unterweisen Sie den Patienten in der richtigen Handhabung und Pflege des
Produkts. Ohne Unterweisung ist eine Weitergabe an den Patienten nicht
zulässig.
Nehmen Sie das Produkt nur gemäß den Informationen in den mitgelieferten
Begleitdokumenten in Betrieb.
2 Produktbeschreibung
Das Produkt ermöglicht die Verlängerung des Ladekabels.
2.1 Kombinationsmöglichkeiten
Das Produkt ist ausschließlich mit folgenden Kniegelenken kombinierbar:
• C-Leg: 3C98-3, 3C88-3
3 Verwendung
3.1 Verwendungszweck
Das Produkt ist ausschließlich zur Verlegung der Ladebuchse der elektro
nischen Kniegelenk-Systeme C-Leg 3C88-3 und 3C98-3 in den Knöchelbe
reich bzw. in den Kniebereich zu verwenden.
Ottobock | 3

3.2 Einsatzgebiet
Das Produkt ist für den Einsatz in Alltagsaktivitäten entwickelt. Es darf nicht
für Aktivitäten verwendet werden, bei denen es unzulässigen Umgebungsbe
dingungen und Belastungen ausgesetzt wird (z.B. Extremsportarten).
3.3 Einsatzbedingungen
Das Produkt ist ausschließlich für die Versorgung an einem Patienten vor
gesehen. Der Gebrauch des Produkts an einer weiteren Person ist von Sei
ten des Herstellers nicht zulässig.
4 Sicherheit
4.1 Bedeutung der Warnsymbolik
WARNUNG Warnung vor möglichen schweren Unfall- und Verletzungs
gefahren.
VORSICHT Warnung vor möglichen Unfall- und Verletzungsgefahren.
HINWEIS Warnung vor möglichen technischen Schäden.
4.2 Aufbau der Sicherheitshinweise
VORSICHT
Die Überschrift bezeichnet die Quelle und/oder die Art der Gefahr
Die Einleitung beschreibt die Folgen bei Nichtbeachtung des Sicherheits
hinweises. Sollte es mehrere Folgen geben, werden diese wie folgt ausge
zeichnet:
> z.B.: Folge 1 bei Nichtbeachtung der Gefahr
> z.B.: Folge 2 bei Nichtbeachtung der Gefahr
►Mit diesem Symbol werden die Tätigkeiten/Aktionen ausgezeichnet, die
beachtet/durchgeführt werden müssen, um die Gefahr abzuwenden.
4.3 Allgemeine Sicherheitshinweise
HINWEIS
Verwendung des Produkts mit beschädigter Ladekabelverlängerung
Keine einwandfreie Ladefunktion durch beschädigte Ladekabelverlänge
rung (Kabelbruch) am Prothesenschaft infolge ständiger Bewegung beim
Gehen.
►Die Ladekabelverlängerung nicht zum Prothesenschaft, sondern über
den Rohradapter verlegen.
4 | Ottobock

4.4 Patientenhinweise
HINWEIS
Eindringen von Schmutz und Feuchtigkeit in das Produkt
Keine einwandfreie Ladefunktion infolge Fehlfunktion.
►Achten Sie darauf, dass weder feste Teilchen noch Flüssigkeit in das
Produkt eindringen.
HINWEIS
Mechanische Belastung des Produkts
Keine einwandfreie Ladefunktion infolge Fehlfunktion.
►Setzen Sie das Produkt keinen mechanischen Vibrationen oder Stößen
aus.
►Überprüfen Sie das Produkt vor jedem Einsatz auf sichtbare Schäden.
►Sorgen Sie im Bedarfsfall für geeignete Maßnahmen (z.B. Reparatur,
Austausch, Kontrolle durch den Kunden-Service des Herstellers, etc.).
5 Lieferumfang
• 1St. Ladekabelverlängerung – Knie 4X157
• 2St. O-Ring klein 65X3
• 1St. Gebrauchsanweisung (Fachpersonal) 647G1146
oder
• 1St. Ladekabelverlängerung – Knöchel 4X156
• 2St. O-Ring groß 80X3
• 2St. O-Ring klein 65X3
• 1St. Pad 4X890
• 1St. Gebrauchsanweisung (Fachpersonal) 647G1146
oder
• 1St. Ladekabelverlängerung – Knöchel, lang 4X158
• 2St. O-Ring groß 80X3
• 2St. O-Ring klein 65X3
• 1St. Pad 4X890
• 1St. Gebrauchsanweisung (Fachpersonal) 647G1146
6 Herstellung der Gebrauchsfähigkeit
6.1 Aufbau
6.1.1 Ladekabelverlängerung - Knie
1) Die Abdeckung der Ladebuchse am Kniegelenk entfernen.
Ottobock | 5

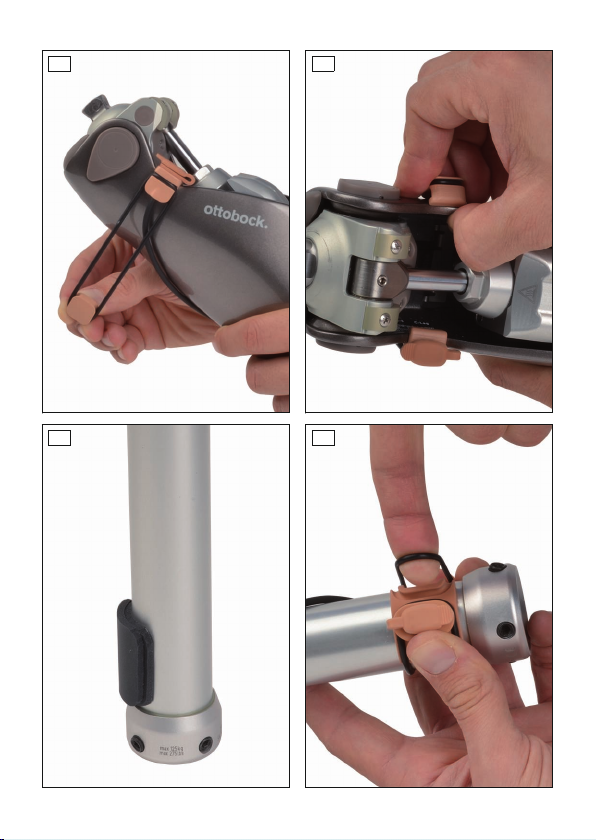
2) Die Ladekabelverlängerung an das Kniegelenk anstecken.
3) Die Ladebuchse der Ladekabelverlängerung am Rahmen des Kniege
lenks anstecken (siehe Abb.1).
4) Den O-Ring in die Halterung der Ladebuchse einhängen.
5) Das Gegenstück der Ladebuchse in den O-Ring einfädeln.
6) Den O-Ring um das Kniegelenk legen.
7) Das Gegenstück der Ladebuchse auf der gegengesetzten Rahmenseite
des Kniegelenks einhängen (siehe Abb.2).
8) Die Ladefunktion des Kniegelenks überprüfen.
6.1.2 Ladekabelverlängerung - Knöchel
6.1.2.1 Vorbereitung
1) Die Position für die Ladebuchse der Ladekabelverlängerung gemeinsam
mit dem Patienten festlegen.
2) Die Distanz zwischen Flansch der Ladebuchse und der Schaumkosme
tik Außenseite abmessen.
3) Das Rohr an der definierten Position mit einem feuchten Tuch und milder
Seife (z.B. Ottobock Derma Clean 453H10=1) reinigen.
4) Bei Bedarf die Pads vorbereiten.
6.1.2.2 Montage
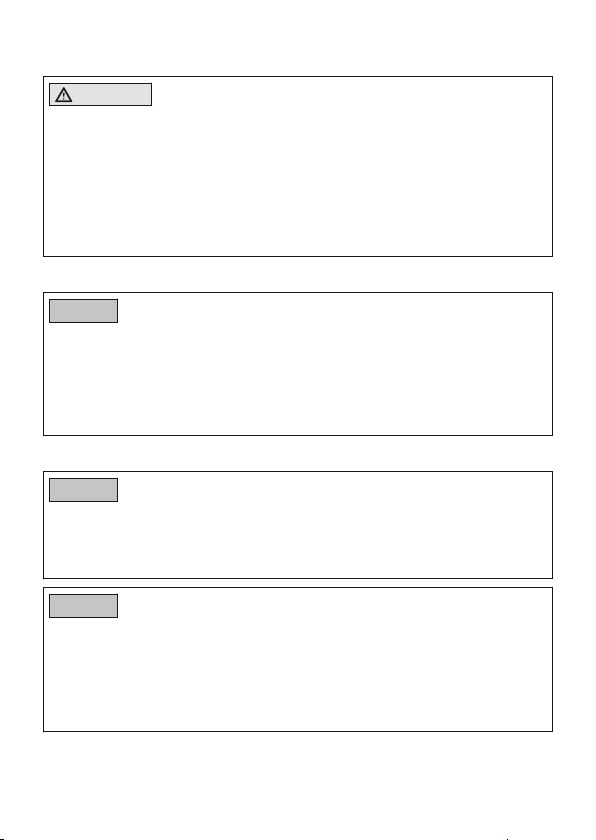
1) Bei Bedarf die ermittelte Distanz zwischen Ladebuchse und Schaumkos
metik mit übereinander geklebten Pad-Stücken (siehe Abb.3) auffüllen.
2) Die Abdeckung der Ladebuchse am Kniegelenk entfernen.
3) Die Ladekabelverlängerung an das Kniegelenk anstecken.
4) Das Kabel bei Bedarf um den Rohradapter wickeln.
5) Die Halterung der Ladebuchse auf dem Rohr oder bei Bedarf auf den
übereinander geklebten Pad-Stücken positionieren.
6) Mit dem O-Ring die Halterung der Ladebuchse befestigen (siehe
Abb.4).
INFORMATION: Den O-Ring klein bei bis zu 3 aufgeklebten Pad-
Stücken verwenden. Den O-Ring groß ab 3 aufgeklebten Pad-
Stücken verwenden.
7) Die Ladefunktion des Kniegelenks überprüfen.
6 | Ottobock

7 Entsorgung
Dieses Produkt darf nicht überall mit unsortiertem Hausmüll entsorgt
werden. Eine nicht den Bestimmungen Ihres Landes entsprechende
Entsorgung kann sich schädlich auf die Umwelt und die Gesundheit
auswirken. Bitte beachten Sie die Hinweise der für Ihr Land zuständi
gen Behörde zu Rückgabe- und Sammelverfahren.
8 Rechtliche Hinweise
8.1 Haftung
Der Hersteller haftet, wenn das Produkt gemäß den Beschreibungen und
Anweisungen in diesem Dokument verwendet wird. Für Schäden, die durch
Nichtbeachtung dieses Dokuments, insbesondere durch unsachgemäße
Verwendung oder unerlaubte Veränderung des Produkts verursacht werden,
haftet der Hersteller nicht.
8.2 Markenzeichen
Alle innerhalb des vorliegenden Dokuments genannten Bezeichnungen un
terliegen uneingeschränkt den Bestimmungen des jeweils gültigen Kennzei
chenrechts und den Rechten der jeweiligen Eigentümer.
Alle hier bezeichneten Marken, Handelsnamen oder Firmennamen können
eingetragene Marken sein und unterliegen den Rechten der jeweiligen Ei
gentümer.
Aus dem Fehlen einer expliziten Kennzeichnung, der in diesem Dokument
verwendeten Marken, kann nicht geschlossen werden, dass eine Bezeich
nung frei von Rechten Dritter ist.
8.3 CE-Konformität
Das Produkt erfüllt die Anforderungen der RoHS-Richtlinie 2011/65/EU des
Europäischen Parlaments und des Rates vom 08.06.2011 zur Beschränkung
der Verwendung gefährlicher Stoffe in Elektro- und Elektronikkomponenten
und Geräten.
9 Anhänge
9.1 Angewandte Symbole
Konformitätserklärung gemäß der anwendbaren europäischen
Richtlinien
Ottobock | 7

Dieses Produkt darf nicht überall mit unsortiertem Hausmüll ent
sorgt werden. Eine nicht den Bestimmungen Ihres Landes ent
sprechende Entsorgung kann sich schädlich auf die Umwelt und
die Gesundheit auswirken. Bitte beachten Sie die Hinweise der
für Ihr Land zuständigen Behörde zu Rückgabe- und Sammel
verfahren.
9.2 Technische Daten
Umgebungsbedingungen
Lagerung und Transport in der Ori
ginalverpackung (≤3Monate)
-20°C/-4°F bis +40°C/+104°F
Lagerung und Transport ohne Ver
packung (<48Stunden)
-25°C/-13°F bis +70°C/+158°F
max. 93% relative Luftfeuchtigkeit,
nicht kondensierend
Langzeitlagerung (>3Monate) -20°C/-4°F bis +20°C/+68°F
max. 93% relative Luftfeuchtigkeit,
nicht kondensierend
Betrieb -10°C/+14°F bis +60°C/+140°F
max. 93% relative Luftfeuchtigkeit,
nicht kondensierend
Laden des Akkus +10°C/+50°F bis +45°C/+113°F
Allgemein
Kennzeichen 4X156, 4X157, 4X158
Lebensdauer des Produkts Verschleißteil, das einer üblichen
Abnutzung unterliegt
1 Foreword English
INFORMATION
Last update: 2015-07-15
►Please read this document carefully before using the product.
►Follow the safety instructions to avoid injuries and damage to the
product.
►Instruct the user in the proper and safe use of the product.
►Please keep this document in a safe place.
The product "4X156 charger extension cable – ankle" is referred to below as
product/charger extension cable – ankle.
8 | Ottobock

The product "4X157 charger extension cable – knee head" is referred to
below as product/charger extension cable – knee.
The product "4X158 charger extension cable – ankle, long" is referred to
below as product/charger extension cable – ankle, long.
These instructions for use provide you with important information on the use,
adaptation and handling of the product.
Instruct the patient in the proper use and care of the product. The product
may not be transferred to the patient without prior instruction.
Only put the product into use in accordance with the information contained
in the accompanying documents supplied.
2 Product Description
The product permits the charger cable to be extended.
2.1 Combination Possibilities
The product can only be combined with the following knee joints:
• 3C98-3, 3C88-3 C-Leg
3 Application
3.1 Indications for use
The product should be used exclusively for relocating the charging recept
acle of the C-Leg 3C88-3 and 3C98-3 electronic knee joint systems to the
ankle area or the knee area.
3.2 Area of Application
The product has been developed for use in everyday activities. It must not be
used for activities where it would be exposed to unallowable environmental
conditions or strains (e.g. extreme sports).
3.3 Conditions of use
The product is intended exclusively for use on one patient. Use of the
product by another person is not approved by the manufacturer.
4 Safety
4.1 Explanation of Warning Symbols
WARNING Warning regarding possible serious risks of accident or injury.
CAUTION Warning regarding possible risks of accident or injury.
NOTICE Warning regarding possible technical damage.
Ottobock | 9

4.2 Structure of the safety instructions
CAUTION
The heading describes the source and/or the type of hazard
The introduction describes the consequences in case of failure to observe
the safety instructions. Consequences are presented as follows if more
than one consequence is possible:
> E.g.: Consequence 1 in case of failure to observe the hazard
> E.g.: Consequence 2 in case of failure to observe the hazard
►This symbol identifies activities/actions that must be observed/carried
out in order to avert the hazard.
4.3 General Safety Instructions
NOTICE
Use of the product with damaged charger extension cable
Lack of proper charging functionality due to damaged charger extension
cable (cable break) on the prosthesis socket as a result of constant motion
while walking.
►Do not relocate the charger extension cable to the prosthesis socket
but rather over the tube adapter.
4.4 Patient information
NOTICE
Penetration of dirt and humidity into the product
Lack of proper charging functionality due to malfunction.
►Ensure that neither solid particles nor liquids can penetrate into the
product.
NOTICE
Mechanical stress on the product
Lack of proper charging functionality due to malfunction.
►Do not subject the product to mechanical vibrations or impacts.
►Check the product for visible damage before each use.
►Take any necessary measures (e.g. repair, replacement, inspection by
the manufacturer's customer service, etc.).
10 | Ottobock

5 Scope of Delivery
• 1pc. 4X157 charger extension cable – knee
• 2pc. 65X3 small O-ring
• 1pc. 647G1146 instructions for use (qualified personnel)
or
• 1pc. 4X156 charger extension cable – ankle
• 2pc. 80X3 large O-ring
• 2pc. 65X3 small O-ring
• 1pc. 4X890 pad
• 1pc. 647G1146 instructions for use (qualified personnel)
or
• 1pc. 4X158 charger extension cable – ankle, long
• 2pc. 80X3 large O-ring
• 2pc. 65X3 small O-ring
• 1pc. 4X890 pad
• 1pc. 647G1146 instructions for use (qualified personnel)
6 Preparation for Use
6.1 Alignment
6.1.1 Charger extension cable – knee
1) Remove the cover of the charging receptacle on the knee joint.
2) Attach the charger extension cable to the knee joint.
3) Attach the charging receptacle of the charger extension cable to the
frame of the knee joint (see fig.1).
4) Hook the O-ring into the bracket of the charging receptacle.
5) Insert the counterpart piece of the charging receptacle into the O-ring.
6) Place the O-ring around the knee joint.
7) Hook the counterpart piece of the charging receptacle on the opposite
frame side of the knee joint (see fig.2).
8) Check the charging function of the knee joint.
6.1.2 Charger extension cable – ankle
6.1.2.1 Preparation
1) Determine the position for the charging receptacle of the charger exten
sion cable together with the patient.
2) Measure the distance between the flange of the charging receptacle and
the outside of the cosmetic foam cover.
3) Clean the tube at the specified position with a damp cloth and mild soap
(e.g. Ottobock 453H10=1 Derma Clean).
Ottobock | 11

4) Prepare the pads if necessary.
6.1.2.2 Assembly
1) If necessary, fill the determined distance between the charging recept
acle and the cosmetic foam cover with pieces of pad glued together one
on top of the other (see fig.3).
2) Remove the cover of the charging receptacle on the knee joint.
3) Attach the charger extension cable to the knee joint.
4) If necessary, wrap the cable around the tube adapter.
5) Position the holder of the charging receptacle on the tube or, if neces
sary, on the pieces of pad that have been glued one on top of the other.
6) Secure the holder of the charging receptacle with the O-ring (see fig.4).
INFORMATION: Use the small O-ring with up to 3 pad pieces glued
on. Use the large O-ring with 3 or more pad pieces glued on.
7) Check the charging function of the knee joint.
7 Disposal
In some jurisdictions it is not permissible to dispose of these products
with unsorted household waste. Disposal that is not in accordance
with the regulations of your country may have a detrimental impact on
health and the environment. Please observe the instructions of your
national authority pertaining to return and collection.
8 Legal Information
8.1 Liability
The manufacturer will only assume liability if the product is used in accord
ance with the descriptions and instructions provided in this document. The
manufacturer will not assume liability for damage caused by disregard of this
document, particularly due to improper use or unauthorised modification of
the product.
8.2 Trademarks
All product names mentioned in this document are subject without restriction
to the respective applicable trademark laws and are the property of the
respective owners.
All brands, trade names or company names may be registered trademarks
and are the property of the respective owners.
Should trademarks used in this document fail to be explicitly identified as
such, this does not justify the conclusion that the denotation in question is
free of third-party rights.
12 | Ottobock

8.3 CE Conformity
The product meets the requirements under the RoHS Directive 2011/65/EU
of the European Parliament and of the Council of 8 June 2011 on the restric
tion of the use of certain hazardous substances in electrical and electronic
equipment.
9 Appendices
9.1 Symbols Used
Declaration of conformity according to the applicable European
directives
In some jurisdictions it is not permissible to dispose of these
products with unsorted household waste. Disposal that is not in
accordance with the regulations of your country may have a det
rimental impact on health and the environment. Please observe
the instructions of your national authority pertaining to return and
collection.
9.2 Technical data
Environmental conditions
Storage and transport in original
packaging (≤3months)
-20°C/-4°F to +40°C/+104°F
Storage and transport without pack
aging (<48hours)
-25°C/-13°F to +70°C/+158°F
Max. 93% relative humidity, non-
condensing
Long-term storage (>3months) -20°C/-4°F to +20°C/+68°F
Max. 93% relative humidity, non-
condensing
Operation -10°C/+14°F to +60°C/+140°F
Max. 93% relative humidity, non-
condensing
Charging the battery +10°C/+50°F to +45°C/+113°F
General
Reference numbers 4X156, 4X157, 4X158
Product service life Wear part subject to normal wear
and tear
Ottobock | 13

1 Avant-propos Français
INFORMATION
Date de la dernière mise à jour: 2015-07-15
►Veuillez lire attentivement l’intégralité de ce document avant d’utiliser le
produit.
►Respectez les consignes de sécurité afin d’éviter toute blessure et en
dommagement du produit.
►Apprenez à l’utilisateur à bien utiliser son produit et informez-le des
consignes de sécurité.
►Conservez ce document.
Le produit «Rallonge de câble de charge pour cheville 4X156» sera simple
ment nommé «produit/rallonge de câble de charge pour cheville» dans la
suite du document.
Le produit «Rallonge de câble de charge pour tête de genou 4X157» sera
simplement nommé «produit/rallonge de câble de charge pour genou»
dans la suite du document.
Le produit «Rallonge de câble de charge longue pour cheville 4X158» sera
simplement nommé «produit/rallonge de câble de charge longue pour che
ville» dans la suite du document.
Ces instructions d’utilisation vous fournissent des informations importantes
relatives à l’utilisation, au réglage et à la manipulation du produit.
Expliquez au patient comment manipuler et entretenir correctement le pro
duit. Il est interdit de remettre le produit au patient sans lui prodiguer ces ex
plications.
Ne procédez à la mise en service du produit qu’en vous conformant aux in
formations figurant dans les documents fournis avec le produit.
2 Description du produit
Le produit permet d’augmenter la longueur du câble de charge.
2.1 Combinaisons possibles
Ce produit peut être utilisé uniquement avec les articulations de genou sui
vantes:
• C-Leg: 3C98-3, 3C88-3
14 | Ottobock

3 Utilisation
3.1 Usage prévu
Le produit est uniquement destiné à la pose de la prise chargeur des sys
tèmes électroniques d’articulation de genou C-Leg 3C88-3 et 3C98-3 dans
la zone de la cheville ou du genou.
3.2 Domaine d’application
Le produit est conçu pour une utilisation au cours des activités du quotidien.
Il ne doit pas être utilisé pour des activités au cours desquelles il est soumis
à des conditions d’environnement et à des sollicitations non autorisées
(parex. sports extrêmes).
3.3 Conditions d’utilisation
Le produit est exclusivement prévu pour l’appareillage d’un seul patient.
Le fabricant interdit toute utilisation du produit sur une tierce personne.
4 Sécurité
4.1 Signification des symboles de mise en garde
AVERTISSEMENT Mise en garde contre les éventuels risques d’accidents
et de blessures graves.
PRUDENCE Mise en garde contre les éventuels risques d’accidents
et de blessures.
AVIS Mise en garde contre les éventuels dommages tech
niques.
4.2 Structure des consignes de sécurité
PRUDENCE
Le titre désigne la source et/ou le type de risque
L’introduction décrit les conséquences du non-respect de la consigne de
sécurité. S’il s’agit de plusieurs conséquences, ces dernières sont dési
gnées comme suit:
> par ex.: conséquence 1 si le risque n’a pas été pris en compte
> par ex.: conséquence 2 si le risque n’a pas été pris en compte
►Ce symbole désigne les activités/actions à observer/appliquer afin
d’écarter le risque.
Ottobock | 15

4.3 Consignes générales de sécurité
AVIS
Utilisation du produit avec une rallonge de câble de charge défec
tueuse
La charge ne peut pas avoir lieu correctement en raison d’une rallonge de
câble de charge défectueuse (rupture du câble) au niveau de l’emboîture
de la prothèse. Le dommage de la rallonge est dû au mouvement perma
nent lors de la marche.
►Posez la rallonge de câble de charge sur l’adaptateur tubulaire et non
au niveau de l’emboîture de la prothèse.
4.4 Consignes destinées au patient
AVIS
Pénétration de salissures et d’humidité dans le produit
La charge ne peut pas être effectuée correctement à la suite d’un dysfonc
tionnement.
►Veillez à ce qu’aucune particule solide ni aucun liquide ne pénètrent
dans le produit.
AVIS
Sollicitation mécanique du produit
La charge ne peut pas être effectuée correctement à la suite d’un dysfonc
tionnement.
►Protégez le produit contre les vibrations mécaniques ou les chocs.
►Avant chaque utilisation, vérifiez que le produit ne présente aucun
dommage visible.
►Si besoin, prenez les mesures nécessaires (par ex. réparation, rempla
cement, contrôle par le service après-vente du fabricant, etc.).
5 Contenu de la livraison
• 1x rallonge de câble de charge pour genou 4X157
• 2x joint torique petit 65X3
• 1 instructions d’utilisation (personnel spécialisé) 647G1146
ou
• 1x rallonge de câble de charge pour cheville 4X156
• 2x joint torique grand 80X3
• 2x joint torique petit 65X3
16 | Ottobock

• 1x coussinet 4X890
• 1 instructions d’utilisation (personnel spécialisé) 647G1146
ou
• 1x rallonge de câble de charge longue pour cheville 4X158
• 2x joint torique grand 80X3
• 2x joint torique petit 65X3
• 1x coussinet 4X890
• 1 instructions d’utilisation (personnel spécialisé) 647G1146
6 Préparation à l’utilisation
6.1 Alignement
6.1.1 Rallonge de câble de charge pour genou
1) Retirez la protection de la prise chargeur de l’articulation de genou.
2) Branchez la rallonge de câble de charge à l’articulation de genou.
3) Emboîtez la prise chargeur de la rallonge de câble de charge sur le
châssis de l’articulation de genou (voir ill.1).
4) Accrochez le joint torique dans le support de la prise chargeur.
5) Faites passer la deuxième partie de la prise chargeur dans le joint to
rique.
6) Placez le joint torique autour de l’articulation de genou.
7) Accrochez la deuxième partie de la prise chargeur au côté opposé du
châssis de l’articulation de genou (voir ill.2).
8) Contrôlez que la fonction de charge de l’articulation de genou fonc
tionne bien.
6.1.2 Rallonge de câble de charge pour cheville
6.1.2.1 Préparation
1) Déterminez avec le patient la position de la prise chargeur de la rallonge
de câble de charge.
2) Mesurez l’espace entre la bride de la prise chargeur et la mousse esthé
tique externe.
3) Au niveau de la position définie, nettoyez le tube avec un chiffon humide
et du savon doux (par ex. Ottobock Derma Clean 453H10=1).
4) Si besoin, préparez les coussinets.
6.1.2.2 Montage
1) Si besoin, remplissez l’espace mesuré entre la prise chargeur et la
mousse esthétique avec des morceaux de coussinet collés les uns sur
les autres (voir ill.3).
2) Retirez la protection de la prise chargeur de l’articulation de genou.
Ottobock | 17

3) Branchez la rallonge de câble de charge à l’articulation de genou.
4) Si besoin, enroulez le câble autour de l’adaptateur tubulaire.
5) Placez le support de la prise chargeur sur le tube ou, si besoin, sur les
morceaux de coussinet collés les uns aux autres.
6) Fixez le support de la prise chargeur avec le joint torique (voir ill.4).
INFORMATION: Utilisez le joint torique de petite taille si le nombre
de morceaux de coussinet collés n’est pas supérieur à 3. À partir
de 3 morceaux de coussinet collés, utilisez le joint torique de
grande taille.
7) Contrôlez que la fonction de charge de l’articulation de genou fonc
tionne bien.
7 Mise au rebut
Il est interdit d’éliminer ce produit en tous lieux avec les ordures mé
nagères non triées. Une élimination non conforme aux dispositions en
vigueur dans votre pays peut avoir des effets néfastes sur
l’environnement et la santé. Veuillez respecter les consignes des au
torités compétentes de votre pays concernant les procédures de col
lecte et de retour des déchets.
8 Informations légales
8.1 Responsabilité
Le fabricant est responsable si le produit est utilisé conformément aux des
criptions et instructions de ce document. Le fabricant décline toute respon
sabilité pour les dommages découlant d’un non-respect de ce document,
notamment d’une utilisation non conforme ou d’une modification non autori
sée du produit.
8.2 Marque
Toutes les dénominations employées dans le présent document sont sou
mises sans restrictions aux dispositions du droit des marques de fabrique en
vigueur et aux droits du propriétaire concerné.
Toutes les marques, tous les noms commerciaux ou noms de sociétés cités
ici peuvent constituer des marques déposées et sont soumis aux droits du
propriétaire concerné.
L’absence d’un marquage explicite des marques citées dans ce document
ne permet pas de conclure qu’une dénomination n’est pas soumise aux
droits d’un tiers.
18 | Ottobock

8.3 Conformité CE
Le produit répond aux exigences de la directive RoHS 2011/65/UE du Parle
ment européen et du Conseil du 08/06/2011 relative à la limitation de
l’utilisation de certaines substances dangereuses dans les équipements
électriques et électroniques.
9 Annexes
9.1 Symboles utilisés
Déclaration de conformité conforme aux directives européennes
applicables
Il est interdit d’éliminer ce produit en tous lieux avec les ordures
ménagères non triées. Une élimination non conforme aux dispo
sitions en vigueur dans votre pays peut avoir des effets néfastes
sur l’environnement et la santé. Veuillez respecter les consignes
des autorités compétentes de votre pays concernant les procé
dures de collecte et de retour des déchets.
9.2 Caractéristiques techniques
Conditions d’environnement
Stockage et transport dans
l’emballage d’origine (≤3mois)
-20°C/-4°F à +40°C/+104°F
Stockage et transport sans embal
lage (<48heures)
-25°C/-13°F à +70°C/+158°F
Humidité relative de l’air de 93%
max., sans condensation
Stockage de longue durée (>3mois) -20°C/-4°F à +20°C/+68°F
Humidité relative de l’air de 93%
max., sans condensation
Fonctionnement -10°C/+14°F à +60°C/+140°F
Humidité relative de l’air de 93%
max., sans condensation
Charge de l’accumulateur +10°C/+50°F à +45°C/+113°F
Généralités
Référence 4X156, 4X157, 4X158
Durée de vie du produit Pièce d’usure soumise à une usure
habituelle
Ottobock | 19

1 Introduzione Italiano
INFORMAZIONE
Data dell'ultimo aggiornamento: 2015-07-15
►Leggere attentamente il presente documento prima di utilizzare il pro
dotto.
►Attenersi alle indicazioni di sicurezza per evitare lesioni e danni al pro
dotto.
►Istruire l'utente sull'utilizzo corretto e sicuro del prodotto.
►Conservare il presente documento.
Il prodotto "prolunga del cavo di carica - caviglia 4X156" viene in seguito de
nominato prodotto/prolunga del cavo di carica - caviglia.
Il prodotto "prolunga del cavo di carica - testa del ginocchio 4X157" viene in
seguito denominato prodotto/prolunga del cavo di carica - ginocchio.
Il prodotto "prolunga del cavo di carica - caviglia, lunga 4X158" viene in se
guito denominato prodotto/prolunga del cavo di carica - caviglia, lunga.
Queste istruzioni per l'uso forniscono importanti informazioni sull'utilizzo, la
regolazione e il trattamento del prodotto.
Istruire il paziente sull'utilizzo e la cura corretti del prodotto. Non è consenti
to consegnare il prodotto al paziente senza averlo istruito sul suo utilizzo.
Mettere in funzione il prodotto soltanto in base alle informazioni contenute
nei documenti di accompagnamento forniti.
2 Descrizione del prodotto
Il prodotto consente di prolungare il cavo di carica.
2.1 Possibilità di combinazione
Il prodotto può essere combinato esclusivamente con le seguenti articolazio
ni di ginocchio:
• C-Leg: 3C98-3, 3C88-3
3 Utilizzo
3.1 Uso previsto
Il prodotto deve essere utilizzato esclusivamente come prolunga della pre
sa di carica dei sistemi di articolazione di ginocchio elettronici C-Leg
3C88-3 e 3C98-3 nella zona della caviglia o nella zona del ginocchio.
20 | Ottobock
Other manuals for 4X156
1
This manual suits for next models
2
Table of contents
Languages:
Other Otto Bock Batteries Charger manuals

Otto Bock
Otto Bock 757L20 User manual

Otto Bock
Otto Bock AxonCharge Integral User manual

Otto Bock
Otto Bock AxonCharge Integral 757L500 User manual

Otto Bock
Otto Bock 757L35 User manual

Otto Bock
Otto Bock 757L13 User manual

Otto Bock
Otto Bock 317L20 User manual

Otto Bock
Otto Bock 4E50-2 User manual

Otto Bock
Otto Bock 757L35 User manual