manuals.online logo
Brands
  1. Home
  2. •
  3. Brands
  4. •
  5. Overland Storage
  6. •
  7. Storage
  8. •
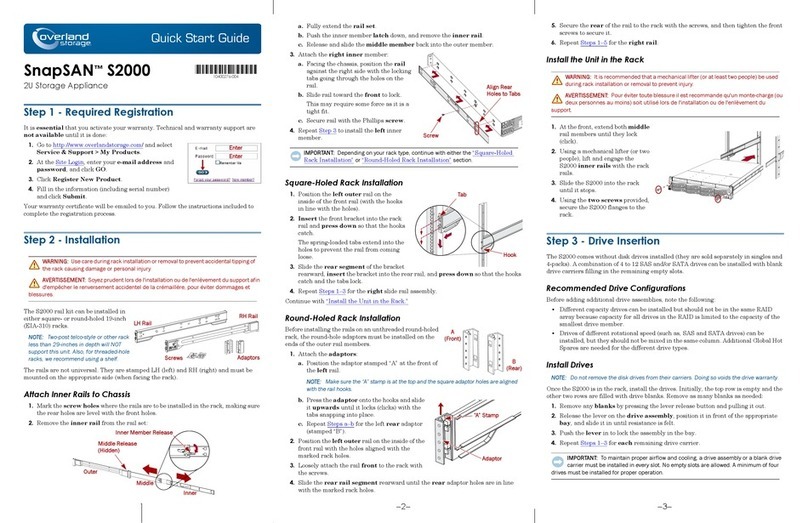
  9. Overland Storage XchangeNOW ARCvault Series User manual

Overland Storage XchangeNOW ARCvault Series User manual

Part Number 10400010-106 06/2008 ©2007-2008 Overland Storage, Inc. Page 1 of 4
This document describes how to remove and replace an
Overland XchangeNOW ARCvault 2U chassis assembly.
WARNING: To reduce the risk of electric shock or
damage to equipment, disconnect the power cord.
CAUTION: A bracket and screws secure the robotics for
shipment and MUST be removed before operating.
IMPORTANT: If possible, document the current settings
by printing out a Full Trace Log before swapping chassis.
Unpacking
Carefully unpack and verify that you have all the parts:
•Spare 2U chassis assembly with drives
•Wire Tie-Down kit
•Magazine Release Tool
•These remove & replace instructions
A Phillips screwdriver is also needed.
Electrostatic Discharge Information
A discharge of static electricity can damage micro-circuitry
or static-sensitive devices. To help prevent Electrostatic
Discharge (ESD), observe standard ESD precautions.
Unpack the spare chassis (Figure 1) and prepare it to receive the magazines and drives from the old unit.
Figure 1. Unpacking the Spare Chassis
WARNING: Due to the weight of the unit, it is
recommended that at least two people be used to lift
the unit out of the box to prevent injury.
1. Open the top of the box (Figure 1) and lift off the top
end caps.
2. Remove the Wire Tie-Down kit.
3. Lift the ARCvault out and set it on a secure surface.
4. Remove the ESD bag.
CAUTION: Do NOT turn the chassis upside down or
allow the front bezel or door to contact the table.
5. Remove the shipping screws underneath (Figure 1):
a. Turn the unit onto its left side making sure the
front bezel does not touch the table.
ARCvault®Series XchangeNOW®
2U Chassis Assembly
Remove & Replace Instructions
Overview & Notes
ARC-0011
Unpack Spare Chassis
ARC-0171
End Cap
End Cap
Spare Chassis
ESD Bag
Carton
Tie-Down Kit
ARC-0048
Front Bezel
Off Table Screws & Well-Nuts
Must Be Removed
Shuttle Bracket Hole
Screw
Well-Nut
Pull
Part Number 10400010-106 06/2008 ©2007-2008 Overland Storage, Inc. Page 2 of 4
b. Unscrew each shipping screw about one-half inch
leaving the screws in the well-nuts.
c. Using the finger pulls, remove and retain the well-
nuts and screws.
d. Carefully return the library to its normal, upright
operating position.
6. Opening the left door, remove and retain the screw
holding the shuttle bracket in place (Figure 2).
Figure 2. Remove the Bracket Screw (Top Inside View)
7. Remove the shuttle bracket (Figure 3):
a. Slightly lift the bracket up to clear the shuttle.
b. Swing the rear of the bracket to the left aligning it
with the magazine bay.
c. Pull the bracket straight out and retain.
Figure 3. Remove the Shuttle Bracket
8. Close the door.
9. At the rear, remove the AC receptacle label (Figure 4).
Figure 4. Removing the AC Receptacle Label
10.Place the packaging components in the box, including
the bracket, and set aside for returning the old unit.
To replace a chassis, you must first remove the media
magazines (Figure 5).
NOTE: ARCvault 12 model only has one magazine located on
the right side.
Figure 5. ARCvault Magazines to be Removed
CAUTION: Keep a loaded magazine level. Don’t hold
magazine by the handle; use both hands to support it.
Remove Magazines with Power On
1. At the OCP Default screen, press Media > Mag
Access > OK (at the offline message) > Unlock All.
2. Open the right door and remove the right magazine.
3. For an ARCvault 24, open the left door and remove the
left magazine.
Continue with “Remove Unit from Rack.”
Remove Magazines with Power Off
Should there be a loss of power, you can still access the
magazines in models built after November 2006 by using
the Magazine Release Tool (MRT) or a 1mm (0.040 in.)
diameter wire at least 5cm (2 in.) long.
1. Open the magazine door (Figure 6).
Figure 6. Manually Releasing a Magazine
2. Slide the MRT into the slot under the handle.
Remove This Screw
Shuttle
Bracket
Front Bezel
Well-Nut
Left Door
Opening
Hole
a
b
cBracket Front Lip
ARC-0027
Remove Magazines From Old Unit
ARCvault 24 (both)
ARCvault 12
(right only)
Insert
Media Magazine
Door
Tool Here
Magazine
Release Tool
Part Number 10400010-106 06/2008 ©2007-2008 Overland Storage, Inc. Page 3 of 4
3. While pressing firmly with the tool, pull the magazine
out about one inch (2.5cm).
4. Remove the tool.
5. Slide the magazine all the way out.
6. For an ARCvault 24 left magazine, repeat Steps 1–5.
Remove Unit from Rack
WARNING: It is recommended that a mechanical lifter
(or at least two people) be used to prevent injury during
rack removal and reinsertion.
1. If necessary, at the OCP, press Power > Power Off
Library > OK (at the power down message).
2. After the unit has shut down, at the rear, remove the
power cord and all cables.
3. At the front, open the doors and loosen the retaining
screws inside (Figure 7).
4. Carefully remove the ARCvault unit from the rack
and place it on a secure, flat surface.
NOTE:
Some units require a tool to release the rail stops.
Figure 7. Left Retaining Screw
Install New Unit in Rack
1. Swap out the chassis assemblies.
2. Carefully slide the new ARCvault into the rack rails.
3. At the front, open the doors and tighten the retaining
screws to the rack.
4. Reinsert the media magazines and close the doors.
NOTE:
If the old unit was an ARCvault 12, insert the single
magazine into the right-side leaving the left side empty.
5. At the rear of the unit, reconnect the LVD SCSI cable,
SCSI terminator, and any management cables.
6. Plug in the power cord and power on the unit.
Configure the Unit
1. If the old unit was an ARCvault 12, reconfigure the new
unit (Figure 8) to also be a 12-slot autoloader:
a. Log into the RMU as Administrator (password = 2)
using IP address 10.0.0.1.
b. Go to Setup > Library.
c. Set Number of Enabled Slots = 12.
d. Click Functions > Reboot Library.
2. Log into RMU > Setup and make any changes to
configure the new unit like the old one.
Use the Trace Log from the old unit to obtain the
configuration data.
Figure 8. RMU Setup Library Option
Left
Retaining Screw
Incorporate New Chassis
Part Number 10400010-106 06/2008 ©2007-2008 Overland Storage, Inc. Page 4 of 4
IMPORTANT: If the old unit didn’t power down with the shuttle
parked, contact Overland Technical Support.
Secure the Robotics
CAUTION: Units that do not have the four holes
underneath for the well-nuts and screws must use the
enclosed Wire Tie-Down kit to secure the robotics before
packaging the unit. Follow the instructions that come
with the kit and then continue with the section “Repack
the Chassis.”
For units with the four holes in the chassis bottom and
track plate, follow this procedure:
1. Open the left door.
2. Install the shuttle bracket:
a. Holding the shuttle bracket by the front lip
(Figure 3), slide it into the magazine bay.
b. Swing the rear of the bracket to the right until it
contacts the shuttle.
c. Press the front lip of the bracket down and to the
right until the screw holes align (Figure 2).
You should hear a click as the bracket slips into
place over the shuttle.
d. Install the screw that holds the shuttle bracket to
the bottom edge of the front panel.
3. Turn the unit onto its left side with the front bezel
off the table.
4. Install the shuttle bracket well-nut:
a. While pressing the shuttle bracket down, visually
check the hole alignment from underneath.
All three holes should be visible and aligned.
b. Insert a well-nut and screw through the three
holes using the extended screw as a handle.
c. While continuing to hold the bracket against the
shuttle, turn the screw three (3) full turns into
the well-nut (Figure 9).
Figure 9. Well-Nut Insertion (Side View)
5. Insert the remaining three well-nuts using the
extended screws, and tighten each one three turns.
6. Carefully return the library to the upright position.
Repack the Chassis
Once the robotics are secure, repack the unit for shipment.
1. Open the top of the box and remove all the packaging
materials stored there except the two bottom end caps.
2. With the ARCvault on a secure surface, slide it into the
ESD bag and seal with packing tape.
3. Using two people, lower the packaged ARCvault into
the box.
4. Place the two top end caps onto the unit.
5. Tape the box using the type of tape required by the
shipper for the shipping method being used.
Return Old Chassis
Well-Nut
Bracket
Track
Chassis
Correct Incorrect
Shuttle
Stop Washer
Plate
Additional Help
You can get additional technical support on the Internet at http://support.overlandstorage.com, or call
1-877-654-3429 (toll-free U.S. & Canada), +44 (0) 118-9898050 (Europe), or +1 (858) 571-5555 Option 5 (International).

Other Overland Storage Storage manuals
Overland Storage NEO S-Series User manual

Overland Storage

Overland Storage NEO S-Series User manual

Overland Storage NEO 8000E User manual

Overland Storage

Overland Storage NEO 8000E User manual

Overland Storage NEO 400S User manual

Overland Storage

Overland Storage NEO 400S User manual
Overland Storage NEO 400S User manual

Overland Storage

Overland Storage NEO 400S User manual

Overland Storage SnapServer XSD 40 User manual
Overland Storage

Overland Storage SnapServer XSD 40 User manual

Overland Storage SnapScale X2 Node User manual

Overland Storage

Overland Storage SnapScale X2 Node User manual

Overland Storage ARCvault Series User manual

Overland Storage

Overland Storage ARCvault Series User manual

Overland Storage SnapServer User manual

Overland Storage

Overland Storage SnapServer User manual

Overland Storage SnapServer DX2 User manual

Overland Storage

Overland Storage SnapServer DX2 User manual

Overland Storage Tandberg Data RDX QuikStor User manual

Overland Storage

Overland Storage Tandberg Data RDX QuikStor User manual

Overland Storage SnapSAN S2000 User manual

Overland Storage

Overland Storage SnapSAN S2000 User manual

Overland Storage NEOs StorageLoader User manual
Overland Storage

Overland Storage NEOs StorageLoader User manual

Overland Storage SnapSAN S3000 Service manual

Overland Storage

Overland Storage SnapSAN S3000 Service manual

Overland Storage NEO Series User manual

Overland Storage

Overland Storage NEO Series User manual

Overland Storage SnapScale X2 User manual

Overland Storage

Overland Storage SnapScale X2 User manual

Overland Storage NEO 8000 Guide

Overland Storage

Overland Storage NEO 8000 Guide

Overland Storage Neo Series 2000 User manual

Overland Storage

Overland Storage Neo Series 2000 User manual

Overland Storage SnapServer DX2 User manual

Overland Storage

Overland Storage SnapServer DX2 User manual

Overland Storage ARCvault 2U Series User manual

Overland Storage

Overland Storage ARCvault 2U Series User manual

Overland Storage LoaderXpress Guide

Overland Storage

Overland Storage LoaderXpress Guide

Overland Storage NEO 4000e User manual

Overland Storage

Overland Storage NEO 4000e User manual

Overland Storage NEO XL Series User manual

Overland Storage

Overland Storage NEO XL Series User manual

Overland Storage NEO XL Series User manual

Overland Storage

Overland Storage NEO XL Series User manual

Overland Storage REO Series User manual

Overland Storage

Overland Storage REO Series User manual

Popular Storage manuals by other brands

Cactus CFast product manual

Cactus

Cactus CFast product manual

Verbatim MediaShare Wireless SD/USB device User information

Verbatim

Verbatim MediaShare Wireless SD/USB device User information

IBM N7800 Hardware and service guide

IBM

IBM N7800 Hardware and service guide

Lenovo IBM Half-high LTO Generation 4 Product guide

Lenovo

Lenovo IBM Half-high LTO Generation 4 Product guide

Sealey APMS50UCS instructions

Sealey

Sealey APMS50UCS instructions

EMC VNX Series Hardware Information Guide

EMC

EMC VNX Series Hardware Information Guide

Fujitsu ETERNUS DX60 S3 Configuration guide

Fujitsu

Fujitsu ETERNUS DX60 S3 Configuration guide

Seagate LD25.2 - Series 80 GB Hard Drive Product overview

Seagate

Seagate LD25.2 - Series 80 GB Hard Drive Product overview

ATMT STORM MP180 user manual

ATMT

ATMT STORM MP180 user manual

Lenovo ThinkStation P7 manual

Lenovo

Lenovo ThinkStation P7 manual

Violin Memory 7300 Service guide

Violin Memory

Violin Memory 7300 Service guide

EMC2 VNXe3300 installation guide

EMC2

EMC2 VNXe3300 installation guide

ATTO Technology FastStream SC 5700 Installation and operation manual

ATTO Technology

ATTO Technology FastStream SC 5700 Installation and operation manual

Akitio Node Lite with Intel Optane SSD Setup guide

Akitio

Akitio Node Lite with Intel Optane SSD Setup guide

OWC Accelsior 4M2 Assembly manual & user guide

OWC

OWC Accelsior 4M2 Assembly manual & user guide

Glyph PGFW8004B-500 Specifications

Glyph

Glyph PGFW8004B-500 Specifications

Dell SCv2080 owner's manual

Dell

Dell SCv2080 owner's manual

SilverStone FS204 Installation

SilverStone

SilverStone FS204 Installation

manuals.online logo
manuals.online logoBrands
  • About & Mission
  • Contact us
  • Privacy Policy
  • Terms and Conditions

Copyright 2025 Manuals.Online. All Rights Reserved.