10400198-004 03/2011 ©2010-11 Overland Storage, Inc. Page 2 of 8
Step 2: Rail Kit Installation
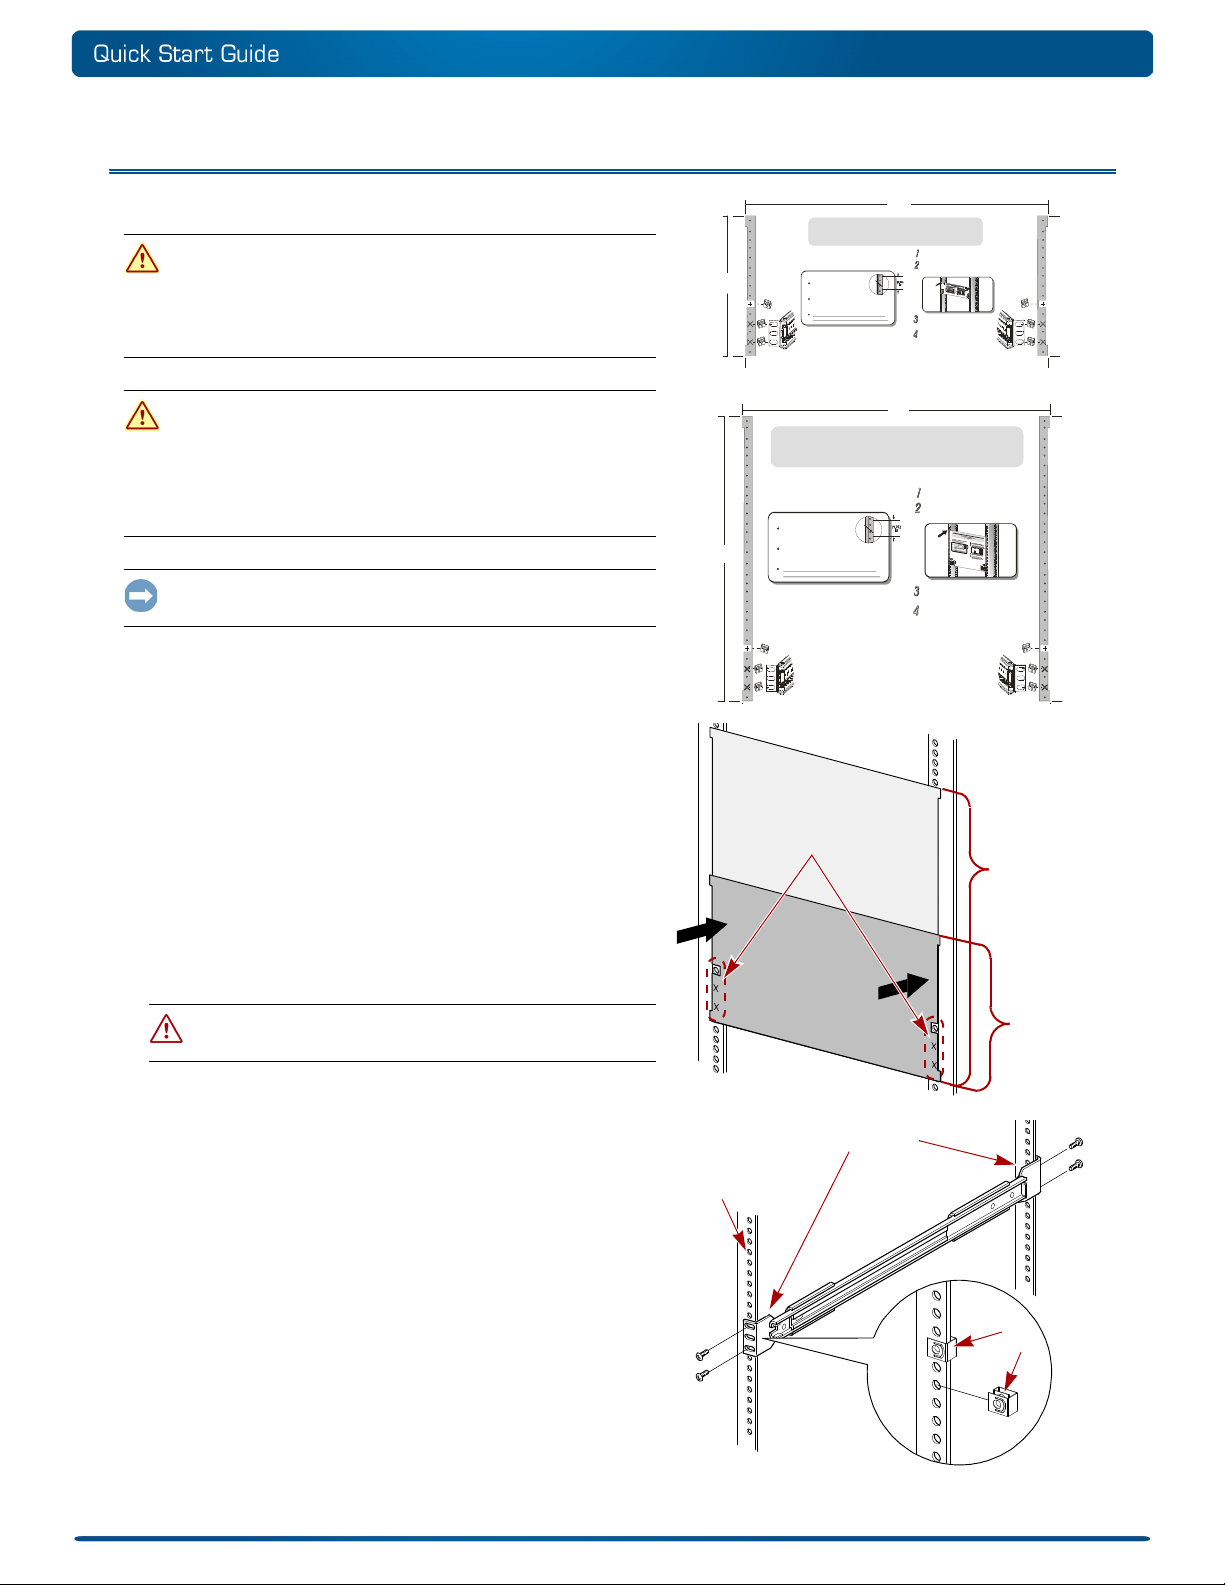
Use Template to Mark Rack
WARNING: It is recommended that a mechanical lifter (or at
least two people) be used to raise and align the unit to prevent
injury during installation. Use care when inserting or removing a unit
into or out of a rack to prevent the accidental tipping of the rack
causing damage or personal injury.
AVERTISSEMENT: afin d’éviter des blessures pendant
l’installation, il est recommande d’utiliser un monte-charge (ou
au moins deux personnes) pour élever ou aligner l’appareil. Faites
attention lorsque vous insérez ou retirez l’appareil d’un support, pour
empêcher le déversement accidentel de la crémaillère causant des
dommages et des blessures.
IMPORTANT: Do NOT remove the front-door packing materials
until the library is in the rack.
You must first install the rail kit in the rack using the template
from the Accessory Kit:
1. Ensure you have adequate rack space available:
•NEO 2000e requires 8.75 in. (22.25cm) (5U)
•NEO 4000e requires 17.5 in. (44.50cm) (10U)
2. Using the template, mark the location for the mounting
hardware on the rack rails:
a. Match up the hole pattern indicated on the sides of the
template with the hole pattern in the rack.
b. Use the template to mark the six mounting holes.
c. Remove the template.
3. Repeat Step 2 at the rack rear using just the lower two
holes on each side.
CAUTION: Be sure rear holes are horizontally in line with the
front holes so the unit remains level.
Install Rails
1. Using four screws, loosely attach each pre-assembled rail
set as follows:
• Threaded-Hole Rack—Position each rail with the
brackets outside the vertical rack member, and install
four screws to secure them.
• Non-Threaded Hole Rack—Install the four clip nuts on
the insides of both vertical rack members, position each
rail with brackets outside the member, and install four
screws to secure them.
2. Tighten the screws on both rear brackets.
3. Tighten the screws on both front brackets.
4. Slide out the middle slide members until they lock.
FIRST: See other side for instructions
to attach Rack Mount Slides
to tape library unit.
LibraryXpress Neo Series
LXN 2000 Library Module
RETMA RACK MOUNTING TEMPLATE
Start at the bottom of the rack or at
top o f a pr evio usly m ounted co mponent .
Use a pencil to mark locations for cage
nuts (C) and mounting brackets (M).
Place the template on the front of the rack.
Matchthe hole pattern on the template with
the hole pat tern on th e verti cal rai ls of the rack .
On older racks with10-32 tapped
mounting holeson the vertical rails,
omit four 10-32 cage nuts on the front
and rear slide mounting brackets.
18.89”
6.67"
C
INSTALLATION TIPS
Use the tick marks on the verticalrails of the
rack to co unt the U-space s.
Older ra cks do not have ti ck marks.
Waituntil the componenti sinserted into ther ackbefore
tightening the supportrails. The smallamount of play
helpsposition the rails tothe exact width of the component
beinginstalled.
NOTE:
Ensu re S lide Oute r Member s are lev el from
frontto rear prior to securing onRack Frame.
Tick
mark
C
M
M
Neo-0081
FIRST: See other side for instructions
to attach Rack Mount Slides
to tape library unit.
For Use with Neo Series 4000
TM
RETMA RACK MOUNTING TEMPLATE
Start at the bottom of the rack or at
top of a previously mounted component.
Use a pencil t o mark locations for cage
nuts (C ) and moun tin g bra ckets (M).
Place the templa te on the fron t of the rack.
Match th e hole patt ern on the temp late with
the hole pa ttern on the vertical rai ls of the r ack.
On older rac ks with 10-32 ta pp ed
mounti ng hole s on the vertical rail s,
omit fo ur 10-32 c age n uts o n the fro nt
and rear sli de mounting bra ckets.
18.89”
9.16"
C
INSTALLATION TI PS
Use the tick marks on the vertical rails of the
rack to count the U-spaces.
Older ra cks do not hav e tick mar ks.
Wait until the component is inserted into the rack before
tightening the supp ort rails. The small amoun t of play
helps position the rails to the exact width of the component
bein g inst alle d.
NOTE:
Ensure Slide Outer Members are level f rom
front to rear prior to securing on Rack Frame.
Tick
mark
C
M
M
NEO 2000e
NEO 4000e
Mark These Holes
Template
Template
Clip
Nuts
Brackets Outside
Smooth
Threaded
Only


