Oxford Aqua Series Instruction Manual


2
The information included in this booklet was correct at time of going to print, subject to
errors and omissions. Product specication page subject to change.
If you require any further help or advice, do not hesitate to contact either your local
authorised Oxford dealer or Oxford direct on +44(0)1993 862300
Oxford Products Ltd, De Havillard Way, Range Road, Witney, 0X29 0YA
www.oxfordproducts.com info@oxprod.com
AQUA LUGGAGE GUIDELINES
General Advice for users of soft luggage 3
Tail Packs 4-5
Tank Bags 6
French 7-9
German 10-12
Spanish 13-15
Italian 16-18
Polish 19-21
Japanese 22-24
Product Care 25
IF YOU HAVE DIFFICULTY READING THIS GUIDE YOU CAN
DOWNLOAD A LARGER FORMAT FROM THE WEBSITE.

3
A motorcycle is a relatively ‘hostile environment’ for luggage and the following general guidelines
are provided to ensure that the luggage performs as the manufacturer intended. As with all types
of luggage, users should always pay particular attention to the manufacturer’s own safety, tment
and usage instructions included with this product.
LOADING
Always ensure that luggage is loaded as evenly as possible and within the stated maximum
capacity and weight limits. Heavy objects should be loaded at the bottom and particular care
should be taken with sharp objects to avoid damaging the luggage.
Dependent on the type and specication of the luggage, the contents may have to be protected
against the elements (e.g. water, dirt, etc). by wrapping in plastic bags for example.
FITMENT
All adjacent surfaces of the motorcycle should be clean and smooth to avoid possible abrasion.
Where the possibility of abrasion exists, the necessary precautions should be taken – ref page
25. The luggage should be securely attached to the motorcycle and should be mounted clear of
moving parts and sources of heat such as engine and exhaust system(s). It is recommended that
riders check the security/mounting of luggage at regular intervals throughout their journey.
RAINCOVERS
Where rain covers are tted, it is the responsibility of the user to ensure rain covers are tted
safely and correctly (see tment advice above) i.e. ensure that they are tted snugly to the
luggage and are not left baggy and able to ll with air when on the move.
USAGE
As the tment of luggage may affect the stability or operating characteristics of the motorcycle,
riders should always heed the stated recommended maximum speeds for both solo and ‘two-up’
use. Care should also be taken with luggage that uses magnetic mountings as these may affect
items containing magnetic data such as credit cards, lm, etc. This luggage has been designed for
universal tment on motorcycle, for road use only.
PRODUCT
To ensure longevity of the luggage, the manufacturer’s own cleaning and storage instructions
should always be observed.
IMPORTANT
The manufacturer cannot accept any liability for damage caused to the vehicle, the luggage or
its contents arising out of its misuse or any failure to t and use it in accordance with the above
guidelines and the manufacturers special instructions.
MOTORCYCLE INDUSTRY ASSOCIATION LTD

4
GB
INCLUDED:
• 1 Tail Pack • Integral seatbelt/s • 1 pack of webbing straps
FITTING INSTRUCTIONS:
Before tting your Tailpack, always ensure that the surface onto which it is to be tted is
completely free from any dirt. This is because even the nest of residue can lead to marking. It is
designed to be attached onto a removable rear seat/pillion seat of a motorcycle, not onto a seat
hump/cover. Roll closure at least 3 times and secure with clip buckles to ensure a waterproof seal.
TO FIT:
1. Unlock and lift seat of motorcycle (or pillion seat pad if motorcycle has one).
2. Fasten bag securely to seat using Hook and Loop strap/s provided. This Hook and Loop strap/s
must be tted tightly. Replace seat and lock into place.
3. If the Hook and Loop strap is too long it can be cut down with a pair of scissors. However,
ensure the 15cm overlap/ contact patch is still achieved.
4. Webbing straps have been included which are suitable for many motorcycles. However, you
may need to purchase bungees to suit your specic motorcycle to ensure a completely secure
and stable attachment.
5. Attach the webbing straps under tension to suitable, secure parts of the motorcycle
frame, such as a dedicated luggage hook or foot rest. Ensure that the front straps are
tensioned towards the front of the motorcycle and the rear straps are tensioned
towards the back of the motorcycle, rolled at the ends and secured using the hook and
loop tabs.
WARNING:
• Do not overload – maximum recommended loading capacity 5kg.
• It is the owner’s responsibility to ensure that the luggage is attached in such a way that
it does not damage or put at risk the owner or any property of the owner.
• Do not exceed the UK legal speed limit. This product has only been tested for use at
UK road legal speeds.
• Regularly check bungee cords for wear and replace if they show any signs of weakening
or friction damage.These can be purchased from your local dealer.
• Ensure that no part of the straps or bag can damage your motorcycle and that it does
not rub against any moving or hot parts of the motorcycle, thus causing it to fray, burn
or otherwise weaken.
PLEASE NOTE:
• If the luggage is not attached securely, it may become detached and cause an obstruction that
could lead to serious injury and even death.
• Tail packs must NOT be attached to motorcycle seat humps. They are only suitable for
motorcycles with detachable seats (under which the Hook and Loop strap should be locked
into place). The Hook and Loop strap should NOT be fastened underneath the rear body work
where it may come into dangerous contact with the rear wheel.
TAILPACKS TAILPACKS MUST BE ATTACHED
TO THE PILLION SEAT USING THE
INTEGRAL SEAT-BELT STRAP AND
ADDITIONAL STRAPS

5
GB
HOW TO FIT YOUR TAIL PACK
HOW NOT TO FIT YOUR TAILPACK
Under seat
strap
Solid anchor points such
as luggage mounts,
footrest mounts etc
Front of motorcycle
Webbing straps
through D rings
Webbing straps
tensioned
Important!
UNDER 5KG EVENLY LOADED
Hook and Loop under
seat strap MUST be
fitted tightly
Under seat strap
Motorcycle seat
locked in place
READ FITTING
GUIDELINES
BEFORE USE!
CORRECT
INCORRECT
Webbing straps not
through D rings
Webbing straps
untensioned
Webbing straps
tensioned in same
direction or angled
towards each other
OVER 5KG UNEVENLY LOADED
Hook and Loop under
seat strap folded
(unused) under bag or
fitted loosely
Under seat strap
Motorcycle seat
locked in place
ADDITIONAL ATTACHMENT SYSTEM WHICH MUST BE USED:-
If still unsure, the use of a Cargo Net is recommended.

6
GB
INCLUDED:
• 1 Tank bag • Headstock strap
FITTING INSTRUCTIONS:
Before tting your tank bag, always ensure that the tank is completely free from any dirt. This is
because even the nest of residue can lead to marking of the tank. It is also advisable to clean the
bottom of the bag every time before use (traces of metal could be attracted to the magnets)
TO FIT:
1. Hold the bag with the headstock strap facing towards the headstock and gently set the base
of the bag onto the tank. The base is magnetic and will therefore secure the bag to a steel
tank. The position of the magnets may be adjusted slightly in order to suit the shape of the
tank – simply manoeuvre the magnets within their individual pockets before attaching the bag.
2. Pass the headstock strap around the headstock and clip together. This acts as a secondary
securing device and must be used.
3. Ensure that the bag is securely fastened before setting off.
WARNING
• Do not overload – maximum recommended loading capacity 5kg.
• It is the owner’s responsibility to ensure that the luggage is attached in such a way that
it does not damage or put at risk the owner or any property of the owner.
• Do not exceed the UK legal speed limit. This product has only been tested for use at UK road
legal speeds.
PLEASE NOTE:
• If the luggage is not attached securely, it may become detached and cause an obstruction that
could lead to serious injury and even death.
• Do not leave the tank bag on the fuel tank over-night or for longer periods. The non-slip base
material under the magnets may leave PVC residue which can damage certain lacquers and
stain the paint nish. Once the bag is removed, wipe the tank with a polishing cloth to remove
any residue.
TANK BAGS

7
FR
CONTENU:
• 1 sacoche arrière
• 1 ceinture de sécurité intégrée
• 1 paquet de sangles de xation
INSTRUCTIONS D’INSTALLATION:
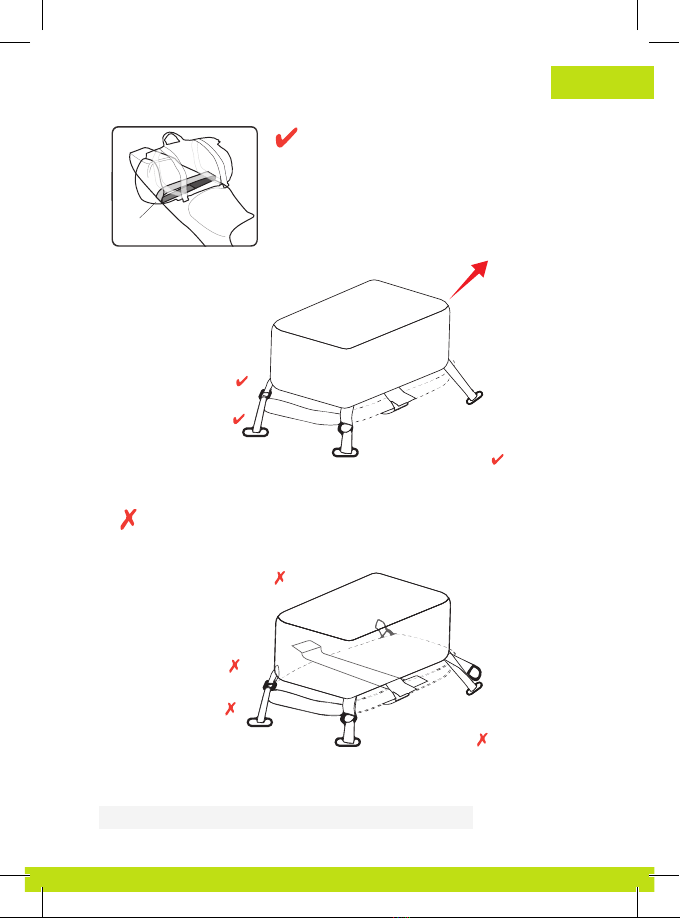
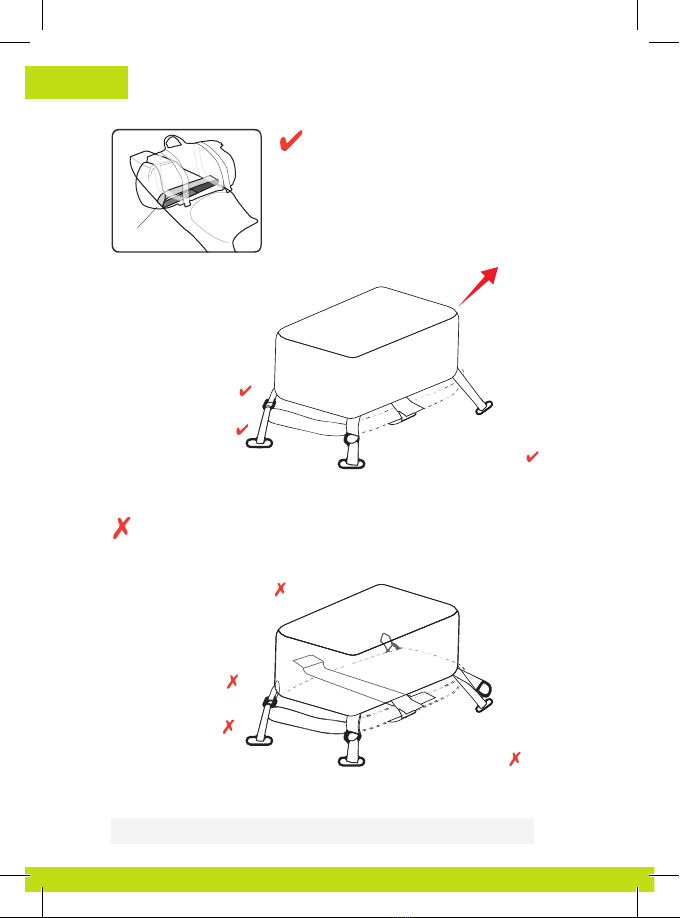
Avant d’installer la sacoche arrière, toujours s’assurer que la surface sur laquelle elle va être xée
est totalement exempte de poussière. En effet, le moindre résidu peut causer des marques. Elle
est conçue pour être xée sur le siège arrière amovible/passager d’une moto et non pas sur un
siège de forme arrondie/couverture ou support. Rouler la fermeture au moins trois fois et fermer
avec les boucles à clip.
INSTALLATION:
1. Déverrouiller et soulever le siège de la moto (ou la selle du siège passager, le cas échéant).
2. Fixer la sacoche de manière sécurisée sur le siège à l’aide du crochet et de la boucle de sangle
fournis. Ces crochet et boucle doivent être fermement attachés. Remettre le siège en place et
le verrouiller à nouveau.
3. Si le crochet et les boucles de sangle sont trop longs, ils peuvent être coupés à l’aide de
ciseaux. Il faut cependant toujours veiller à avoir une zone de contact/chevauchement de 15cm
minimum.
4. Des sangles de xation sont incluses et compatibles avec la plupart des motos. L’achat de
tendeurs compatibles avec un type de moto spécique pourra cependant être nécessaire an
de xer tout bagage de manière sûre et stable.
5. Attacher les sangles de xation sous tension à des endroits sécurisés et compatibles du châssis
de la moto, comme un crochet spécialement conçu pour les bagages ou les repose-pieds.
Vérier que les sangles avant sont tendues vers l’avant de la moto et que les sangles arrière
sont tendues vers l’arrière de la moto, enroulées aux extrémités et xées en place à l’aide des
crochets et des boucles.
AVERTISSEMENT:
• Ne pas trop charger. Charge maximale recommandée de 5kg.
• Il incombe au propriétaire de s’assurer que les bagages sont xés de manière à ne pas
endommager ni à mettre en danger le propriétaire ou les biens du propriétaire.
• Ne pas dépasser les limitations de vitesse légales en vigueur au Royaume-Uni. Ce produit
uniquement été testé pour être utilisé aux limitations de vitesse légales en vigueur au
Royaume-Uni.
• Vérier régulièrement les cordons/sangles à la recherche de tout signe d’usure et les remplacer
en cas de signes de faiblesse ou de dégâts causés par une friction. Ils sont disponibles auprès
de votre revendeur local.
• Lors de l’utilisation de tendeurs, ne pas les étirer au-delà de leur élasticité (environ 175 % de
leur taille d’origine).
• Veiller à ce qu’aucune partie des sangles ou des sacoches ne puisse endommager la moto et
à ce qu’elles ne frottent pas contre des pièces mobiles ou chaudes de la moto, comme le pot
d’échappement, an d’éviter qu’elles ne s’eflochent, ne brûlent ou ne s’usent de toute autre
manière.
REMARQUE:
• Si le bagage n’est pas attaché de manière sécurisée, il risque de se détacher et de causer une
obstruction qui pourrait entraîner de graves blessures, voire même la mort.
• NE PAS xer les sacoches arrières sur les sièges de forme arrondie de la moto. Elles sont
uniquement compatibles avec les motos équipées de sièges amovibles (sous lesquels le
crochet et les boucles de sangle peuvent être verrouillés en place). NE PAS attacher le
crochet et la boucle de sangle (ni aucune autre sangle ou tendeur) sous la carénage arrière
de la moto, car il risque d’entrer en contact avec la roue arrière, ce qui serait dangereux.
SACOCHES ARRIÈRES LES SACOCHES ARRIÈRES
DOIVENT ÊTRE ATTACHÉES AU
SIÈGE ARRIÈRE À L’AIDE DE
LA SANGLE QUI PASSE SOUS
LE SIÈGE ET DE SANGLES
SUPPLÉMENTAIRES.

8
FR
MODE D’INSTALLATION DE LA SACOCHE ARRIÈRE
INSTALLATION INCORRECTE DE LA SACOCHE ARRIÈRE
Sangles allant
sous le siège
Points d’ancrage solides,
comme des supports à bagage,
des repose-pieds, etc.
Avant de la moto
Sangles de fixation
avec boucle en D
Sangles de
tension
Important!
CHARGE UNIFORME DE MOINS DE 5KG
Le crochet et la boucle
de sangle DOIVENT être
fixés de manière
sécurisée sous le siège.
Sangles allant sous le siège
Siège de moto
verrouillé en place
LIRE LES
INSTRUCTIONS DE
MONTAGE AVANT
UTILISATION!
CORRECT
INCORRECT
Siège de moto
verrouillé en place
Sangles de fixation sans
boucle en D
Sangles de fixation
non tendues
Sangles de tension
dans la même
direction ou inclinées
l'une vers l'autre
CHARGE NON UNIFORME DE PLUS DE 5KG
Le crochet et la boucle de la
sangle allant sous le siège
sont pliés (inutilisés) sous la
sacoche ou ne sont pas fixés
de manière sécurisée.
Sangles allant sous le siège
SYSTÈME DE FIXATION SUPPLÉMENTAIRE POUVANT ÊTRE UTILISÉ:
En cas de doute, il est recommandé d'utiliser un filet.

9
FR
COMPREND:
• 1 Sacoche de réservoir • Sangle de poupée xe
MODE D’EMPLOI:
Avant d’installer votre sacoche de réservoir, vériez toujours que le réservoir est exempt de toute
saleté. En effet, le moindre résidu peut causer des marques sur le réservoir. Il est également
conseillé de nettoyer le fond de la sacoche avant chaque utilisation (des traces de métaux
pourraient être attirées par les aimants).
INSTALLATION:
1. Maintenez la sacoche avec la sangle de poupée xe tournée vers la poupée, puis posez
délicatement la base de la sacoche sur le réservoir. La base est aimantée et maintiendra
donc la sacoche sur le réservoir en acier. La position des aimants peut être légèrement ajustée
an de l’adapter à la forme du réservoir : déplacez simplement les aimants dans leurs poches
individuelles avant d’attacher la sacoche.
2. Passez la sangle de la poupée xe autour de cette dernière et attachez-la à l’aide du clip. Ce
dispositif de xation secondaire doit obligatoirement être utilisé.
3. Vériez que la sacoche est fermement maintenue en place avant de partir.
AVERTISSEMENT:
• Ne chargez pas trop la sacoche. La charge maximale recommandée est de 5kg.
• Il vous incombe de vous assurer que les bagages sont xés de manière à ne pas endommager
vos biens ni à vous mettre en danger.
• Ne dépassez pas les limitations de vitesse légales en vigueur en France. Ce produit
uniquement été testé pour être utilisé selon les limitations de vitesse légales en vigueur au
Royaume-Uni.
REMARQUE:
• Si le bagage n’est pas attaché de manière sécurisée, il risque de se détacher et de provoquer
une obstruction qui pourrait entraîner de graves blessures, voire la mort.
• Ne laissez pas la sacoche de réservoir sur ce dernier pendant la nuit ou des périodes
prolongées. Le matériau antidérapant de la base sous les aimants peut laisser des traces de
PVC, qui peuvent à leur tour endommager certaines laques et tâcher la nition de la peinture.
Une fois que vous avez retiré la sacoche, essuyez le réservoir à l’aide d’un chiffon doux pour
effacer toute trace éventuelle.
SACOCHES DE RÉSERVOIR

10
DE
IM LIEFERUMFANG ENTHALTEN:
• 1 Hecktasche • Integrierter Sicherheitsgurt • 1 Packung Gurte
ANLEITUNG ZUR BEFESTIGUNG:
Vor der Befestigung der Hecktasche immer sicherstellen, dass die Oberäche der
Befestigungsstelle der Tasche vollständig frei von Verschmutzungen ist. Selbst kleinste
Schmutzreste können bleibende Spuren hinterlassen. Die Tasche ist zur Befestigung auf einer
abnehmbaren Rückbank/einem abnehmbaren Soziussitz eines Motorrads, nicht jedoch zur
Befestigung auf Sitzhöckern/einer Abdeckung noch einem Gepäckträger konzipiert. Rolltop-
Verschluss mindestens 3 mal einrollen und mit den Clip-Schnallen sichern.
BEFESTIGUNG:
1. Die Sitzbank des Motorrads (oder ggf. den Soziussitz) entriegeln und anheben.
2. Die Tasche mit dem Klettverschlussgurt fest am Sitz anbringen. Den Klettverschlussgurt fest
anziehen. Sitzbank wieder anbringen und verriegeln.
3. Zu lange Klettverschlussstreifen können mit einer Schere gekürzt werden. Es müssen jedoch
noch mindestens 15cm Überlappung/Kontaktäche vorhanden sein.
4. Es liegen für viele Motorräder passende Gurte bei. Für eine absolut sichere Befestigung ist evtl.
der Kauf von Spanngummis notwendig, die für Ihr Motorrad passen.
5. Die Gurte unter Spannung an geeigneten, sicheren Teilen des Motorradrahmens, wie
speziellen Gepäckhaken oder Fußrasten, befestigen. Sicherstellen, dass die vorderen Gurte
Richtung Vorderseite des Motorrads und die hinteren Gurte Richtung Heckseite des Motorrads
angezogen und an den Enden gerollt mit Klettverschlüssen gesichert werden.
ACHTUNG:
• Nicht überladen – die maximale empfohlene Kapazität beträgt 5kg
• Der Benutzer trägt die Verantwortung dafür, das Gepäckstück so zu befestigen, dass der
Benutzer nicht gefährdet bzw. das Eigentum des Benutzers nicht beschädigt wird.
• Es müssen stets die gesetzlich vorgeschriebenen Tempolimits beachtet werden. Dieses Produkt
wurde nur für den Gebrauch bei im Vereinigten Königreich erlaubten Geschwindigkeiten
getestet.
• Spanngummis regelmäßig auf Verschleiß prüfen und ersetzen, falls sie Reibungs- oder sonstige
Schäden aufweisen. Ersatz ist bei Ihrem Händler vor Ort erhältlich.
• Die Spanngummis sollten nicht über ihre Dehnungskapazität hinaus belastet werden (ca. 175 %
der Originallänge).
• Sicherstellen, dass kein Teil der Gurte oder der Tasche Ihr Motorrad beschädigen kann und
dass dieses nicht an beweglichen oder heißen Teilen des Motorrads reiben und somit
ausfransen, Feuer fangen oder sonstige Beschädigungen erleiden könnte.
HINWEISE:
• Nicht sicher angebrachtes Gepäck kann sich lösen und zu Unfällen mit schweren Verletzungen
oder sogar Todesfällen führen.
• Hecktaschen dürfen NICHT an Motorradsitzhöckern angebracht werden. Sie sind nur für
Motorräder mit abnehmbaren Sitzbänken (unter denen der Klettverschlussgurt verriegelt
werden muss) geeignet. Der Klettverschlussstreifen (noch andere Gurte oder Spanngummies)
darf (dürfen) NICHT unter der Heckkarosserie befestigt werden, da sie das Heckrad gefährlich
berühren könnten.
HECKTASCHEN HECKTASCHEN MÜSSEN ÜBER
DEN INTEGRIERTEN SITZGURT
UND ZUSÄTZLICHE GURTE AM
SOZIUSSITZ BEFESTIGT WERDEN

11
DE
SO BEFESTIGEN SIE IHRE HECKTASCHE
FALSCHE BEFESTIGUNG IHRER HECKTASCHE
Unter der Sitzbank
befindlicher Gurt
Solide Verankerungspunkte wie
Gepäckträger, Fußrastenträger
etc.
Vorderseite des Motorrads
Gurte durch
D-Ringe geführt
Gurte gespannt
Wichtig!
UNTER 5KG, GLEICHMÄSSIG BELASTET
Der unter der Sitzbank
befindliche
Klettverschluss MUSS
sicher befestigt werden
Unter der Sitzbank
befindlicher Gurt
Motorradsitz
verriegelt
VOR DEM
GEBRAUCH DIE
ANWEISUNGEN
ZUR BEFESTIGUNG
LESEN!
RICHTIG
FALSCH
Motorradsitz
verriegelt
Gurte nicht durch
D-Ringe geführt
Gurte nicht gespannt
Gurte in dieselbe
Richtung gespannt
oder zueinander
angewinkelt
ÜBER 5KG, UNGLEICHMÄSSIG BELASTET
Unter der Sitzbank
befindlicher Klettverschluss
unter der Tasche
zusammengelegt (unbenutzt)
oder lose befestigt
Unter der Sitzbank
befindlicher Gurt
ZUSÄTZLICH ZU VERWENDENDES BEFESTIGUNGSSYSTEM:
Im Zweifel empfiehlt sich der Einsatz eines Gepäcknetzes.

12
DE
VERPACKUNGSINHALT:
• 1 Tankrucksack • Kopfplattengurt
BENUTZERANLEITUNG:
Stellen Sie vor dem Anbringen des Tankrucksacks sicher, dass der Tank vollständig frei von
Verschmutzungen ist. Selbst kleinste Schmutzreste können bleibende Spuren auf dem Tank
hinterlassen. Es ist darüber hinaus empfehlenswert, die Unterseite des Rucksacks vor jedem
Gebrauch zu reinigen (Metallreste könnten von den Magneten angezogen werden)
BEFESTIGUNG:
1. Halten Sie die Tasche mit dem Kopfplattengurt in Richtung Kopfplatte und senken Sie diese
vorsichtig auf den Tank ab. Die Kopfplatte ist magnetisch und hält den Rucksack daher auf
Stahltanks fest. Die Position der Magneten kann leicht verändert werden, um den Rucksack
an die Form des Tanks anzupassen – bewegen Sie die Magneten einfach vor der Montage des
Rucksacks in ihren jeweiligen Taschen.
2. Legen Sie den Kopfplattengurt um die Kopfplatte und stecken Sie ihn zusammen. Dieser dient
als zusätzliche Sicherung und muss eingesetzt werden.
3. Vergewissern Sie sich vor dem Losfahren, dass der Rucksack ordentlich befestigt ist.
WARNUNG:
• Nicht überladen – die maximale empfohlene Kapazität beträgt 5kg
• Der Benutzer trägt die Verantwortung dafür, das Gepäckstück so zu befestigen, dass der
Benutzer nicht gefährdet bzw. das Eigentum des Benutzers nicht beschädigt wird.
• Es müssen stets die gesetzlich vorgeschriebenen Tempolimits beachtet werden. Dieses Produkt
wurde nur für den Gebrauch bei im Vereinigten Königreich erlaubten Geschwindigkeiten
getestet.
HINWEIS:
• Nicht sicher angebrachtes Gepäck kann sich lösen und zu Unfällen mit schweren Verletzungen
oder sogar Todesfällen führen.
• Lassen Sie den Tankrucksack nicht über Nacht oder für längere Zeit auf dem Tank liegen.
Das rutschfeste Trägermaterial unter den Magneten kann PVC-Rückstände hinterlassen,
die bestimmte Lacke beschädigen und die Lackierung verschmutzen können. Sobald der
Tankrucksack entfernt ist, wischen Sie den Tank mit einem Poliertuch ab, um eventuelle
Rückstände zu entfernen.
TANKRUCKSACK

13
ES
SE INCLUYE:
• 1 Tailpack • Cinto de seguridad integrado • 1 paquete de correas de cincha
INSTRUCCIONES DE MONTAJE:
Antes de montar su Tailpack, asegúrese siempre de que la supercie sobre la cual se va a montar
está limpia y no tiene polvo. Incluso el más no de los residuos puede provocar ralladuras.
El tailpack está diseñado para sujetarse a un asiento trasero, desmontable o no, de una
motocicleta, y no sobre una joroba o un portaequipajes. Enrolle la parte superior de las alforjas
como mínimo 3 veces y asegúrela con las hebillas de clip.
PARA EL MONTAJE:
1. Desbloquee y levante el asiento de la motocicleta (o la almohadilla del asiento del colín si la
motocicleta tiene uno).
2. Sujete la bolsa de forma segura al asiento utilizando la correa de Velcro suministrada. Esta
correa de Velcro debe ajustarse bien. Vuelva a colocar el asiento y bloquéelo en su posición.
3. Si la correa de Velcro es demasiado larga, puede recortarse con unas tijeras. Sin embargo,
debe asegurarse de que el Velcro se solapa, como mínimo, 15cm.
4. Se han incluido correas de cincha que son adecuadas para muchas motocicletas. Aún así,
es posible que deba comprar cuerdas elásticas adecuadas para su motocicleta especíca para
garantizar una sujeción plenamente segura y estable.
5. Sujete los ganchos de las cuerdas elásticas/correas en tensión a piezas adecuadas y seguras
de su motocicleta, como un gancho especial para equipajes o un reposapiés. Asegúrese
de que las correas elásticas delanteras se tensan hacia la parte frontal de la moto y las correas
elásticas traseras se tensan hacia la parte trasera, y de que se enrollan los extremos y se
aseguran con las lengüetas de Velcro.
ADVERTENCIA:
• No sobrecargar – la capacidad de carga máxima recomendada es de 5kg
• Es responsabilidad del propietario asegurarse de que el equipaje esté sujeto de forma que no
dañe o ponga en peligro al propietario o a cualquier bien del propietario.
• No supere el límite de velocidad legal del R.U. Este producto solo ha sido probado para su uso
a velocidades en carretera legales en el R.U.
• Compruebe regularmente el desgaste de las cuerdas/correas y cámbielas si muestran alguna
señal de debilitamiento o de daños por fricción. Puede comprarlas en su distribuidor local.
• Cuando estén bajo tensión, las cuerdas elásticas no deben estirarse más de lo que permita su
elasticidad (aprox. 175% de su tamaño original).
• Asegúrese de que ninguna parte de las correas o de la bolsa pueda dañar su motocicleta y de
que no rozan contra ninguna pieza móvil o caliente de la motocicleta, como el tubo de escape,
provocando que se puedan deshilachar, quemar o dañarse
TENGA EN CUENTA:
• Si no se asegura bien el equipaje, este puede desprenderse y ocasionar una obstrucción que
puede causar lesiones graves e incluso la muerte.
• Las Tailpacks NO deben sujetarse a las jorobas de los asientos. Solo son adecuadas para
motocicletas con asientos desmontables (debajo de los cuales debe bloquearse en posición
la correa de Velcro). Ni la correa de Velcro (ni ninguna otra correa o cuerda elástica) debe atarse
por debajo de la chapa trasera de la motocicleta, ya que podría entrar en contacto con la rueda
trasera y esto supone un peligro.
TAILPACKS LAS TAILPACKS PARA MOTO DEBEN ESTAR
SUJETAS AL ASIENTO DEL PASAJERO
MEDIANTE LA CORREA INTEGRADA DEBAJO
DEL ASIENTO Y LAS CORREAS ADICIONALES.

14
ES
CÓMO MONTAR SU TAILPACK
MODO INCORRECTO DE MONTAR SU TAILPACK
Correa para
debajo del asiento
Puntos de sujeción estables
como portaequipajes,
reposapiés, etc.
Parte frontal de la
motocicleta
Correas de cincha
con anillas en
forma de D
Correas de cincha
tensada
¡Importante!
MENOS DE 5 KG DE CARGA EQUILIBRADA
La correa de Velcro
para debajo del
asiento debe estar
fuertemente tensada
Correa para debajo
del asiento
Asiento de
motocicleta
bloqueado
¡LEA LAS
INSTRUCCIONES
DE MONTAJE
ANTES DEL USO!
CORRECTO
INCORRECTO
Correas de cincha sin
anillas en forma de D
Correas de cincha
sin tensar
Correas de cincha
tensadas en la
misma dirección o
en ángulo la una
hacia la otra
MÁS DE 5 KG DE CARGA DESEQUILIBRADA
Correa de Velcro para
debajo del asiento
doblada (sin utilizar)
bajo la bolsa o atada
pero sin tensar
Correa para debajo
del asiento
Asiento de
motocicleta
bloqueado
ELEMENOS ADICIONALES QUE DEBEN USARSE:
Si sigue teniendo dudas, se recomienda que use una red para equipaje de moto.

15
ES
INCLUYE:
• 1 bolsa para depósito • Correa de jación
INSTRUCCIONES DE MONTAJE:
Antes de montar su bolsa para depósito, asegúrese siempre de que el depósito esté
completamente limpio. Incluso el más no de los residuos puede provocar que se raye el
depósito. También es aconsejable limpiar la parte inferior de la bolsa cada vez antes del uso (los
imanes pueden atraer restos de metales).
PARA EL MONTAJE:
1. Coloque la bolsa de modo que las correas de jación estén situadas mirando hacia la tija y
deposite la bolsa suavemente sobre el depósito. La base de la bolsa es magnética y por
tanto se jará al depósito de acero. La posición de los imanes puede ajustarse ligeramente
para adaptarse a la forma del depósito – mueva simplemente los imanes de los bolsillos
individuales antes de jar la bolsa.
2. Pase las correas alrededor de la tija y abróchelas. Estas correas deben usarse ya que actúan
como dispositivo de jación secundario.
3. Asegúrese de que la bolsa está bien sujeta antes de arrancar.
ADVERTENCIA:
• No sobrecargar – la capacidad de carga máxima recomendada es de 5kg
• Es responsabilidad del propietario asegurarse de que el equipaje esté sujeto de forma que no
dañe o ponga en peligro al propietario o a cualquier bien del propietario.
• No supere el límite de velocidad legal del R.U. Este producto solo ha sido probado para su
uso a velocidades en carretera legales en el R.U.
TENGA EN CUENTA:
• Si el equipaje no está sujeto con seguridad, puede soltarse, o provocar una obstrucción
conllevando lesiones graves e incluso la muerte.
• No deje la bolsa sobre el depósito de la motocicleta aparcada durante la noche o durante
largos periodos de tiempo. El material antideslizante situado debajo de los imanes puede dejar
restos de PVC que pueden arañar y manchar el acabado de la pintura de la motocicleta.
Cuando retire la bolsa, pase un trapo para limpiar el depósito y retirar los posibles restos.
BOLSA PARA DEPÓSITO

16
IT
SONO INCLUSI:
• 1 Borsa da codino • Cinturino per sedile integrale • 1 Confezione di cinghie elastiche
ISTRUZIONI DI MONTAGGIO:
Prima di montare la borsa da codino, controllare sempre che la supercie su cui andrà ad
appoggiare sia perfettamente pulita. Si ricorda che la presenza di residui anche minimi può
provocare dei segni. La borsa è studiata per essere applicata sul sedile posteriore/sedile del
passeggero, e non sulla gobba/sul rivestimento/sul portapacchi. Arrotolare la chiusura almeno 3
volte e ssare con le bbie a clip.
ISTRUZIONI DI MONTAGGIO:
1. Sbloccare e sollevare il sedile del mezzo (o l’eventuale imbottitura del sedile
passeggero).
2. Fissare la borsa al sedile utilizzando il nastro a strappo in dotazione, avendo cura di stringerlo
perfettamente. Riposizionare il sedile e bloccarlo in sede.
3. Se il nastro a strappo risulta troppo lungo, tagliarlo a misura con le forbici. Fare sempre
attenzione a mantenere una zona di sovrapposizione/contatto di almeno 15cm.
4. La dotazione comprende cinghie elastiche adatte per numerosi tipi di moto. In alcuni casi
potrebbe però essere necessario acquistare elastici specici per garantire un ssaggio
perfettamente stabile sul mezzo.
5. Applicare le cinghie in tensione su punti sicuri (e idonei) del mezzo (es., gancio per bagagli o
poggiapiedi). Controllare che le cinghie anteriori siano in tensione verso la parte anteriore
del mezzo e quelle posteriori verso la parte posteriore, arrotolate alle estremità e ssare con
linguette a strappo.
AVVERTENZA:
• Non sovraccaricare! Massima capacità di carico consigliata: 5kg
• L’utente è tenuto a vericare che il bagaglio sia ssato correttamente in modo da non
danneggiare o mettere a rischio la sua persona o le sue proprietà.
• Non superare i limiti di velocità. Prodotto omologato per i limiti di velocità previsti nel Regno
Unito.
• Controllare regolarmente che gli elastici / i cinturini non siano usurati e sostituirli se mostrano
segni di indebolimento o danni da sfregamento. Gli elastici possono essere acquistati presso i
rivenditori locali.
• Non tirare gli eventuali elastici oltre i limiti di elasticità (circa il 175% della lunghezza originale).
• Assicurarsi che le cinghie e la borsa non danneggino il mezzo e che non sfreghino contro
parti calde o in movimento (es., scarico) in quanto potrebbero infragilirsi, bruciare o comunque
rovinarsi.
NOTA:
• Se non ssata saldamente, la borsa potrebbe staccarsi e provocare situazioni rischiose se non
addirittura mortali.
• Le borse da codino NON devono essere applicate alle gobbe del sedile. Sono studiate
esclusivamente per moto con sedili staccabili (sotto i quali si deve, appunto, bloccare il nastro
a strappo). Il nastro a strappo (né altri eventuali cinghie o elastici) NON deve essere ssato
sotto la struttura posteriore del mezzo dove potrebbe venire pericolosamente a contatto con la
ruota posteriore.
BORSE DA CODINO
LE BORSE DA CODINO DEVONO
ESSERE FISSATE AL SEDILE
DEL PASSEGGERO MEDIANTE
IL CINTURINO INTEGRALE E
CINGHIE COMPLEMENTARI

17
IT
INDICAZIONI DI MONTAGGIO
ERRORI DA NON FARE
Cinghia sotto
il sedile
Punti di ancoraggio solidi
(es., portapacchi,
poggiapiedi etc.)
Parte anteriore
della moto
Cinghie elastiche
inserite in D-ring
Cinghie elastiche
in tensione
Importante!
CARICO DISTRIBUITO UNIFORMEMENTE
(MENO DI 5KG)
Il nastro a strappo
sotto il sedile DEVE
essere ben stretto
Cinghia sotto il sedile
Sedile del mezzo
bloccato in sede
LEGGERE LE
ISTRUZIONI DI
MONTAGGIO PRIMA
DELL’USO!
CORRECTO
ERRATO
Cinghie elastiche
non inserite in
D-Ring
Cinghie elastiche
non in tensione
Cinghie elastiche in
tensione nello stesso
senso o ad angolo
reciproco
CARICO DISTRIBUITO NON UNIFORMEMENTE
(OLTRE 5 KG)
Nastro a strappo sotto il
sedile piegato (non
utilizzato) sotto la borsa
o lento
Cinghia sotto il sedile
Sedile del mezzo
bloccato in sede
SISTEMA DI FISSAGGIO EXTRA DA UTILIZZARE:-
In caso di bisogno, si consiglia di utilizzare una rete fermacarico.

18
IT
IN DOTAZIONE:
• 1 Borsa da serbatoio • Cinghia per cannotto
ISTRUZIONI DI MONTAGGIO:
Prima di procedere al montaggio della borsa, controllare che il serbatoio sia perfettamente pulito.
Si ricorda che la presenza di residui anche minimi può provocare segni sul serbatoio. Inoltre si
consiglia di pulire sempre il fondo della borsa prima di utilizzarla (le eventuali tracce metalliche
potrebbero essere attratte dai magneti).
ISTRUZIONI DI MONTAGGIO:
1. Tenera la borsa con la cinghia rivolta verso il cannotto dello sterzo e presentare delicatamente
la base della borsa sul serbatoio. La base è magnetica, per cui blocca la borsa al serbatoio
d’acciaio. È possibile modicare leggermente la posizione dei magneti in base alla forma del
serbatoio (è sufciente spostare i magneti all’interno delle rispettive tasche prima di attaccare
la borsa).
2. Far passare la cinghia attorno al cannotto dello sterzo e ssarla con le clip. Si tratta di un
ulteriore dispositivo di ssaggio, da utilizzare obbligatoriamente.
3. Prima di mettere in moto, accertarsi che la borsa sia ssata saldamente.
AVVERTENZA:
• Non sovraccaricare! Massima capacità di carico consigliata: 5kg
• L’utente è tenuto a vericare che il bagaglio sia ssato correttamente in modo da non
danneggiare le sue proprietà o mettere a rischio la sua persona.
• Non superare i limiti di velocità. Prodotto omologato per i limiti di velocità previsti nel Regno
Unito.
NOTA:
• Se ssata in modo improprio, la borsa potrebbe staccarsi, pregiudicando seriamente la
sicurezza della persona no a metterne a rischio la vita.
• Non lasciare la borsa sul serbatoio tutta la notte o per periodi di tempo più lunghi. Il materiale
con cui è stata realizzata la base antiscivolo sotto i magneti potrebbe lasciare dei residui di
PVC, danneggiando alcuni tipi di vernice e macchiando la nitura. Dopo aver tolto la borsa,
pulire il serbatoio con una panno lucidante per rimuovere gli eventuali residui.
BORSA DA SERBATOIO

19
PL
W ZESTAWIE (JEŚLI MAJĄ ZASTOSOWANIE):
• 1 torba na tylne siedzenie
• Zintegrowany pas
• 1 opakowanie taśm
INSTRUKCJA MONTAŻU:
Przed zamontowaniem torby na tylne siedzenie należy zawsze upewnić się, że powierzchnia,
na której ma zostać zamocowana torba, jest czysta. Nawet najdrobniejsze zabrudzenia mogą
doprowadzić to powstania uszkodzeń. Torba została opracowana z myślą o montażu na
zdejmowanym tylnym siedzeniu/siedzeniu pasażera motocykla, a nie na osłonie/wybrzuszeniu
siedziska lub bagażniku. Zawinąć zamknięcie co najmniej 3 razy i zabezpieczyć klamrami z
zaciskiem.
W CELU ZAMONTOWANIA TORBY:
1. Odblokować i unieść siedzenie (lub podkładkę siedzenia pasażera, jeśli motocykl jest w nią
wyposażony).
2. Mocno zamocować torbę do siedzenia, korzystając z dołączonego pasa z zapięciem na rzep.
Pas z zapięciem na rzep musi być starannie zapięty. Zamontować i zablokować siedzenie.
3. Jeśli pas z zapięciem na rzep jest za długi, można go przyciąć nożyczkami. Należy jednak
upewnić się, że zostanie zachowana minimalna odległość zachodzenia na siebie rzepów
wynosząca 15cm.
4. Do zestawu dołączono taśmy odpowiednie do wielu modeli motocykli. W celu zapewnienia
pewnego, stabilnego mocowania może być jednak konieczny zakup linek elastycznych
odpowiednich do konkretnego modelu motocykla.
5. Zamocować napięte pasy do odpowiednich, trwałych elementów ramy motocykla, takich jak
specjalny haczyk do mocowania bagażu lub podnóżek. Należy upewnić się, ze przednie pasy
są naciągnięte do przodu motocykla, a tylne — do tyłu oraz że na końcach pasy są zwinięte i
zabezpieczone elementami z zapięciem na rzep.
OSTRZEŻENIE:
• Nie należy nadmiernie obciążać torby — maksymalne zalecane obciążenie wynosi 5kg.
• Obowiązkiem właściciela jest upewnić się, że bagażnik jest zamocowany w taki sposób, by nie
spowodował uszkodzenia ciała ani własności właściciela ani nie zagroził ich bezpieczeństwu.
• Nie należy przekraczać ograniczeń prędkości obowiązujących na terenie Wielkiej Brytanii.
Ten produkt został przetestowany pod kątem użytkowania wyłącznie przy prędkościach
dozwolonych zgodnie z przepisami prawa Wielkiej Brytanii.
• Należy regularnie sprawdzać linki/pasy pod kątem zużycia; w przypadku wykrycia jakichkolwiek
oznak uszkodzenia lub przetarcia należy je wymieniać. Elementy te można kupić u lokalnego
sprzedawcy.
• W przypadku użycia linek elastycznych linki można naciągać wyłącznie do momentu, gdy nadal
wykazują one elastyczność (do ok. 175% pierwotnej długości).
• Należy upewnić się, że żadna część pasów ani torby nie może uszkodzić motocykla i że nie
obciera się ona o żadną ruchomą lub nagrzewającą się część motocykla, taką jak wydech,
ponieważ mogłoby to spowodować jej wystrzępienie, zapłon lub innego rodzaju uszkodzenie.
UWAGA:
• Jeśli bagażnik nie zostanie pewnie zamocowany, może się odczepić. Wystąpienie tego rodzaju
przeszkody może doprowadzić do poważnych urazów ciała, a nawet śmierci.
• Torby na tylne siedzenie NIE NALEŻY mocować do wybrzuszeń siedziska motocykla. Torby
są dostosowane do użycia wyłącznie na motocyklach ze zdejmowanymi siedzeniami (pod
którymi należy przeciągnąć i zapiąć pas z zapięciem na rzep). Pasów z zapięciem na rzep
(ani żadnych innych pasów lub linek) NIE NALEŻY zapinać pod tylną częścią nadwozia,
ponieważ mogłyby one zetknąć się z tylnym kołem, co mogłoby być niebezpieczne.
TORBY NA TYLNE SIEDZENIE
NALEŻY ZAMOCOWAĆ
DO SIEDZENIA PASAŻERA
KORZYSTAJĄC ZE
ZINTEGROWANEGO PASA I
DODATKOWYCH PASÓW.

20
PL
MOCOWANIE TORBY NA TYLNE SIEDZENIE
JAK NIE NALEŻY MOCOWAĆ TORBY NA SIEDZENIE
Pas pod
siedzeniem
Pewne punkty zaczepienia,
takie jak mocowania bagaży,
mocowania podnóżków itp.
Przód motocyklu
Taśmy przeciągnięte
przez pierścienie w
kształcie litery D
Naciągnięte taśmy
Ważne!
OBCIĄŻENIE PONIŻEJ 5KG,
RÓWNOMIERNIE ROZŁOŻONE
Pas pod siedzeniem
zapinany na rzep MUSI
zostać mocno zapięty
Pas pod siedzeniem
Zamontowane
siedzenie
motocyklowe
PRZED UŻYCIEM
ZAPOZNAĆ SIĘ ZE
WSKAZÓWKAMI
MOCOWANIA!
PRAWIDŁOWE
NIEPRAWIDŁOWE
Taśmy nie są
przeciągnięte przez
pierścienie w
kształcie litery D
Taśmy nie są
naciągnięte
Taśmy naciągnięte w
tym samym kierunku
lub ustawione pod
kątem względem siebie
PONAD 5KG NIERÓWNOMIERNIE
ROZŁOŻONEGO OBCIĄŻENIA
Pas z zapięciem na rzep
złożony (nieużyty)
poniżej torby lub luźno
założony
Zamontowane
siedzenie
motocyklowe
Pas pod siedzeniem
DODATKOWY WYMAGANY SYSTEM MOCOWANIA: —
W razie wątpliwości zaleca się zastosowanie siatki ładunkowej.
Table of contents
Languages:
Other Oxford Motorcycle Accessories manuals

Oxford
Oxford HOTGRIPS PRO Adventure Operation manual

Oxford
Oxford HotGrips OF772 User manual

Oxford
Oxford Drystash Series Instruction Manual

Oxford
Oxford Heritage Series Instruction Manual

Oxford
Oxford HotGrips OF693 Original User manual

Oxford
Oxford HotGrips OF690 Adventure User manual

Oxford
Oxford QR Series Instruction Manual

Oxford
Oxford Top Box User manual
Popular Motorcycle Accessories manuals by other brands

Fisher-Price
Fisher-Price POWER WHEELS 74370 Replacement instructions

PerfectPrime
PerfectPrime HP0210 user manual

hepco & becker
hepco & becker Easyrack 661671 01 01 installation instructions

Caberg
Caberg Just SpeakS user guide

Arai Helmet
Arai Helmet Penta-Pro Instructions for use

Crivit
Crivit 298519 quick start guide