Oxypharm NOCOSPRAY User manual

1
NOCOSPRAY
IMP-PX-00-L7_IndC
www.oxypharm.net
829 rue Marcel Paul
94500 Champigny-sur-Marne | France
info@oxypharm.net
MADE IN FRANCE
User Manual
Brugsanvisning
Bruksanvisning
Naudojimo instrukcijos
Kasutusjuhend
EN
DA
SE
LT
ET

2
CONTENTS

3
ENGLISH •••••••••••••••••••••••••••••••••••••••••••••••••••••••••••••••••••••••••••••••• 4
DANSK •••••••••••••••••••••••••••••••••••••••••••••••••••••••••••••••••••••••••••••• 31
SVENSKA •••••••••••••••••••••••••••••••••••••••••••••••••••••••••••••••••••••••••••••• 58
LIETUVIŲ••••••••••••••••••••••••••••••••••••••••••••••••••••••••••••••••••••••••••••••••84
EESTI •••••••••••••••••••••••••••••••••••••••••••••••••••••••••••••••••••••••••••••••••112
CONTENTS

4
EN

5
EN
1. INTRODUCTION 7
1.1 General Informaon..............................................................................................................................7
1.2 Classication/Regulations .........................................................................................................7
1.3 Guarantee................................................................................................................................................7
2. SAFETY INFORMATION 8
3. DESCRIPTION 10
3.1 Descripon of the NOCOSPRAY 2................................................................................................. 10
3.2 Overall dimensions............................................................................................................................. 10
4. USE 11
4.1 Posioning of the device .................................................................................................................. 11
4.2 Installaon of the bole ................................................................................................................... 11
4.3 Operaon in standard mode............................................................................................................ 12
4.3.1 Use without remote control.......................................................................................................12
4.3.2 Use with remote control .............................................................................................................13
Initial pairing with the remote control 13
Re-pairing a remote control 14
Operation with the remote control 15
4.4 Operaon in programmer mode..................................................................................................... 16
4.4.1 Modus operandi ............................................................................................................................16
4.4.2 Special features of programmer mode.....................................................................................18
4.4.3 Return to standard mode............................................................................................................19
5. TRACKING SYSTEM 20
5.1 Soware installaon.......................................................................................................................... 20
5.2 History transfer................................................................................................................................... 22
CONTENTS

6
EN
5.3 History display..................................................................................................................................... 23
5.3.1 Screen descripon........................................................................................................................23
5.3.2 Modicaon of general sengs ...............................................................................................24
5.3.3 Export the history in PDF format..............................................................................................24
5.3.4 Exit USB mode...............................................................................................................................25
6. ANNEXES 26
6.1 Duraon of diusion and consumpon........................................................................................ 26
6.2 Maintenance ........................................................................................................................................ 27
6.3 Technical characteriscs................................................................................................................... 27
7. EMC COMPLIANCE 28
7.1 Cable length......................................................................................................................................... 28
7.2 Recommended separaon distance............................................................................................... 28
7.3 Electromagnec emissions............................................................................................................... 28
7.4 Electromagnec and magnec immunity..................................................................................... 29
7.5 Electromagnec immunity, RF ........................................................................................................ 29
8. RECYCLING 30

7
EN
1. INTRODUCTION
1.1 General Informaon
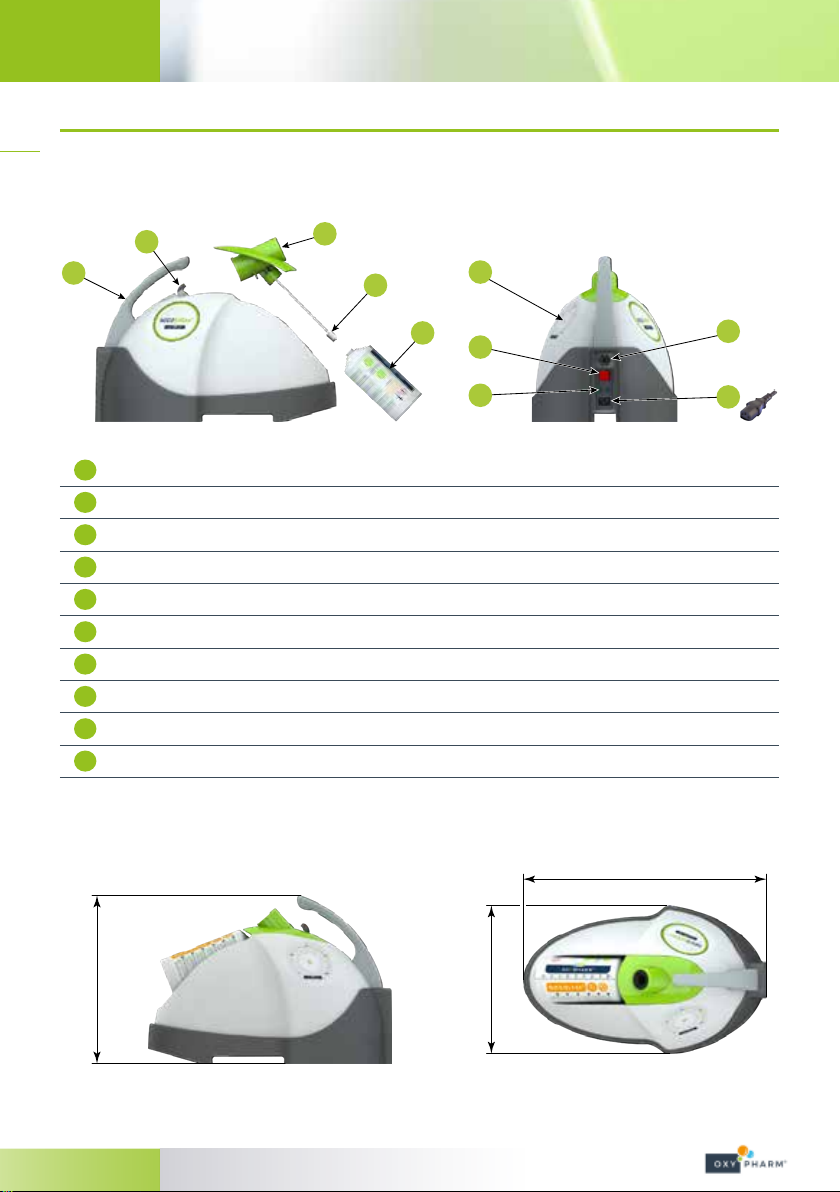
Nocospray 2 is a portable device for diusion of disinfectant product.
This device is for professional use only. It can be used in hospitals, food industry, pharmaceutical industry or any
environment where disinfection is required.
This user’s manual describes the operation of the NOCOSPRAY 2 diuser and includes essential information for
safe use of the product.
The documentation applies to Nocospray 2.0 diusers in their original manufacturer’s condition and which have
not been altered.
Review this manual before using the NOCOSPRAY® 2 diuser. It was written to ensure you master all
functionalities.
• Please read this manual carefully before using the NOCOSPRAY 2 diuser.
It has been created to allow you to eectively use all of its functions.
• Illustrations are provided to facilitate the comprehension of the various functions of the
NOCOSPRAY 2. They are not binding.
1.2 Classication/Regulations
The NOCOSPRAY 2 diuser is compliant with the following standards:
Electrical Classication
Standard IEC 60950-1/60417-5019
Class I Electrical Protection
Electromagnetic Compatibility
(EMC)
Standard EN 60601-1-2 (2007)
The product does not emit electromagnetic disturbances which
may aect other devices. It demonstrates appropriate immunity
in the presence of electromagnetic disturbances.
1.3 Guarantee
The guarantee certicate must be presented to the retailer or to the company OXY’PHARM - Z.A., based at
Grands Godets – 829, rue Marcel Paul – 94508 Champigny-sur-Marne, France, in order to prove the guarantee.
Guarantee Clauses
The following provisions do not exclude the benet of the legal guarantee anticipated by Articles 1641 et seq of
the French Civil Code pertaining to hidden defects.
Subject Matter of the Guarantee
The guarantee consists of the gratuitous provision of parts which have been recognised as defective by our
technical services.
Reparations made consecutive to incorrect handling, abnormal use, negligence or the overloading of the
device, as well as those necessitated by electrical network variations, voltage surges or defective installations,
etc., cannot be covered by the guarantee.
Furthermore, if any abnormal corrosion is observed on the exible parts, hoses, joints, etc., indicating the use of
a liquid other than those produced by OXY’PHARM, the guarantee shall also be rendered null and void.
Transportation
The transportation of the equipment is at the risk of the user: in the event of deterioration during transport, the
recipient must communicate any reserves and complaints to the carrier before accepting the delivery of the
device.
The device must be stored in a dry location and transported in its original packaging.
Guarantee Duration
The NOCOSPRAY 2 diuser is guaranteed for a period of 2 years, eective as of the date of the invoice.

8
EN
2. SAFETY INFORMATION
The manufacturer may in no case be held responsible for any incident caused physically or to the hardware by
faulty or abnormal use of the device which is contrary to the recommended instructions in the following non-
exhaustive list:
To avoid all risks of electrical shock, the device must imperatively be connected to an electrical supply network
equipped with a protective grounding.
Ensure that the electrical supply is compliant with the standards in force.
This device is intended solely for professional use.
Any modication to the EM device is strictly prohibited.
Portable and mobile RF communication devices may aect EM devices.
According to the requirements of the standard NF EN 60601-1, the device may cause radio-electric disturbances
and/or disturb the operation of a nearby device. The use of accessories, transducers and cables other than those
specied, with the exception of equipment sold by the manufacturer as replacement parts of internal components,
may lead to an increase in emissions or a reduction of the device’s electromagnetic immunity.
The device must not be used next to or stacked with other devices.
If this condition cannot be respected, test to ensure correction operation in this conguration.
Hand-held radio frequency (use of remote control) communication devices may aect other electrical equipment
and devices and should not be used at less than 30cm of the Nocospray 2.
To avoid risk of electric shock, this device must only be connected to a supply main with protective earth.
Make sure that electric power meets regular standards.
Use only with products from the NOCOTECH range.
Do not insert any object or liquid into the nose of the diuser, whether it is in use or not.
Check for the presence of the jet and the jet support (reference 4 on page38).
Remove the bottle from the diuser for transport.
Handle the reservoir with care.
The user is not authorised to replace any part of the device.
In the event of device failure, call your retailer/approved technician.
Any electrical intervention on the device must be performed by an approved technician. OXY'PHARM provides
retailers with all technical information required for troubleshooting.
INSERT THE CONTACT DETAILS OF YOUR RETAILER HERE
Mr(s) ……………………...............................................................................…..………….
Address .......................................................................................................................
Telephone No. ……………………..…...............................................................................………….

9
EN
The device diuses a chemical substance. Due to this, the following recommendations must imperatively be
respected:
Users are required to read the accompanying documents.
Decontamination process need to be monitored.
The device must be used solely indoors.
Do not inhale the product.
Do not smoke in proximity to the device
Do not direct the device towards an incandescent area.
Do not use in the presence of an inammable anaesthetic mixture.
Decontamination process need to be monitored
Evacuate the room during diusion.
Respect the contact times provided in the usage protocols (minimum 30 minutes) before returning into the treated
area.
In case of emergency, if a person must return into a treated area before treatment is over, they must be equipped
with Personal Protection Equipment: hearing protection and PPE in accordance with the product’s safety data
sheet.
Before allowing safe entry into the treated area for those not protected with PPE, a H202 gas detection unit can be
used to measure any residual gas.
Entry must only be permitted when the ppm count falls below that of the requisite levels stipulated by local laws of
exposure times in the workplace and mentioned in the product’s SDS.

10
EN
3. DESCRIPTION
3.1 Descripon of the NOCOSPRAY 2
4
5
3
2
16
7
10
9
8
1Handle
2Diuser release button
3Diuser nose (venturi)
4Jet and support jet
5Bottle
6Control keypad
7Power switch
8Fuses
9Power cable plug
10 Mini-USB Port
3.2 Overall dimensions
342 mm
300 mm
494 mm

11
EN
4. USE
4.1 Posioning of the device
The Nocospray must be placed on a at and solid surface, ideally in a corner of the room to be treated and in
an elevated position, if possible
Before beginning a treatment, check that there is no obstacle within 1,5 metres of the nozzle tip.
4.2 Installaon of the bole
The installation of the bottle is carried out in the manner below.
Consider dating the product bottle before installing it onto the NOCOSPRAY 2.
Always check that the bottle contains a sucient amount of product for the desired treatment (the device does not
indicate this).
Please refer to the attached table on page54.
Steps Acon Illustraon
1Remove the diuser nose by pressing the release button.
2Screw the product bottle (after dating it) onto the diuser nose.
Do not screw it too tight in order to avoid irreversibly damaging the
joint.
3Place the diuser nose back onto the device.
You should hear a “click”. CLIC !

12
EN
4.3 Operaon in standard mode
4.3.1 Use without remote control
Steps Acon Illustraon
1Plug in the NOCOSPRAY 2 power cable.
Set the power switch to“1”.
2Select the volume to be treated by sliding your nger over the pale
part of the keypad (*).
The selection range is between 10 m3and 1000 m3.
(*) In standard mode, the volume selected by default is 10 m3.
3The level is progressive: if two LEDs are illuminated, the intermediary
value is selected.
For example, if LEDs 10 and 20 are illuminated, the selected volume is
15m3.
4To launch the device, press the button at the centre of the key pad
(press and hold).
5A beep will sound for 15 seconds before the machine begins to
function.
Leave the room before the end of the 15seconds.
AT the end of diusion, a beep will sound.
The device will stop automatically.
15
S

13
EN
If necessary, the device may be stopped during treatment by pressing
the button at the centre of the keypad again.
Respect the safety information provided on page<EX>.
4.3.2 Use with remote control
The remote control allows the device to be launched from outside of the room.
4.3.2.1 Initial pairing with the remote control
Before using the remote control for the rst time, it needs to be paired with the NOCOSPRAY 2 device. Follow
the steps below:
Steps Acon Illustraon
1Plug in the NOCOSPRAY 2 power cable.
Set the power switch to“0”.
2Press the button on the remote control (approx. 5 seconds) in direct
proximity to the NOCOSPRAY 2 with which you wish to pair it, hold the
button until the LED on the remote control begins to blink.
3Keep the button on the remote control held down.
Turn on the NOCOSPRAY 2 to be paired by setting the power switch to
“1”.

14
EN
Steps Acon Illustraon
4The LED on the remote control will begin to blink rapidly.
The paired NOCOSPRAY 2 will beep several times to signal that the
pairing has been made.
BIP
BIP
BIP
4.3.2.2 Re-pairing a remote control
The remote control can only be paired with one device at a time.
However, a remote control which has already been paired can be paired with another device.
Steps Acon Illustraon
1Ensure that all NOCOSPRAY 2 devices in proximity to the remote
control are switched o.
Switches set to“0”.
2Plug in the power cable of the new NOCOSPRAY 2 to be paired.
3Press and hold the button on the remote control (approx. 30 seconds
directly next to the NOCOSPRAY 2 to be paired.
4For 30 seconds, the LED of the remote control will blink, then it will
stop before beginning to blink again.
This phase is repeated 3 times.

15
EN
Steps Acon Illustraon
5Once the LED of the remote control blinks regularly and without
stopping, turn on the NOCOSPRAY 2 to be paired using its power
switch whilst holding down the button on the remote control.
6The LED on the remote control will begin to blink rapidly.
The paired NOCOSPRAY 2 will beep several times to signal that the
pairing has been made.
BIP
BIP
BIP
4.3.2.3 Operation with remote control
Steps Acon Illustraon
1Plug in the NOCOSPRAY 2 power cable.
Set the power switch to“1”.
2Select the volume to be treated by sliding your nger over the pale
part of the keypad.
The selection range is between 10 m3and 1000 m3.
3The level is progressive: if two LEDs are illuminated, the intermediary
value is selected.
For example, if LEDs 10 and 20 are illuminated, the selected volume is
15m3.

16
EN
Steps Acon Illustraon
4Press the button on the remote control to launch
treatment.
5A beep will sound for 15 seconds before the machine begins to
function.
Leave the room before the end of the 15seconds.
AT the end of diusion, a beep will sound.
The device will stop automatically.
15
S
If necessary, the device may be stopped during treatment by pressing
the button on the remote control again.
Respect the safety information provided on page<EX>.
4.4 Operaon in programmer mode
4.4.1 Modus operandi
It is possible to use the NOCOSPRAY 2 with a programmer (not provided) in order to dier or repeat
treatments. Follow the procedure outlined below to select the programmer mode.
Steps Acon Illustraon
1Plug in the NOCOSPRAY 2 power cable.
Set the power switch to“1”.

17
EN
Steps Acon Illustraon
2Turn your nger in a clockwise direction on the pale part of the
keypad up to the value 1000, then carry out at least 3 supplementary
rotations.
x3
3The programmer mode is engaged with 3 LEDs are illuminated in the
following manner:
• the LEDs 100 m3and 500m3are illuminated,
• the LED 250 m3is blinking.
4Select the desired volume by turning in an anticlockwise direction (*).
(*) In programmer mode, the volume selected by default
is 1000m3.
The selected volume is displayed only when you touch the keypad.
5Set the power switch to“0”.
Unplug in the NOCOSPRAY 2 power cable.
6Connect the NOCOSPRAY 2 to the programmer.
Plug the programmer into a mains socket.
Set the power switch to“1”.
7Refer to the programmer’s notice to program it.
NB: it is possible to program it beforehand.

18
EN
Steps Acon Illustraon
8The programmer will launch and stop the NOCOSPRAY 2 according to
the performed programming.
A beep will sound for 15 seconds before the machine begins to
function.
Leave the room before the end of the 15seconds.
AT the end of diusion, a beep will sound.
The device will stop automatically.
15
S
4.4.2 Special features of programmer mode
In programmer mode, the device cannot be stopped by pressing the
centre of the keypad.
In case of emergency, set the power switch to “0"or unplug the device.
When the treatment in programmer mode is nished, it is highly recommended to congure the device in
standard mode before switching it o.
Refer to § 4.4.3 below.
If the device is in programmer mode and you switch the device o and
on again, you have 1 minute to change the volume or return to standard
mode.
At the end of this minute, the device will begin to beep in order to signal
the beginning of the treatment.
Leave the room before the end of the 15seconds.
15
S
Steps Acon Illustraon
1At the end of treatment, if the device is still turned on, the volume may
be modied.

19
EN
4.4.3 Return to standard mode
Steps Acon Illustraon
1To exit programmer mode and return to standard mode:
Turn your nger in a clockwise direction on the pale part of
the keypad up to the indication 10, then carry out at least 3
supplementary rotations.
x3

20
EN
5. TRACKING SYSTEM
The tracking system records the 125 latest treatments performed by the NOCOSPRAY 2.
The 126th treatment erases and replaces the 1st and so forth.
5.1 Soware installaon
• Insert the CD Rom or the USB key provided into your PRC and open the folder named“Nocospray Tracker”.
• Launch“NocosprayTracker_Setup.exe”.
• Authorise the software installation if Windows asks you to.
Steps Acon Illustraon
1Click“Next”.
2Click“Next”again.
3Click“Install”.
Other manuals for NOCOSPRAY
1
Table of contents
Languages:
Other Oxypharm Medical Equipment manuals
Popular Medical Equipment manuals by other brands

Nutricia
Nutricia FLOCARE INFINITY II Instructions for use

Planmeca
Planmeca ProX Technical manual

Integra
Integra Luxtec MLX Operation and service manual

LINET
LINET OptiCare Instructions for use

Merit Medical
Merit Medical ONE Snare Endovascular Microsnare System Instructions for use

Nidek Medical
Nidek Medical ICE mini Operator's manual