2. SAW ALIGNMENT
45
0
30
0
15
0
0
0
15
0
30
0
45
0
20 40 50 60 100 120 140 160 180
45
0
30
0
15
0
0
0
15
0
30
0
45
0
20 40 50 60 100 120 140 160 180
45
0
30
0
15
0
0
0
15
0
30
0
45
0
20 40 50 60 100 120 140 160 180
Blade Bolt
Washer
Outer Flange
Blade
Inner Flange
Spindle
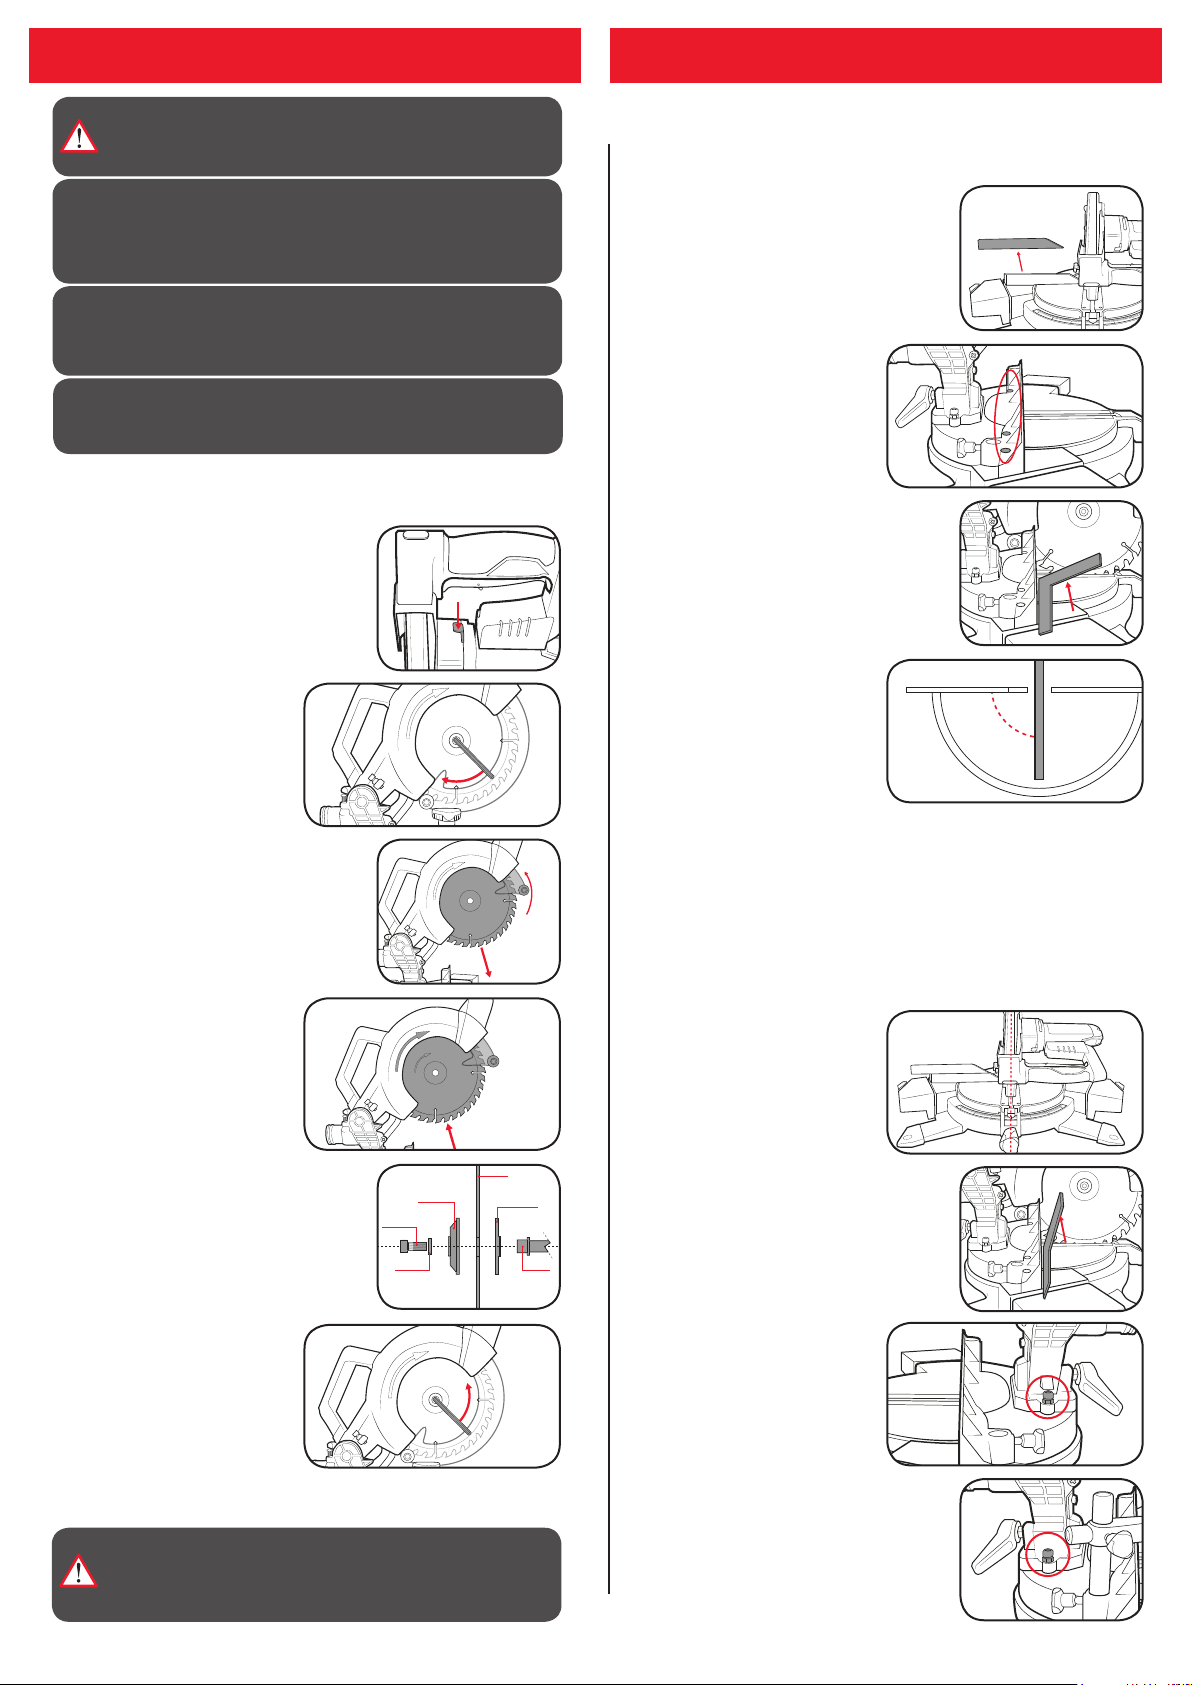
Fence Alignment
Bevel Alignment
2 Loosen slightly all 4 hex
bolts securing the rear fence
in place.
2 Once the spindle lock stops
the blades rotation, rotate
the blade bolt clockwise to
remove the bolt and outer
ange.
6 Depress the spindle lock and
then tighten the blade bolt
using a hex key in an anti-
clockwise direction.
4 Install the new the blade over
the spindle and onto the inner
ange.
Note: Ensure the blade is tted
so that the arrow on the blade
matches the same direction as
the arrow on the guard.
1 Set the bevel angle to 0°,
lock the cutting head down
and loosen the bevel locking
lever.
3 Loosen the right bump
stop nut and adjust the
screw until the blade is
perpendicular with the table.
Then tighten the nut to
secure in position.
4 Gently tap the fence into
position so that the fence is
perfectly perpendicular to
the blade.
Retighten the bolts.
1 Set the mitre angle to 0°, lock the cutting
head down and remove the upper rear
fence by loosening the fence locking knob
all the way out.
1 Ensure the cutting head is raised. Press
the spindle lock button in while rotating
the blade clockwise using a hex key in the
central blade bolt.
5 Fit the outer ange by placing the cupped
side against the blade followed by the
washer and blade bolt.
Make sure the lower guard operates smoothly and properly protects you from
the blade before using the saw.
3 Raise the lower blade guard and remove
the blade from the spindle.
Note: Make sure the inner ange stays in
place on the spindle.
The saw has 2 bump stops that limit the bevel angle to 0° and 45°. If the
bevel angle becomes inaccurate, these stops can be readjusted by following
the steps below.
3 Lay a carpenters square on the table with
one edge along the blade and the other
along the fence. Any inaccuracy should be
visible.
Note: The square must contact the blade,
not the teeth, for an accurate reading.
2 Lay a carpenters square along the table
with one edge along the blade. Any
inaccuracy should be visible.
Note: The square must contact the blade,
not the teeth, for an accurate reading.
4 Repeat steps 2 and 3 for the left bump
stop using a 45° angle carpenters triangle.
5 Make a test cut and repeat this process until the fence is adjusted
accurately. Then you can reattach the upper rear fence.
The mitre saw should be set-up fairly accurate out of the box, but if the saw
becomes misaligned, you can follow the instructions below to adjust the tool.
1. CHANGING THE BLADE
The tool is recommended for wood cutting only and is not recommended
for use with abrasive wheels or masonry/diamond cutting wheels. Only use
210mm wood cutting blades.
WARNING! ENSURE THE TOOL IS SWITCHED OFF AND
DISCONNECTED FROM THE POWER SUPPLY BEFORE
PERFORMING ANY OF THE FOLLOWING TASKS.
CAUTION! NEVER TRY TO USE A BLADE THAT IS LARGER
THAN THE STATED CAPACITY OF THE MITRE SAW. IT MIGHT
COME INTO CONTACT WITH THE BLADE GUARDS AND RISK
PERSONAL INJURY OR DAMAGE TO THE MITRE SAW. THIS
WILL NOT BE COVERED UNDER WARRANTY.
CAUTION! ENSURE THAT THE CORRECT BLADE BUSH THAT
MAY BE REQUIRED SUITS THE SPINDLE AND BLADES THAT
ARE FITTED.
CAUTION! NEVER USE A BLADE THAT IS TOO THICK TO
ALLOW THE OUTER FLANGE TO ENGAGE WITH THE FLATS ON
THE SPINDLE. IT WILL PREVENT THE BLADE SCREW FROM
PROPERLY SECURING THE BLADE ONTO THE SPINDLE.
WARNING! TO ENSURE THE CORRECT BLADE ROTATION,
ALWAYS INSTALL THE BLADE WITH THE BLADE TEETH
POINTING DOWNWARDS. ENSURE THE ARROW
DIRECTION ON THE BLADE CORRESPONDS WITH THE
ARROW ON THE UPPER BLADE GUARD.
0318


