PAC GM1A-RST User manual

GM1A-RST
Radio Replacement Interface with
Steering Wheel Control and Telematics Retention
for select General Motors Vehicles
with Class II Data-Bus
© 2018 AAMP Global. All rights reserved. PAC is a Power Brand of AAMP Global.
PAC-audio.com
Pacific Accessory Corporation
Rev: V6
Date: 100318 Page 1
Introduction and Features
Important Notes
1. The included chime speaker should be used when: The vehicle has a standard Bose system (UQ7), the vehicle does not have
a factory amplier at all, or if you are connecting an aftermarket amplier to the cabin speakers.
2. The Programming Button and Adjustment Dial on the side of the interface have multiple functions. Please see Page 3 for
more details.
3. Aftermarket radios with a 2-wire resistive based SWC circuit will not have default button assignments programmed. Please
refer to the owners manual of the radio you are installing to nd out the proper SWC programming procedure.
4. Compatible in both Premium Bose (Y91 / UQA) and Standard Bose systems.
5. Real time speaker fading on Premium factory amplied systems (Y91 / UQA) is only supported with the “amplied output”
connection of the GM1A-RST.
6. When using real time speaker fading (Premium Bose only), if the fader setting is biased more to the front or rear, as the radio
turns on the sound may begin at the default setting and then quickly transition to your custom setting.
7. Aftermarket radio features such as High Pass Filters (crossovers), DSP or “Network Mode” will interfere with proper fader
function (Premium Bose only). In order for the GM1A-RST’s fader function to work, the audio from the aftermarket radio’s
output must match so it can compare the front and rear audio levels and determine the proper fader setting for the factory
amplier.
8. When used in conjunction with the add on camera controller (VS41) the GM1A-RST will only provide Data-Bus controlled
automatic activation for the front camera. Please refer to the vehicle specic VS41 instructions for more detail.
Interface Connector 1
Expansion Port
Interface Connector 2 Interface Connector 3
Non-Amplied
Audio Output
LED 1
LED 2
The GM1A-RST interface allows the replacement of a factory radio in select General Motors vehicles with the Class II Data-Bus.
Using this interface will retain factory features such as Steering Wheel Controls (SWC), Rear Seat Control (RSC), OnStar, warning
chimes and the factory Bose amplier when the original radio is removed. The GM1A-RST provides data bus driven outputs such
as retained accessory power (RAP), vehicle speed signal (VSS), illumination, reverse trigger and parking brake. You can also add
multiple camera inputs to your aftermarket radio with Data-Bus controlled automatic activation (front camera only) by connecting
a VS41 into the expansion port on the GM1A-RST.
USB PortRadio Select
DIP switches
Interface Connector 4
Adjustment Dial Programming Button
Module Layout
Amplied
Audio Output

GM1A-RST
Radio Replacement Interface with
Steering Wheel Control and Telematics Retention
for select General Motors Vehicles
with Class II Data-Bus
© 2018 AAMP Global. All rights reserved. PAC is a Power Brand of AAMP Global.
PAC-audio.com
Pacific Accessory Corporation
Rev: V6
Date: 100318 Page 2
Installation Steps
Other =
Advent, BOYO, Dual, Lightning Audio, Rockford Fosgate, Visteon
Alpine JVC Kenwood /
Lightning Audio
Clarion /
Nakamichi
2-Wire
Resistive
Pioneer /
Other* Sony Fusion
1 2 1 & 2 3 2 & 3 1, 2, & 3 4 1 & 4
Set DIP switches that correspond with your radio to the ON position.
Set all other DIP switches to the OFF position.
*Other - Dual / Axxera (these brands could also have 2-wire resistive), Jensen, Rockford Fosgate
1. Set the Radio Select DIP switches according to the radio you are installing.
2. Wire your aftermarket radio to the GM1A-RST’s harness according to the wiring connections chart below.
3. The Brown mute loop in Interface Connector 4 (if not cut) will turn the GM1A’s accessory output off when any OnStar
function is active. If the aftermarket radio has a mute input, cut this loop and connect the Brown wire in pin 23 to it.
4. Plug Interface Connectors 1 and 2 into the appropriate ports on the GM1A-RST interface (using the diagram on page 1 or
the label on the bottom of the interface).
5. The Connector 3 connection will be dependent upon whether or not the vehicle has a factory amplied system. Plug this
connector into the appropriate port on the GM1A-RST (using the diagram on page 1 or the label on the bottom of the
interface).
6. If the aftermarket radio is equipped with an auxiliary input and you wish to retain the factory RSE audio, plug the RCA
connectors from the secondary harness into the radios auxiliary input.
7. Remove the factory radio and plug in the GM1A-RST’s Vehicle Connector 1 and Vehicle Connector 2 into the factory vehicle
harness.
8. If you wish to reassign functions to the SWC, follow the programming instructions on Page 4.
9. If you are connecting an aftermarket amplier to the cabin speakers, connect the chime speaker to the chime plug coming out
of Interface Connector 4 and install the chime speaker in a place free of obstructions, where it can be easily heard (usually
low in the dash facing downward).
Interface Connector 1
(3-pin)
Interface Connector 2
(20-pin)
Interface Connector 4
(24-pin)
Interface Connector 3
(12-pin)
Vehicle Connector 1
(24-pin)
Vehicle Connector 2
(12-pin)
Yellow 12v+
Red Accessory Output
(10 amp)
Black Ground
Brown Loop Mute Output
Blue Not Used
Blue / White Remote On Input
Orange Not Used
Orange / White Illumination Output
Purple / White Reverse Output (+)
Light Green Parking Brake Output (-)
Pink Vehicle Speed Signal
(VSS) Output
Blue / Yellow SWC Output / Key 1
Brown SWC Output / Key 2
3.5 mm Jack SWC Output
Purple Rear R + input
Purple / Black Rear R - input
Green Rear L + input
Green / Black Rear L - input
Gray Front R + input
Gray / Black Front R - input
White Front L + input
White / Black Front L - input
Wiring Connections

GM1A-RST
Radio Replacement Interface with
Steering Wheel Control and Telematics Retention
for select General Motors Vehicles
with Class II Data-Bus
© 2018 AAMP Global. All rights reserved. PAC is a Power Brand of AAMP Global.
PAC-audio.com
Pacific Accessory Corporation
Rev: V6
Date: 100318 Page 3
Programming Button and Adjustment Dial Functions
VS41 Wiring
The VS41 can be connected to the GM1A-RST and used to switch multiple cameras. Please refer to the document labeled
“Instructions for wiring the VS41 into 2003-2006 Chevy / GMC Trucks and SUVs” which can be found on www.pac-audio.
com under the VS41 product page.
You can press and hold the programming button on the side of the interface to access different programming modes. Once the
LED is lit to the mode you desire (see below for modes), immediately release the programming button to access that mode.
PLEASE NOTE:
• This process must be done with the interface in the vehicle and the key in the ignition position.
• If there is a Premium Bose system, and you are also installing an amplier on the cabin speakers, make sure that
the chime speaker is connected and chimes are enabled through the RadioPRO app before proceeding. Please see
the RadioPRO app section on Page 4 for more details.
A. 1 Chime and LED 1 ash green: SWC re-assignment. This allows you to re-assign the SWC functions to the buttons
of your choice. Please see the Optional Steering Wheel Control Programming instructions on Page 4 for more details.
B. 2 Chimes and LED1 ash amber: SWC re-calibration (this mode is available in the Corvette only).This allows you to
re-calibrate the analog SWC in the event they fall out of the expected range and do not function properly. If data control
SWC are detected by the interface, this mode will be automatically skipped.
C. 3 Chimes and both LEDs ash green: Chime volume adjustment. This allows you to adjust the volume of the
chimes generated by the interface using the adjustment dial on the side. (This mode is not available in vehicles
equipped with Premium Bose (Y91 / UQA) amps. If a premium Bose amp is detected by the interface, this mode will be
skipped as the factory amp is what generates the chimes. Please see the vehicles owner’s manual for adjustment of
chime volume in vehicles with Premium Bose (Y91 / UQA).
D. 4 Chimes and LED 1 ash red: Master reset. This does a master reset of the interface and restores the following
settings to factory defaults:
• SWC Mapping
• SWC Calibration
• Camera Settings
• Infotainment Settings
• Interface User Options
Adjustable Settings
These products have settings that are adjustable through our RadioPRO PC app or through the push-button on the module.
Some settings are only adjustable through the PC app. Some of these settings require the module to be connected to the
vehicle. Below is a breakdown of these settings.
CONNECTED TO CAR NOT CONNECTED TO CAR
Chime volume (excluding Premium Bose Y91/UQA) YES NO YES
Factory amplifier settings:
Bass, Mid, Treble, Gain, and Fade
(Premium Bose Y91/UQA only)
YES NO GAIN ONLY
OnStar volume (RST or RT products only) YES NO YES
Read product version YES YES N/A
Update firmware YES YES N/A
Camera settings (VS41 required) YES YES NO
AVAILABLE ON PC APP
AVAILABLE ON MODULESETTING
Related Downloads
• RadioPRO PC App: http://aampglobal.com/radioproapp
• Latest instruction manuals: Search part number on pac-audio.com, and then look under the “Downloads” tab

GM1A-RST
Radio Replacement Interface with
Steering Wheel Control and Telematics Retention
for select General Motors Vehicles
with Class II Data-Bus
© 2018 AAMP Global. All rights reserved. PAC is a Power Brand of AAMP Global.
PAC-audio.com
Pacific Accessory Corporation
Rev: V6
Date: 100318 Page 4
Alpine JVC Kenwood /
Lightning Audio
Clarion /
Nakamichi
2-Wire
Resistive Other * Pioneer Sony
1
Volume +
Volume +
Volume +
Volume +
Volume +
Volume +
Volume +
2
Volume -
Volume -
Volume -
Volume -
Volume -
Volume -
Volume -
3
Mute
Mute
Mute
Mute
Mute
Mute
Mute
4
Preset +
Source
Source
Source
Preset +
Preset +
Preset +
5
Preset -
Track +
Play
Search +
Preset -
Preset -
Preset -
6
Source
Track -
Track +
Search -
Source
Source
Source / End Call
7
Track +
Band / Disc +
Track -
Band
Track +
Track +
Track +
8
Track -
Preset / Disc -
Disc / FM +
Send / End
Track -
Track -
Track -
9
Power
Select
Disc / AM -
Send
Band
Band
Band
10
Enter / Play
Attenuation
Answer
End
Answer **
Phone Menu
Power / End Call
11
Band / Program
Phone Receive
Voice
Voice
End **
Answer Call
Voice / Answer / End Call
12 Receive Phone Reject On Hook PTT ** End Call Voice (Android Auto & Car
Play) Answer / End Call***
13
End
Voice
Off Hook
Voice
14
Voice
Power
Mute
15 Preset +
* Dual / Axxera, Jensen, Rockford Fosgate ** Jensen ONLY *** XAV-AX100 / 200 Only
No specific
programming
order. Please
refer to the
owner's
manual of
your radio for
SWC
programming
instructions.
Please Note: On any entry withmultiple commands, the commands shown are source dependent.
Optional Programming Order
Optional Steering Wheel Control Programming
Programming
1. Turn the key to the ignition position.
2. Press and release programming button on the side of the interface.
3. Within 7 seconds, press the button that is to be learned on the steering wheel. LED 1 will turn red when the button is pressed.
At this point you have two options:
A. For short press functionality: Release the button within 1.5 seconds. LED 1 will turn back to green.
B. For long press functionality: Hold the button until LED 1 starts blinking. Release the button and the LED will
go back to green.
4. Repeat step 3 for each additional audio function on the steering wheel.
5. If you come across a function in the chart that your steering wheel does not have, or you do not want to program, press and
release the program button on the side of the interface to skip that function.
6. Once programming is completed, wait seven seconds. LED 1 will ash three times indicating end of programming.
7. Test the interface for proper functionality. Whenever a SWC is pressed LED 1 will illuminate green.
8. If any function does not work, repeat the programming steps.
Alpine JVC Kenwood Clarion Pioneer Sony Fusion
V
olume + Volume + Volume + Volume + Volume + Volume + Volume + Volume +
V
olume - Volume - Volume - Volume - Volume - Volume - Volume - Volume -
Source Up Source Source Source Source Source Source Source
Source Down Band Preset + Mute N/P Band Band Off
Seek Up Track + Track + Track + Search + Track + Track + Track +
Seek Down Track - Track - Track - Search - Track - Track - Track -
V
oice* OnStar/Voice OnStar/Voice OnStar/Voice OnStar/Voice OnStar/Voice OnStar/Voice OnStar/Mute
Prog Preset + Preset - Preset + Band Preset + Preset + Audio
*Voice default is OnStar. If OnStar retention is not necessary, unplug the OnStar module to default to Voice (Mute for Fusion radios).
Default Steering Wheel Control Programming
Default SWC Button Assignments
Alpine JVC Kenwood Clarion Pioneer Sony Fusion
Volume + Volume + Volume + Volume + Volume + Volume + Volume + Volume +
V
olume - Volume - Volume - Volume - Volume - Volume - Volume - Volume -
Seek Up Track + Track + Track + Search + Track + Track + Track +
Seek Down Track - Track - Track - Search - Track - Track - Track -
V
oice OnStar/Voice OnStar/Voice OnStar/Voice OnStar/Voice OnStar/Voice OnStar/Voice OnStar/Mute
End Source Source Source Source Source Source Source
*Voice default is OnStar. If OnStar retention is not necessary, unplug the OnStar module to default to Voice (Mute for Fusion radios).
Default SWC Button Assignments (Corvette)

GM1A-RST
Radio Replacement Interface with
Steering Wheel Control and Telematics Retention
for select General Motors Vehicles
with Class II Data-Bus
© 2018 AAMP Global. All rights reserved. PAC is a Power Brand of AAMP Global.
PAC-audio.com
Pacific Accessory Corporation
Rev: V6
Date: 100318 Page 5
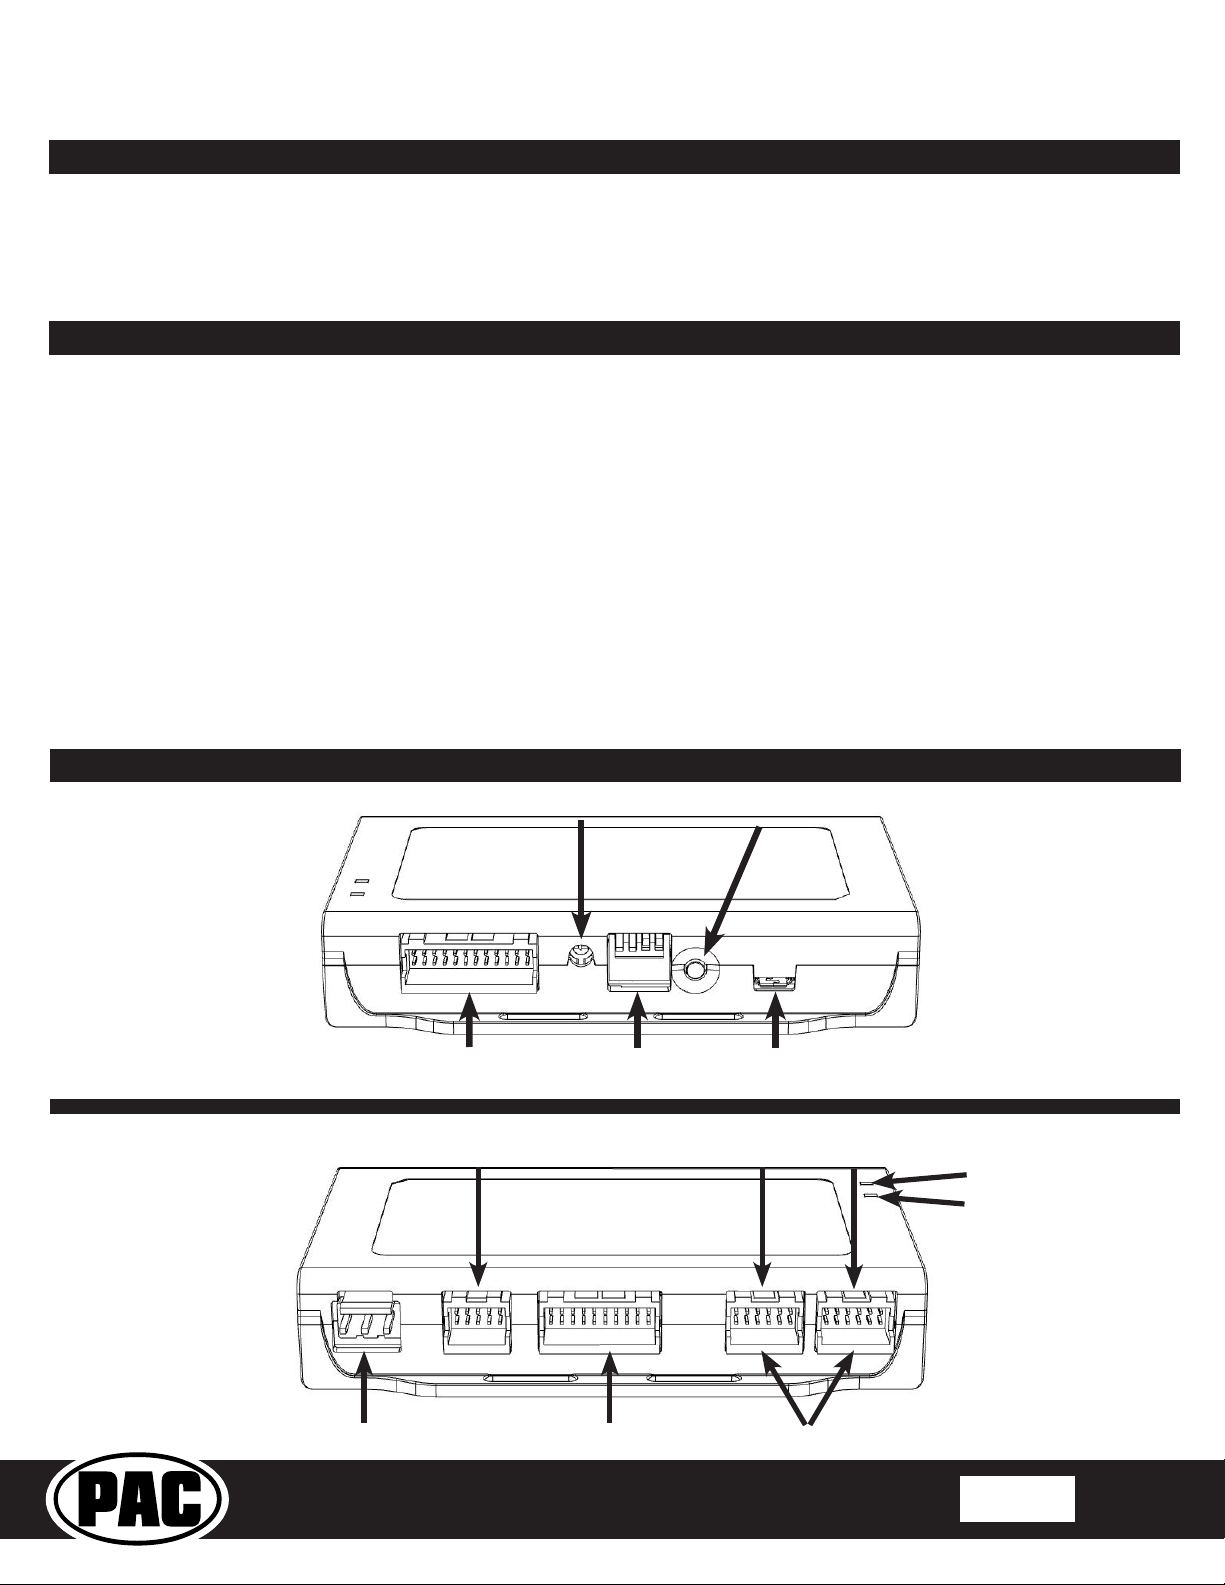
Rear Seat Entertainment (RSE); If equipped
The factory RSE system will function independently from the aftermarket radio. The unit will power up and pass audio through
the headphones as long as the vehicle’s ignition is on. If you wish to pass audio from the RSE to the aftermarket radio you must
connect the RCAs from the 12-pin connector to the aftermarket radios auxiliary input. Select the aftermarket radios auxiliary input
to hear RSE audio.
Button Programming Order
Volume Up
Volume Down
Seek Up
Seek Down
Preset
Answer / Voice
Hang Up
Preset Up
SWC Re-calibration Procedure (Corvette Only)
Please Note: This is only necessary if after installation, the SWC are acting erratic or
unresponsive in the Corvette.
1. Turn the key to the ignition position.
2. Press and hold the programming button until LED 1 turns amber and you hear two chimes.
When this happens, release the programming button.
3. Within 7 seconds, press and hold the button that is to be learned on the steering wheel. The
LED will turn off when the button is pressed and begin blinking when the value has been
learned. Once the LED begins blinking, release the button.
4. Repeat step 3 for each additional function on the steering wheel.
5. If you come to a button in the list that your vehicle does not have, skip it by pressing the
programming button on the interface. Any buttons not learned during this process will not
function.
6. Once programming is completed, the LED will ash indicating end of programming.
7. Test the interface for proper functionality. Whenever a SWC is pressed LED 1 on the interface
should blink green. If any function does not work, repeat the programming steps.
RadioPRO PC App
PLEASE NOTE:
The interface must be connected to the vehicle when using
the following features of the RadioPRO PC App:
• Factory Amplier Settings
• Chime Volume
• Telematics Volume
The interface does not need to be connected to the vehicle
when using the following features of the RadioPRO PC
App:
• Interface User Options
• Camera Settings
• Firmware Updates
• Reading rmware/hardware versions
Testing and Verication
1. Turn the ignition on. LED 1 will illuminate red and the +12v accessory wire will turn on.
2. Turn on the radio and check chimes, volume, balance, and fader.
3. In vehicles equipped with Premium Bose (Y91 / UQA): If the overall volume is too low, use the adjustment dial on the
side of the interface to set it to the desired level. The best way to do this is to turn the volume on the radio to 3/4 volume,
then turn the adjustment dial on the GM1A-RST clockwise until some distortion is heard, then counter-clockwise a little.
4. Verify that all SWC buttons are functioning properly for both the aftermarket radio and OnStar. To adjust OnStar volume,
press the OnStar button on the mirror then use the volume buttons on the SWC to adjust the level. When you hear a chime
during this process it means you have reached the farthest minimum / maximum level.
5. Pressing the OnStar button on the rearview mirror will turn off the rear speakers and allow the OnStar audio to be heard in
the two front speakers. The OnStar active LED will also turn on. When OnStar disconnects, the radio will un-mute or turn
back on and the OnStar LED will turn off. Pressing the VR / OnStar button on the steering wheel will also activate OnStar.
6. Turn off vehicle and remove key. RAP will be active and keep the radio on for 10 minutes or until any door is opened.
7. The LED and radio will turn off when RAP turns off or until any door is opened.
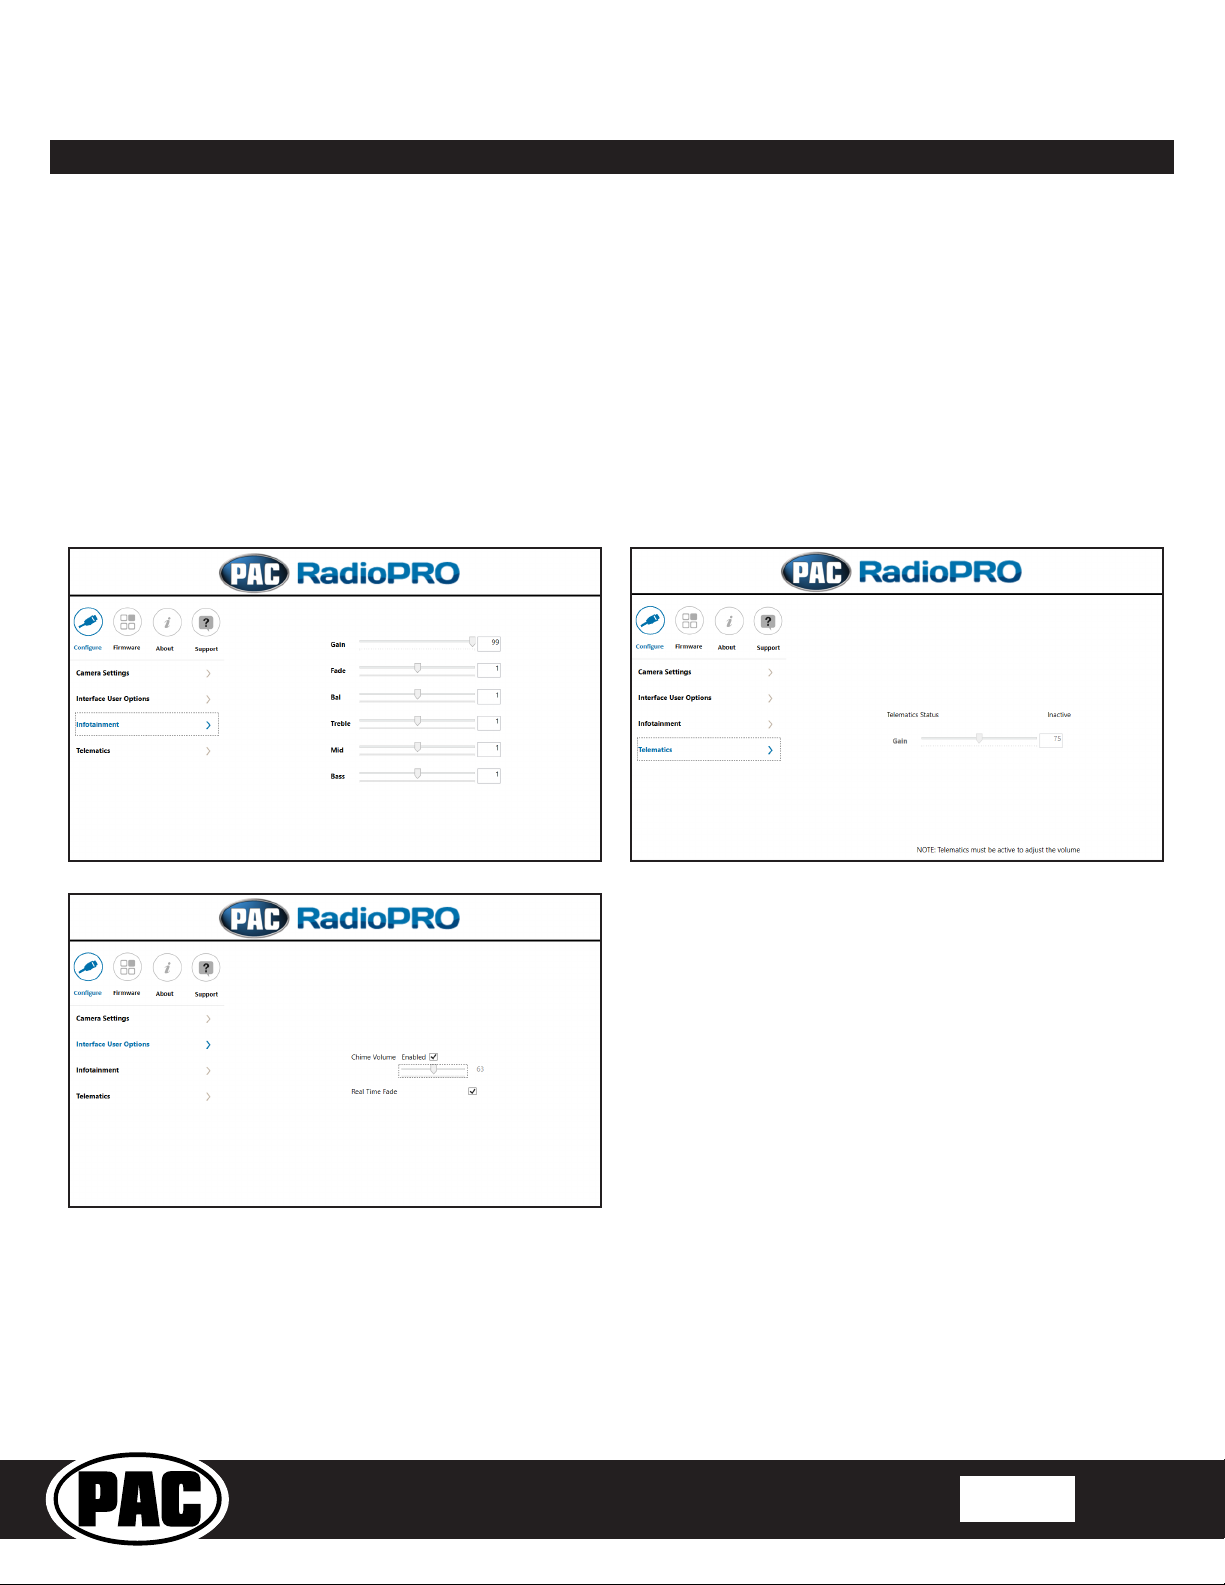
Use of the RadioPRO PC App allows you to do the
following:
• Congure User Interface Options such as:
• Factory amplier settings (Bass, Mid, Treble, Gain,
Fader and Balance)
• Chime Volume
• Camera Settings
• Telematics Volume
• Update Product Firmware
• Read Firmware/Hardware Versions
Download the RadioPRO PC App at: https://aampglobal.com/radioproapp

GM1A-RST
Radio Replacement Interface with
Steering Wheel Control and Telematics Retention
for select General Motors Vehicles
with Class II Data-Bus
© 2018 AAMP Global. All rights reserved. PAC is a Power Brand of AAMP Global.
PAC-audio.com
Pacific Accessory Corporation
Rev: V6
Date: 100318 Page 6
RadioPRO PC App (cont)
Infotainment/Factory Amplier Adjustments
The RadioPRO PC app will also allow you to adjust the settings of the factory amplier (Y91 Premium systems only). You
can adjust Amp Gain, Fader, Balance, Bass, Mid and Treble and real time fade. When real time fade is enabled in amplied
systems, it will allow fading to be controlled directly from the aftermarket radio. Restoring factory settings on the module will
default all values back to middle.
Telematics Volume
You can adjust the OnStar volume through the RadioPRO PC app. Press the blue button on the mirror or the VR SWC to
launch OnStar then adjust the volume using the slider.
Chime Volume
You can adjust the chime volume through the RadioPRO PC app. Not available in Premium Bose (Y91 / UQA) systems.

GM1A-RST
Radio Replacement Interface with
Steering Wheel Control and Telematics Retention
for select General Motors Vehicles
with Class II Data-Bus
© 2018 AAMP Global. All rights reserved. PAC is a Power Brand of AAMP Global.
PAC-audio.com
Pacific Accessory Corporation
Rev: V6
Date: 100318 Page 7
Firmware Updates
The RadioPRO PC app will also allow you to update the interface with new rmware as it becomes available. The GM1A-RST
can be updated with new rmware as it becomes available. Please visit www.PAC-audio.com/rmware for available updates.
Connect the interface to your PC and select ”Firmware”, then “Update Firmware”. Now select “Select File”. Finally, browse to the
place where you saved the le and select it. This will begin the updating process. Once nished, disconnect the interface from
the PC and test operation.
Email: support@PAC-audio.com
Phone: 866-931-8021
International: 727-572-9255 ext 230
Technical Support
RadioPRO PC App (cont)
Table of contents
Other PAC Automobile Accessories manuals
Popular Automobile Accessories manuals by other brands

ICON Vehicle Dynamics
ICON Vehicle Dynamics 17-UP FSD PRO Series installation instructions

Cruz
Cruz Evo Rack Pro P34-158 Assembly instructions

Parrot
Parrot CK3100 LCD installation manual

Whispbar
Whispbar K182W Fitting instructions

Big Mikes Performance Parts
Big Mikes Performance Parts STO N SHO SNS 207 Installation procedures

Thule
Thule RAPID SYSTEM 1242 Fitting instructions

DIGITAL DELAY
DIGITAL DELAY 1023-SCR quick start guide

Havis-Shields
Havis-Shields KR-SB-800 Installation

Metra Electronics
Metra Electronics Saddle Tramp BC-HDR-K4 quick start guide

Quadratec
Quadratec 92034.1018 quick start guide

Stryker
Stryker Vocera Badge Usage Guide

HG2
HG2 SIDE RUNNER 2014-2019 Ford F150 install guide