PAC RP4-CH21 User manual

Radio Replacement & Steering Wheel Control Interface
for Dodge/Jeep/Ram Vehicles
RP4-CH21
© 2018 AAMP Global. All rights reserved. PAC is a Power Brand of AAMP Global.
PAC-audio.com
Pacific Accessory Corporation
Page 1
Rev: 2
Date: 041218
Introduction & Features
Important Notes
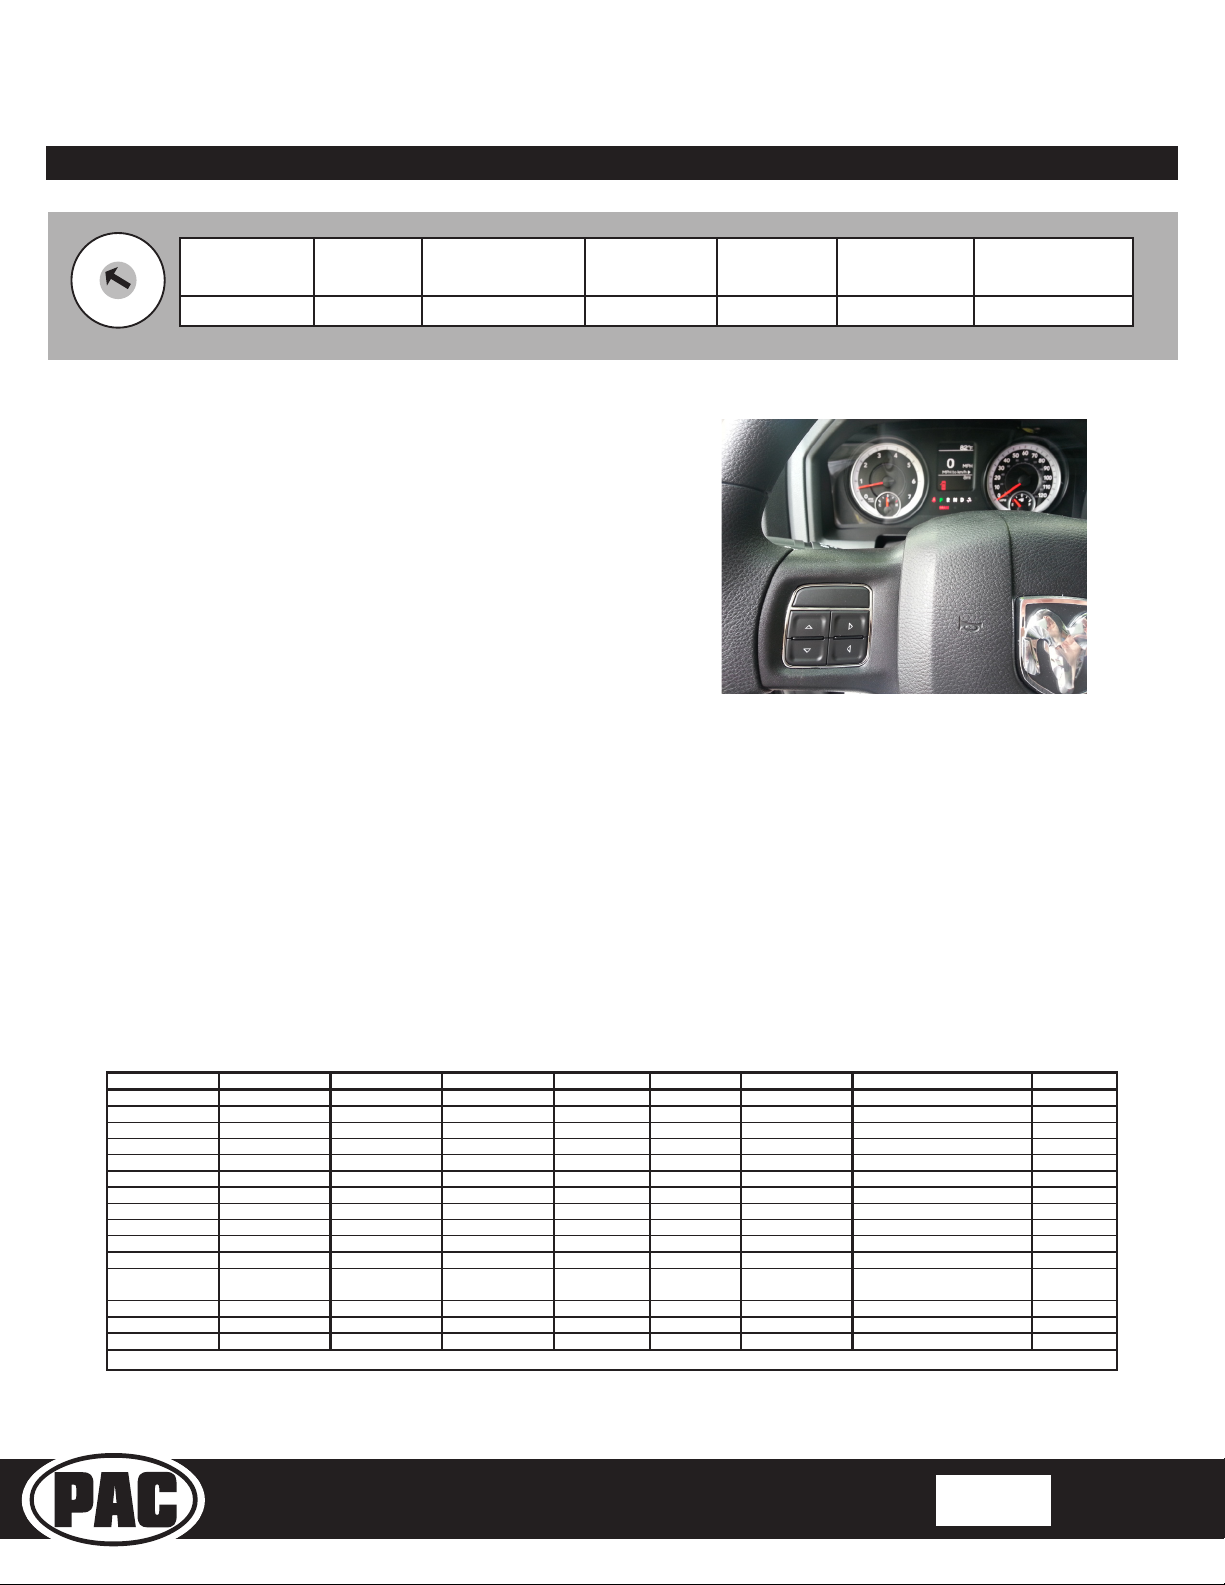
The RP4-CH21 interface allows the replacement of a factory radio in select Dodge/Jeep/Ram vehicles with MS-CAN
databus radios. Using this interface will retain factory features such as steering wheel controls (SWC), HVAC controls,
Driver Information Center (DIC), vehicle settings, vehicle safety features and the factory audio amplier whenever the
original radio is removed. Use of this interface also allows you to program two radio functions to each SWC button by
using short press long press dual command functionality. The RP4-CH21 also provides data bus driven outputs such as
retained accessory power (RAP), vehicle speed sensor (VSS), illumination, reverse trigger and parking brake.
1. These instructions apply to r.1.5.1.4 or later revisions. The revision info can be found on a small white sticker on the interface
and packaging.
1. Please make your vehicle settings selections before removing the factory radio for optimal installation time. Once the radio has
been removed, the vehicle settings which are normally selected through the factory radio can be accessed by downloading
and installing the PAC Vehicle Settings program from http://www.pac-audio.com/rmware/RP/index.html. A PAC-UP is
required to connect with the interface. Please see page 6 for further details on the vehicle settings app.
2. Vehicles with a factory amplier: The factory amplier only accepts two channels of audio input (left and right). Fading is
not supported in these applications. The factory amplier’s fading is controlled by data communication from the factory radio.
Neither the aftermarket radio or the RP interface have the ability to control the amplier’s fader.
3. Vehicles equipped with VES: Retention of the VES system is not currently supported
4. The active guide lines for the factory reverse camera can be turned off and on in the vehicle settings app referenced above.
5. In vehicles equipped with the 8.4” uConnect system, the factory compass display on the DIC, 911 assist, WiFi hotspot and
uConnect access will be lost.
6. The radio select rotary switch on the side of the interface must be adjusted to the proper radio setting before plugging the
interface into the vehicle (see next page for setting chart).
7. The interface comes pre-programmed for all of the vehicles factory SWC functions and does not require programming unless
you wish to re-assign the SWC functions or utilize short press long press dual command functionality. The SWC can always
be restored to default settings by pressing and releasing the programming button on the side of the interface once and waiting
7 seconds for the LED to ash 4 times.
8. The LED will ash whenever a programmable SWC button is pressed.
9. uConnect is not retained when using this interface
10. RAM Promaster equipped with a single DIN radio is not compatible
11. Dodge Durango - You will lose the button from radio to ip down third row headrests. Users will have to control rear climate
controls from the controls located in the rear roof. Ventilated seats are not supported.
12. Jeep Grand Cherokee: Ventilated seats are not supported
13. Jeep Cherokee: Ventilated seats are not supported
14. All vehicle settings will be retained, however the following settings are not adjustable once the factory radio is removed:
• RAM Trucks/Grand Cherokee/Durango
• Fuel Saver Display
• Air Suspension Settings
• Forward Collision Warning with Crash Mitigation
• Cherokee (With Technology Package)
• Adaptive Cruise Control with Stop and Go
• Advanced Brake Assist
• Automatic High Beam Headlamp Control
• Blind Spot and Cross Path Detection
• Forward Collision Warning with Crash Mitigation
• LaneSense Lane Departure Warning
• Parallel and Perpendicular Park Assist
• Rain Sensitive Windshield Wipers
• Tilting Side Mirrors While in Reverse
• Power Lift Gate Chime

Radio Replacement & Steering Wheel Control Interface
for Dodge/Jeep/Ram Vehicles
RP4-CH21
© 2018 AAMP Global. All rights reserved. PAC is a Power Brand of AAMP Global.
PAC-audio.com
Pacific Accessory Corporation
Page 2
Rev: 2
Date: 041218
Installation Steps
1. The radio select rotary switch on the side of the interface must be adjusted to the proper radio
setting before plugging the interface into the vehicle.
2. Make all connections as described in the connection chart on page 1. Vehicles without a factory amplier: Connect the
aftermarket radio’s front and rear speaker wires to the vehicle connector. Vehicles with a factory amplier: Connect the
front outputs of the aftermarket radio to the rear inputs of the vehicle connector. This will allow navigation voice prompts and
Bluetooth calls to be heard.
Illustration / Schematic
Aftermarket Radio
Connections
Vehicle
Connector
SWC Connection
x4
See above chart for
different radio type
connections
Acc On/
Programming
LED
Programming
Button
Wiring SWC Connection
Wiring Connection Chart
Red / White Parking Brake
Output (-)
Purple / White Vehicle Speed
Output
Blue / White Amp Turn On Input
Red Accessory Output
Output (10 amp)
Orange / White Illumination Output
(+)
Green Reverse Output (+)
Interface Connector
Yellow Battery +12v
Black Ground
White Front L + input
White / Black Front L - input
Grey Front R + input
Grey / Black Front R - input
Green Rear L + input
Green / Black Rear L - input
Purple Rear R + input
Purple / Black Rear R - input
Yellow RCA Factory Reverse
Camera Video (if
equipped)
Vehicle Connector SWC Connector
Blu/Yel Kenwwod, Newer
JVC
3.5mm Jack Alpine, JVC,
Clarion, Fusion,
Pioneer, Sony,
Boyo, Dual,
Lightning Audio,
Visteon or Advent
1
2
3
4
5
6
7
8
9
0
Alpine JVC Kenwood /
Lightning Audio
Clarion /
Nakamichi
Pioneer /
Other* Sony Fusion
1 2 3 4 7 8 9
*Other - Dual / Axxera (these brands could also have 2 - wire resisve), Jensen, Rockford Fosgate
SET RADIO SELECT SWITCH

Radio Replacement & Steering Wheel Control Interface
for Dodge/Jeep/Ram Vehicles
RP4-CH21
© 2018 AAMP Global. All rights reserved. PAC is a Power Brand of AAMP Global.
PAC-audio.com
Pacific Accessory Corporation
Page 3
Rev: 2
Date: 041218
Default Steering Wheel Control Programming
IMPORTANT! The interface comes pre-programmed for all of the vehicles factory SWC functions and does not require programming
unless you wish to re-assign the SWC functions or utilize short press long press dual command functionality. The SWC can always
be restored to default settings by pressing and releasing the program button on the side of the interface once and waiting 7
seconds for the LED to ash 4 times.
Optional Steering Wheel Control Programming
If you wish to re-assign the SWC functions or utilize short press long press dual command functionality, the interface must be
programmed in the specic order shown on the chart below. If you come across a function in the chart that your steering wheel
does not have, or you do not want to program, press and release the programming button on the side of the interface to skip that
function. The LED will ash off and on conrming that you have successfully skipped that function and are ready to proceed to
the next one.
Default SWC Button Assignments
Alpine JVC Kenwood Clarion Pioneer Sony Fusion
Volume + Volume + Volume + Volume + Volume + Volume + Volume + Volume +
Volume - Volume - Volume - Volume - Volume - Volume - Volume - Volume -
Volume Knob Volume Volume Volume Volume Volume Volume Volume
Source Source Source Source Source Source Source Source
Track + Track + Track + Track + Search + Track + Track + Track +
Track - Track - Track - Track - Search - Track - Track - Track -
Tune Knob Track +/- Track +/- Track +/- Track +/- Track +/- Track +/- Track +/-
Preset + Preset +
Band/Disc Up
Disc/Radio + Band Preset + Preset + Audio
Voice Voice Voice Dial Voice Voice Voice Voice Mute
Mute N/P N/P N/P N/P N/P N/P N/P
Phone/Answer Receive Receive Off Hook Send Answer Answer Power
End End Reject On Hook End End Reject/Source N/P
OK N/P N/P N/P N/P N/P N/P N/P
Arrow Up N/P N/P N/P N/P N/P N/P N/P
Arrow Down N/P N/P N/P N/P N/P N/P N/P
Arrow Le N/P N/P N/P N/P N/P N/P N/P
Arrow Right N/P N/P N/P N/P N/P N/P N/P
Short Press Long Press Dual Command Functionality
This feature allows you to assign two aftermarket radio functions to each of the vehicles SWC buttons. It can be used with as
many of the buttons as the user likes or none at all. When this functionality is implemented, quickly pressing and releasing a SWC
button will initiate the short press command while pressing and holding a SWC button for longer than two seconds will initiate the
long press command. Please note that no long press commands are programmed by default. If you wish to assign dual command
functionality to the SWC please follow the programming steps on the next page.
*The Volume knob and Tune knob are on the HVAC panel and will do the exact same functions as the Volume and Tune
buttons on the SWC by default and if reprogrammed.
N/P = Not programmed by default. Can be re-programmed to perform any function the user would like.
Installation Steps (cont.)
3. Connect the SWC wire according to the chart on page 1 (aftermarket radio MUST support a wired remote input)
4. Once all connections have been made, plug the interface into the vehicle. It is reccommended that this be done with the
vehicle running. Once connected the interface has been connected the LED will blink until initilization is complete.
5. If you wish to reassign functions to the SWC, or utilize short press long press dual command functionality, follow the
programming instructions on the next page.

Radio Replacement & Steering Wheel Control Interface
for Dodge/Jeep/Ram Vehicles
RP4-CH21
© 2018 AAMP Global. All rights reserved. PAC is a Power Brand of AAMP Global.
PAC-audio.com
Pacific Accessory Corporation
Page 4
Rev: 2
Date: 041218
Optional Steering Wheel Control Programming (cont)
Alpine JVC Kenwood Clarion Other * Pioneer Sony Fusion
1 Volume + Volume + Volume + Volume + Volume + Volume + Volume + Volume +
2 Volume - Volume - Volume - Volume - Volume - Volume - Volume - Volume -
3 Mute Mute Mute Mute Mute Mute Mute Mute
4 Preset + Source Source Source Preset + Preset + Preset + Source
5 Preset - Track + Play Search + Preset - Preset - Preset - Track +
6 Source Track - Track + Search - Source Source Source / End Call Track -
7 Track + Band / Disc + Track - Band Track + Track + Track + Audio
8 Track - Preset / Disc - Disc / FM + Send / End Track - Track - Track - Power
9 Power Select Disc / AM - Send Band Band Band
10 Enter / Play Attenuation Answer End Answer ** Phone Menu Power / End Call
11 Band / Program Phone Receive Voice Dial VR End ** Answer Call Voice Dial / Answer / End Call
12 Receive Phone Reject On Hook PTT ** End Call VR (Android Auto & Car Play)
Answer / End Call***
13 End Voice Dial Off Hook VR
14 VR Power Mute
15 Preset +
* Advent, Boyo, Dual, Lightning Audio, Jensen, Rockford Fosgate & Visteon ** Jensen & Advent ONLY ***
XAV-AX100 Only
Optional Programming Order
Programming
1. Turn the key to the ignition position.
2. Press and release programming button on the side of the interface.
3. Within 7 seconds, press the button that is to be learned on the steering wheel. The LED will turn off when the button is pressed.
At this point you have two options:
A. For short press functionality: Release the button within 1.5 seconds. The LED will turn back on.
B. For long press functionality: Hold the button until the LED starts blinking. Release the button and the LED will
go back to solid.
4. If you need to program more buttons, repeat step 3 for each additional audio function on the steering wheel.
5. If you come across a function in the chart that your steering wheel does not have, or you do not want to program, press and
release the program button on the side of the interface to skip that function.
6. Once programming is completed, wait seven seconds. The LED will ash three times indicating end of programming.
7. Test the interface for proper functionality. Whenever a SWC is pressed the LED on the interface should blink. If any function
does not work, repeat the programming steps
RP4-CH21 SWC Notes
1. In vehicles that do not have SWC for the radio but do have
SWC for the menu you can program the up/down/left/right
arrows to whatever you want. We recommend that you
have the DIC in the speedometer screen when using the
SWC for the radio (Fig.1)
2. The Mute, Answer and End buttons in the Ram Promaster
can not be programmed for long press functionality.
Fig. 1
1
2
3
4
5
6
7
8
9
0
Alpine JVC Kenwood /
Lightning Audio
Clarion /
Nakamichi
Pioneer /
Other* Sony Fusion
1 2 3 4 7 8 9
*Other - Dual / Axxera (these brands could also have 2 - wire resisve), Jensen, Rockford Fosgate
SET RADIO SELECT SWITCH

Radio Replacement & Steering Wheel Control Interface
for Dodge/Jeep/Ram Vehicles
RP4-CH21
© 2018 AAMP Global. All rights reserved. PAC is a Power Brand of AAMP Global.
PAC-audio.com
Pacific Accessory Corporation
Page 5
Rev: 2
Date: 041218
Testing & Verication
1. Turn the ignition on. The LED on the interface will turn on & the +12v accessory wire will turn on.
2. Turn on the radio & check balance & fade. Note: Factory amplied Systems will not fade as neither the aftermarket radio
or the RP interface have the ability to control the amplier’s fader.
3. Verify that the factory subwoofer (if present) is playing
4. Verify that all SWC are functioning properly.
5. Turn off vehicle & remove key. RAP will be active & keep the radio on for up to 10 minutes (depending on the user
programmed vehicle setting) or until the drivers door is opened.
6. The LED & radio will turn off when RAP turns off or the drivers door is opened.
Additional Controls
When replacing the radio in the following vehicles you may lose some of the climate control features that the factory radio provides:
Grand Cherokee, Cherokee, Ram & Durango. The RP4-CH21 retains those features by integrating them into the existing factory
buttons and displaying the information on the DIC. PLEASE NOTE: The DIC must be set to Audio mode in order for the HVAC
information to be displayed.
The following buttons have been re-purposed from their original OEM function to retain key HVAC controls that are missing when
removing the factory radio:
• Mute Button - Sets Max A/C On/Off
• Enter Button - Locks out rear zone climate controls (Durango only)
• Screen Off Button - Sets fan position (Defrost/Vents/Floor)
• Back Button - Syncs temperatures for dual zone climate controls
• The lock buttons on the doors control their respective seat heaters. Press and hold lock for 2 seconds to engage seat heater.
Press lock again to change from high/low/off. The status will displayed on DIC.
• The assist button on mirror turns heated steering wheel on/off. The status will displayed on DIC.
• HVAC buttons that remain retain their original OEM functionality
Volume Knob & Tune Knob - Work one for one with the SWC
Mute Button –
Sets Max A/C. On/O
Screen O Button -
Sets fan position.
Back - Sync temps
for dual zone climate
control.
Enter - Locks out rear
zone climate control.
Setting the Clock in the Promaster (Must be done with radio off)
1. Press and hold volume down on the SWC.
2. While holding volume down, use the track up/down buttons on the SWC to adjust the time.
Setting the Date in the Promaster
1. Press and hold volume up on the SWC.
2. While holding volume up, use the track up/down buttons on the SWC to adjust the date.
3. The 12/24 hour setting will have to be adjusted using the vehicle settings app referenced on the next page.

Radio Replacement & Steering Wheel Control Interface
for Dodge/Jeep/Ram Vehicles
RP4-CH21
© 2018 AAMP Global. All rights reserved. PAC is a Power Brand of AAMP Global.
PAC-audio.com
Pacific Accessory Corporation
Page 6
Rev: 2
Date: 041218
Product Updates (Firmware)
The RP4-CH21 can be updated with new rmware as it becomes available using the PAC-UP interface updater (sold seperatly).
Please visit www.pac-audio.com/rmware for available updates.
Vehicle Settings
Please go to http://www.pac-audio.com/rmware/RP/RP4.html to download the vehicle settings app. Once downloaded
and installed you can use this app to make changes to vehicle settings that would normally be done through the factory radio.
Important Notes
1. A PAC-UP is required to connect your PC to the RP4-CH21 and make changes to the vehicle settings.
2. Some vehicle settings may show up even if you’re vehicle is not equipped with them. If when you change a setting and it
reverts back, the vehicle did not accept it or the option does not exist.
3. Vehicle settings can only be changed when the vehicle is running.
Select Setting Category Change Setting
Table of contents
Other PAC Automobile Accessories manuals
Popular Automobile Accessories manuals by other brands

Sunsky
Sunsky S-TSA-0104 user manual

Discount Car Stereo
Discount Car Stereo A20-GM3x Quick start installation guide

Metra Electronics
Metra Electronics 99-7328 installation instructions

IBEX
IBEX 10008017 Mounting instruction

Metra Electronics
Metra Electronics 99-8216 installation instructions

Rola
Rola 58966 Fitting instructions

Connects2
Connects2 CAN-Connect CANHBBM1 manual

Bulldog Security
Bulldog Security BX1 instructions

eRapta
eRapta ATYZX7 Installation and operation guide

Over Armour Offroad
Over Armour Offroad TX-STAMP-4-TC01 Instructions for Installation and Care

Prime Design
Prime Design FBM-1061 Assembly instructions

Safe Fleet
Safe Fleet PRIME DESIGN masterack VRR CE manual