PAC RadioPRO4 User manual

RP4-FD11
Radio Replacement & Steering Wheel Control Interface
for Ford/Lincoln/Mercury Vehicles
Pacic Accessory Corporation® | Santa Ana, California 92705 | Ph. 866-931-8021 | [email protected]
©2011 Pacic Accessory Corporation
www.pac-audio.com
Rev. 112811
Pacific Accessory Corporation
Introduction & Features
Important Notes
Wiring Connection Chart
The RP4-FD11 interface allows the replacement of a factory radio in select Ford/Lincoln/Mercury vehicles with MSCAN
databus radios. Using this interface will retain factory features such as steering wheel controls (SWC), rear seat
entertainment (RSE), Rear Seat Controls (RSC) and the THX or Sony amplier when the original radio is removed. The
RP4-FD11 also provides data bus driven outputs such as retained accessory power (RAP), vehicle speed sensor (VSS),
illumination, reverse trigger and parking brake.
1.The radio select rotary switch on the side of the interface must be adjusted to the proper radio setting
before plugging the interface into the vehicle (see below for setting chart).
2. The interface comes pre-programmed for all of the vehicles factory SWC functions and does not require programming unless
you wish to re-assign the SWC functions to different buttons. The SWC can always be restored to default settings by pressing
and releasing the program button on the side of the interface once and waiting 7 seconds for the LED to ash 4 times.
3. RSC & LCD buttons that are identical to the SWC will mimic the SWC one for one. All other buttons cannot be programmed.
4. The LED will ash whenever a SWC button is pressed.
5. The RSC must be in AM mode for Track +/- to function. RSC must be set to AUX mode to pass audio to aftermarket radio.
6. Vehicles equipped with a factory amplied system must disconnect SYNC if they wish to use the voice button. Not disconnecting
SYNC will result in the rear speakers muting every time the voice button is pressed.
7. Feeding too strong of an audio signal into the headrest monitors will cause the audio output to shut down. If this happens you
must turn the tv off and on and lower the audio signal.
Red / White P.B. Output (-)
Purple / White VSS Output
Blue / White Amp Turn On Input
Red Acc. Output (1 amp)
Orange / White Illum. Output (+)
Green Reverse Output (+)
Interface Connector
Yellow Battery +12v
Black Ground
Blue Antenna On Input
White Front L + input
White / Black Front L - input
Grey Front R + input
Grey / Black Front R - input
Green Rear L + input
Green / Black Rear L - input
Purple Rear R + input
Purple / Black Rear R - input
Vehicle Connector SWC Connector
Blu/Yel Kenwwod, Newer
JVC, OEM or
Blaupunkt
3.5mm Jack Alpine, JVC,
Clarion, Pioneer,
Sony, Valor, Boyo,
Dual, Visteon or
Advent
Page 1

RP4-FD11
Radio Replacement & Steering Wheel Control Interface
for Ford/Lincoln/Mercury Vehicles
Pacic Accessory Corporation® | Santa Ana, California 92705 | Ph. 866-931-8021 | [email protected]
©2011 Pacic Accessory Corporation
www.pac-audio.com
Rev. 112811
Pacific Accessory Corporation
Installation Steps
1. The radio select rotary switch on the side of the interface must be adjusted to the proper radio setting before plugging the interface
into the vehicle.
2. Make all connections as described in the connection chart on page 1.
3. If the vehicle is equipped with RSE plug the RCA cables labeled “RSE” into the aftermarket radios AUX input. The RSE RCA cables are
necessary to allow the headunit to play the RSE media audio through the cabin.
4. If the vehicle is equipped with a factory subwoofer plug the RCA cables connected to the 8 pin plug into the Subwoofer or Non-Fading output
of the aftermarket radio.
5. Connect the SWC wire according to the chart on page 1 (aftermarket radio MUST support a wired remote input).
6. If you wish to reassign functions to the SWC follow the programming instructions in the next section.
Illustration / Schematic
SET RADIO SELECT SWITCH
Alpine
Advent,
BOYO, Dual,
Visteon, Sony
Blaupunkt Clarion JVC Kenwood OEM Pioneer Valor
1 7 8423675
1
2
3
4
5
6
7
8
9
0
IMPORTANT! If you wish to use the Voice, OK or Phone button in vehicles equipped with analog SWC you MUST wire them into
the RP4-FD11. The wires you need can be found by removing the steering wheel column and accessing the connector shown in
Fig. 1. Once you have located the plug you must cut the wires located in pins 4 & 6 as shown in Fig. 2 (Wire colors may vary by
vehicle). Finally you must connect the steering wheel side of pins 4 & 6 to the RP4-FD11 interface connector as shown in Fig. 3.
Connector
Pin 4
Pin 6
Cut Wires
Cut Wires
SWC Connection
See above chart for
different radio type
connections
x4
SWC Connection
AUX
AUX
RSE
RSE
SUB
SUB
9
1
Pacific Accessory Corporation
Interface Connector
See above chart for wire color descriptions.
Vehicle Connector
See above chart for wire color description.
Wiring
Fig. 1 Fig. 2
8
16 9
1
Connect steering wheel side of
pin 4 to the grn/wht wire in
pin 4 of the RP Interface plug
Connect steering wheel side of
pin 6 to the black wire in
pin 11 of the RP Interface plug
Fig. 3
Page 2

RP4-FD11
Radio Replacement & Steering Wheel Control Interface
for Ford/Lincoln/Mercury Vehicles
Pacic Accessory Corporation® | Santa Ana, California 92705 | Ph. 866-931-8021 | [email protected]
©2011 Pacic Accessory Corporation
www.pac-audio.com
Rev. 112811
Pacific Accessory Corporation
Optional Steering Wheel Control Programming
IMPORTANT! The interface comes pre-programmed for the functions listed in the chart below and does not require programming
unless you wish to re-assign the SWC functions to different buttons. The SWC can always be restored to default settings by
pressing the program button on the side of the interface once and waiting for the timeout.
11/9/2011 - 11:01 AM swi-rc radio and button chart.xls
Alpine JVC Kenwood Clarion Valor OEM
A
dvent, Boyo, Dual,
Visteon, Sony Pioneer Blaupunkt
1 Volume + Volume + Volume + Volume + Volume + Volume + Volume + Volume + Volume +
2 Volume - Volume - Volume - Volume - Volume - Volume - Volume - Volume - Volume -
3 Mute Mute Mute Mute Mute Mute Mute Mute Mute
4 Preset + Source Source Source Source Source Preset + Preset + Source
5 Preset - Track + Play Search + Track + Next Preset - Preset - Track +
6 Source Track - Track + Search - Track - Previous Source Source Track -
7 Track + Band/Disc + Track - Band Up Cursor Play/Ok Track + Track + Disc +
8 Track - Preset/Disc - Disc/FM + Send/End Down Cursor Band Track - Track - Disc -
9 Power Select Disc/AM - Send Ok Up Cursor Band Band Ok
10 Enter/Play Attenuation Answer End Down Cursor Phone Menu
11 Band/Program Phone Receive BT Answer Answer Call
12 Receive Phone Reject BT Hangup End Call
13 End Voice Dial Voice Activation
14 Powe
r
If you wish to re-assign the SWC functions, the interface must be programmed in the specic order shown in the chart below If you
come across a function in the chart that your steering wheel does not have, or you do not want to program, press and release the
program button on the side of the interface to skip that function. The LED will ash off and on conrming that you have successfully
skipped that function and are ready to proceed to the next one.
Alpine JVC Kenwood Clarion
V
alo
r
OEM Sony/Pionee
r
Blaupunkt
V
olume + Volume + Volume + Volume + Volume + Volume + Volume + Volume + Volume +
V
olume - Volume - Volume - Volume - Volume - Volume - Volume - Volume - Volume -
Media Source Source Source Source Source Source Source Source
Track + Track + Track + Track + Search + Track + Track + Track + Track +
Track - Track - Track - Track - Search - Track - Track - Track - Track -
V
oice Mute Attenuation Mute Mute Mute Mute Mute Mute
Phone Receive Phone Receive Answer Send/End Cursor Up Answer Answer Call Disc Up
OK Ent/Pl
y
Selec
t
Pla
y
Band OK Play/O
K
Phone Menu OK
SET RADIO SELECT SWITCH
Alpine
Advent,
BOYO, Dual,
Visteon, Sony
Blaupunkt Clarion JVC Kenwood OEM Pioneer Valor
1 7 8423675
1
2
3
4
5
6
7
8
9
0
Optional Programming Order
Default SWC Button Assignments
Page 3
Page 2

RP4-FD11
Radio Replacement & Steering Wheel Control Interface
for Ford/Lincoln/Mercury Vehicles
Pacic Accessory Corporation® | Santa Ana, California 92705 | Ph. 866-931-8021 | [email protected]
©2011 Pacic Accessory Corporation
www.pac-audio.com
Rev. 112811
Pacific Accessory Corporation
Step B.
Press and
hold the
programming
button.
Step C.
Release the
programming
button. The
LED will turn
back on.
LED will turn off.
SWC Connection
See above chart for
different radio type
connections
x4
SWC Connection
See above chart for
different radio type
connections
x4
SWC Connection
See above chart for
different radio type
connections
x4
Step A.
Turn the vehicle ignition to
the ON position.
OFF
ACC
IGN
STRT
SWC Connection
See above chart for
different radio type
connections
x4
Step E.
Release the button.
The LED will turn on
back on.
Step D.
Within 7 seconds,
press and release the
button that is to be
learned on the steering
wheel.
The LED will
turn off during
this process.
SWC Connection
See above chart for
different radio type
connections
x4
VOL
VOL
Step F.
If you need to program more buttons,
repeat steps D & E for each additional
audio function on the steering wheel.
Program
remaining buttons
SWC Connection
See above chart for
different radio type
connections
x4
Once programming is
completed, wait 7 seconds.
The LED will ash four
times indicating the end of
programming.
Step G.
After all buttons are
programmed
Optional Steering Wheel Control Programming (cont.)
Testing & Verication
1. Turn the ignition on. The LED on the interface will turn on & the +12v accessory wire will turn on.
2. Turn on the radio & check balance & fade. Note: Factory amplied Systems will not fade as neither the aftermarket radio or
the RP interface have the ability to control the amplier’s fader.
3. Verify that the factory subwoofer (if present) is playing
4. Verify that all SWC are functioning properly.
4. Turn off vehicle & remove key. RAP will be active & keep the radio on for 10 minutes or until the drivers door is opened.
5. The LED & radio will turn off when RAP turns off or the drivers door is opened.
Page 4

RP4-FD11
Radio Replacement & Steering Wheel Control Interface
for Ford/Lincoln/Mercury Vehicles
Pacic Accessory Corporation® | Santa Ana, California 92705 | Ph. 866-931-8021 | [email protected]
©2011 Pacic Accessory Corporation
www.pac-audio.com
Rev. 112811
Pacific Accessory Corporation
Rear Seat Entertainment (RSE); If equipped
If you would like for the RSE system’s audio to
play through the aftermarket radio:
First set the aftermarket radio to Aux input. Press
the Power button on the RSE & insert a DVD. You
should now hear the RSE audio on the aftermarket
radio. If the RSE audio is only playing on the front
speakers the RSE is set to dual zone mode. Press
the Dual Zone button on the RSE controls until
“Single Play” is displayed across the top of the RSE
screen.
RSE Audio Modes - There are 2 different modes for
the RSE audio, they are Single Play & Dual Play.
1. Single Play - Press the Dual Zone button on the
RSE controls until “Single Play” is displayed across the
top of the RSE screen. In this mode the RSE audio is
played throughout all speakers in the cabin.
2. Dual Play - Press the Dual Zone button on the RSE
controls until “Dual Play” is displayed across the top
of the RSE screen. In this mode the rear speakers will
be muted & the RSE audio is transmitted through the
factory IR headphones while the front passengers can
now listen to whatever source they like.
RSE Operation Notes:
1. If the vehicle is equipped with RSE with single play/
dual play button on the monitor in the headrests, the
driver side monitor is the master source unit. The
source on
the passenger headrest cannot be viewed on the
driver side.
2. Both monitors must turn headphones off in order to
hear rse audio through radio.
3. Monitors without single play/dual play button on
monitor operate independantly and audio can never
be passed to the new radio. In these vehiicles rse
audio comes from aux in on back of center console.
4. In 2011+ vehicles the car must be in ignition mode
for the RSE to operate properly. Being in acc mode will
cause erratic behavior.
ENTER MENU RETURN
VOLUME
MEDIA
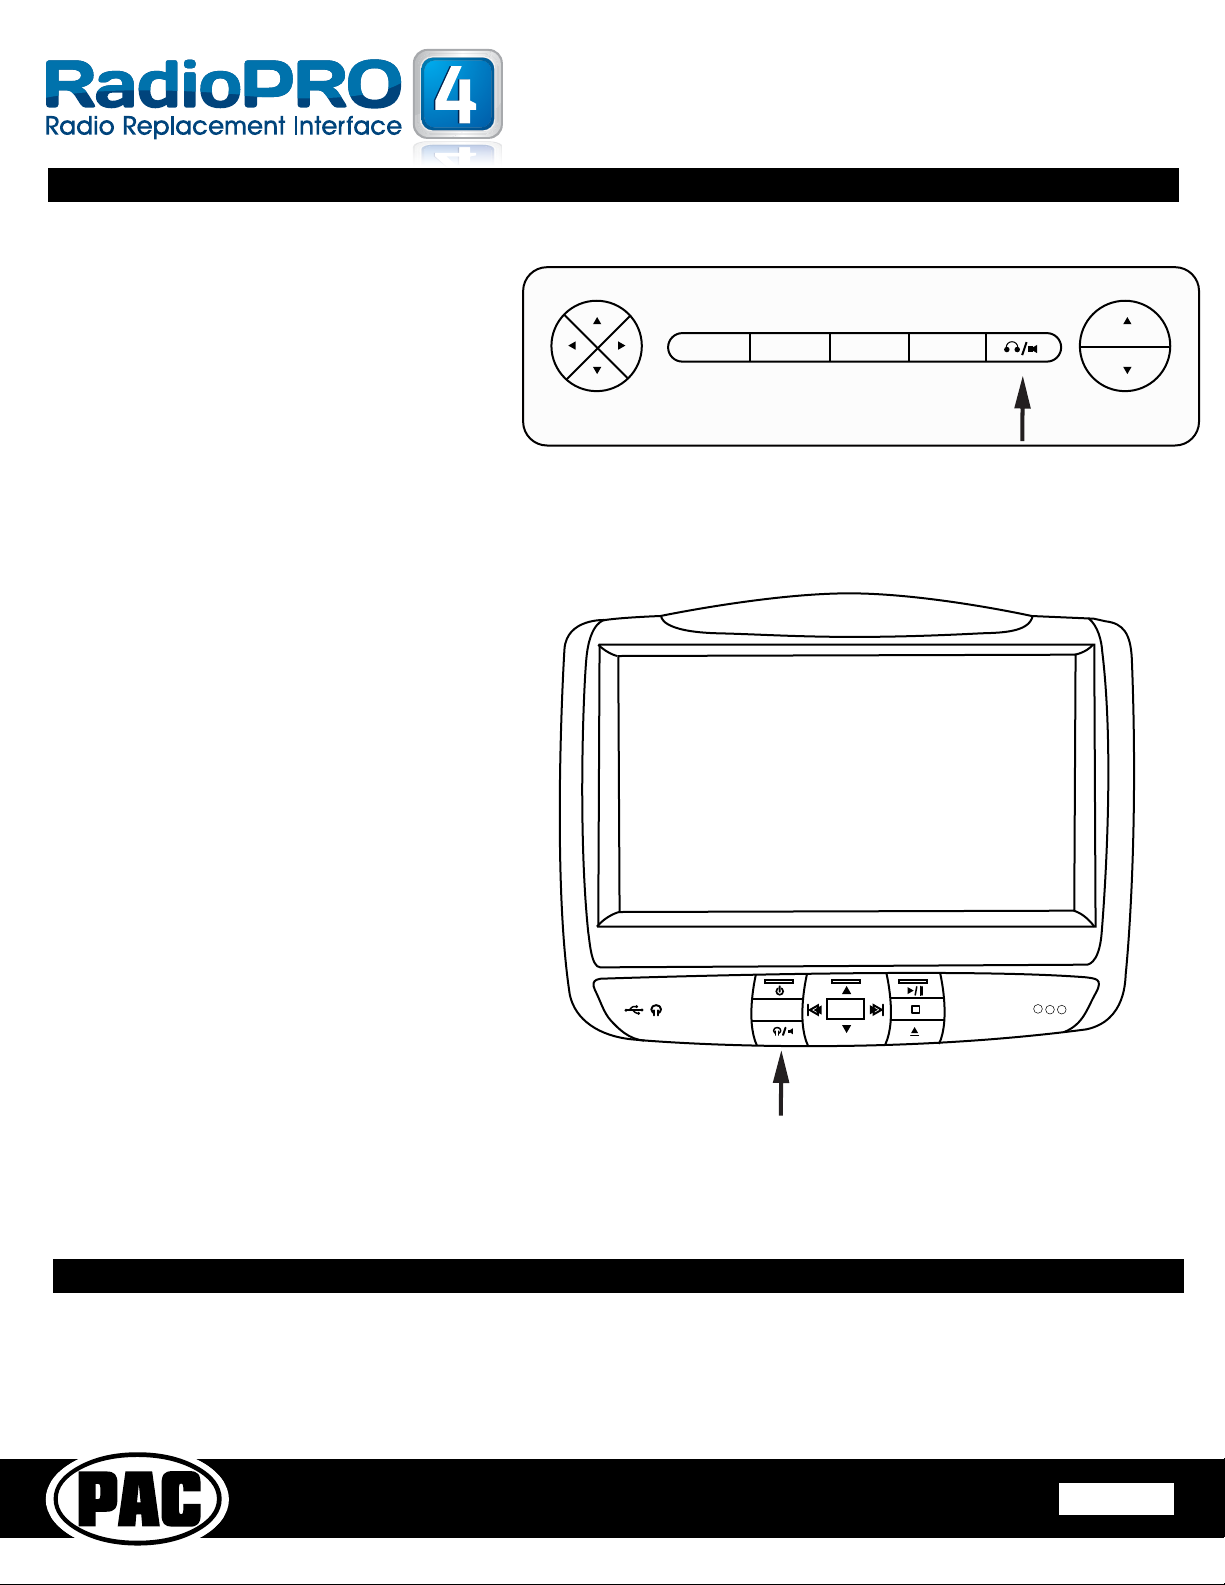
Vehicles With Overhead Monitor
Dual Play
Button
MEDIA MENU
SEL
Vehicles With Headrest Monitor
Dual Play
Button
Product Updates (Firmware)
The RP4-FD11 can be updated with new rmware as it becomes available using the PAC-UP interface updater (sold seperatly).
Please visit www.pac-audio.com/rmware for available updates.
Page 5
Page 4
Other manuals for RadioPRO4
1
This manual suits for next models
1
Table of contents
Other PAC Automobile Electronic manuals