manuals.online logo
Brands
  1. Home
  2. •
  3. Brands
  4. •
  5. Palram
  6. •
  7. Greenhouse Kit
  8. •
  9. Palram Sun Room User manual

Palram Sun Room User manual

83333_19.11_MV-3.1
Sun Room + Sun Lounge Roof Vent
AFTER SALE SERVICE
palramapplications.com/after-sales-service
LOCATIONS
USA
England
France
Germany
International
customer.service@palram.com
customer.serviceUK @palram.com
customer.serviceFR@palram.com
customer.serviceDE @palram.com
customer.service@palram.com
www.palramapplications.com
877-627-8476
01302-380775
0169-791-094
0180-522-8778
+972 4-848-6816
IMPORTANT
Please read these instructions carefully beforeyou start to assemblethis product .
Please carry out the steps in the order set out in these instructions.
Keep these instructions in a safe place for future reference.
Safety Advice
For safety purposes we strongly recommend the product to be assembled by at least two people.
Some parts may have sharp edges. Please be careful when handling components. Always wear
gloves, eye protection, and long sleeves when assembling or performing any maintenance on your
product.
Do not attempt to assemble the product in windy or wet conditions.
Do not attempt to assemble the product if you are tired, have taken drugs,
medications or alcohol, or if you are prone to dizzy spells.
Dispose of all plastic bags safely - keep them away from children's reach.
Keep children away from the assembly area.
When using a stepladder or power tools, make sure that you are following
the manufacturer's safety advice.
Keep roof and gutters clear of snow, dirt & leaves.
Heavy snow load on the roof can make it unsafe to stand below or nearby.
Do not lean against or push the product during construction.
Hot items such as recently used grills, blowtorches etc. must not be stored inside the product.
Heavy or sharp articles should not be leaned against the wall panels.
Make Sure there are no hidden pipes or cables in the ground before inserting the pegs (not supplied)
Do not touch overhead power cables with the aluminum profiles.
If color was scratched during assembly it can be fixed.
Note:This product must be anchored on to a leveled surface and solid foundation to ensure its
stability.
Make sure that screws and anchors are compatible with foundation type. Make sure that there are no
obstructions between the assemblyarea and the final position.
Cleaning Instructions
In order to clean the product, use a mild detergent solution and rinse with cold clean water.
Do not use acetone, abrasive cleaners, or other special detergents to clean the panels.
Clean the product once assembly is complete.
Before Assembly
Choose your site carefully before beginning assembly.
The ground surface must be perfectly flat and leveled and have a solid base such as concrete, asphalt,
deck etc.
Parts should be laid out close at hand. Keep all small parts (screws etc.) in a bowl so they do not get
lost.Please consult your local authorities if any permits are required prior to constructing the product.
Make sure you received all boxes according to the additional page (Extending your SunRoom) on the
instruction manual.
As soon as you are ready to assemble your product (you can start with this
box), sort the parts and check against the content parts list.
Complete site preparation before unpacking parts and beginning assembly.
During Assembly
When encountering the information icon,
please refer to the relevant assembly step
for additional comments and assistance.
This icon indicates
that the installer should
be inside the product.
During assembly use a soft surface below the parts to avoid scratches and
damages.
Steps
Steps 5+6: If you have purchased Sun Room 8', you should use the entire 7802 panel.
If you have purchased Sun Room 6', you should cut panel 7802 to size, in accordance with
illustration 6a.
Step 7: Please decide your preferred window location. Available options are shown in the
illustration.
Step 17: If the window doesn't close properly, please release the screws, adjust the profile
and re-tighten the screws.
* Please tighten all screws when completing assembly.
IMPORTANTE
Le rogamos lea con atencion las siguientes instrucciones antes de empezar a montar este producto.
Siga los distintos pasos en el mismo orden de las instrucciones.
Guardelas instrucciones en un lugar seguro para poder consultarlas en el futuro.
Consejos de cuidado y seguridad
Por motivos de seguridad, recomendamos encarecidamente que el producto sea montado al menos por
dos personas.
Algunas piezas pueden tener bordes afilados. Por favor, tenga cuidado al manipular los componentes.
Lleve siempre guantes, proteccion ocular y mangas largas al montar o realizar cualquier mantenimiento
de su producto.
No intente montar el producto en condiciones de viento o humedad.
Tire todas las bolsas de plastico con seguridad; mantengalas fuera del alcance de los ninos pequenos.
Mantenga a los ninos lejos del area de montaje.
No intente montar el producto si esta cansado, ha tornado drogas, medicamentos o alcohol o si es
propenso a ataques de mareo.
Cuando utilice una escalera de mano o herramientas electricas, asegurese de seguir los consejos de
seguridad
del fabricante.
Mantenga el tejado y el canal& sin nieve, suciedad ni hojas.
No es seguro pararse debajo o cerca cuando hay gran cantidad de nieve sobre el techo.
No se apoye ni empuje el producto durante la construcci6n.
Articulos calientes, como parrillas recientemente usadas, sopletes, etc. no deben ser almacenados
dentro del producto.
Los articulos pesados o afilados no deben apoyarse contra los paneles de la pared.
Asegurese de que no haya tuberfas o cables ocultos en el suelo antes de insertar las estacas (no
suministradas).
No toque cables electricos en altura con los perfiles de aluminio.
Si se ray6 el acabado de colordurante el montaje, el mismo puede ser arreglado.
Nota: Este producto debe estar anclado a una superficie nivelada y a una base solida.
Asegurese de que los tornillos y los anclajes sean compatibles con el tipo de base.
Asegurese de que no haya obstrucciones entre el area de ensamblaje y la posicion final.
Instrucciones de limpieza
Limpie el producto una vez terminado el montaje.
Cuando necesite limpiar su producto, use una solucion de detergente suave y aclarelo con
agua limpia fria.
No utilice acetona, limpiadores abrasivos ni otros detergentes especiales para limpiar los paneles.
Antes de empezar:
Elija su sitio cuidadosamente antes del ensamblaje inicial.
La superficie del terreno debe estar perfectamente plana, nivelada y tener una base solida tal como
concreto, asfalto, cubierta, etc.
Las partes deben disponerse al alcance de la mano.
Mantenga todas las piezas pequenas (tornillos, etc.) en un recipiente para que no se pierdan.
Consulte las limitaciones, requisitos, permisosy a las autoridades locales para la construed& de este
cobertizo de jardin.
Despues de haber comprado una cubierta de patio larga, asegUrese de haber recibido todas las
cajas de acuerdo con la pagina adicional (Extensionde su cubierta de SunRoom), en el manual de
instrucciones.
Tan pronto como este listo para armar su cubierta de producto (puede comenzar con esta caja), ordene
las piezas y verifique su correspondencia con el listado de partes.
Es necesario desmontar varias piezas; se recomienda guardarlas en un lugar seguro para su use futuro.
Complete la preparacion del sitio antes de desempacar las piezas y comenzar el ensamblaje.
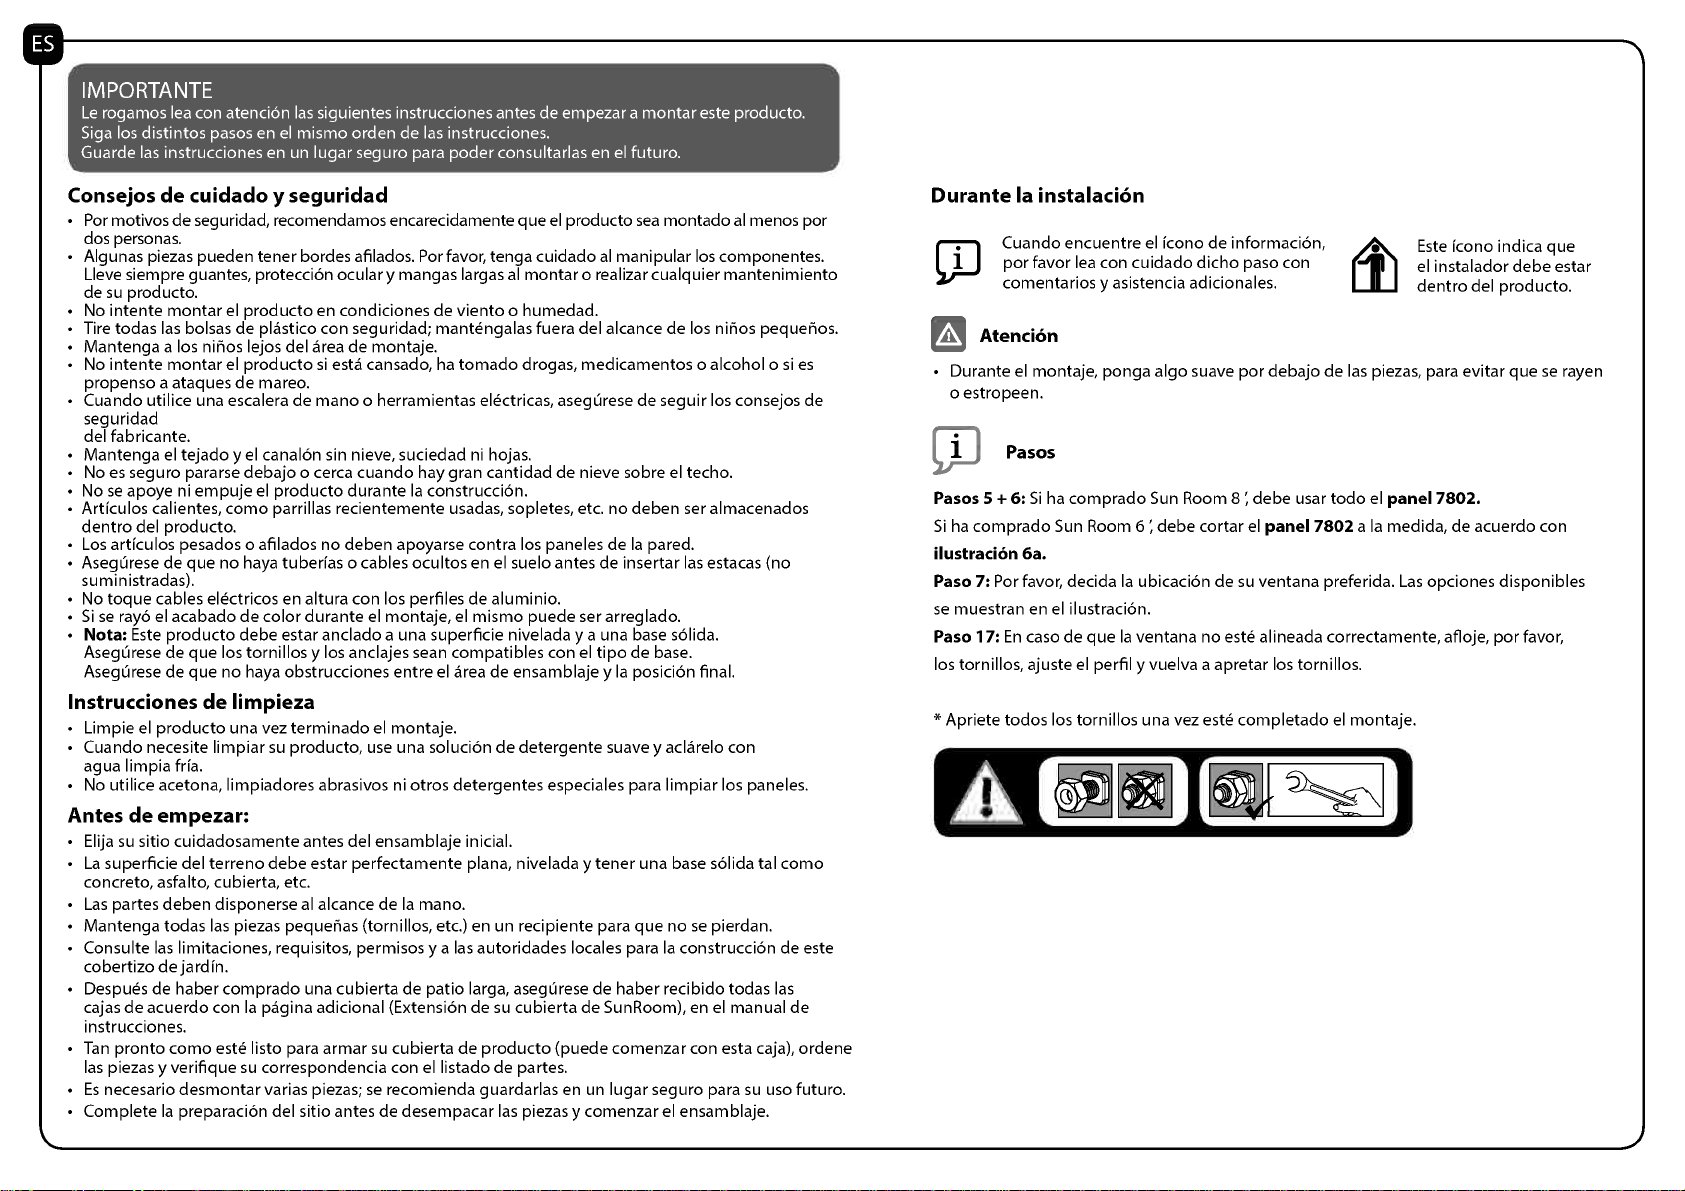
Durante la instalacion
Cuando encuentre el icono de informacion,
porfavor lea con cuidado dicho paso con
comentarios y asistencia adicionales.
Atencion
Este icono indica que
el instalador debe estar
dentro del producto.
Durante el montaje, ponga algo suave por debajo de las piezas, para evitar que se rayen
o estropeen.
Pasos
Pasos 5 + 6: Si ha comprado Sun Room 8 debe usar todo el panel 7802.
Si ha comprado Sun Room 6 debe cortar el panel 7802 a la medida, de acuerdo con
ilustracion 6a.
Paso 7: Por favor, decida la ubicacion de su ventana preferida. Las opciones disponibles
se muestran en el ilustracion.
Paso 17: En caso de que la ventana no este alineada correctamente, afloje, por favor,
los tornillos, ajuste el perfil y vuelva a apretar los tornillos.
* Apriete todos los tornillos una vez este completado el montaje.
989 1
991
992
1
2
7536 1
7534 1
7535
7533
1
1
465
M4x8mm
4
422 (3) M4
4
4008 4
SF 1
586 1
7802 1
8797 c-----
"oj14 1,
1
8798
4111111111-4...... ..
1
8801 111 1
8799 1
8800 ,000 ............. 1
410 %).....v
/ 1
412 JO111II
1
7441 ,
%
1
466 11 1
461 sAI 1
Item Qty.
992 _ 2
586 1
Item Qty.
SF 1
-
Item Qty.
7536 1
7533 1
7534 1
465 111
., M4x8mm
2
422
M4
2
7536
"
7 mm
4
Item Qty.
7535
0
1
465 1111 M4x8mm
2
422 (3) M4
2
a
y"7 mm
P If you have purchased Sun Room 8', you should use the entire 7802 panel.
If you have purchased Sun Room 6', you should cut panel 7802 to size, in accordanc
diagram 6a.
Item Qty.
7802 1
Sun room 8'
aI...,I '
If you have purchased Sun Room 8', you should use the entire 7802 panel.
If you have purchased Sun Room 6', you should cut panel 7802 to size, in accordanc
diagram 6a.
Sun room 6'
pH For Sun room 6' only!
DE
FR
Nur fuer Sun room 6'!
Pour Sun room 6' seulement!
110 Solamente Para Sun room 6'!
P MPlease decide your preferred window location. Available options are shown in the
illustration.
1113 Windows Location
Fenster Standort
Fenetre Emplacement
110 Ventana UbicaciOn
DE
FR
8
_
-
_
_
14

This manual suits for next models

3

Other Palram Greenhouse Kit manuals

Palram Automatic Vent Opener User manual

Palram

Palram Automatic Vent Opener User manual

Palram Plant Inn Compact - Clear Glazing User manual

Palram

Palram Plant Inn Compact - Clear Glazing User manual

Palram CANOPIA OASIS 12 3.2x3.6 Administrator Guide

Palram

Palram CANOPIA OASIS 12 3.2x3.6 Administrator Guide

Palram Canopia SKYLIGHT 6x5 Administrator Guide

Palram

Palram Canopia SKYLIGHT 6x5 Administrator Guide

Palram Glory Standard 8'x 8' User manual

Palram

Palram Glory Standard 8'x 8' User manual

Palram CANOPIA TURINO 3x4,25 Administrator Guide

Palram

Palram CANOPIA TURINO 3x4,25 Administrator Guide

Palram Balance User manual

Palram

Palram Balance User manual

Palram Mythos 6x4 User manual

Palram

Palram Mythos 6x4 User manual

Palram CANOPIA HARMONY 6x6 User manual

Palram

Palram CANOPIA HARMONY 6x6 User manual

Palram Harmony 6'x4' User manual

Palram

Palram Harmony 6'x4' User manual

Palram Lean To User manual

Palram

Palram Lean To User manual

Palram Canopia Sun Room Series Administrator Guide

Palram

Palram Canopia Sun Room Series Administrator Guide

Palram CANOPIA OASIS 12 3.2x3.6 Administrator Guide

Palram

Palram CANOPIA OASIS 12 3.2x3.6 Administrator Guide

Palram Eco Grow User manual

Palram

Palram Eco Grow User manual

Palram HG1005 User manual

Palram

Palram HG1005 User manual

Palram Snap&Grow User manual

Palram

Palram Snap&Grow User manual

Palram Snap & Grow 8' Series User manual

Palram

Palram Snap & Grow 8' Series User manual

Palram SNG 8' Series User manual

Palram

Palram SNG 8' Series User manual

Palram Lean To User manual

Palram

Palram Lean To User manual

Palram CANOPIA MAJORCA Administrator Guide

Palram

Palram CANOPIA MAJORCA Administrator Guide

Palram 121L x 62W x 148H cm User manual

Palram

Palram 121L x 62W x 148H cm User manual

Palram Grand Gardener Prestige 8x8 User manual

Palram

Palram Grand Gardener Prestige 8x8 User manual

Palram CANOPIA HARMONY 701634 Administrator Guide

Palram

Palram CANOPIA HARMONY 701634 Administrator Guide

Palram ORANGERY User manual

Palram

Palram ORANGERY User manual

Popular Greenhouse Kit manuals by other brands

Vitavia Merkur 6700 Assembly instructions

Vitavia

Vitavia Merkur 6700 Assembly instructions

HOKLARTHERM Riga Assembly instruction

HOKLARTHERM

HOKLARTHERM Riga Assembly instruction

Vitavia JUPITER 6700 Assembly instructions

Vitavia

Vitavia JUPITER 6700 Assembly instructions

harvst S24 Setup guide

harvst

harvst S24 Setup guide

Exaco VI23 Assembly instructions

Exaco

Exaco VI23 Assembly instructions

Greenhouse People HE-BLE Assembly instructions

Greenhouse People

Greenhouse People HE-BLE Assembly instructions

Robinsons Victorian RUSHMOOR 8 Dwarf Assembly instructions

Robinsons

Robinsons Victorian RUSHMOOR 8 Dwarf Assembly instructions

Sunnydaze Decor MINI GREENHOUSE HB-535 Assembly instructions

Sunnydaze Decor

Sunnydaze Decor MINI GREENHOUSE HB-535 Assembly instructions

Forest GEORGIAN WALL instructions

Forest

Forest GEORGIAN WALL instructions

FarmTek Sunblocker Shade House 2020SVSPC Assembly instructions

FarmTek

FarmTek Sunblocker Shade House 2020SVSPC Assembly instructions

EzyFast 20JSEF00522 instruction manual

EzyFast

EzyFast 20JSEF00522 instruction manual

Juliana Grand Oase 13,0 Assembly instruction

Juliana

Juliana Grand Oase 13,0 Assembly instruction

Dancover Orangery manual

Dancover

Dancover Orangery manual

Juliana Gartner Assembly instruction

Juliana

Juliana Gartner Assembly instruction

Dancover TITAN Arch+ 320 manual

Dancover

Dancover TITAN Arch+ 320 manual

Juliana Oase 8,8 Assembly instruction

Juliana

Juliana Oase 8,8 Assembly instruction

Vitavia VM0062-GJL Assembly instructions

Vitavia

Vitavia VM0062-GJL Assembly instructions

Sunnydaze Decor GRANDEUR manual

Sunnydaze Decor

Sunnydaze Decor GRANDEUR manual

manuals.online logo
manuals.online logoBrands
  • About & Mission
  • Contact us
  • Privacy Policy
  • Terms and Conditions

Copyright 2025 Manuals.Online. All Rights Reserved.