manuals.online logo
Brands
  1. Home
  2. •
  3. Brands
  4. •
  5. Panasonic
  6. •
  7. DVR
  8. •
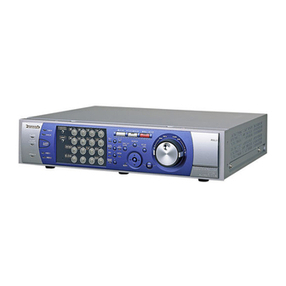
  9. Panasonic WJ-HD300A Reference manual

Panasonic WJ-HD300A Reference manual

WJ-HD300A DVR Series
Introduction to User Interface for Schedule Recording
(Front Panel Advanced Setup)
Steps to create a recording schedule
Step I: Creating a REC Program
…………………………….…………….…………………………………………….
Creating an Event Program
……………………………………………….…………………….……………….
Steps II & III: Creating time table and assigning the programs to time table
……………………….......
Application of [Schedule] settings
Scenario I: Single Input
……………………………………………………………………………………………………..
Scenario II: Multiple Inputs
……………………………………….…………………………………………………………
WJ-HD300A DVR SERIES GUIDE
TableofContents
Copyright © 2005 Panasonic Security Systems
(Note: The WJ-HD300DVR Series is available in either 9 channel (WJ-HD309) or 16 channel (WJ-HD316) configuration.
Images displayed throughout this guide depict the WD-HJ316 DVR.)
WJ-HD300A DVR SERIES GUIDE
1
Key Buttons to Set a Schedule for Recording a Program/Event
1. Jog Dial
2. Set Button
3. Setup/Escape Button
4. Arrow Buttons
5. Camera Channels
[Schedule] Setting for Recording Program/Event Program
WJ-HD300A DVR SERIES GUIDE
Key points to remember:
1. Setup menu can be seen only on monitor two.
2. A day can be divided into six time zones and you can assign programs and event action programs to each time zone to
create a recording schedule.
3. Up to four normal recording programs (REC Program) and up to four event programs (Event Program) can be created.
4. To perform setting for REC Program, you must assign Resolution and Recording Rate. To perform setting for Event
Program, you must assign Action Mode for each event type and auto copy.
5. You can also create special days apart from the normal schedule, and a recording program of another day of the week
can be easily switched to a special day’s program automatically.
6. Always use [SETUP/ESC] button to return to Main Menu.
7. You can save the settings and upload them using WJ-HD300 Administration Console.
2
Three Steps to Create a Recording Schedule
WJ-HD300A DVR SERIES GUIDE
3
Step 3
Step 2
Create a
Timetable
Step 1
Assign REC Program/
Event Program to a
Timetable
Create a REC Program/
Event Program
WJ-HD300A DVR SERIES GUIDE
Step I
A. Creating a recording program
[REC Program]
To create a recording program, go to SETUP MENU and
set up a schedule program.
To set the REC Program, assign resolution (image quality)
and recording rate (image per second or ips).
4
WJ-HD300A DVR SERIES GUIDE
x Resolution
There are four different resolutions available for you to create a REC
program:
x FRAME 3D ON: High resolution (720 x 480) with motion blur
compensation. (Please note that when FRAME 3D ON is selected, it is
possible to record moving object with less blurring. However,
sometimes fuzzy images may be displayed.)
x FRAME 3D OFF: High resolution (720 x 480) without motion blur com-
pensation
x FIELD: Standard resolution (720 x 240)
x SIF: Low resolution (360 x 240)
Remember:
Recording will not occur for four seconds in the
following cases:
x A different resolution is set depending on different
time zones.
x The SETUP MENU is closed after changing the
settings.
5
WJ-HD300A DVR SERIES GUIDE
The total recording rate of the camera channels must be as follows:
x FRAME 3D ON/FRAME 3D OFF: 30 ips or less
x FIELD: 60 ips or less
x SIF: 120 ips or less
Remember:
x When total recording rate is more than the values
on left, sections displaying maximum recording
rates for each camera channel turn red. In such a
case, lower the recording rate of camera channel
that has turned red to a lesser value.
6
x Recording Rate for Camera Channels
WJ-HD300A DVR SERIES GUIDE
x Image Quality for the Camera Channel
The following image qualities are available for setup.
x SFA/SFB: Top Quality (SUPER FINE)
x FQA/FQB: High Quality (FINE)
x NQA/NQB: Standard quality (NORMAL)
x EXA/EXB: Low Quality (EXTENDED)
*A is suitable for images with less motion.
**B is suitable for images with more motion.
7
WJ-HD300A DVR SERIES GUIDE
Step I...continued
B. Creating an event program for an event
occurrence [EVENT Program]
To perform setting for Event Program, assign Action Mode for each
event type.
You can perform settings of event action for each
event type (motion detection/video loss/terminal or
command alarm).
8
WJ-HD300A DVR SERIES GUIDE
x Video Motion Detection
There are three types of VMD settings:
x ACT DET (Activity Detection Mode): Performs only
recording, writing an event log, and camera movement
to a preset position at an event occurrence. It does
not generate alarm and alarm status.
x ALARM (Alarm mode): Performs alarm and alarm
status operation.
x OFF: Performs only recording of event log.
9
WJ-HD300A DVR SERIES GUIDE
x Video Loss/Terminal Command Alarm
You can assign settings to an event function at a video
loss function the same way as mentioned for VMD above.
10
WJ-HD300A DVR SERIES GUIDE
Steps II and III
Creating a timetable [Time Table] and
assigning REC Program/Event Program
to a timetable
You can create timetables for each day of the week,
and assign REC Program and Event Program to each
timetable.
You can create a maximum of six timetables.
11
WJ-HD300A DVR SERIES GUIDE
Creating a [Time Table]
Step 1: Open the Setup menu and go to Timetable
window.
Step 2: Press [SET]. A pop up window will show
setting menu for timetable for every day of the week.
The cursor displayed can be moved to
’MON’ (Monday) by using arrow buttons (ʆʈʉʇ).
Step 3: Select a day of the week using up/down
arrow buttons (Ÿź) and then press [SET]. For
example, you choose ‘TUE’ (Tuesday).
Step 4: A new window will pop up and display
timetable for selected day of the week. Select ‘New
Time Table Setup’ using up/down arrow buttons
(Ÿź) and rotate the Jog Dial to confirm button.
12
WJ-HD300A DVR SERIES GUIDE
Creating a [Time Table]...continued
Remember:
x You can copy a timetable set for a different day of
the week by simply selecting ‘Copy the Other
Timetable’ and select the day of the week by
rotating the Jog Dial as in Step 3.
x If you move the cursor to [CANCEL] and press
[SET] button, it cancels the setting and the popup
window of the timetable for the selected day
closes.
Step 5: Use the arrow buttons (ʆʈʉʇ)to move cursor to the
‘start time’ input box for ‘Period 1’.
Step 6: Rotate Jog Dial to set ‘start time’. Set ‘end time’ the
same way. Set ‘start time’ and ‘end time’ for other periods 2-6,
if needed.
Step 7: Select OK using arrow buttons (ʆʈʉʇ). Press [SET].
13
WJ-HD300A DVR SERIES GUIDE
Creating a [Time Table]...continued
Step 8: Use arrow buttons (ʆʈʉʇ)to assign the REC Program/
Event Program and move cursor to a particular time zone of the
day.
Step 9: Rotate Jog Dial to select desired REC Program/Event
program.
Step 10: Press [SET] button to display the REC Program/Event
Program window. You can repeat steps 8-10 to assign REC
Program/Event program to other timetables.
Step 11: Move cursor to OK using arrow buttons (ʆʈʉʇ)and
press [SET].
Remember:
REC or Pre/ Post Event programs are displayed in
different colors :
x Yellow = REC Program 1/Event Program 1
x Green = REC Program 2/Event Program 2
x Pale Purple = REC Program 3/Event Program 3
x Indigo Blue = REC Program 4/Event Program 4
If you move the cursor to [CANCEL] and press [SET],
the settings cancel and the selected timetable window
closes.
14
WJ-HD300A DVR SERIES GUIDE
Creating a [Time Table]...continued
You can assign timetables for ‘Special Days’ apart from other days of
the week.
Timetable for special days can be set up to 30 days.
You can also assign settings for special days by specifying the
‘dates’ and applying recording schedule to these special days.
15
Scenario 1: Single Input
WJ-HD300A DVR SERIES GUIDE
Now that you have understood the basics of creating the settings of a
schedule, let’s try applying them to two commonly used settings.
Operator A needs specific settings for recording program/events during
different hours in a day with just one camera (see the box on right for
setting parameters).
Setting Parameters
x One Camera
x Scheduled to record from 9 A.M. - 5 P.M. daily
x Field Resolution
x 30 ips, Super Fine “B” mode (SFB)
x VMD from 5 P.M. - 9 A.M.
x VMD for one area (not full screen)
x Pre Event 15 ips, SFB, 3s
x Post Event 60 ips, SFB, 20s
x Alarm and Buzzer Off
16
WJ-HD300A DVR SERIES GUIDE
Creating [REC Program] and [Event Program]
Step 1: Press [SETUP] button for more than 2 seconds to open Setup
Menu.
Step 2: Press [SET] to select SCHEDULE from Main
Menu and use arrow buttons (ʆʈʉʇ)to go to
REC PROGRAM in the submenu. Click [SET] and use
arrow buttons to move cursor to recording program. You
are setting PROGRAM 1. Press [SET]. This displays
the selected recording program.
Step 3: Use the Jog Dial to set the resolution to FIELD.
This provides a standard resolution of 720 x 240.
17
WJ-HD300A DVR SERIES GUIDE
Creating [REC Program] and [Event Program]...continued
Step 4: Use arrow buttons (ʆʈʉʇ)to move cursor to MANUAL and turn it
OFF. Repeat the step for SCHEDULE.
Step 5: Use arrow buttons (ʆźŻŹ) to go to PRE EVENT. Use Jog Dial to
set values:
x RATE = 15 ips
x QUALITY = SFB
x TIME = 3s
Step 6: Use arrow buttons (ʆʈʉʇ)to move cursor to POST EVENT. Use
Jog Dial to set values:
x RATE = 60 ips
x QUALITY = SFB
x TIME = 20s
Step 7: Use arrow buttons (ʆʈʉʇ)to move cursor to OK and press
[SET].
Step 8: Press SETUP/ESC to go to Main Menu.
Remember:
x The maximum rate for each camera channel can
be set up to 30 ips for field resolution and the total
recording rate of the camera channels can be set
up to 60 ips for field resolution.
x Be sure to disable (turn off) camera inputs that are
not required to be recorded. Default is AUTO and
no input would be recorded. Same holds true for
pre/post event and schedule program setup.
Select “OFF” for no camera input.
18
WJ-HD300A DVR SERIES GUIDE
Creating [REC Program] and [Event Program]...continued
Step 9: Click and move cursor to recording program. You are setting
PROGRAM 2. Press [SET]. This displays selected recording program.
Step 10: Use arrow buttons (ʆʈʉʇ)to move cursor to MANUAL
recording. Turn it OFF.
Step 11: Use arrow buttons (ʆʈʉʇ)to go to SCHEDULE REC. Since
you are using only one camera input, use Jog Dial to set recording rate
to 30 ips for the camera channel, for instance in this case,
CAM1.
Step 12: Use arrow buttons (ʆʈʉʇ)to move to
image quality. Use Jog Dial to set image quality to SFB
(Super Fine More Motion). Use [SETUP/ESC] to return to
the Main Menu.
Step 13: Use arrow buttons (ʆʈʉʇ)to take the cursor
to submenu EVENT PROGRAM from Schedule Main
Menu. You are at Event Program 1 – SETUP. Press
[SET].
19
ʆ
Recording
Program 1
ʉ
Recording
Program 2
WJ-HD300A DVR SERIES GUIDE
Creating [REC Program] and [Event Program]...continued
Step 14: Select VMD under Event Program 1 and Press [SET] to enter
SETUP. Press [SET] again.
Step 15: Click on OPERATION MODE to set action. Use
Jog Dial and select ACT DET. Use arrow buttons to
move cursor to OK and press [SET]. Press [SETUP/
ESC] to go to Main Menu.
(In ACT DET, the system does not generate any “alarm”
or “buzzer” function.)
20
WJ-HD300A DVR SERIES GUIDE
Creating [REC Program] and [Event Program]...continued
Step 16: Use arrow buttons (ʆʈʉʇ)to go to EVENT on Main
Menu. Select VMD Setup submenu. Press [SET]. Use Jog Dial to
select ON for camera channel being used. (Use Jog Dial to select
OFF for remaining camera channels.) Press [SET].
Step 17: Click on selected camera channel and rotate Jog Dial until
SETUP AREA is displayed in status area.
Step 18: Use arrow buttons (ʆʈʉʇ)to move cross cursor
(+) to desired ‘starting point’. Press [SET]. Use arrow buttons
to select desired ‘ending point’. Press [SET]. (You can select
up to 4 areas this way.)
21
WJ-HD300A DVR SERIES GUIDE
Creating [REC Program] and [Event Program]...continued
Step 19: Use Jog Dial to select SENSITIVITY on status bar.
Use arrow buttons (ŸźŻŹ) to move cursor to selected
SETUP AREA to set sensitivity for that area. Press
[SET]. Use Jog Dial to EXIT.
Sensitivity for the selected area can be set to LOW, MD,
HIGH or OFF. Use left/right arrow buttons (ŻŹ)to move
cursor to the area and Jog Dial to select sensitivity of that
area.
22
WJ-HD300A DVR SERIES GUIDE
Creating a [Time Table] to Assign to REC Program/ Event Program
Step 20: Select TIMETABLE submenu from Schedule Main Menu. Press
[SET]. A new window of weekly timetable appears. Use
arrow buttons (ʆʈʉʇ)to move cursor to the day.
Select DAILY. Press [SET].
Step 21: A pop up screen displays DAILY timetable.
Select NEW TIME TABLE SETUP. Use arrow buttons
(ʆʈʉʇ)to move cursor to ‘start time’ input box for
PERIOD 1. Rotate Jog Dial to set ‘start time’ as 12:00
A.M. and ‘end time’ as 9:00 A.M.
Step 22: Use arrow buttons (ʆʈʉʇ)to move cursor to
‘start time’ input box for PERIOD 2. Rotate Jog Dial to
set ‘start time’ as 9:00 A.M. and ‘end time’ as 5:00 P.M.
Select OK using arrow buttons. Press [SET].
23
WJ-HD300A DVR SERIES GUIDE
Create a [Time Table] to Assign to REC Program/ Event Program
Step 23:Use arrow buttons (ʆʈʉʇ)to move cursor to ‘start time’ input
box for PERIOD 3. Rotate Jog Dial to set ‘start time’ as
5:00 P.M. and ‘end time’ as 12:00 A.M. Select OK using
arrow buttons and press SET. Press [SETUP/ESC] to go
back to Main Menu.
(For setting a schedule that encompasses 24 hours
recording program/event program, a minimum of three
time periods is required. )
Step 24: Use right arrow to go to Period 2 on the
timetable panel which has recorded REC Program.
Move Jog Dial to select color for program 2 as Green.
(REC or Event Program 2 are always Green in color.)
Use arrow buttons to go to OK at the bottom of the
screen [SET]. Press [SETUP/ESC] to go back to Main
Menu.
You have just completed applying a daily timetable for
REC and Event program recording.
24
WJ-HD300A DVR SERIES GUIDE
Scenario II: Multiple Inputs
Let’s try doing this with multiple camera channels.
Operator B needs to set up a specific schedule for
recording a program and events with five cameras (see the
box on right for setting parameters).
Setting Parameters
x Scheduled to Record Tuesday, Thursday,
Saturday, Sunday 6 A.M.- 8 P.M.
x Five cameras
x Field Resolution
x Cameras One and Two:
- Stationary cameras
- VMD for 2 areas on opposite sides of
images
- Pre-Event 15 ips, SFB, 4s
- Post-Event 15 ips, SFB, 4s
- VMD operation mode ACT DET
x Cameras Three, Four, Five
- PTZ cameras
- 10 ips, SFB
25
WJ-HD300A DVR SERIES GUIDE
Creating [REC Program] and [Event Program]
Step 1: Click [SETUP/ESC] button to open the Setup Menu
Advanced.
Step 2: Select SCHEDULE from Main Menu and REC
PROGRAM from submenu. Use arrow buttons (ʆʈʉʇ)
to move cursor to desired recording program. You are
setting PROGRAM 1. Press [SET]. This displays the
selected recording program.
Step 3: Use Jog Dial to set resolution to FIELD.
This provides a standard resolution of 720 x 240.
26
WJ-HD300A DVR SERIES GUIDE
Creating [REC Program] and [Event Program]...continued
Step 4: Use arrow buttons (ʆʈʉʇ)to navigate to CAM1. Press [SET].
Use arrow buttons to move cursor to PRE EVENT. Use Jog Dial to set the
values:
x RATE = 15 ips
x QUALITY = SFB
x TIME = 4s
Step 5: Use arrow buttons (ʆʈʉʇ)to move cursor to
POST EVENT. Use Jog Dial to set values:
x RATE = 15 ips
x QUALITY = SFB
x TIME = 4s
Step 6: Set the same values for CAM2.
27
WJ-HD300A DVR SERIES GUIDE
Creating [REC Program] and [Event Program]...continued
Step 7: For CAM3, CAM4 and CAM5, use arrow buttons (ʆʈʉʇ)to go
to SCHEDULE and set the values:
x RATE = 10 ips
x QUALITY = SFB
(Be sure to disable/turn off camera inputs that are not
required to be recorded. )
Step 8: Select submenu EVENT PROGRAM from
Schedule Main Menu. Go to EVENT PROGRAM 1.
Press [SET].
28
WJ-HD300A DVR SERIES GUIDE
Creating [REC Program] and [Event Program]...continued
Step 9: Select VMD Setup submenu. Use Jog Dial to set Operation
mode to ACT DET (Activity Detection Mode). Use arrow
buttons (ŸźŻŹ) to move the cursor to OK and press
[SET].
Step 10: Use [SETUP/ESC] to go to EVENT on Main Menu.
Select VMD Setup Sub Menu. Press [SET]. Select ON for
CAM 1. Press [SET].
Step 11: Rotate Jog Dial until SETUP AREA is displayed in
the status area. Use arrow buttons (ŸźŻŹ) to move
cross (+) cursor to desired ‘starting point’. Press [SET]. Use
arrow buttons to select area ‘ending point’.
Step 12: Choose two opposite areas on the screen to
capture the image from the opposite sides of the point of
interest. Press [SET].
29
WJ-HD300A DVR SERIES GUIDE
Creating [REC Program] and [Event Program]...continued
Step 13: Use Jog Dial to select SENSITIVITY on status bar.
Use arrow buttons (ʆʈʉʇ)to move cursor to selected
SETUP AREA to set sensitivity for that area. Press
[SET].
Step 14: Press [SETUP/ESC] button to return to
submenu page. Use Jog Dial to EXIT from the submenu.
Step 15: Repeat Steps 12 to 14 for CAM 2. Press
[SETUP/ESC] button to return to Main Menu.
30
WJ-HD300A DVR SERIES GUIDE
Creating a [Time Table] to Assign to REC Program/Event Program
Step 16: Select [TIME TABLE] submenu from
SCHEDULE Main Menu. Press [SET]. A new window of
weekly timetable appears. Use arrow buttons (ŸźŻŹ)
to move cursor to ‘day’. Start with TUES. Press [SET].
Step 17: A pop up screen displays timetable for TUES
(Tuesday). Click on ‘NEW TIME TABLE SETUP’. Use
arrow buttons (ʆʈʉʇ)to move cursor to ‘start time’
input box Period 1. Rotate Jog Dial to set ‘start time’ as
6 A.M. and ‘end time’ as 8 P.M. Use arrow buttons to go
to OK . Press [SET].
31
Creating a [Time Table] to Assign to REC Program/Event Program
Step 18: You can copy schedule to other days of week.
Go to THURS (Thursday). Press [SET[. Highlight ‘COPY
THE OTHER TIME TABLE’.
Step 19: Press [SET]. Use Jog Dial to select day, TUES
in this case. Use arrows (ʆʈʉʇ)to go to OK and
press [SET].
WJ-HD300A DVR SERIES GUIDE
32
Step 20: Repeat steps 18 and 19 to copy timetable
schedule to SAT (Saturday) and SUN (Sunday). Upon
completion, move cursor to OK and press [SET].
You have successfully set up a recording schedule for
different days of the week using multiple cameras.
WJ-HD300A DVR SERIES GUIDE
33
Creating a [Time Table] to assign to REC Program/Event Program...cont.
Notes
WJ-HD300A DVR SERIES GUIDE
_______________________________________________________________________
_______________________________________________________________________
_______________________________________________________________________
_______________________________________________________________________
_______________________________________________________________________
_______________________________________________________________________
_______________________________________________________________________
_______________________________________________________________________
_______________________________________________________________________
_______________________________________________________________________
_______________________________________________________________________
_______________________________________________________________________
NATIONAL TECHNICAL SUPPORT CENTER
Phone: 1-800-528-6747
www.panasonic.com/security
Panasonic ideas for life

Other Panasonic DVR manuals

Panasonic DMRE75VP User manual

Panasonic

Panasonic DMRE75VP User manual

Panasonic BB-HNP17A Assembly Instructions

Panasonic

Panasonic BB-HNP17A Assembly Instructions

Panasonic WJ-NT104 User manual

Panasonic

Panasonic WJ-NT104 User manual

Panasonic WJRT416 - 16CH DIGITAL RECORDER Installation and operating instructions

Panasonic

Panasonic WJRT416 - 16CH DIGITAL RECORDER Installation and operating instructions

Panasonic k-nl308k Manual instruction

Panasonic

Panasonic k-nl308k Manual instruction

Panasonic WJ-NV200 User manual

Panasonic

Panasonic WJ-NV200 User manual

Panasonic WJHD309 - DIGITAL DISK RECORDER User manual

Panasonic

Panasonic WJHD309 - DIGITAL DISK RECORDER User manual

Panasonic DMR-E500HS User manual

Panasonic

Panasonic DMR-E500HS User manual

Panasonic WJ-HD616/1000 User manual

Panasonic

Panasonic WJ-HD616/1000 User manual

Panasonic DMR-E53EG, DMR-E55EB, DMR-E55E User manual

Panasonic

Panasonic DMR-E53EG, DMR-E55EB, DMR-E55E User manual

Panasonic DMR-E85HEE User manual

Panasonic

Panasonic DMR-E85HEE User manual

Panasonic ShowStopper PV-HS3000 User manual

Panasonic

Panasonic ShowStopper PV-HS3000 User manual

Panasonic DMR-E500HS User manual

Panasonic

Panasonic DMR-E500HS User manual

Panasonic DIGA DMR-E85H User manual

Panasonic

Panasonic DIGA DMR-E85H User manual

Panasonic Diga DMR-E60 User manual

Panasonic

Panasonic Diga DMR-E60 User manual

Panasonic WJHD500A - Digital Disk Recorder User manual

Panasonic

Panasonic WJHD500A - Digital Disk Recorder User manual

Panasonic WJHD500 - DIGITAL DISC RECORDE User manual

Panasonic

Panasonic WJHD500 - DIGITAL DISC RECORDE User manual

Panasonic LQ-MD800 User manual

Panasonic

Panasonic LQ-MD800 User manual
Panasonic DMR-E85HP User manual

Panasonic

Panasonic DMR-E85HP User manual

Panasonic DMRE75VP User manual

Panasonic

Panasonic DMRE75VP User manual
Panasonic CJ-HDR216A User manual

Panasonic

Panasonic CJ-HDR216A User manual

Panasonic Diga DMR-E95H User manual

Panasonic

Panasonic Diga DMR-E95H User manual

Panasonic DMR-E53 Diga Quick start guide

Panasonic

Panasonic DMR-E53 Diga Quick start guide

Panasonic WJ-HD616/1000 User manual

Panasonic

Panasonic WJ-HD616/1000 User manual

Popular DVR manuals by other brands

AL Tech PVR9600T User manual addendum

AL Tech

AL Tech PVR9600T User manual addendum

HIK VISION DS-MP3516-RH installation guide

HIK VISION

HIK VISION DS-MP3516-RH installation guide

HIK VISION DS-8000HSI-S Series Technical manual

HIK VISION

HIK VISION DS-8000HSI-S Series Technical manual

Q-See QSD2308L user manual

Q-See

Q-See QSD2308L user manual

Q-See QSDF8204C4 quick start guide

Q-See

Q-See QSDF8204C4 quick start guide

HIK VISION DS-72 Series Installation guide and quick start guide

HIK VISION

HIK VISION DS-72 Series Installation guide and quick start guide

Ameba DVR-M04 user manual

Ameba

Ameba DVR-M04 user manual

HIK VISION DS-7608NI-E2/8P quick start guide

HIK VISION

HIK VISION DS-7608NI-E2/8P quick start guide

Techpro Tribrid Series TRIDVR-ELE16M user manual

Techpro

Techpro Tribrid Series TRIDVR-ELE16M user manual

Technologies MemoCam Installation and operation manual

Technologies

Technologies MemoCam Installation and operation manual

HIK VISION DS-9008HUHI-F8/N quick start guide

HIK VISION

HIK VISION DS-9008HUHI-F8/N quick start guide

Q-See QT426 Manual do usuário

Q-See

Q-See QT426 Manual do usuário

HIK VISION DS-7608NI-ST Series Quick operation guide

HIK VISION

HIK VISION DS-7608NI-ST Series Quick operation guide

Clover CDR-0850 instruction manual

Clover

Clover CDR-0850 instruction manual

Loewe OC 3820H operating instructions

Loewe

Loewe OC 3820H operating instructions

urmet domus 1093 Series instructions

urmet domus

urmet domus 1093 Series instructions

Clare Controls ClareVision CV-B8810-02 installation guide

Clare Controls

Clare Controls ClareVision CV-B8810-02 installation guide

Zetronix Orca 4K zShades-HD5 user manual

Zetronix

Zetronix Orca 4K zShades-HD5 user manual

manuals.online logo
manuals.online logoBrands
  • About & Mission
  • Contact us
  • Privacy Policy
  • Terms and Conditions

Copyright 2025 Manuals.Online. All Rights Reserved.