manuals.online logo
Brands
  1. Home
  2. •
  3. Brands
  4. •
  5. Panduit
  6. •
  7. Network Hardware
  8. •
  9. Panduit PANVIEW iQ PVQ-MIQPS96F User manual

Panduit PANVIEW iQ PVQ-MIQPS96F User manual

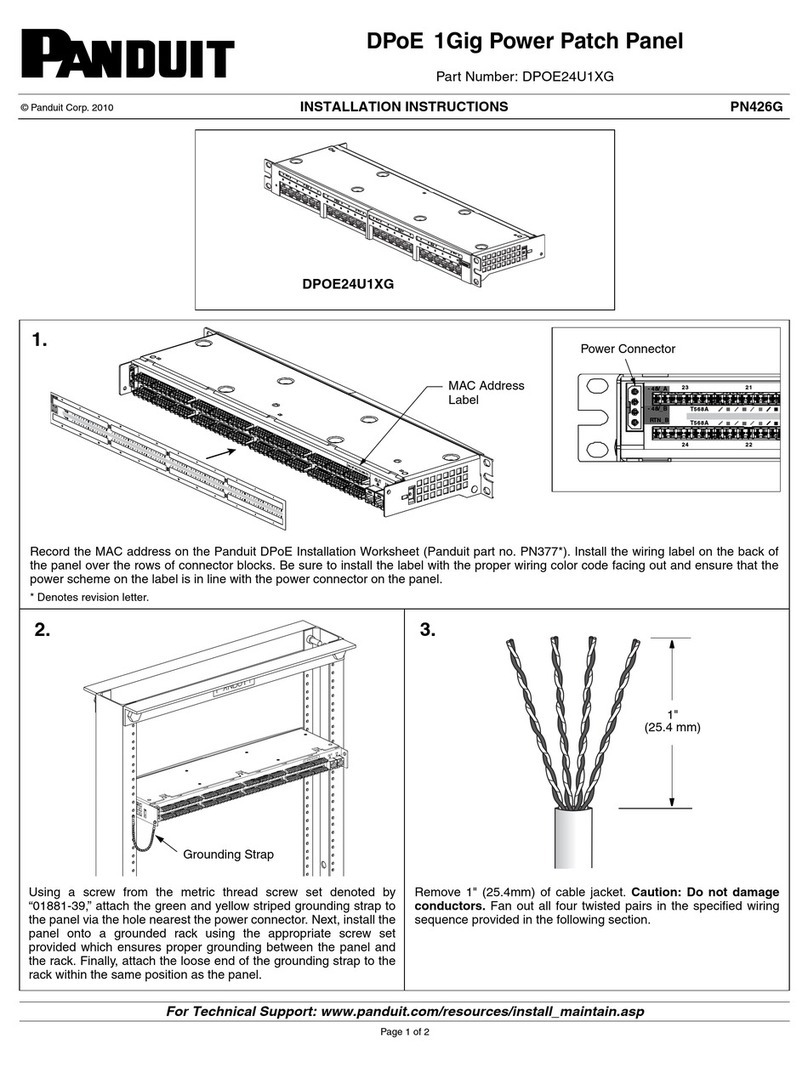
INSTALLATION INSTRUCTIONS PN467
© Panduit Corp. 2008
For Technical Support: www.panduit.com/resources/install_maintain.asp
Page 1 of 3
PANVIEW iQ (PViQ) Modular
Intelligent Panel System
Part Number: PVQ-MIQPS96F
Hardware Components
Rack Mounting and Grounding
Module Installation (Recommended) Cable Routing
3. Leave room for
Mounting Bracket
(4) PANVIEW iQ Patch Panels
(16) Grounded Bonding
Screws
(16) ULTIMATE ID
Label Covers
(4) Mounting Brackets for
PANVIEW iQ Modules
(1) Panel
Manager (PM)
(1) PM Interface
Unit
(3) Expansion
Modules (EM)
(3) EM Interface
Units
(1) Patch Cord (3) Expansion Port Cables
While PViQ Patch Panels work interchangeably with either
the Panel Manager (PM) or the Expansion Module (EM), it is
recommended that PViQ Patch Panels be placed in a manner
that will efficiently accommodate one (1) PM for every three
(3) EMs, with appropriate cable management installed for
proper cable routing. NOTE: PM can be arranged at either
the top or bottom of order depending on need or preference.
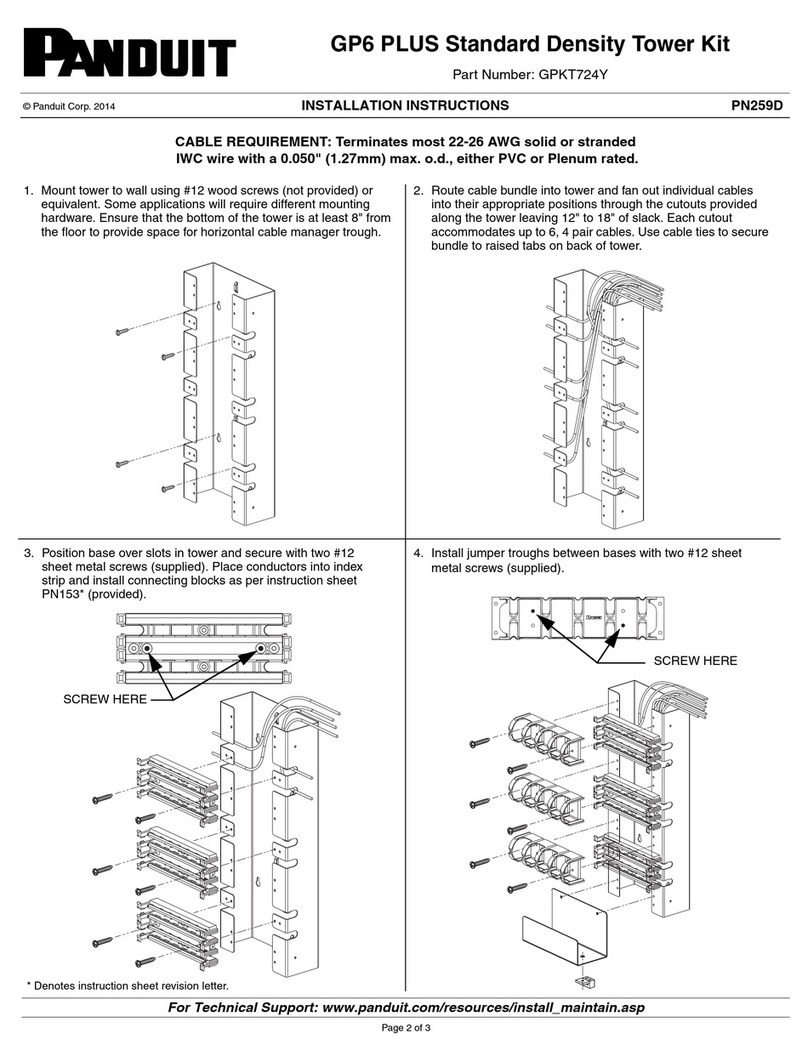
Mount the PViQ Patch Panel onto the face of
the rack or rack cabinet using supplied
grounding screws (as shown).
PViQ Patch Panels MUST be properly
grounded to ensure accurate system
operation.
1.
PM Installation
EM Installation
EM Installation
EM Installation
Cable
Management
2.
Install screws
in 4 places
Use ONLY supplied grounding screws
If supplied screws
do not fit or work
with your rack or
rack cabinet to
provide appropriate
grounding, the following
STRUCTUREDGROUND Rack
Kits from PANDUIT are
recommended:
• Grounding Strip Kit
(Part # RGS134-1Y)
• ESD Port Kit
(Part # RGESD2-1)
• CBN Network Jumper Kit
(Part # RGCBNJ660P22)
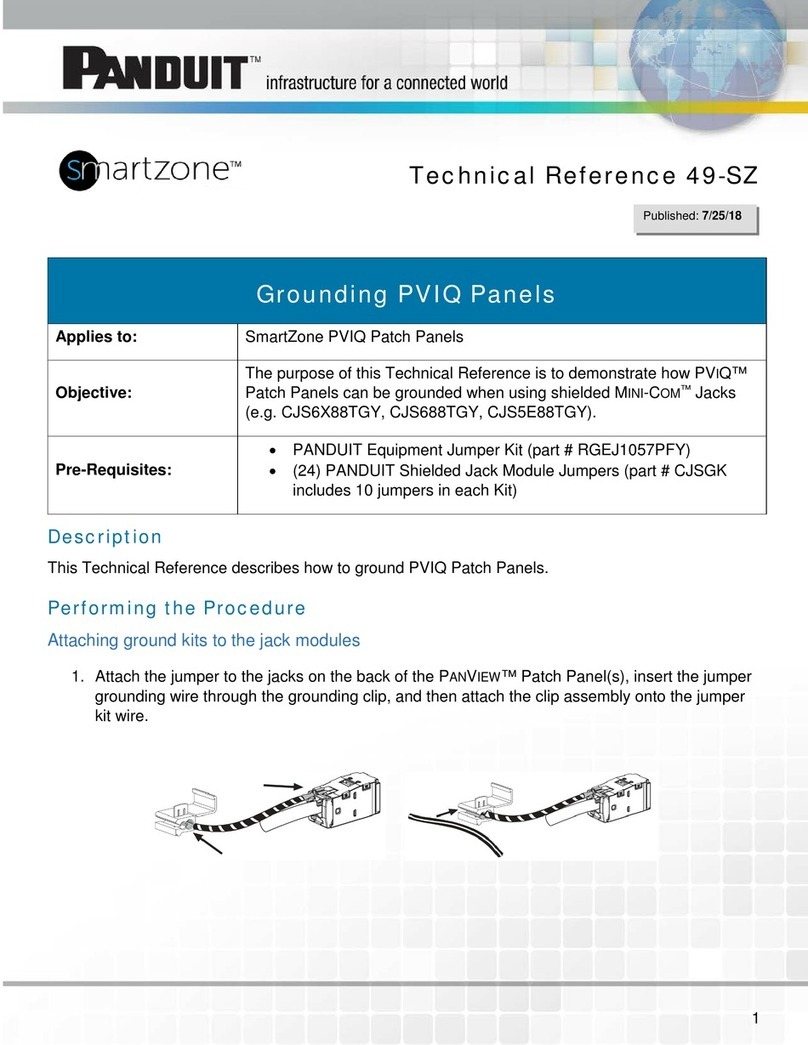
With the PViQ Patch Panel secured to the rack or cabinet, proceed to
install terminated jack modules into the patch panel (as shown above).
NOTE: The PViQ Patch Panel accepts all MINI-COM Copper Jack
Modules and LC Fiber Adapters.
It is advisable to prepare cable management by routing cables into a
left/right and upper/lower separation as you install the terminated jack
modules (as shown above) to reserve appropriate space for the
addition of mounting bracket later.
INSTALLATION INSTRUCTIONS PN467
Page 2 of 3
For Technical Support: www.panduit.com/resources/install_maintain.asp
Mounting Bracket Installation
Installing the Panel Manager (PM) or Expansion Module (EM)
5. 5a. 5b. 5c.
6. 6a.
Bottom Latch
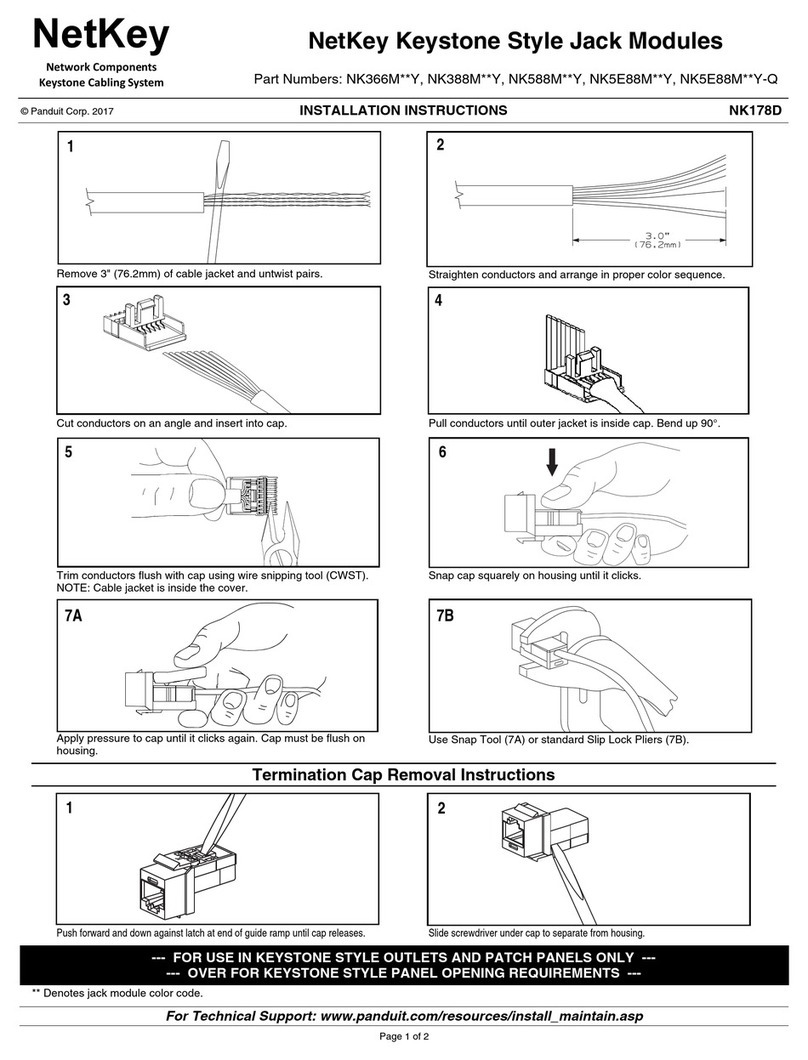
Locate and tilt the mounting bracket
downward into the center of the
PViQ Patch Panel.
Pivot bracket until the tabs on the
patch panel rest inside the slots of
the mounting bracket.
Next apply forward and upward
pressure until bracket slides into
the catch on the patch panel.
Secure the bracket to the patch panel
using a phillips-head screwdriver to
push in and turn the securing screw.
Slide the PM or EM into the mounting bracket until the latch on the bottom of the PM or EM snaps into the slot on the mounting bracket.
Installing the Interface Unit
To remove the blank plastic interface unit, grip the top and
bottom of the unit and then pull it directly outward from the
PViQ Patch Panel. If it cannot be removed easily in this
manner, a screwdriver can be inserted from behind the
panel to push the unit out.
Insert the new PM or EM Interface Unit into the front center
of the patch panel, gently pushing it into the open slot until
it snaps into place.
4. 4a. NOTE:
Be sure to match
the proper
Interface Unit
included with each
module (i.e. PM
Interface Unit with
PM module)
Understanding PM and EM Connections
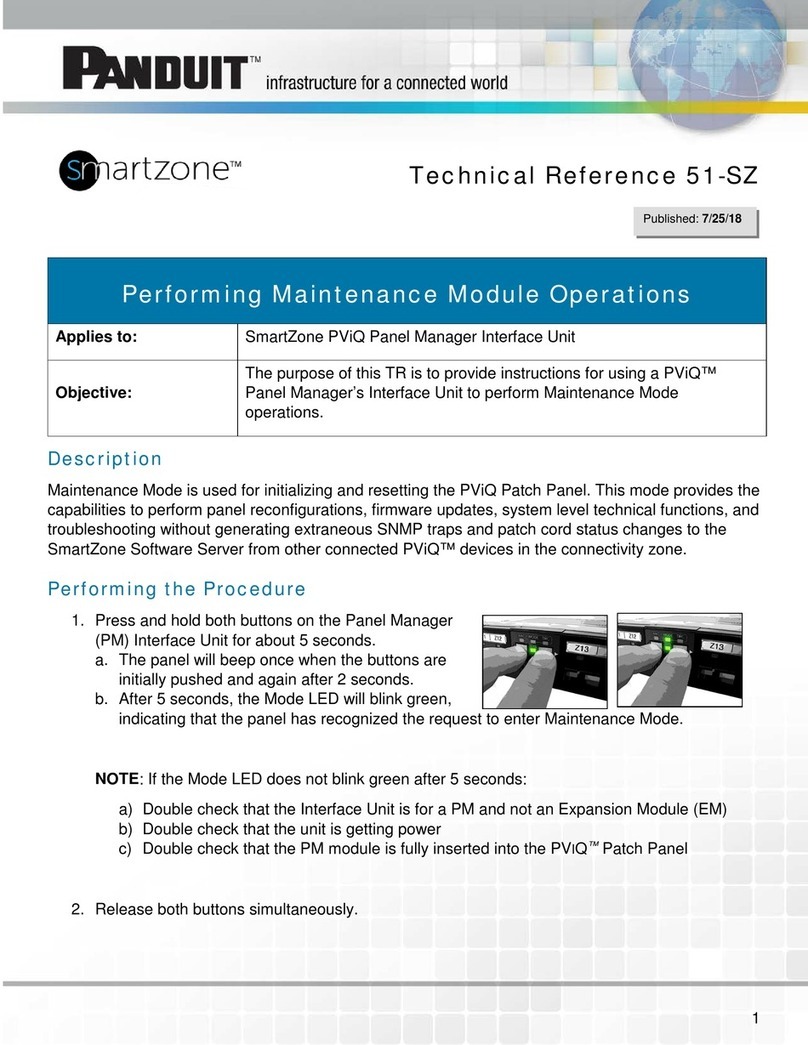
PM Connections - The PM module includes: a.) Expansion Port which is used to connect the PM to the first EM in a chain; b.) LAN Connectors that
connect the PMs to the LAN (either port may be used for connecting to LAN or subsequent PMs); c.) 12VDC power input supplied by power supply
(PANDUIT Part# PVQ-PS12VDC-*, sold separately).
EM Connections - The EM module includes expansion ports which are used to connect the EMs to the PM or subsequent EMs. d.) The "Out" port
connects to downstream EMs. e.) The "In" port connects to either the PM or upstream EMs.
* Denotes regional power supply.
7. PM Connections EM Connections
a.) Expansion Port b.) LAN Connectors for
daisy chaining PMs
c.) 12VDC power
input
d.) "Out" Expansion
MAC Address Label
Port
e.) "In" Expansion Port
E-mail:
[email protected]
Fax:
(708) 444-6993
For Instructions in Local Languages
and Technical Support:
www.panduit.com/resources/install_maintain.asp www.panduit.com
INSTALLATION INSTRUCTIONS PN467
Page 3 of 3
9.
Label Cover
Label*
PM and EM Connection Configuration - (Back View of Installation)
Attach an Expansion Port cable
from the Expansion Port on the PM
to the "In" port on the first EM in
the chain.
Use an Expansion Port cable to
connect the "Out" port of first EM
to the "In" port of the next EM in
the chain.
Repeat step B for subsequent
panels with EMs.
NOTE: A single PM can support
a maximum of three EMs.
Multiple PM/EM chains can be
connected together via the PM
LAN connectors, using standard
RJ45 patch cords (included).
NOTE: A maximum of 30 PMs
can be cascaded together.
Repeat steps A to D as required.
A
B
C
D
E
8.
RJ45
Patch
Cords
(PM to
PM)
(Recommended)
2 RU Space for
Cable Management
PViQ Expansion Port Cables
(PM to EM or EM to EM)
PM
EM
EM
EM
Label / Label Cover Installation
To label PViQ Panel according to TIA/EIA-606-A standard, ULTIMATE ID
labels (not included) should be created and installed (as shown). Label
covers (included) should be installed to protect the label.
* Write on labels are not included with this patch panel per TIA-EIA-606-A
standard which states: “To maximize legibility, all labels shall be printed or
generated by a mechanical device, and shall not be written by hand.”
(Refer to table above for label products)
Suggested Label Solutions for TIA/EIA-606-A Compliance
Patch Panel
Part Number
All
PViQ
Patch Panels
Laser/Ink Jet Desktop
Printer Label
UILJ6
P
AN
T
HER
LS8E Hand-
Held Printer Label
UILS8BW
C
OUGAR
LS9 Hand-
Held Printer Label
UILS8BW
In from Network
WARNINGS:
If a non-PANDUIT power source is used, it must:
• Provide over current protection appropriate to the size of the power wiring connected to the PViQ System.
• Provide an isolated (SELV) source per National requirements.
• Be certified for use with ITE equipment per National requirements.
• Provide a nominal 12VDC source to the PM (min. 11.4VDC and max 12.6VDC).
• Provide a 12VDC output which is electrically isolated from earth ground (minimum 1500 V isolation).
• Have an output power rating of minimum 30W, which is sufficient for powering PViQ System and associated loads.
PViQ European Emissions Warning:
Product is not intended for use in a residential environment. Use of this product in residential areas may cause electromagnetic interference.
Notes:
1. Never touch un-insulated communications wiring or terminals unless the communication line has been disconnected at the network interface.
2. Only trained and qualified service personnel should install or service PViQ Systems.
3. Before installing or servicing PViQ or communication wiring, be aware of the potential for electrostatic discharge (ESD).
ATTENTION:
Observe precautions for handling electrostatic sensitive electronic devices when installing this product. Ensure that you are properly grounded with a wrist
strap or equivalent while installing PM or EM modules.

Other Panduit Network Hardware manuals

Panduit GP6 Plus User manual

Panduit

Panduit GP6 Plus User manual

Panduit Atlona AT-HDR-EX-100CEA-RX User manual

Panduit

Panduit Atlona AT-HDR-EX-100CEA-RX User manual

Panduit Atlona AT-HDR-EX-70C-RX User manual

Panduit

Panduit Atlona AT-HDR-EX-70C-RX User manual

Panduit PVMAPU24 User manual

Panduit

Panduit PVMAPU24 User manual

Panduit PVQ-FMTMTP-9 User manual

Panduit

Panduit PVQ-FMTMTP-9 User manual

Panduit M1 User manual

Panduit

Panduit M1 User manual

Panduit SmartZone PViQ Use and care manual

Panduit

Panduit SmartZone PViQ Use and care manual

Panduit smartzone G5 User manual

Panduit

Panduit smartzone G5 User manual

Panduit SmartZone PVIQ Series Use and care manual

Panduit

Panduit SmartZone PVIQ Series Use and care manual

Panduit SmartZone Use and care manual

Panduit

Panduit SmartZone Use and care manual

Panduit DPOE24U1XG User manual

Panduit

Panduit DPOE24U1XG User manual

Panduit CDPP8RG-S User manual

Panduit

Panduit CDPP8RG-S User manual

Panduit NetKey NK366M**Y User manual

Panduit

Panduit NetKey NK366M**Y User manual

Popular Network Hardware manuals by other brands

Idview Digital 960H Quick installation guide

Idview Digital

Idview Digital 960H Quick installation guide

Cisco ONS 15454 SDH Procedure guide

Cisco

Cisco ONS 15454 SDH Procedure guide

SonicWALL ECLASS NSA E5500 Getting started guide

SonicWALL

SonicWALL ECLASS NSA E5500 Getting started guide

Furukawa LW3008C user manual

Furukawa

Furukawa LW3008C user manual

H3C 1000BASE-X-SFP quick start guide

H3C

H3C 1000BASE-X-SFP quick start guide

Carotron C10032-000 instruction manual

Carotron

Carotron C10032-000 instruction manual

Patton electronics 3096RC Specifications

Patton electronics

Patton electronics 3096RC Specifications

ADTRAN Total Access 1500 Total Reach DDS-DP Job aid

ADTRAN

ADTRAN Total Access 1500 Total Reach DDS-DP Job aid

Johnson Controls IQ WIFI installation manual

Johnson Controls

Johnson Controls IQ WIFI installation manual

Spirent B2-800-QD-4-T1S installation instructions

Spirent

Spirent B2-800-QD-4-T1S installation instructions

Idis DR-8364F quick guide

Idis

Idis DR-8364F quick guide

Patton electronics ForeFront 6081RC EdgeRoute Specification sheet

Patton electronics

Patton electronics ForeFront 6081RC EdgeRoute Specification sheet

Cambium Networks PTP 820F installation guide

Cambium Networks

Cambium Networks PTP 820F installation guide

DPS Telecom ECU LAN user manual

DPS Telecom

DPS Telecom ECU LAN user manual

ClearView PhoenixView 04B-04IP94 user manual

ClearView

ClearView PhoenixView 04B-04IP94 user manual

Paradyne Jetstream CPX-1000 installation guide

Paradyne

Paradyne Jetstream CPX-1000 installation guide

ExtraHop DISCOVER EDA 6200 Replace

ExtraHop

ExtraHop DISCOVER EDA 6200 Replace

Lanner ECA-4025 user manual

Lanner

Lanner ECA-4025 user manual

manuals.online logo
manuals.online logoBrands
  • About & Mission
  • Contact us
  • Privacy Policy
  • Terms and Conditions

Copyright 2025 Manuals.Online. All Rights Reserved.