Parrot Sequoia User manual

User guide
Guide utilisateur
Manual de usuario
Guida per l’utente
Gebrauchsanleitung
Guia do usuário
使用指南
使用指南

Polices du Document : «Avenir»
«Arial» pour le russe
«Simhei» pour le chinois
English...................................................................................................... 1
Français .................................................................................................. 35
Español................................................................................................... 67
Italiano.................................................................................................. 101
Deutsch ................................................................................................ 135
Português............................................................................................. 167
繁體中文 ............................................................................................... 199
简体中文 ............................................................................................... 231
............................................................................................... 263
................................................................................................ 297

English
1
INTRODUCTION .................................................................................2
PACKAGE CONTENTS ........................................................................3
SEQUOIA PRESENTATION..................................................................4
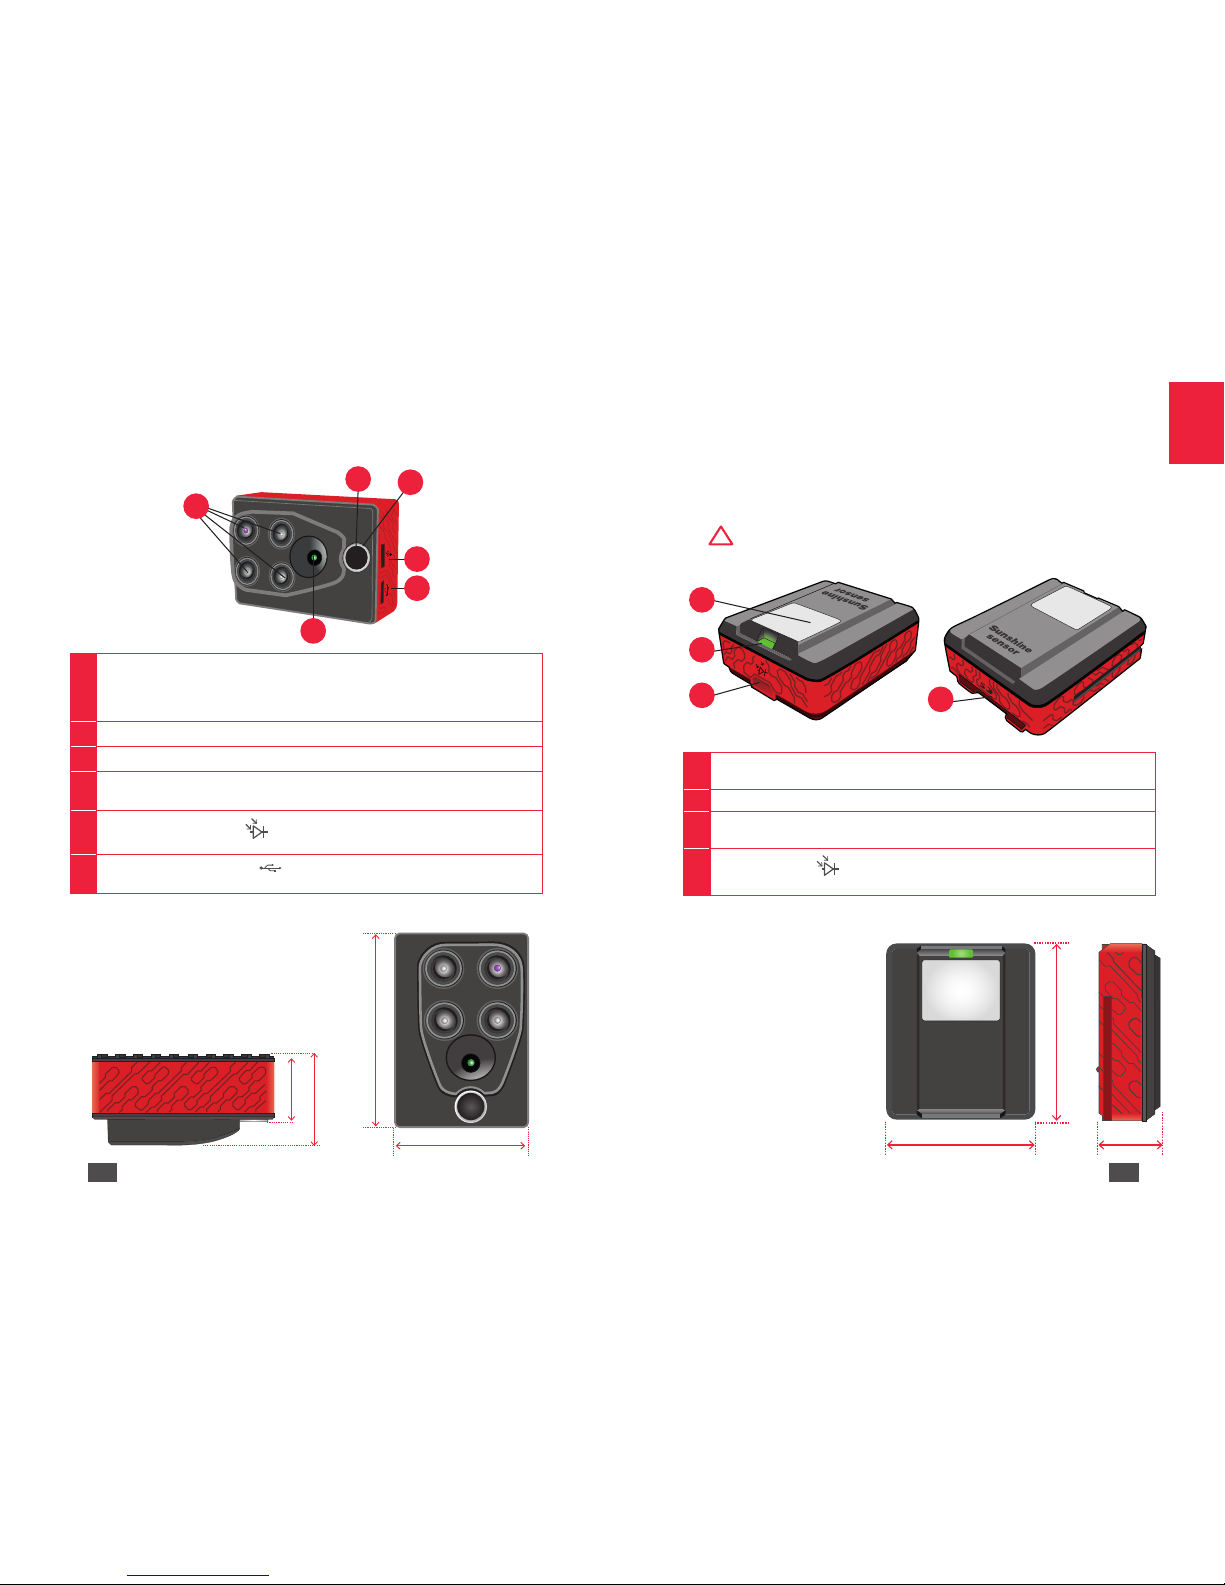
Multispectral sensor .................................................................................6
Sunshine sensor ........................................................................................7
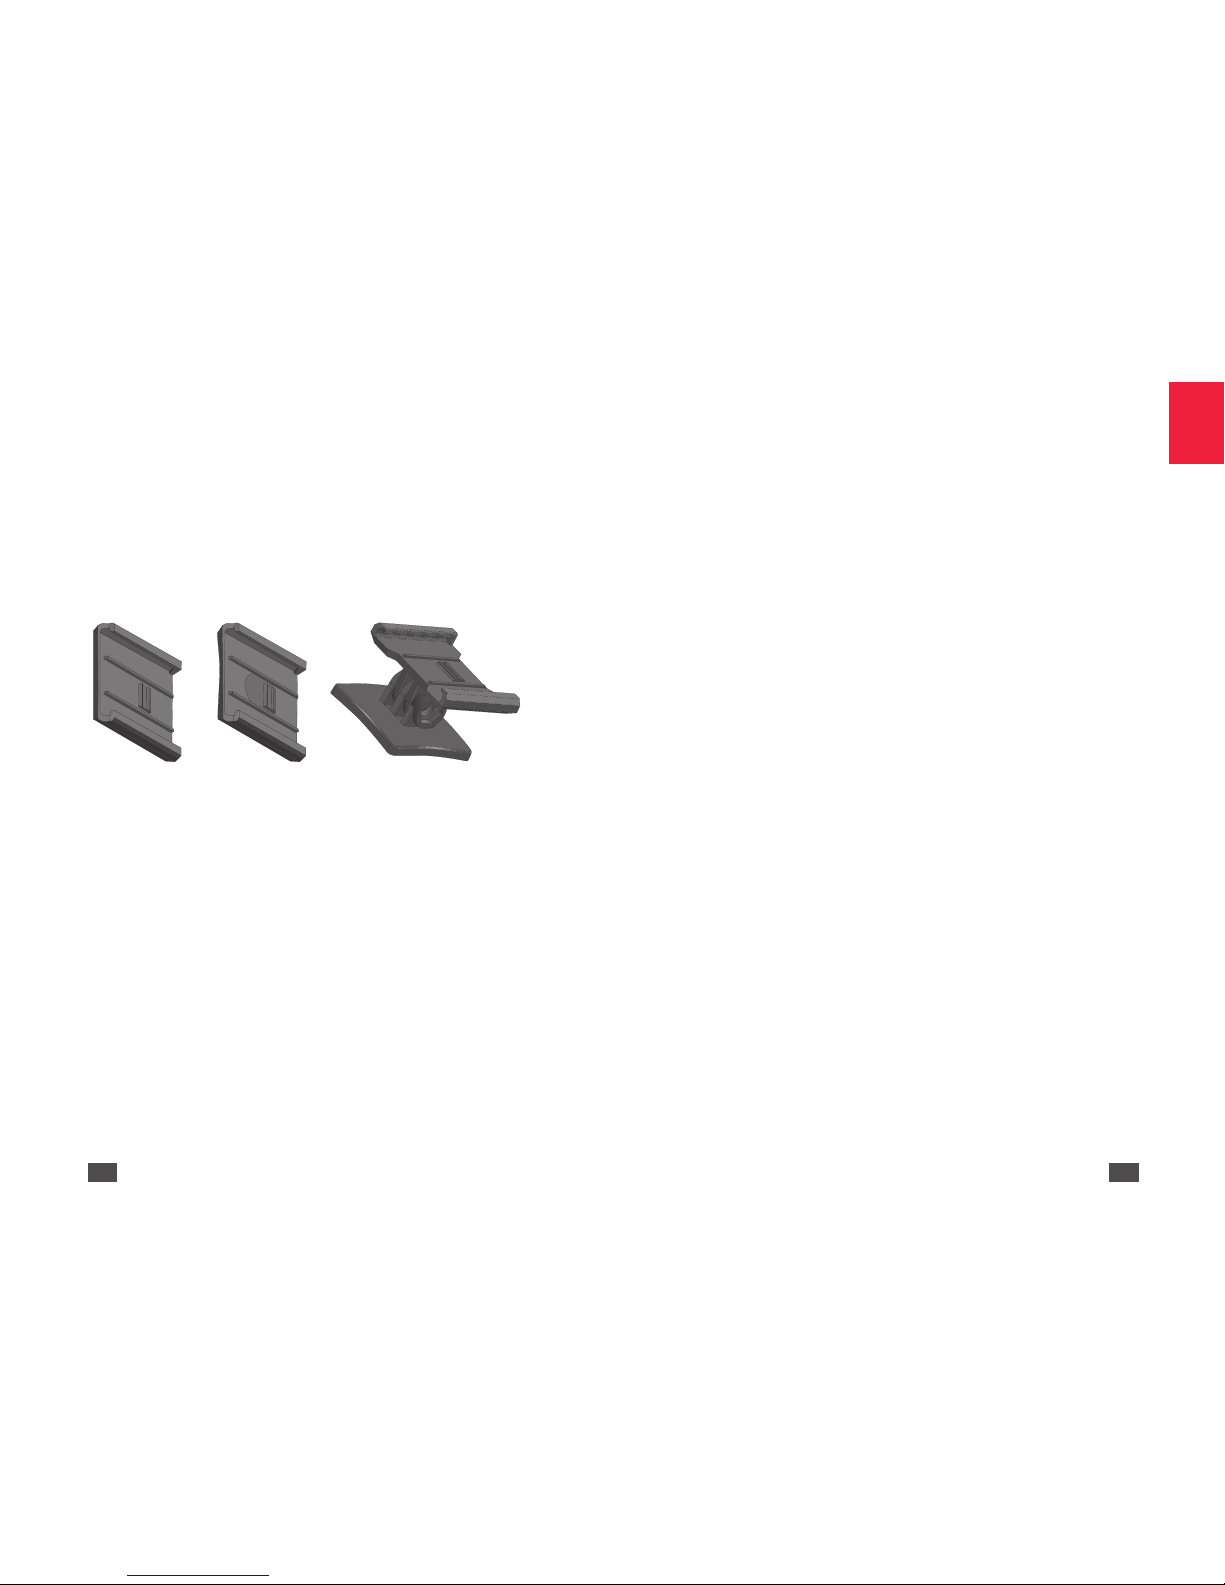
Sunshine sensor holders............................................................................8
CONFIGURING SEQUOIA...................................................................9
Setting up Sequoia via Wi-Fi.....................................................................9
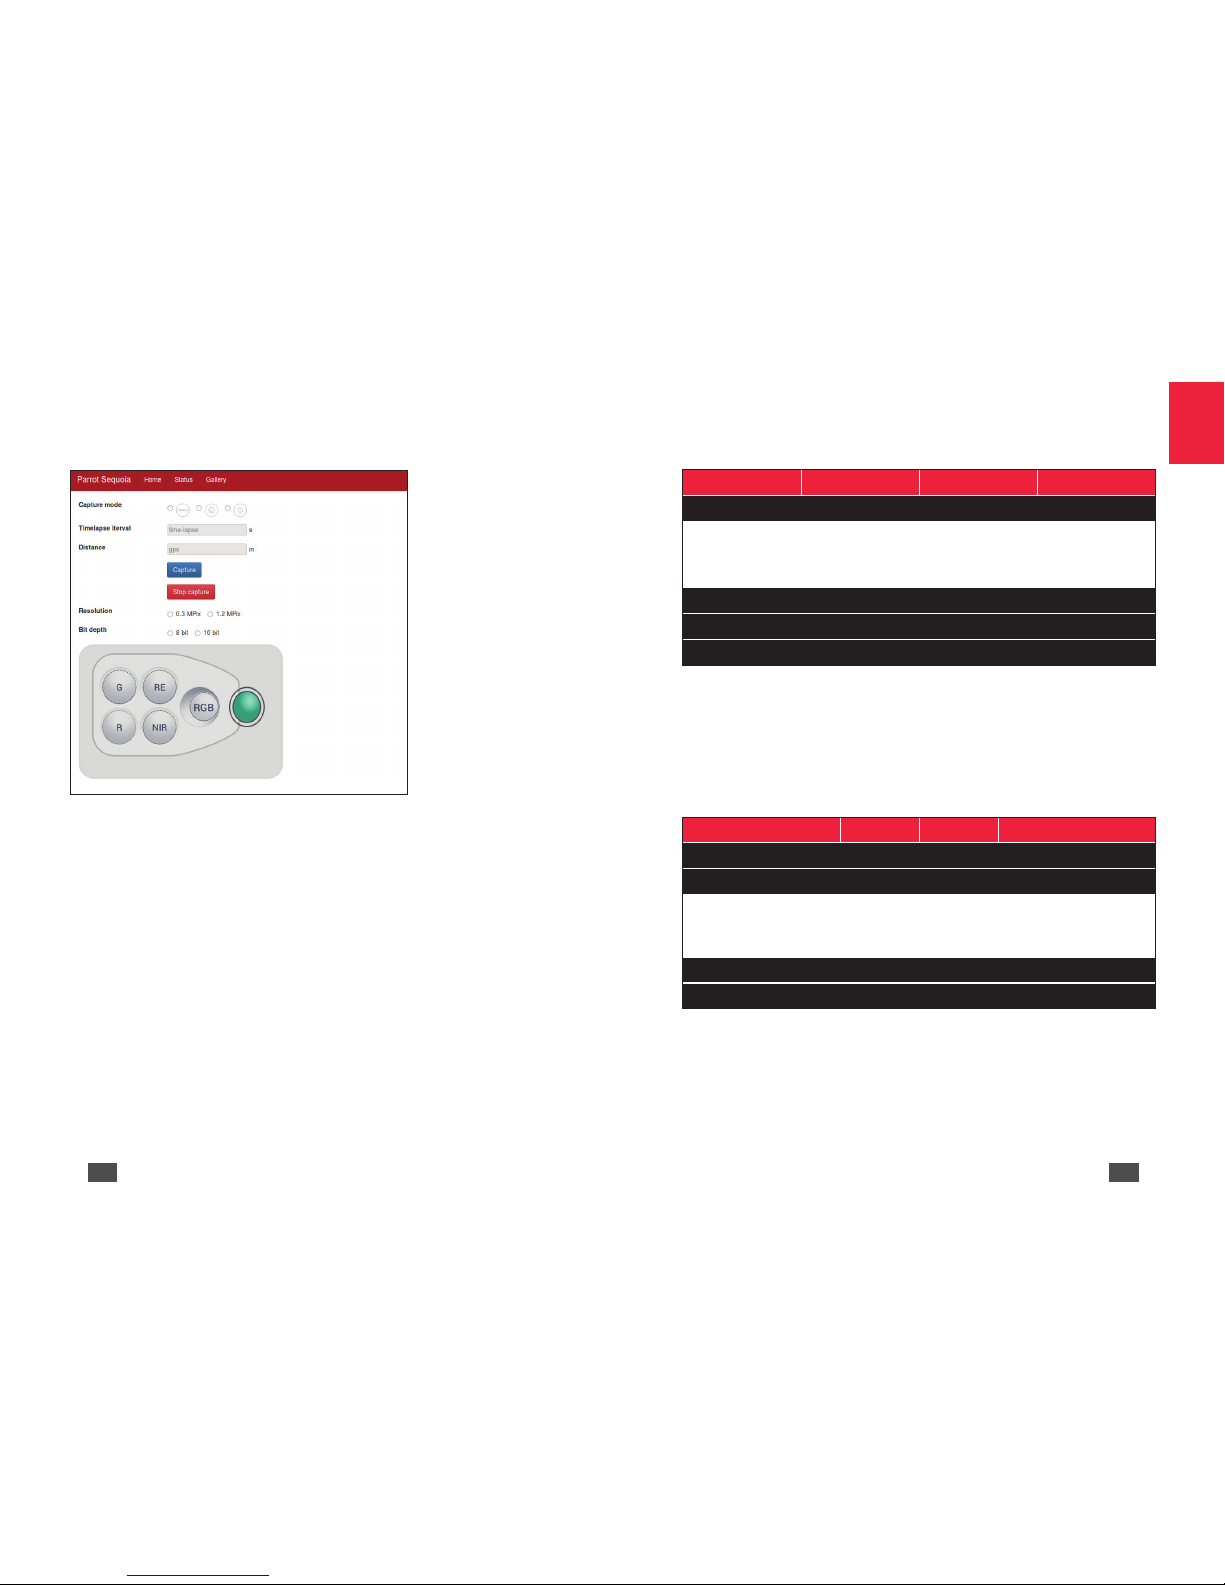
HTML interface for setting up Sequoia.....................................................9
CHECKS TO BE MADE BEFORE USE................................................13
USING SEQUOIA ..............................................................................14
Fitting the protective lens.......................................................................14
Attaching Sequoia to a drone.................................................................14
Connecting Sequoia to a USB battery....................................................15
Calibrating Sequoia.................................................................................15
Functions of the multispectral sensor button .........................................16
Disconnect the multispectral ..................................................................17
LED properties ........................................................................................17
UPDATING SEQUOIA........................................................................18
Via USB....................................................................................................18
Via an SD.................................................................................................19
RETREIVING DATA............................................................................19
Via USB....................................................................................................20
Via Wi-Fi ..................................................................................................21
Via an SD Card ........................................................................................21
SEQUOIA MAINTENANCE................................................................21
Cleaning the sensors...............................................................................21
Obtaining spare parts .............................................................................21
PROCESSING DATA ..........................................................................22
With the MicaSense ATLAS data management software ......................22
With the PIX4Dmapper mapping software.............................................22
Agronomic recommendations from AIRINOV ........................................22
INTEGRATING SEQUOIA VIA PTP OR PTP/IP ...................................23
TECHNICAL SPECIFICATIONS...........................................................25
Sensor resolution.....................................................................................25
Activating the sensors.............................................................................26
Distance between two flight lines...........................................................29
Memory used per hectare.......................................................................29
Other technical specifications.................................................................29
GENERAL INFORMATION.................................................................30

English
2 3
SEQUOIA - User Guide
INTRODUCTION
Thank you for choosing Sequoia, the sensor specifically for precision
farming. Sequoia is one of the lightest sensors on the market. It
provides extremely accurate images:
•16 Mpx RGB sensor: photos of your crops using visible wavelength.
•Four narrow band and synchronised 1.2 Mpx monochrome sensors
(Green, Red, Red Edge and Near Infrared)
•An automatically calibrated camera thanks to the sunshine module
Sequoia also has:
•A sensor weighing 72 grams which is suitable for all types of drones1
•A removable protective lens
•Integrated GPS/GNSS to locate the camera when photos are being
taken
•64GB internal memory, corresponding to 10 flights
•An SD card slot
1 See the list on www.parrot.com
PACKAGE CONTENTS
Multispectral camera Sunshine sensor
Micro USB cable to connect
the two modules Micro USB cable to connect
Sequoia to the drone
Protective lens User Guide
Microfibre cloth Quick Start Guide
Sunshine sensor holders (x 3) 32 GB SD Card
Sequoia works without batteries. Sequoia is powered directly by the
drone using a micro USB connection.

English
4 5
SEQUOIA PRESENTATION
Sequoia is a multispectral sensor specifically for farming. It is designed
according to three main criteria: outstanding precision, minimum size and
weight and ease of use. The Sequoia sensor is designed to be suitable
for all types of drones, those with fixed wings as well as multi-rotors and
mounted on gimbals or not. It can be used to take pictures of agricultural
fields in several spectral bands which measure the state of the vegetation:
Green (550nm wavelength, 40nm bandwidth), Red (660nm wavelength,
40nm bandwidth), Red Edge (735nm wavelength, 10nm bandwidth) and
Near Infrared (790nm wavelength, 40nm bandwidth).
The photos taken can then be analysed using various software. They
can be used to make indexed maps (NDVI, NDRE, etc.) and make
recommendations regarding nitrogen fertilisation.
Green
550nm wavelength,
40nm bandwidth
Definition: 1.2 Mpx
Red
660nm wavelength,
40nm bandwidth
Definition: 1.2 Mpx
Red-edge
735nm wavelength,
10nm bandwidth
Definition: 1.2 Mpx
Near infrared
790nm wavelength,
40nm bandwidth
Definition: 1.2 Mpx
RGB
Definition: 16Mpx

English
6 7
Multispectral sensor
The multispectral sensor is installed under the drone, facing the crops. It is
powered directly by the drone.
1
2
34
5
6
1
1.2 megapixel monochrome sensors collect data in discrete
spectral bands: Green (550nm - 40Nm Bandwidth), Red (660nm -
40nm Bandwidth), Red Edge (735nm - 10nm Bandwidth) and Near
Infrared (790nm - 40nm Bandwidth).
216 megapixel RGB sensor.
3Indicator light: reference for taking photos and calibration.
4Shutter button: enable/disable burst mode, enable/ disable Wi-Fi
and take a photo.
5Micro USB host port : connects the multispectral sensor to
the sunshine sensor.
6Micro USB device port : connects the multispectral sensor to
the drone.
Other multispectral sensor features:
•Inertial measurement unit.
•64 GB internal memory.
•Magnetometer.
•Wi-Fi interface.
•Weight: 72g.
•Size:
Sunshine sensor
The sunshine sensor is used to calibrate the images depending on the
sunlight. This makes it possible to compare photos over time, despite
variations in light during photo shoots. The sunshine sensor is attached
on the upper part of the drone, facing the sky. During flights the sunshine
sensor is powered by the multispectral sensor.
!It is recommended to use a TS32GSDU3X SD card with Sequoia.
Performances are not guaranteed for other SD cards. Check SD
card compatibilities on www.parrot.com/entreprises/sequoia.
1
2
3
4
14 ambient light sensors. These sensors are fitted with band-pass
filters identical to those on the multispectral sensor.
2Slot for an SD card.
3Indicator light: Reference for calibration and indicates if GPS/
GNSS is enabled.
4USB host port : connects the sunshine sensor to the
multispectral sensor.
Other sunshine sensor features:
•GPS /GNSS module.
•Inertial measurement unit.
•Magnetometer.
•Weight: 35g.
•Size:
FP3 - GoPro Form Factor
Sunshine
sensor
59 mm
41 mm
47 mm
29,5 mm
21,2 mm
39,6 mm 18,5 mm
FP3 - GoPro Form Factor
Sunshine
sensor
59 mm
41 mm
47 mm
29.5 mm
21.2 mm
39.6 mm 18.5 mm
FP3 - GoPro Form Factor
Sunshine
sensor
59 mm
41 mm
47 mm
29.5 mm
21.2 mm
39.6 mm 18.5 mm

English
8 9
Sunshine sensor holders
There are three different holders for attaching the sunshine sensor to the
drone.
•Flat bottom holder to attach the sunshine sensor to a flat surface.
•Concave bottom holder to attach the sunshine sensor to a rounded
surface.
•Pivoted holder to attach the sunshine sensor to a rounded surface.
This holder means you can turn the sunshine sensor in the direction
you want.
Flat bottom
holder Concave bottom
holder Pivoted holder
CONFIGURING SEQUOIA
You can set up Sequoia using either flight planning software (such as
Pix4Dmapper Capture or eMotion from SenseFly for example), or Wi-Fi via
an HTML interface. Your set up data will be saved in the Sequoia memory.
Setting up Sequoia via Wi-Fi
Wi-Fi is enabled on Sequoia as the default option. Press four times on
the multispectral sensor button to enable/disable Wi-Fi on Sequoia.
Subsequently, Sequoia keeps the last Wi-Fi set up in its memory, when it
is switched on or off.
You can set up Sequoia from a computer, smartphone or tablet:
1. Connect the multispectral sensor USB device port to a drone or a
USB battery.
>Sequoia turns on automatically.
2. Make sure that the Wi-Fi appears in the list of available Wi-Fi. If not,
press four times on the multispectral sensor button.
3. Connect to the Wi-Fi network: Sequoia_XXXX.
4. Open your internet browser
5. Type the following address in your browser's address bar: 192.168.47.1
>The HTML interface for setting up Sequoia opens. You can set up
Sequoia.
HTML interface for setting up Sequoia
The Sequoia set up interface consists of three screens:
•Home
•Status
•Gallery

English
10 11
Home
The Home screen is used to set up Sequoia.
Setting up the capture mode
Select the capture mode you want:
•Single: take one shot at a time.
•Time-lapse: take burst shots at regular intervals. Specify, in the "time-
lapse" field, the interval of time (in seconds) between each shot.
•GPS: take burst shots at regular distances. Specify, in the "GPS" field,
the distance in metres between each photo.
Once the set up is complete, press the Shot button. The camera starts
taking shots. To stop taking shots, press the Stop shot button.
Setting up the sensors
Select:
•Image resolution: 0.3 Mpx or 1.2 Mpx.
•Bit depth: 8-bit or 10-bit.
•The sensors that you want to enable during the flight (Green, Red, Red
Edge, Near Infrared and RGB). To do this, click on the sensors that you
want to enable or disable.
Status
GPS
Parrot Sequoia Home Status Gallery
GPS
Number of satellites: 7
Precision: 1m
Speed: 10m/s
Altitude: 35m
Instruments
Sunshine sensor
Temperature
The GPS screen tells you about:
•The number of satellites detected.
•Sequoia's precise GPS /GNSS position in metres.
•Sequoia's travel speed in meters per second.
•Sequoia's altitude in meters.
Instruments
Parrot Sequoia Home Status Gallery
GPS
Instruments
Body Sunshine sensor
ROLL
-26°
PITCH
21°
YAW
22°NE
ROLL
2°
PITCH
-3°
YAW
22°NE
Sunshine sensor
Temperature
The Instruments screen tells you about the orientation of the multispectral
sensor and the sunshine sensor.

English
12 13
Irradiance
Parrot Sequoia Home Status Gallery
GPS
Instruments
Sunshine sensor
GREEN
24.324
RED
400
RED EDGE
43.420
NEAR IR
57.239
Temperature
The Irradiance screen tells you about the light intensity of each band
(Green, Red, Red Edge, Near Infrared).
Temperature
Parrot Sequoia Home Status Gallery
GPS
Instruments
Sunshine sensor
Temperature
Body
P7
75°
P7MU
65°
P7
75°
Wifi
35°
IMU
50°
Sensors
Green
55°
Red
54°
RE
54°
NIR
54°
Sunshine sensor
IMU
50°
The Temperature screen tells you about the temperature of all Sequoia's
parts.
Gallery
The Gallery screen can be used to retrieve the photos taken during your
flights. You can select the photos that you would like to view (All, RGB,
Green, Red, Red Edge and Near Infrared).
Media View
Parrot Sequoia Home Status Gallery
Media View
INTERNAL MEMORY
USED 35 Gb
AVAILABLE 28.5 Gb
SD CARD
USED 1.3Gb
AVAILABLE 64 Gb
The Media View screen tells you about the available space in Sequoia's
internal memory and on the SD card.
CHECKS TO BE MADE BEFORE USE
Before each flight with Sequoia, make the following checks:
•Make sure that the lenses are clean. Use the microfibre cloth (supplied)
to clean them.
•Free up enough memory (either in the multispectral sensor internal
memory, or on your SD card) so you can save all the photos taken
during the flight.
•Make sure that the two modules are properly attached to the drone
and that they are not likely to come off during the flight.
•Make sure that the micro USB device cable which connects the drone
to the multispectral sensor is connected.
•Make sure that the two sensors are calibrated. For more information,
see the Calibrating Sequoia section.
•Wait until the sunshine sensor indicator light is green. When it is green
this means that the GPS/GNSS is enabled.

English
14 15
USING SEQUOIA
Note: If Sequoia detects an SD card the shots are saved on this SD
card. If no SD card is detected, Sequoia automatically saves the
shots in its internal memory.
Fitting the protective lens
Use the protective lens to protect the sensors during landing.
1. Put the protective lens on the multispectral sensor.
2. Press lightly on the protective lens as far as it will go on the sensor.
Attaching Sequoia to a drone
Sequoia can be attached to all types of drones.
1. Select the sunshine sensor holder which is most suitable for your drone.
2. Remove the plastic film from the holder and stick the holder on the
back of the drone.
!The holder must be positioned parallel to the drone (diagram A).
Diagram A
3. Insert the sunshine sensor in its holder.
!To avoid distorting the data the sunshine sensor must not be
covered during photo shoots.
4. Insert the multispectral sensor under the drone, in the kit provided
for this purpose.
5. Connect the multispectral sensor to the sunshine sensor using the
USB host cable.
6. Connect the multispectral sensor to the drone using the USB device
cable.
>Sequoia turns on automatically (Diagram B).
Diagram B
!Make sure that the Sequoia cables do not get caught in the drone
propellers during the flight.
Connecting Sequoia to a USB battery
You can use Sequoia without a drone. To do this, you need a 2A USB
battery at least.
1. Connect the multispectral sensor to the sunshine sensor using the
USB host cable.
2. Connect the multispectral sensor to the battery using the USB device
cable.
>Sequoia turns on automatically (Diagram C).
Diagram C
Calibrating Sequoia
Before using Sequoia, you must calibrate it. Before starting the calibration,
make sure that the two sensors are properly attached and connected to
the drone.
!The multispectral sensor and the sunshine sensor must be
attached perpendicularly. It is recommended to calibrate the two
sensors at the same time.
Note: You can calibrate the sensors separately. However the
sunshine sensor must be connected to the multispectral sensor to
be calibrated.
1. Make sure that the Sequoia indicator light flashes purple (Diagram D).
Diagram D

English
16 17
2. Turn the drone on the Z-axis (yaw axis) (Diagram E) until the
multispectral sensor indicator light flashes green.
Diagram E
3. Turn the drone on the Y-axis (pitch axis) (Diagram F) until the
multispectral sensor indicator light flashes blue.
Diagram F
4. Turn the drone on the X-axis (pitch axis) (Diagram G) until the
multispectral sensor indicator light changes colour.
Diagram G
Note: Once the calibration is complete the colour of the
multispectral sensor light varies depending on Sequoia's status.
For example, if the multispectral sensor memory is full, the indica-
tor light will flash yellow.
Functions of the multispectral sensor button
Use the button to enable/disable burst mode, take photos and enable/
disable Wi-Fi on Sequoia.
Note: Sequoia must be turned on to activate these features.
1 click Take a photo
2 clicks Enable/disable shots
4 clicks Enable/disable Wi-Fi
Hold down (3 seconds) Switch off Sequoia
Disconnect the multispectral
Press and hold the Sequoia button for 3 seconds to turn it off. The
indicator light goes out. If you disconnect Sequoia while the indicator is
still on the latest photos may be corrupted.
LED properties
Multispectral sensor
Start up
When you turn on Sequoia the LED has the following properties:
Other
LED properties Meaning
Quick flashing orange Shutting down
Slow flashing orange Update in progress
Flashing blue Enabling/Disabling Wi-Fi
Problem
Flashing red Hardware malfunction
Flashing red
Corrupted memory. Repair in progress.
Once the repair is complete the LED
reverts to green. This operation may take
several seconds depending on the space
available on your SD card.
Flashing yellow Memory full
The sensor is ready to take a
photo.
The sensor needs to be
calibrated.

English
18 19
1. Connect your USB drive to a computer and make sure that it contains
no files in .plf format.
2. Go to the Sequoia help page: www.parrot.com/uk/support/
3. Download the update file available in .plf format.
4. Copy the file to the root directory on your USB key without putting it
in a folder or renaming it.
5. Connect your micro USB OTG cable to the USB host port on the
multispectral sensor.
6. Connect the USB key containing the update file to the other end of
the cable.
7. Turn on Sequoia.
>The update runs automatically. During the update the multispectral
sensor light flashes orange (diagram I). Once the update is com-
plete the light turns green.
Diagram I
Via an SD
Before you begin make sure that the multispectral sensor is connected to
the sunshine sensor.
1. Connect your USB key to a computer and make sure that it contains
no files in .plf format.
2. Go to the Sequoia help page: www.parrot.com/uk/support/
3. Download the update file available in .plf format.
4. Copy the file to the root directory on your SD Card without putting it
in a folder or renaming it.
5. Insert the SD card in the sunshine sensor.
6. Turn on Sequoia.
>The update runs automatically. During the update the multispectral
sensor light flashes orange (Diagram J). Once the update is com-
plete the light turns green.
Diagram J
Calibration
Flashing purple The sensor needs to be calibrated
Flashing green Calibration in progress (pitch axis)
Flashing blue Calibration in progress (roll axis)
Photo shoot
Continuous blue Shot being taken
Continuous light green At least one of the four sensors is enabled
Sunshine sensor
LED properties Meaning
Problem
Continuous red Hardware malfunction
Flashing yellow SD Card full
Calibration
Flashing purple Calibration in progress (yaw axis)
Flashing green Calibration in progress (pitch axis)
Flashing cyan Calibration in progress (roll axis)
GPS/GNSS
Continuous yellow GPS /GNSS connection not established
Continuous green GPS /GNSS connection established
UPDATING SEQUOIA
There are two ways to update Sequoia.
Via USB
To update Sequoia via USB you must use a micro USB OTG cable male
plug with a USB female socket (Diagram H).
Diagram H

English
20 21
RETREIVING DATA
It is recommended to transfer your data to a computer after each flight.
You can transfer your data in three different ways: via USB, via Wi-Fi and
via an SD card.
The photos taken by Sequoia are in .tiff format for the four monochrome
sensors, and in .jpeg format for the RGB sensor.
Via USB
1. Using the micro USB cable (supplied), connect the micro USB device
port on the multispectral sensor to your computer.
2. In Windows: go to Start > Computer > Sequoia
>Internal. This will take you to the multispectral sensor internal me-
mory. You can retrieve the photos taken during the flight.
Note : Sequoia creates a folder for each sequence of shots. For
example, if you have taken a single shot and then a shot in burst
mode, you will have two different folders in the Sequoia memory.
3. For Mac: open Image Transfer. This will take you to the multispectral
sensor internal memory. You can retrieve the photos taken during the
flight.
Via Wi-Fi
1. Connect the multispectral sensor USB device port to a drone or a
USB battery.
>Sequoia turns on automatically.
2. Make sure that the Wi-Fi appears in the list of available Wi-Fi networks.
If not, press the multispectral button four times.
>The multispectral sensor indicator light flashes blue when Wi-Fi is
enabled.
3. Connect your computer, tablet or smartphone to the Wi-Fi network:
Sequoia_XXXX.
4. Open your internet browser and log on to the IP address 192.168.47.1.
5. Go to the Gallery tab and retrieve the photos taken during the flight.
Via an SD Card
1. Insert your SD card into an adapter which is compatible with your
computer.
2. Retrieve the photos taken during the flight.
You can also use the sunshine sensor as an SD card reader. To do this,
connect the sensor's micro USB device port to your computer.
!Do not take out the SD card when Sequoia is on.
SEQUOIA MAINTENANCE
Cleaning the sensors
If dust or dirt gets on the lens and/or the sensors:
1. Use the microfibre cloth (supplied) to clean the lens.
2. Remove any remaining traces with a cotton bud soaked in lens cleaner.
Obtaining spare parts
The following parts are available:
•Protective lens.
•Sunshine sensor.
•Sunshine sensor holders
For more information, contact your dealer at:
www.sensefly.com, www.airinov.fr, www.micasense.com, www.pix4d.com.

English
22 23
PROCESSING DATA
The data retrieved by Sequoia can be processed in several ways.
With the MicaSense ATLAS data management software
You can analyse the photos taken by Sequoia with the MicaSense ATLAS
software. For more information, go to www.micasense.com
With the PIX4Dmapper mapping software
You can analyse the photos taken by Sequoia with the PIX4Dmapper
software. For more information, go to www. pix4d.com.
Agronomic recommendations from AIRINOV
Airinov offers a nitrogen fertiliser recommendation service for rapeseed and
wheat. For more information, go to www.airinov.fr.
INTEGRATING SEQUOIA VIA PTP OR PTP/IP
PTP and PTP/IP protocol can be used to control and set up Sequoia.
PTP and PTP/IP software such as gphoto2 and ptpcam must be used and
this means that programmes integrating Sequoia can be developed or
communication with another media can be established.
Sequoia supports the following PTP commands:
Standard
Request
GET_STORAGE_IDS
GET_STORAGE_INFO
GET_NUM_OBJECTS
GET_OBJECT_HANDLES
GET_OBJECT_INFO
GET_OBJECT
GET_THUMB
DELETE_OBJECT
GET_PARTIAL_OBJECT
INITIATE_CAPTURE
FORMAT_STORE
GET_DEVICE_PROP_DESC
GET_DEVICE_PROP_VALUE
SET_DEVICE_PROP_VALUE
RESET_DEVICE_PROP_VALUE
TERMINATE_OPEN_CAPTURE
INITIATE_OPEN_CAPTURE
Event
EVENT_CANCEL_TRANSACTION
EVENT_OBJECT_ADDED
EVENT_OBJECT_REMOVED
EVENT_STORE_ADDED
EVENT_STORE_REMOVED
EVENT_DEVICE_PROP_CHANGED
EVENT_DEVICE_INFO_CHANGED
EVENT_STORE_FULL
EVENT_CAPTURE_COMPLETE

English
24 25
Device Properties
FUNCTIONAL_MODE
IMAGE_SIZE
COMPRESSION_SETTING
WHITE_BALANCE
F_NUMBER
FOCAL_LENGTH
FOCUS_DISTANCE
FOCUS_MODE
EXPOSURE_METERING_MODE
EXPOSURE_PROGRAM_MODE
DATETIME
STILL_CAPTURE_MODE
TIMELAPSE_NUMBER
TIMELAPSE_INTERVAL
FOCUS_METERING_MODE
Custom
Request
GET_SUNSHINE_VALUES
GET_TEMPERATURE_VALUES
GET_ANGLE_VALUES
GET_GPS_VALUES
GET_GYROSCOPE_VALUES
GET_ACCELEROMETER_VALUES
GET_MAGNETOMETER_VALUES
GET_IMU_VALUES
GET_STATUS_MASK
START_MAGNETO_CALIB
STOP_MAGNETO_CALIB
MAGNETO_CALIB_STATUS
SEND_FIRMWARE_UPDATE
Event STATUS
MAGNETO_CALIBRATION_STATUS
Properties
PHOTO_SENSORS_ENABLE_MASK
PHOTO_SENSORS_KEEP_ON
MULTISPECTRAL_IMAGE_SIZE
MAIN_BIT_DEPTH
MULTISPECTRAL_BIT_DEPTH
HEATING_ENABLE
WIFI_STATUS
WIFI_SSID
Refer to the documentation for your PTP or PTP/IP software (gphoto2 or
ptpcam for example).
For more information on the Sequoia PTP and PTP/IP protocols, see the
Integration Guide available in the Sequoia set up interface help section
and on www.parrot.com/uk/support.
TECHNICAL SPECIFICATIONS
Sensor resolution
The ground resolution of the RGB sensor and the multispectral sensor
depends on the height of the flight. Refer to the table below to determine
the flight height depending on the required resolution.
Ground resolution (cm/px)
Height (m) Monochrome RGB
30 3.7 0.8
40 4.9 1.1
50 6.2 1.4
60 7.4 1.6
70 8.6 1.9
80 9.9 2.2
90 11.1 2.4
100 12.4 2.7
110 13.6 2.9
120 14.8 3.3
130 16.1 3.5
140 17.3 3.7
150 18.6 4.1

English
26 27
Activating the sensors
Photo 2
Coverage
Area to be mapped
Drone route
Distance between
two flight lines
? drone
Photo 1
For the best coverage rate during flights at a certain altitude you must
allow for a time lapse between shots. The RGB sensor can take shots with
a minimum delay of 1 second between each photo. Multispectral sensors
can take shots with a minimum delay of 0.5 seconds between each photo.
To find out the minimum time to be respected depending on the flight
height refer to the following chart and diagram.
Time between shots
Height (m) 5 m/s 10 m/s 13 m/s 20 m/s
30 1.1 0.5 0.4 0.3
40 1.4 0.7 0.5 0.4
50 1.8 0.9 0.7 0.5
60 2.2 1.1 0.8 0.6
70 2.6 1.3 1.0 0.7
80 2.9 1.4 1.1 0.74
90 3.3 1.6 1.2 0.8
100 3.7 1.8 1.4 0.9
110 4.1 2.1 1.6 1.0
120 4.4 2.2 1.7 1.1
130 4.8 2.4 1.9 1.2
140 5.2 2.6 2.0 1.3
150 5.6 2.8 2.2 1.4
Key:
•In red: the multispectral sensor and the RGB sensor cannot be
activated.
•In blue: the RGB sensor cannot be activated.
•In green: all the sensors can be activated.
0
0.5
1
1.5
2
2.5
3
3.5
4
4.5
5
5.5
6
30 50 70 90 110 130 150
Time between shots (s)
Flight height (m)
Time between shots
(for an 80% coverage rate)
V = 5 m/s
V = 10 m/s
V = 13 m/s
V = 20 m/s

English
28 29
For the best coverage rate during flights at a certain altitude you must
allow for a distance between shots. To find out the minimum time to be
respected depending on the flight height refer to the following chart and
diagram.
Distance between shots (m)
Height (m) 0.7 0.75 0.8 0.85
30 8.4 7.0 5.6 4.2
40 11.2 9.3 7.5 5.6
50 14.0 11.7 9.3 7.0
60 16.8 14.0 11.2 8.4
70 19.6 16.4 13.1 9.8
80 22.4 18.7 15.0 11.2
90 25.2 21.0 16.8 12.6
100 28.0 23.4 18.7 14.0
110 30.8 25.7 20.6 15.4
120 33.7 28.0 22.4 16.8
130 36.5 30.4 24.3 18.2
140 39.3 32.7 26.2 19.6
150 42.1 35.1 28.0 21.0
0
5
10
15
20
25
30
35
40
45
30 50 70 90 110 130 150
Distance between two flight lines (m)
Flight height (m)
Distance between shots
Overlap = 70%
Overlap = 75%
Overlap = 80%
Overlap = 85%
Distance between two flight lines
Refer to the diagram below to find out the distance between two flight
lines depending on the Sequoia flight height.
0
5
10
15
20
25
30
35
40
45
50
55
60
30 50 70 90 110 130 150
Distance between two flight lines (m)
Flight height (m)
Distance between two flight lines
Overlap = 70%
Overlap = 75%
Overlap = 80%
Overlap = 85%
Memory used per hectare
Refer to the diagram below to find out the memory required by Sequoia
for a given number of hectares.
0
500
1000
1500
2000
2500
3000
3500
4000
30 50 70 90 110 130 150
Memory used per hectare
Flight height (m)
Memory used per hectare
Overlap = 70%
Overlap = 75%
Overlap = 80%
Overlap = 85%
Overlap = 70%
Overlap = 75%
Overlap = 80%
Overlap = 85%
Other technical specifications
•The frame rate is 1 fps (frame per second) maximum.
•Environmental operating conditions:
o Light range: 3000 to 120,000 lux. Use between
-10°C and +45°C.
•Power consumption: 5 to 12 W.

English
30 31
•Power supply by micro USB 5V - 2A. Sequoia is powered by the drone
on which it is mounted.
•The power supply must be Safety Extra Low Voltage (SELV) and
Limited Power Source (LPS).
GENERAL INFORMATION
Precautions for use and maintenance
Only use accessories specified by the manufacturer.
If sand or dust gets into Sequoia it may be irreparably damaged and no
longer function correctly.
Do not use Sequoia in adverse weather conditions (rain, strong wind and
snow) or when visibility is poor (at night).
Keep Sequoia away from high voltage power lines, buildings or any other
potentially hazardous areas.
Do not use this device near liquids. Do not place Sequoia in water or on
a wet surface as this could cause irreparable damage.
Avoid making Sequoia undergo significant changes in altitude.
Do not leave Sequoia in the sun.
Risk of ingestion of small objects. The packaging is not part of the product
and must be discarded as a safety measure.
If you use Sequoia with a drone refer to the general information for your
drone.
Wi-Fi
Before you use your Sequoia check the restrictions regarding the use
of Wi-Fi frequencies in the place where you are going to fly. Certain
frequencies may be restricted or prohibited.
Warning regarding privacy and respect for property
Recording and broadcasting an individual's image and voice without their
permission may constitute an invasion of privacy and you may be held
liable.
Ask for permission before filming and recording an individual's voice,
particularly if you would like to save your recordings and/or broadcast
them on the Internet.
Do not broadcast degrading images or sounds which may affect an
individual's reputation or dignity.
Recording and broadcasting the image of property without the permission
of its owner may constitute an infringement of the property image rights
and you may be held liable; ask for the owner's permission before filming
a property.
Warranty
For the warranty terms please refer to the General Conditions of sale for
the dealer where you purchased Sequoia.
Amendments
The explanations and specifications contained in this user guide are
provided for information purposes only and may be amended without
prior notification. This information is correct at the time of printing and
the utmost care has been taken in preparing it to provide you with the
most accurate information possible. However, Parrot Drones SAS cannot
be held responsible or liable, directly or indirectly, for any damages
or unintentional loss of data resulting from an error or omission in this
document. Parrot Drones SAS reserves the right to amend or improve the
product as well as the user guide without any restrictions or any obligation
to inform the user. As part of Parrot Drones SAS' focus on improving our
products, the product you have purchased may differ... slightly from the
one described in this document. In this case you may be able to find a
new version of the user guide in electronic format on the www.parrot.
com website.
How to recycle this product
The symbol on the product or documentation indicates that it must
not be disposed of with household waste. The uncontrolled
disposal of waste may harm the environment or human health.
Please separate it from other types of waste and recycle it
responsibly.
This will help to foster the sustainable re-use of material resources.
Individuals may contact the dealer who sold them their product, or their
local council, to find out how and where they can dispose of this product
to ensure that it is recycled in an environmentally friendly way. Companies
may contact their suppliers or refer to the terms of their sales contract.
Registered trademarks
Parrot is a registered trademark of Parrot SA.
Sequoia is a filed or registered trademark of Parrot Drones SAS.
Mac is a trademark of Apple Inc., registered in the USA and other
countries.
Wi-Fi®is a registered trademark of the Wi-Fi Alliance®.
All other products, trademarks and intellectual property rights mentioned
in this guide are the property of their respective owners.
Declaration of Conformity
Parrot Drones SAS, 174 quai de Jemmapes, 75010 Paris, France, declares
under its sole responsibility that the product described in this user guide
conforms with technical standards EN300328 (v1.8.1), EN301489-17

English
32 33
(v2.1.1), EN 60950-1:2006/A11:2009/A1: 2010/A12: 2011/A2: 2013 in
accordance with the provisions of the R&TTE Directive 1999/5/EC, the
Low Voltage Directive 2006/95/EC and the RoHS Directive 2011/65/EC.
Declaration of Conformity in Canada
This Class B digital camera complies with Canadian standards ICES-003
and RSS-210.
This device complies with the Industry Canada RSS applicable to license-
exempt radio apparatus. Operation is permitted subject to the following
two conditions:
(1) the device must not produce interference, and (2) the user of the device
must accept any radio interference encountered, even if the interference
is likely to compromise operations.
FCC/IC
To comply with the FCC/IC RF exposure guidelines for transmission
equipment, a distance of at least 20cm must be maintained between
the product antenna and individuals. To remain compliant it is not
recommended to use the product at any distance less than this.
Federal Communications Commission (FCC) Statement.
To meet the FCC/IC requirements on exposure to RF for transmission
devices, a distance of at least 20 cm must be maintained between the
product’s antenna and people. To ensure compliance, it is recommended
that the device not be used at any shorter distance.
This equipment has been tested and found to comply with the limits
for a Class B digital device, pursuant to part 15 of the FCC rules. These
limits are designed to provide reasonable protection against harmful
interference in a residential installation. This equipment generates or uses
or can radiate radio frequency energy and, if not installed and used in
accordance with the instructions, may cause harmful interference to radio
communications. However, there is no guarantee that interference will
not occur in a particular installation. If this equipment does cause harmful
interference to radio or television reception, which can be determined by
turning the equipment off and on, the user is encouraged to try to correct
the interference by one or more of the following measures:
•Reorient or relocate the receiving antenna.
•Increase the separation between the equipment and receiver.
•Connect the equipment into an outlet on a circuit different from that
to which the receiver is connected.
•Consult the dealer or an experienced radio/TV technician for help.
This device complies with Part 15 of the FCC Rules. Operation is subject
to the following two conditions:
1) This device may not cause harmful interference and
2) This device must accept any interference received, including interference
that may cause undesired operation of the device.
Changes or modifications not expressly approved by the party responsible
for compliance could void the user’s authority to operate the equipment.
Canada, Industry Canada (IC) Notices
This Class B digital apparatus complies with Canadian ICES-003 and RSS-
210.
This device complies with Industry Canada license-exempt RSS standard(s).
Operation is subject to the following two conditions: (1) this device may
not cause interference, and (2) this device must accept any interference,
including interference that may cause undesired operation of the device.

34 35
Français
INTRODUCTION ...............................................................................36
CONTENU DE L’EMBALLAGE ...........................................................37
PRÉSENTATION DE SEQUOIA ..........................................................38
Le capteur multispectral..........................................................................38
Le sunshine sensor ..................................................................................41
Les supports du sunshine sensor ............................................................42
CONFIGURER SEQUOIA...................................................................43
Configurer Sequoia via Wi-Fi ..................................................................43
Interface HTML de configuration de Sequoia.........................................43
VÉRIFICATIONS AVANT UTILISATION...............................................47
UTILISER SEQUOIA...........................................................................48
Installer la lentille de protection .............................................................48
Fixer Sequoia sur un drone.....................................................................48
Brancher Sequoia à une batterie USB ....................................................49
Calibrer Sequoia......................................................................................49
Fonctions du bouton du capteur multispectral ......................................50
Débrancher le capteur multispectral ......................................................51
Comportement de la LED.......................................................................51
METTRE À JOUR SEQUOIA ..............................................................52
Via USB....................................................................................................52
Via une carte SD......................................................................................53
RÉCUPÉRER LES DONNÉES .............................................................54
Via USB....................................................................................................54
Via Wi-Fi ..................................................................................................55
Via une carte SD......................................................................................55
ENTRETIEN DU SEQUOIA ................................................................55
Nettoyer les capteurs..............................................................................55
Obtenir des pièces détachées ................................................................55
TRAITER LES DONNÉES ...................................................................56
Avec le logiciel de gestion de données MicaSense ATLAS....................56
Avec le logiciel de cartographie Pix4Dmapper......................................56
Les prescriptions agronomiques de AIRINOV ........................................56
INTÉGRER SEQUOIA VIA PTP OU PTP/IP.........................................57
SPÉCIFICATIONS TECHNIQUES........................................................59
Résolution des captures..........................................................................59
Déclenchement des capteurs..................................................................60
Distance entre deux lignes de vol...........................................................63
Mémoire utilisée par hectare ..................................................................63
Autres spécifications techniques.............................................................63
INFORMATIONS GÉNÉRALES...........................................................64
Français
Other manuals for Sequoia
2
Table of contents
Languages:
Other Parrot Accessories manuals