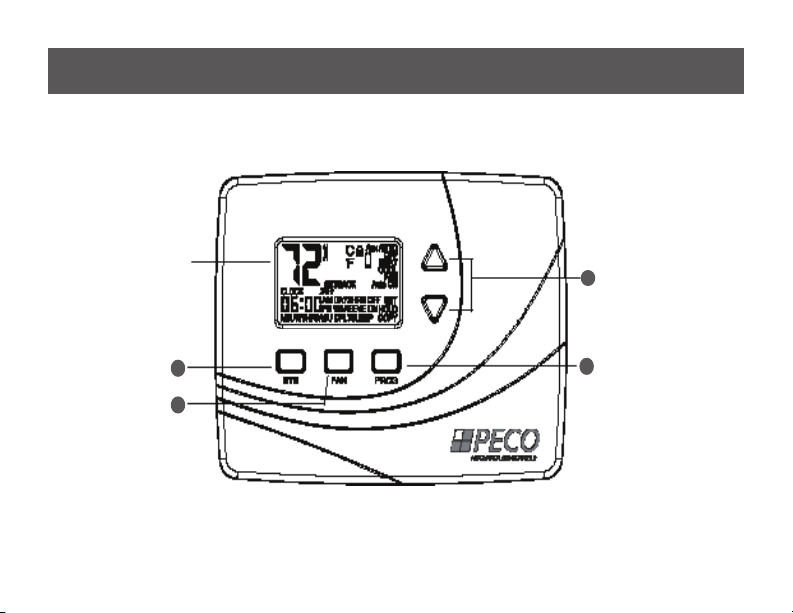
Peco WavePRO T2500 User manual

WavePRO™ Wireless Programmable
T2500 Thermostat & R2500 Receiver
Model K2500-001

2
Thank you for choosing the PECO WavePROTM Wireless System (Model K2500-001).
The PECO WavePRO Wireless System is a wireless thermostat transmitter and receiver. It is
designed for use with conventional (gas, oil, electric) or heat-pump systems. It can support up to
2-HEAT/ 2-COOL con gurations in conventional systems and 3-HEAT/ 2-COOL con gurations
in heat pump applications. The PECO WavePRO Wireless System is comprised of the wireless
T2500 Thermostat paired with the wireless R2500 Receiver. This operating manual contains
important information on operating the T2500 Thermostat and R2500 Receiver.
The T2500 Thermostat may be powered by batteries, 24 VAC, or by both. The thermostat
may be programmed for 7-day individual, 5/2-day, 5/1/1-day, or 7-day identical programmable
operation, with four time periods per day.
The R2500 Receiver is powered by 24 VAC only and is wired directly to the HVAC equipment
that it controls.

3
(Model K2500-001)
Temperature Range: 50° to 90° F (10° to 32° C)
Differential: 1° F (0.5°C)
Input Power:
T2500 Thermostat: Two AA alkaline batteries or 24 VAC, 50/60 Hz
R2500 Receiver: 24 VAC, 50/60 Hz
Output Power 24 VA (Pilot Duty)
Wireless Type: 902 to 928 MHz Band, Frequency Hopping Spread Spectrum (FHSS)
Wireless Range: 100 feet (30.48 meters) typical reliable range in open air
Operation Temperature: 0° to 120° F (-17° to 48°C)
Shipping Temperature: -20° to 130°F (-28°to 54°C)
Operating Humidity: 5% to 95% RH, non-condensing
Physical dimensions:
T2500: 4.5”H x 5.75” W x 1.1”D
R2500: 4.8”H x 3.8”W x 1.3”D

4
The PECO WavePRO Wireless System ..............................................................................................
Front panel display reference: T2500 Thermostat ...............................................................................
Button operation ..................................................................................................................................
The T2500 Display .............................................................................................................................
The T2500 Display menus .................................................................................................................
Set the time and day .........................................................................................................................
Select the Fahrenheit or Celsius temperature ...................................................................................
Programming the T2500 ....................................................................................................................
Custom program ................................................................................................................................
Custom program: Copy feature .........................................................................................................
Overriding the program ......................................................................................................................

5
• READ INSTRUCTIONS CAREFULLY BEFORE ATTEMPTING TO OPERATE THIS THERMOSTAT
AND RECEIVER.
• FOLLOW THE WAVEPRO WIRELESS INSTALLATION INSTRUCTIONS BEFORE PROCEEDING.
• Contact a qualied service person if at any time your system does not operate properly.
• Use care to avoid static discharge to the thermostat and receiver.
• Failure to observe safety information and comply with instructions could result in PERSONAL INJURY,
DEATH AND/OR PROPERTY DAMAGE.
• To avoid electrical shock or damage to equipment, disconnect power before installing or servicing and use
only wiring with insulation rated for full thermostat operating voltage.
• To avoid potential re and/or explosion do not use in potentially ammable or explosive atmospheres.
• This product, when installed, will be part of an engineered system whose specications and performance
characteristics are not designed or controlled by PECO. You must review your application and national
and local codes to assure that your installation will be functional and safe.
• Retain these instructions for future reference.
IMPORTANT NOTE: This thermostat was shipped with factory default settings. Your thermostat’s installer
may have congured the thermostat differently from the factory-default settings, and may have modied
or disabled certain features. Contact the installer or a service technician if you have questions about the
thermostat’s conguration.

6
Following are the T2500 Thermostat and.
SYSTEM button
Display
FAN button
UP ▲and
DOWN ▼
buttons
PROGRAM
button

7
The SYS (system) button is used to control the operating mode of the T2500. Press the
SYS button once to light up the menu options, as described below. Continue pressing
SYS button to scroll through menu options. As you scroll, the menu option being accessed
(operating mode) will ash. To select that option, allow the display to automatically time
out. The T2500 saves the “ashing” option and switches the thermostat to the selected
operating mode. The SYS modes are:
HEAT – Indicates the system is in heating mode.
COOL – Indicates the system is in cooling mode.
AUTO – Indicates the system will automatically changeover between heating
and cooling modes as the room temperature varies.
OFF – Disables thermostat outputs.
SETBACK –Indicates the heating or cooling system is operating in manual setback
mode. (To appear, SETBACK must be selected in “Advanced conguration.” See the
“PECO WavePRO Wireless System Installation Guide”).
The SYS button is also used to scroll through the Service Menu in advanced
conguration.(see “Advanced conguration” in the “PECO WavePRO™ Wireless
System Installation Guide”).
i

8
The FAN button is used to control the fan mode. Pressing FAN will light up the two fan
mode options described below. Press FAN to scroll through the options. As you scroll,
the ashing option is automatically selected. The T2500 Thermostat times out and
automatically saves the ashing option. The modes are:
ON – Turns on continuous fan, even if no demand exists for heating
or cooling.
AUTO – Sets fan cycles with demand for heating and cooling.
The PROG (program) button is used to program the T2500. Press PROG button once
to light up ve program mode options, described below. Press ▲or ▼buttons to scroll
through the options. As you scroll, the option being accessed will ash. To select the
ashing option (e.g.,”CLOCK”), press PROG again, and an associated submenu appears.
Press ▲or ▼to scroll through the submenu options. Press PROG button to select the
desired option. The ve program mode options are:
CLOCK –Sets the current time and day (see “Set the time and day”).
°F / °C –Sets temperature display to Fahrenheit or Celsius. Default setting is Fahrenheit
(see “Select the Fahrenheit or Celsius temperature”).

9
SET – Initiates the time and temperature schedule for a particular day or group of days.
Allows you to reset the thermostat to the factory default factory settings program. (see
“Programming the T2500”).
COPY – Copies one day’s schedule to another day or to another group of days (see
“Programming the T2500”).
HOLD – Puts the thermostat in Temporary or Permanent Hold mode. Overrides your
programmed settings but does not lose them (see “Overriding the program”).
Press the SYS button to exit the program menu at any time.
The up ▲and ▼down buttons are used to create a temporary override, thereby increasing
or decreasing the current setpoint, or to access the Service Menu. The buttons are also
used with the PROG button to select various programming options.
i

10
Figure 1 below illustrates the various display menus in the T2500 display. The menus are:
System Mode Display Programming Commands Program Override Commands
Temperature Display Time Period Indicators Service Indicator
Time & Day Display Fan Operation Indicators Keypad Lockout
Battery Indicator
Figure 1.
T2500
Display.

11
HEAT – Indicates the system is in heating mode.
COOL – Indicates the system is in cooling mode.
AUTO – Indicates the system will automatically changeover between heating and cooling
modes as the room temperature varies.
OFF – Turns off the entire system.
SETBACK – Indicates the heating or cooling system is operating in manual setback mode.
(To appear, SETBACK must be selected in “Advanced conguration.” See the “PECO
WavePRO Wireless System Installation Guide”).
Default display: Digits display the current room temperature.
During programming: Digits are used to set the desired temperatures format.
Default display: Digits indicate the current time.
Day abbreviations indicate the current day. During programming: Digits and days are used
to program time periods.
CLOCK – Lights up during programming when the clock is being set.
24Hr – Lights up during programming to indicate time will be displayed in 24-hour clock

12
format.
AM / PM – Indicates 12-hour clock format.
SET – Enters thermostat into custom program mode which allows you to specify a unique
times and temperatures for a particular day or group of days.
COPY – Simplies programming by allowing you to copy all of an individual day’s settings
to another day or group of day.
DFLT – Restores the thermostat to the factory program.
SYS – Allows you to exit the PROG menu; current menu option is not saved.
WAKE, DAY, EVE, and SLEEP are the names given to the four time periods per day. Each
time period has its own unique setpoint times and temperatures.
FAN – FAN will be always be lit in conjunction with ON or AUTO.
ON – Indicates constant, continuous fan operation.
Auto – Indicates fan is only on with heating or cooling demand.
HOLD – Indicates thermostat is in a Temporary or Permanent Hold.
(Programmed settings are off, but they are not lost.)

13
HOLD HRS – During programming, lights up in conjunction with clock digits; allows
program to be put on Temporary Hold for up to 24 hours.
HOLD DAYS – During programming, lights up in conjunction with the clock digits; allows
program to be put on Temporary Hold for up to 99 days.
HOLD ON – Turns the Permanent Hold on. The current setpoint is maintained indenitely
or until the Permanent Hold is turned off.
HOLD OFF – Turns the Permanent Hold off and resumes programmed settings.
The wrench symbol will ash during wireless pairing. For further information, see “Establish
a wireless connection” in the “WavePRO Wireless System Installation Guide.” The wrench
symbol is displayed when there is a temperature sensor error. The wrench symbol also
indicates there is an open or a short connection to the sensor. When this occurs, the
T2500 Thermostat will disable all outputs and illuminate the wrench symbol. A service
technician should be called to determine the cause of the error.
Allows you to set keypad access. If keypad prohibits input, see “Advanced Conguration”
in “PECO Wave Wireless System TW205/TW206 &RW205 Installation Guide.”
Lit only when battery is low; ashes when at a critically low level—.

14
: You must
press PROG to advance
to the next menu option.
The ashing
option is saved automatically in each of
the program modes.
Make your selections in consecutive order.
Set the time
1. Press PROG to show program options.
2. Press ▲or ▼to scroll until “CLOCK” is
ashing. To select, press PROG once.
3. Press ▲or ▼to scroll through “24Hr”,
“AM”, “PM” options. “24Hr” sets your
thermostat to a 24-hour clock. “AM” and
“PM” sets your thermostat to a 12-hour
clock. To select, press PROG once.
4. Press ▲or ▼to scroll to the current
hour. To select, press PROG once.
5. Press ▲or ▼to scroll to the current
minute. To select, press PROG once.
Set the day
6. Press ▲or ▼to scroll to the current day.
To select, press PROG once.
Press ▲or ▼buttons in PROG menu until
“CLOCK” is ashing.
i

15
Set the temperature display using the
following simple steps. Settings are saved
automatically after you exit the PROG mode.
1. Press PROG once.
2. Press ▲or ▼to scroll until BOTH
“°F/°C” are ashing.
3. Press PROG once to enter the
temperature menu for “°F/°C” .
: Either “°F” or “°C” will ash as an
option.
4. Press ▲or ▼to scroll to select the
ashing option as desired (°F / °C).
5. To select desired option, press PROG
once.
In the PROG menu, press ▲or ▼to scroll to
select the ashing option.
i

16
Each day has four scheduled periods (WAKE, DAY, EVE, and SLEEP ). Each one of the periods
has a start time and heat and cool setpoints. Heat Setpoint controls system heating during cold
weather. Cool Setpoint controls the cooling system during hot weather. (Your thermostat is
preprogrammed with factory default settings.) Program one event after the next, in consecutive
order. Press PROG to retain your current selection, and the system will advance to the next
menu item. Press the SYS button to exit the PROG menu at any time.
Factory Program: The T2500 is preprogrammed with seven days of the week:
Wake 6:00 am 70° F (21.0° C) 78° F (25.0° C)
Day 8:00 am 62° F (17.0° C) 85° F (28.5° C)
Evening 6:00 pm 70° F (21.0° C) 78° F (25.0° C)
Sleep 10:00 pm 62° F (17.0° C) 82° F (27.0° C)
: If you want to change the preprogrammed times and/or temperatures, follow the
instructions under “Custom program”.
i

17
The T2500 can be programmed with settings
for each day individually, for Monday through
Friday, for Saturday and Sunday, or for all
seven days as identical. Follow this step-by-
step procedure.
1. Press PROG once.
2. Press ▲or ▼to scroll until “SET” is
ashing.
3. Press PROG once to select a menu
option.
4. Press ▲or ▼to scroll to the day or
group of days you want to program.
SET
HOLD
COPY
In the PROG menu, press ▲or ▼until
“” is ashing.

18
Day/Group of Days
:
Select “DFLT” to restore seven days
of the week to the Factory Program
default settings.
5. Select one of the following options and
press PROG.
: Each day
ashes individually. Select: “M,” Monday; “TU,”
Tuesday; “W,” Wednesday; “TH,” Thursday;
“F,” Friday,“SA,” Saturday, and “SU,” Sunday.
You must program four periods for each day.
“MTUWTHFSASU” ashes as a block. Select
“MTUWTHFSASU” to program every day of
the week identically.
: “MTUWTHF”
ashes as a block. Select “MTUWTHF” to
program Monday through Friday identically
“SASU” ashes as a
block. Select “SASU” to program identically.
shown here.
i
MTUWTHF
SET

19
: After the Day/Group of Days
are selected, each time period must be
programmed for the start time as well as
the Heat and Cool Setpoints.
6. Press ▲or ▼to scroll through the four time
periods (, , , and ).
Select the time period to be programmed and
press PROG once.
7. Press ▲or ▼to scroll to the desired
starting hour. Press PROG once.
8. Press ▲or ▼to scroll to the desired
starting minute. Press PROG once.
9. Press ▲or ▼to scroll to the desired Heat
Setpoint Temperature. Press PROG once.
10. Press ▲or ▼to scroll to the desired Cool
Setpoint Temperature. Press PROG once.
After you complete this process, the T2500 will
return to the default Display.
Repeat steps 7 through 10 for
remaining day(s) and time periods.
i
MTUWTHF
SET

20
Time & Temperature Programming Example
In this example, the thermostat user wants to program the weekend with a schedule different
from the Factory Program. The user wants the Saturday and Sunday program to be identical.
1. Press PROG once.
2. Press ▲or ▼to scroll until “SET” is ashing. To select, press PROG once.
3. Press ▲or ▼to scroll until “SASU” is ashing. To select, press PROG once.
4. Press ▲or ▼to scroll until “WAKE” is ashing. To select, press PROG once.
5. Press ▲or ▼to scroll hours to “8: ”. To select, press PROG once.
6. Press ▲or ▼to scroll minutes to “ :30”. To select, press PROG once.
7. User wants to keep same Heat Setpoint Temperature. Press PROG once.
8. User wants to keep same Cool Setpoint Temperature. Press PROG once.
The user may want to set up additional time periods for Saturday and Sunday:
• Program the Day period for SASU by repeating steps 1 through 8, but in Step 4,
select “DAY”.
• Program the Evening period for SASU by repeating steps 1 through 8, but in Step 4,
select “EVE”.
• Program the Sleep period for SASU by repeating steps 1 through 8, but in Step 4,
select “SLEEP”.
Other manuals for WavePRO T2500
1
This manual suits for next models
1
Table of contents
Other Peco Thermostat manuals

Peco
Peco TC170 User manual

Peco
Peco TF115P-002 User manual

Peco
Peco Peco RW205 User manual

Peco
Peco TA180-001 User manual

Peco
Peco Peco TW206 User manual

Peco
Peco T158 User manual

Peco
Peco TA167-006 User manual

Peco
Peco Peco TW205 User manual

Peco
Peco PERFORMANCE PRO MULTI-FAN User manual

Peco
Peco Performance pro T4000 series User manual