3 of 11 2016-11-17 #180-9092-2 2016-12-06
ISSUED:06-12-12 SHEET #: 180-9023-1
User Manual and Installation Guide
Pro Wireless Multimedia Kit
Models:
HDS200
HDS200-2
HDS200-3
HDS200-4 READY
®
Step7 While turning on the display device the HD Flow Pro Wireless Multimedia units will be going through the star tup process. This process may
takeupto two minutes to complete. The Power/Link indicator lights on the Transmitter and the Receiverwill b e flashing at first. Flashing indicates
thattheunits are establishing a secure connection. Wait until the connection is successfully established, indicated by the Power/Link indicator
lightbecomingsolid.
Minutes
2
1xTransmitter
1xReceiver
2xStand
1xRemote Control
1xIR Flasher
1xIR Extender
1xComponent Adaptor
2xPower Adapter
1xQuick Start Guide
1xUsers Manual
Step2 Connect the provided IR Flasher to the IR-OUT port on the Transmitter.
Findthelocation of the IR window on your source device and adhere the
IRFlashereye directly over the IR window on your source device.
NOTE:OneIRFlasher eye i s to be used for one compo nent device.
Step4 Install the IR Extender by plugging in the provided IR E xtender in to
theIR-INport on the Receiver and adhering the other end of the IR Extender
toavertical surface near the output device. Ensure that the IR Ex tenderis in
alineof sight to the remote control that controls your source devices.
NOTE:ForMulticastmo dels, receivers t wo, three and four do n ot come with an IR Ex tender. AdditionalIRExtenders
(HDS-IRE)canbep urchased separ ately; visit peerle ss-av.com for more inform ation.
Step6 Turn on your display device (TV, monitor, projector,etc .).
Step3 Connect the display device (TV, monitor, projector, etc.)
totheReceiver.
Step5 Power-up the HD Flow Pro Devices.
1.Plugin the power adapter for the Transmitter and the Receiver to nearby
availablepower outlets.
2.Plugin the power adapter endtothe Transmitter and then to the Receiver.
3.Theunits will automatically turn-on. The aver age power-on/synctime
isapproximately two minutes.
What’sin the Box
Installationan d Setup
TroubleshootingTips
TipTheIR window
maybeeasierto
locatewithadirect
lightshiningon
sectionsofthe
frontpanelof the
componentdevice.
Asmallflashlight
workswell.
Power/Source
SelectionButton
TipRepeatSteps
3-11toconnect
morethanone
Receiverunit
(HDS200-2,
HDS200-3,
HDS200-4).
Step1 Connect the Transmitter to the source devices
(Blu-ray™Discplayer,set top box, gaming console, etc.).
Step9 Turn on the desired source device that is connected to
theTransmitter.
Step11 Play the source device content and enjoy up to Full HD 1080p
wirelessentertainmentexperience.
• Check the media source resolution. The display device must be able
tosupportthe resolution of the media source that is being streamed.
UtilizingtheINFO button will allow you to see the resolution data that
thedisplaydevice supports. If the display device suppor ts the highest
resolutionof720p but the source device is outputting 1080p content,
thecontentneeds to be down-scaled to the maximum resolution of the
displaydevice,in this case 720p.
ReceiverOutputIndicator Light Blinks:
• Make sure that your display device, source device and the HD Flow Pro units
areallturned ON and the Receiver is properly connected to the output device.
• Verify that the Receiver is set to the appropriate output port.
• Check the resolution setting of your source device. This may need to be
changedtoa resolution supported by the HD Flow Pro unit. Reference
theResolutionChart in the HD Flow Pro Manual for compatibility.
Referenceyoursource devices’ manual for instruction on changing
theoutputresolution.
Iftheabove troubleshooting tips donot re solvethe issues for a unicast setup,
pleasereferencethe Factory Reset Section of the HD Flow Pro Manual. For a
multicastsystemconfiguration, please contact Peerless-AV Customer Care at
800-856-2112forfurther instruction.
Step8 Select the output that connects the Receiver to the display using
thePower/SourceSelection Button or the provided remote control.
Theoutputindicator light will become solid and the HD Flow logo will
appearonthe display device.
Step10 Select the desired source or device input on the Transmitter
usingthePower/SourceS election Button on the remote control.
Transmitterand/orReceiverIndicator Lights are all Blinking:
• The HD Flow Pro units are establishing a connection. It can take
uptotwo minutes for the HD Flow Pro units to establish a complete
connection.Ifafter two minutes have passed and the units have not
establishedaconnection, unplug the power cable, wait 30 seconds
andreconnectthe power supply to the units.
TransmitterorReceiverPower Indicator Light is OFF:
• Check and verify the power supply connection.
TransmitterInputIndicatorLight Blinks:
• Make sure that your sourcedev ice is turned ON and the cable
isproperlyconnected.
• Verify that the Transmitter is set to the appropriate input port.
• Check the resolution from your source device. This may need to
bechangedto a resolution supported by the HD Flow Pro Wireless
MultimediaKit.Reference the Resolution Chart in the HD Flow Pro
Manualforcompatibility. Reference your source devices’ manual
forinstructionon changing the output resolution.
ReceiverPowerIndicator Light Blinks:
• Verify that the HD Flow Pro Transmitter and Receiver are within
therecommendedrange of 131 feet. Physical obstructions such as
walls,floorsand ceilings between the Transmitter and Receiver may
decreasethestrength of the connection sig nal and reducethe over all
transmissionrange.
Ifaconnection has been established and the HD Flowlogo can be seen
onthedisplay device, but contentis not playing:
• Make sure that the input/outputcables are proper ly connected.
• Verify that the Transmitter is set to the appropriate input port.
WarningDo not place the HD Flow
Prounitsnear other devices that
emitexcessiveamounts of heat.
Increasedtemperaturesmay
causetheHD Flow Pro Transmitter
orReceiverunit to malfunction
orstopworking.
tthdi l d i (TV it j t t)
teps
ect
ne
t
QuickStartGuide for HD Flow Pro Wi reless Multime dia Kit -LIT-0906
Power/Source
SelectionButton
©2012PeerlessInd ustries, In c. Peerless -AV™ is a tradema rk of Peerless I ndustries , Inc. All righ ts reserv ed.
HDFlow™isa trademark o f I Do It, LTD. Other par ties’ mark s are the proper ty of their res pective own ers. hdflow.com
Quick Start Guide
PROWIRELESSMULTIMEDIA KIT
ModelNo.HDS200 (-2, -3, -4)
READY
®
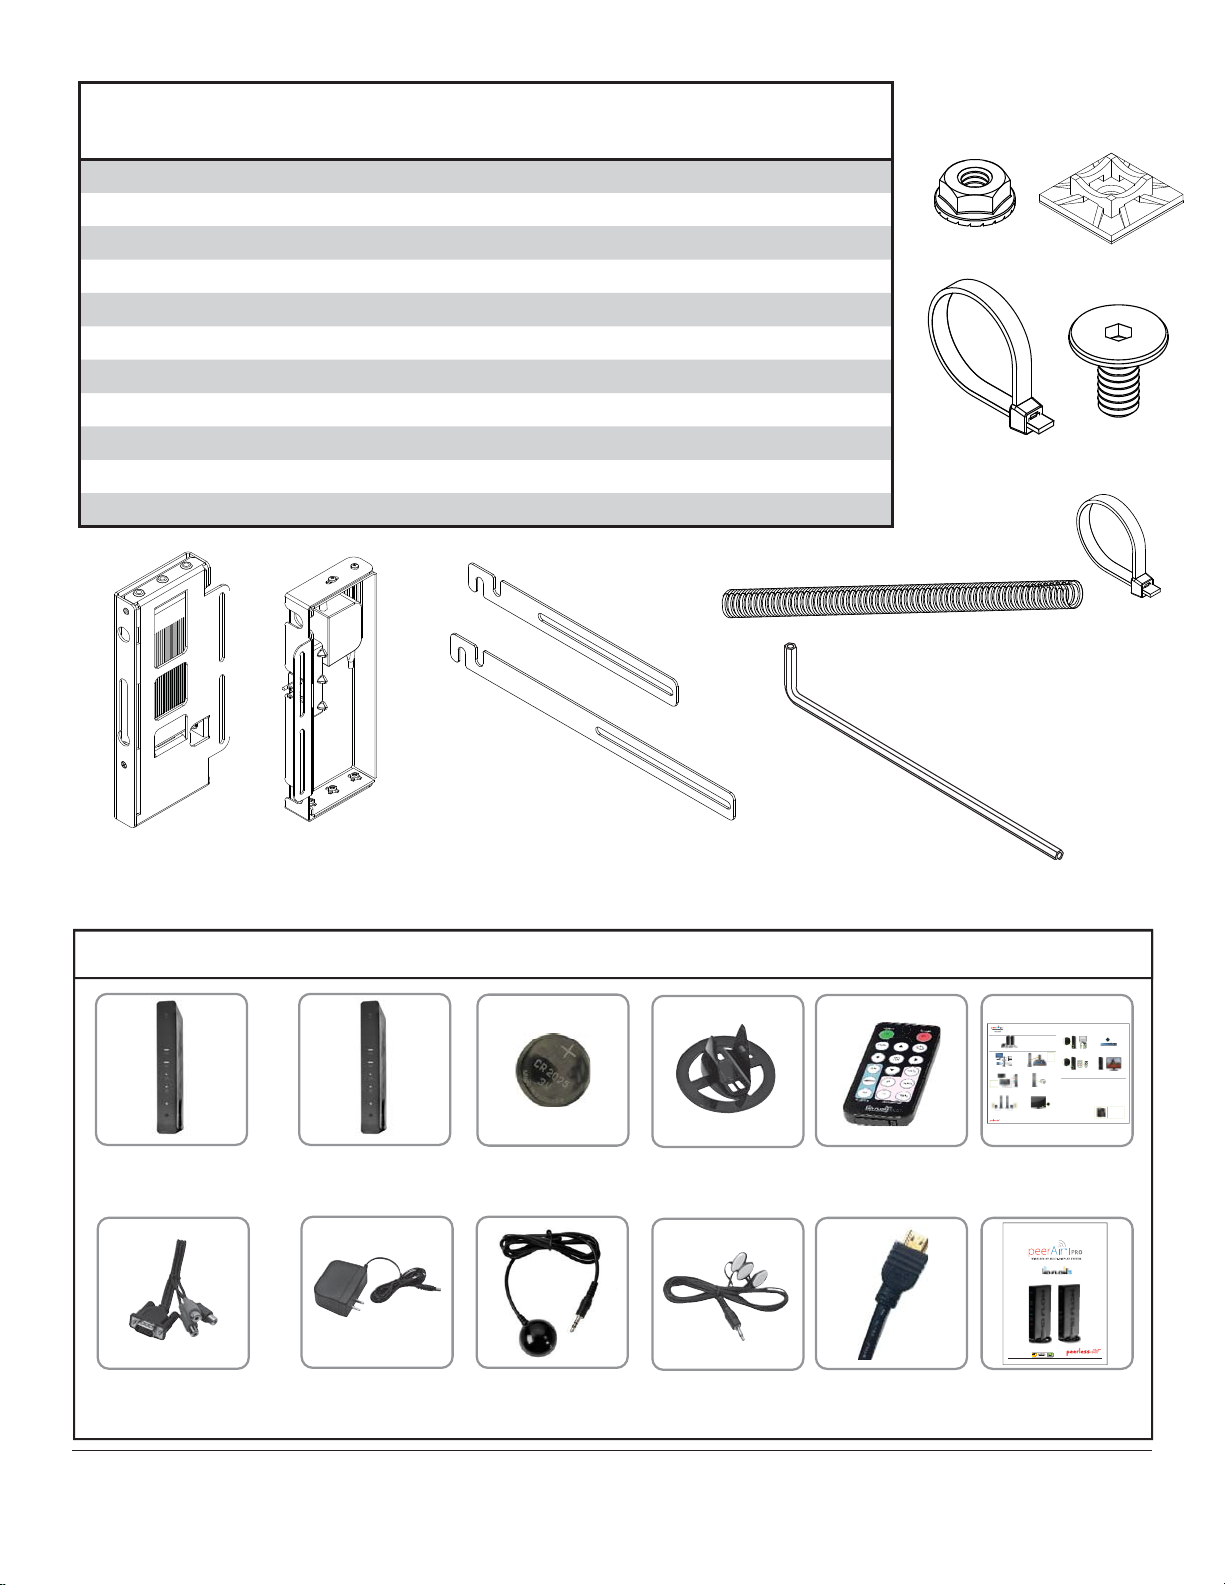
Parts List Part #
Description Qty
AA wireless receiver assembly 1 180-1327
BB power module assembly 1 180-1015
CC enclosure mounting bracket small 4 120-1195
DD enclosure mounting bracket large 4 120-1196
EE lock nut 1/4-20 8 530-1021
FF cable tie anchor 2 590-9469
GG cable tie large 8 590-1168
HH cable tie small 2 560-9711
II 1/4-20 x 12mm decorative screw 8 520-2325
JJ cable management sheath 1 590-9468
KK 4 mm allen wrench 1 560-9646
II
GG
HH
KK
EE FF
CC
DD
BB
AA JJ
Additional Wireless Components
wireless transmitter (1)wireless Receiver (1)
component/composite
to VGA dongle (1) IR Extender (1)
remote (1)
ir flasher (1)
plastic stand (1)
instruction sheet (1)12v power adapter (2)
3v battery (1) install guide (1)
hdmi cable (2)
ISSUED:12-22-14 SHEET #: 180-9064-1
User Manual and Installation Guide
Models:
HDS300
HDS300-2
HDS300-3
HDS300-4
HDS300-5
HDS300-6 READY
®
Powered by
owere
Step7 While turning on the display device the PeerAirTM Pro Wireless AV Multi-Display System will be going through the startup process. This
processmaytake up to 45 seconds to complete. The Power/Linkindicator lights on the Transmitter and the Receiver will be flashing at first.
Flashingindicatesthat the units are establishing a secure connection. Wait until the connection is successfully established, indicated by the
Power/Linkindicatorlight becoming solid.
1xTransmitter
1xReceiver
2xStand
1xRemote Control
1xIR Flasher
1xIR Extender
1xComponent Adaptor
2xPower Adaptor
1xQuick Start Guide
1xUsers Manual
Step2 Connect the provided IR Flasher to the IR-OUT port on the Transmitter.
Findthelocation of the IR window on your source device and adhere the
IRFlashereye directly over the IR window on your source device.
NOTE:OneIRFlas her eye is to be used for on e component device.
Step4 Install the IR Extender by plugg ingin the prov ided IR Extender in to
theIR-INport on the Receiver and adhering the other end of the IR Extender
toavertical surf acenear the output dev ice. Ensurethat the IR E xtender is in
alineof sight to the remote control that controls your source devices.
NOTE:ForMulticast models, receiv ers two through si x do not come with an IR Ex tender. AdditionalIRExtenders (HDS -
IRE)canbepu rchased separa tely; visit peerle ss-av.com for more infor mation.
Step6 Turn on your display device (TV, monitor, projector, etc.).
Step3 Connect the display device (T V,monitor, projector, etc.)
totheReceiver.
Step5 Power-up the PeerAirTM Pro Devices.
1.Plugin the power adaptor for the Transmitter and the Receiver to nearby
availablep oweroutlet s.
2.Plugin the power adapt or end to the Transmitterand then to the Receiver.
3.Theunits will automatically turn- on. The average power-on/synctime
isapproximately 45 seconds.
What’sin the Box
Installationand Setup
TroubleshootingTip s
TipTheIR window
maybeeasierto
locatewitha direct
lightshiningon
sectionsofthe
frontpanelof the
componentdevice.
Asmallflashlight
workswell.
Power/Source
SelectionButton
Step1 Connect the Transmitter to the source devices
(Blu-ray™Discplayer,set top box, gaming console, etc.).
Step9 Turn on the desired source device that is connected to
theTransmitter.
Step11 Play the source device content and enjoy up to Full HD 1080p
wirelessentertainmentex perience.
• Check the media source resolution. The display device must be able
tosupportthe resolution of the media source that is being streamed.
UtilizingtheINFO button will allow you to see the resolution data that
thedisplaydevice supports. If the display device suppor ts the highest
resolutionof720p but the source device is outputting 1080p content,
thecontentneeds to be down-scaled to the maximum resolution of the
displaydevice,in this case 720p.
ReceiverOutputIndicator Light Blinks:
• Make sure that your display device, source device and the
PeerAirTMPro
units
areallturned ON and the Receiver is properly connected to the output device.
• Verify that the Receiver is set to the appropriate output port.
• Check the resolution setting of your source device. This may need to be
changedtoa resolution supported by the
PeerAirTMPro
unit.Reference
theResolutionChart in the
PeerAirTMPro
Manualfor compatibility.
Referenceyoursource devices’ manual for instruction on changing
theoutputresolution.
Iftheabove troubleshooting tips do not resolve the issues for a unicast setup,
pleasereferencethe Factory Reset Section of the PeerAirTM Pro Manual. For a
multicastsystemconfiguration, please contact Peerless-AV Customer Care at
800-865-2112forfurther instruction.
Step8 Select the output that connects the Receiver to the display using
thePower/SourceSelection Button or the provided remote control.
Theoutputindicator light will become solid and the HD Flow logo will
appearonthe display device.
Step10 Select the desired source or device input on the Transmitter
usingthePower/Source Selection Button or the remote control.
Transmitterand/orReceiverIndicator Lights are all Blinking:
• The PeerAirTM Pro units are establishing a connection. It can take
upto45 seconds for the PeerAirTM Pro units to establish a complete
connection.Iftwo minutes have passed and the units have not
establishedaconnection, unplug the power cable, wait 30 seconds
andreconnectthe power supply to the units.
TransmitterorReceiver Power IndicatorLig ht is OFF:
• Check and verify the power supply connection.
TransmitterInputIndicator Light Blinks:
• Make sure that your source device is turned ON and the cable
isproperlyconnected.
• Verify that the Transmitter is set to the appropriate input port.
• Check the resolution from your source device. This may need to be
changedtoa resolution supported by the PeerAirTM Pro Wireless
AVMulti-DisplaySystem. Reference the Resolution Chart in the
PeerAirTMProManual for compatibility. Reference your source
devices’manualfor instruction on changing the output resolution.
ReceiverPowerIndicator Light Blinks:
• Verifythatthe
PeerAirTMPro
Transmitterand Receiver are within
therecommendedrange of 210 feet. Physical obstruct ions such as
walls,floorsand ceilings between the Transmitter and Receiver may
decreasethestrength of the connec tion signal and reduce the overall
transmissionrange.
Ifaconnection has been established and the HD Flow logo can be seen
onthedisplay device, but content is not playing:
• Make sure that the input/output cables are properly connected.
• Verify that the Transmitter is set to the appropriate input port.
WarningDo not place the
PeerAirTM
Prounitsnear other devices that
emitexcessiveamounts of heat.
Increasedtemperaturesmay
causethePeerAirTM Pro Transmitter
orReceiverunit to malfunction
orstopworking.
QuickStartGuidefor PeerAirTM ProWireless AV Multi-Display System - LIT-0906
Power/Source
SelectionButton
©2015PeerlessI ndustries , Inc. Peerles s-AV™ is a trade mark of Peerle ss Industri es, Inc. All rig hts reser ved.
HDFlow™isa tradem ark of I Do It, LTD. Othe r parties’ mar ks are the prop erty of thei r respectiv e owners. www.peerless-av.com
Quick Start Guide
ModelNo.HDS300 (-2, -3, -4, -5, -6)
POWER POWER
RECEIVERTRANSMITTER
ON OFF
MENU SCAN
/BACK
INFO
/OK
HDMI HDMI1
COMPONENT PC HDMI2
AV AV HDMI3
PoweredbyPoweredb
TipRepeatStep s
3-11toconnect more
thanoneReceiverunit
(HDS300-2,HDS300-3,
HDS300-4,HDS300-5,
HDS300-6)
POWER POWER
RECEIVERTRANSMITTER
ON OFF
MENU SCAN
/BACK
INFO
/OK
HDMI HDMI1
COMPONENTPC HDMI2
AV AV HDMI3
TRANSMITTER
HDMI1
PC HDMI2
AV HDMI3