PEIKER CEE CEE COACH User manual

Please contact your distributor for any questions and
warranty issues:
Purchased on:
At:
Use at your own risk!
nformation regarding certication is provided on the
additional information sheet.
P 03
P 04
P 05
P 06
P 07 - 08
P 09
P 10
P 11
P 12
P 13
P 14 - 15
Table of contents
Explanation of symbols
llustrated device overview
Before getting started
Assigning roles pairing
Possible connection modes
Key Lock, Mute Moderator
Connection with Bluetooth Accessories
e.g. Headset
unction tables short overview, range,
setting the volume resetting
echnical features and update function
nformation on usage, protection,
radio communication
attery maintenance, disposal
currentness
2

Explanation of symbols
f applicable, please observe the instructions of
the separately delivered headset. ou can also
make use of your own headset.
*
Scope of delivery
see package
he light ring around the alk button o indicates the
operating modes. he ring can be illuminated in various
colors green, blue, red, yellow, white and purple,
continuously and ashing.
Examples
Fast
ashing
Continuous
light
Light
off
Slow
ashing
Con guration for headsets
Please make sure that CEECOACH con guration is
correct for your headsets. ou can check and change
that in the installer. Please take note of the guide for
the installer on our homepage. hen using mono
headsets e.g. abra wave on CEECOACH with stereo
con guration delivery standard since Dec 01
you might experience echoes. hen using stereo
headsets e.g. abra Chill on CEECOACH with mono
con guration you will only have audio on one ear. 3

Device overview
otating clip
mount snaps
in at a
90° angle
Plus key +
Headset-
connection
. mm jack
Headset
Micro-USB
cable
alk button o
Light ring
Micro-USB-
connection
inus key -
4

Depending on the status of the battery, the device is fully charged in max. hours, once the continuous yellow light
has switched to green. For charging: Plug the included charging cable into the micro-USB connection and connect it
to the included power supply or a computer.
Connect the micro-
USB charging cable
Charge
Green permanent
light Device is fully
charged
Unplug micro-U
cable
1.
2.
3.
4.
Before getting started
Connect
headset
Switch on
(white light = role
assignment has
to be performed
Switch off. (Light
ring brie y lights
up in red
5.
6.
7.
All CEECOACH functions are only available after removing the U plug
>3sec. = off
max. 4hours
Audio cue when
switching on:
"Battery good /
battery low"
5

>2sec. (o) & (-) Ready for use
after approx. 30 sec., indicated by
slow ashing .
>2sec. (o) & (+) Ready for use and/or maximum
number of participants found, after
approx. 30 sec., when ashing slowly.
.
Assigning participants
o assign the role of the participant to the device, switch on and press the inus button - and the alk button o
simultaneously for 2 seconds. CEECOACH's LED should now turn green.
Role assignment (pairing)
he devices have not been assigned roles upon delivery all devices are identical. his is done when the devices are
switched on for the rst time. f you wish to switch on the devices without changing the prede ned role assignments,
press the alk button o for one second. ole assignment only needs to be performed once when switched on for
the rst time. f you would like to change the role of a device, you can repeat the process at any time following
a reset. f you would like to increase the number of participants, the connected devices have to be reset rst.
Assigning the moderator
o do so, after switching on the prospective moderator, please press the Plus button + and the alk button o
simultaneously for seconds. CEECOACH's LED should now turn blue.
6

Connection modes: 1st Moderator Mode
Moderator
Participant
he moderator speaks up to 5 participants listen. his connection is already established after role assignment, without
the moderator having to press the alk button o.
7

Connection modes: 2nd Participant Mode
Moderator
Participant
he moderator can switch an active conversation to
private mode, i.e. the moderator speaks to one participant
privately. he remaining participants are unable to
listen in. o do so, the moderator presses the alk
button o once. f the moderator would like to end
the private mode, heshe briefly presses the alk
button o twice.
Connection modes: 3rd Private Mode
Moderator
Participant
Participant and moderator can speak to one another
all other participants can only eavesdrop. oice
communication with the moderator is established when
the participant brie y presses the alk button o 1 time.
he conversation is stopped by the moderator by double
clicking the alk button o.
8

n participant mode as well as private mode, the
individual conversation can only be interrupted
after 10 seconds. y pressing the alk button o,
another participant may speak and the other
participants can listen see participant mode.
Mute Moderator
As a oderator you can mute yourself independent
from the current connection mode. The continuous
transmission can be interrupted by doing a long press
on the minus - or the plus + button or the mic button
until the audio signal “mute on” is heard.
hile the moderator is muted a reminder signal rings
out regularly if a participant tries to establish a con-
nection with the moderator.
y pressing the minus - or plus + button you get back to
the previous connection mode.
rom software version 01.0 a keylock function is
available.
y pressing the o button three times
short press it is activated or deactivated.
Key Lock
f keylock is active LED light blinks purple.
9

Connect a smartphone
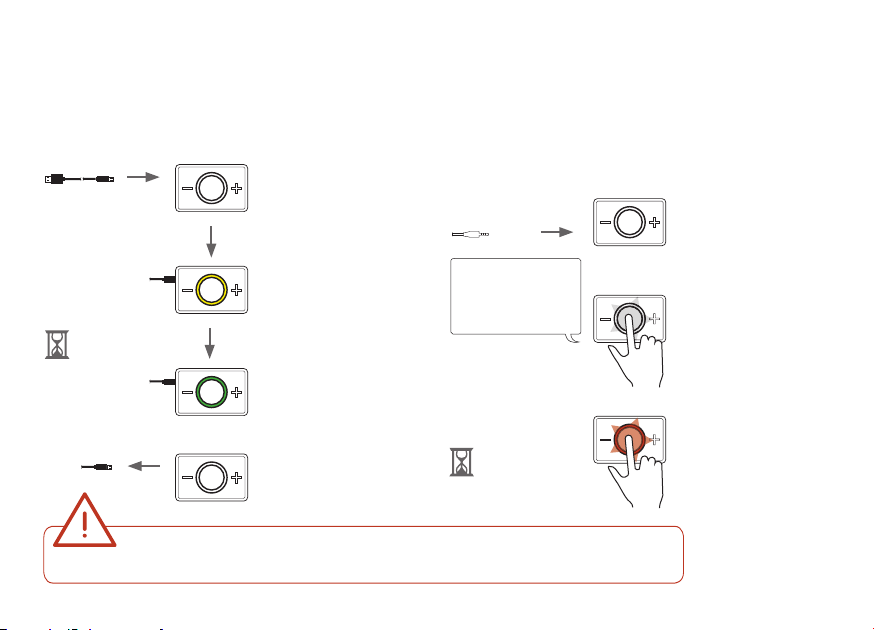
et the device into pairing mode by pressing the Plus + and the inus - button simultaneously. Activate luetooth®on
your smartphone and scan for luetooth devices. he device is shown on the mobile phone as CEECOACH incl. the last
characters of the serial number, which can be found on the back side of the device. Click or tap the device to establish
a connection. An incoming call is announced by CEECOACH and accepted by pressing the alk button o once. Double
clicking the alk button o terminates the call. Pressing the alk button o again puts the device back into participant
mode. f you do not wish to accept a call, click the alk button o twice - and the participant mode will be retained.
CEECOACH 2 only: Connect luetooth headset or loudspeaker
Attention As long as no luetooth headset is paired you can hear audio prompts from CEECOACH through the provided
corded headset only. et your CEECOACH and your headset or loudspeaker into pairing mode. Please consider manuals
and audio prompts of your respective devices. ecommended and tested headsets are offered on our online-shop
www.ceecoach-onlineshop.de. urther, you can use all headsets supporting the "luetooth® Headset Pro le". However,
we cannot guarantee faultless functioning with all headsets. ith CEECOACH you can pair a smartphone in addition to
your luetooth headset see above.
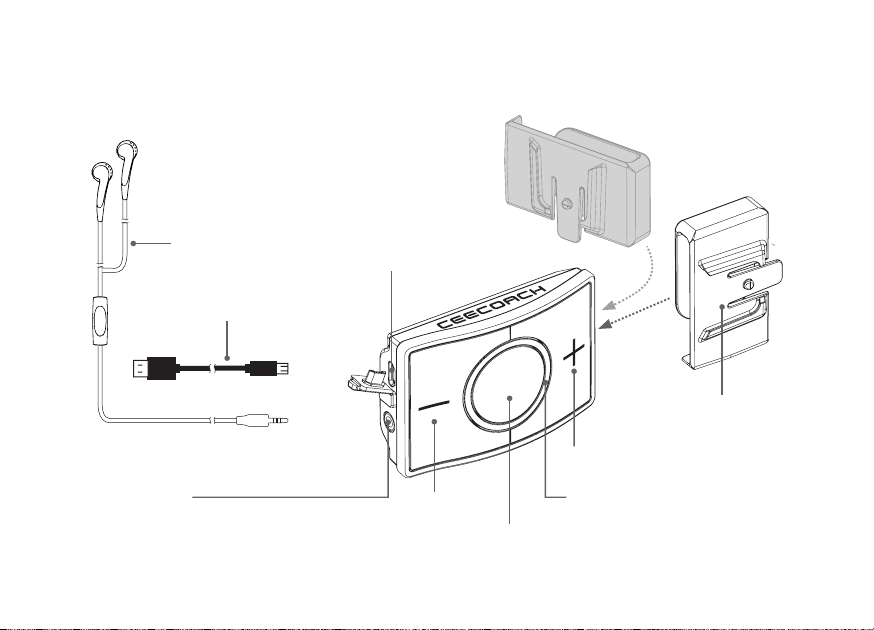
CEECOACH
Made in Germany
CEECOACH
XXXXXXX
SN: XXXXX 2D53
XXXXXXXX
3.1. Turn
CEECOACH
device
4.1. Select CEECOACH
device
1. Press - +
simultaneously
until yellow ashing
light appears
2.1. Activate luetooth®
on your smartphone
2.2 Set your Bluetooth
accessories into
pairing mode
3.2 For headsets: Pay attention to audio
prompts of your headset or loudspeaker and wait
for a signal that connection is established successful
e.g. connected.
2D53
CEECOACH
Loudspeaker has to support handsfree mode
Connection to Bluetooth accessories (e.g. headset)
10

Function table Range
Adjusting the volume
f you would like to reset your CEECOACH device to factory
settings, press all three buttons -, o and + until the
devices switches off. During this process, the light ring
brie y ashes red and then white again factory settings.
Reset
>2 sec.
Please adjust the volume by pressing the + or - buttons
several times until you have set the desired volume.
he maximum range of 00 m 100 ft is reached when line
of sight is given. f a participant is out of range, two short
deep tones will be played. Once the participant is back in
range, the participant hears a deep tone followed by a high
one.
Activate o o 1second
Deactivate o > 3 seconds
olume ncrease volume +
Decrease volume -
Establish connection
e.g.:
-Participant ight to speak
- Accept telephone calls
o Press once
Disconnect
e.g.:
oderator End participant
mode
- End or reject telephone
calls
o Press twice
Connection with
Bluetooth accessories
- + simultaneously,
>2seconds
Reset to factory settings
+, o -
simultaneously,
>2seconds
Role assignment:
Moderator
+ o
simultaneously,
>2seconds
Role assignment:
Participant
- o simultaneously,
>2seconds 11

Number of users up to 6 people
simultaneously
Dimensions xHxD 75 X 50 X 24 mm
(2.95 x 2x 0.95 inches
Mount clip that snaps in 90° levels
Illumination multi-colored LEDs
Talk time up to 10 hours*
Stand-by time up to 3days*
Operating temperature -10°C to 45° C (14°F to 113°F)
Storage -20°C to 60°C (-4°F to 140
Protection class splash-proof, dust-proof,
shock-proof
Range up to 500 m (1600 ft
Data transfer Bluetooth® 4.0
Power supply Lithium-ion battery
Charging time max.4hours*
Headset connection 3.5 mm jack plug
Charger connection standard micro-USB
*Deviations possible depending on method of use.
aximum range is reached when visual contact is given.
Update function
Updates are used to keep CEECOACH functions current and
up to date. he latest software version can be downloaded
at www.ceecoach.com at any time. Use the USB cable
included in the delivery to connect your CEECOACH device
to a computer to which you have downloaded the update
and press all three buttons +, o and - simultaneously
for more than 2seconds.
ow, run the le on your computer. he light ring ashes
white while the update is being imported and will "show"
the battery life when the update was successful. Please
consider indications given onscreen. hen you can
safely disconnect the device. Our website
contains further information on the update procedure.
Technical features
>2sec.
un the le on the
computer
Update is
imported
Update is
completed
12

CEECOACH transmits close-range signals in the license-
free band . GHzluetooth®. he maximum
range depends on various factors and operating modes
direct view, no antenna coverage, etc. luetooth®is a
registered trademark of Bluetooth®SIG Inc.
Although Bluetooth®is designed to establish stable
connections at short range, like with any radio technology,
interruptions are possible. Connections can malfunction,
be faulty or even shut down entirely. Particularly if several
devices are operated in a luetooth network, faultless
connections cannot be ensured in all situations.
According to current knowledge, there is no indication
that the use of luetooth devices has any negative effects
on humans. he transmission power of the CEECOACH
communication system is max. 100m. n comparison
the transmission power of a mobile phone is 2. he
ISM frequency range used by Bluetooth® has been
classied as uncritical in terms of potential health risks
for worldwide use in the elds of industry, science and
medical technology.
o prevent damage to hearing, the device
should not be applied at high volumes over
longer periods of time. educe the volume when using
a headset if you cannot hear the voices of the people
in your direct vicinity or when people next to you hear
echo from your headset. Store CEECOACH with all its
accessories in a secure place and keep out of reach of
children and animals. he device contains small parts
that can be swallowed or inhaled.
Use CEECOACH at ambient temperatures between
-10 °C and 45 °C (14°F to 113°.
• Protect batteries and chargers against damage.
• Protect batteries against extreme cold and heat. Extreme
temperatures may impair the charging capacity and
service life of your batteries.
• Batteries should not come into contact with metal
objects
as this may cause them to short circuit, which in turn
damages the battery temporarily or even permanently.
ever make use of damaged batteries or chargers.
Bluetooth®
Radio contact
Health notice
Avoiding hearing damage
Secure temperature range
Information
13

This can damage the battery:
hen charging the battery, only use the charging cable
provided in the delivery.
mmediately discontinue use if the product overheats,
the charging cable is damaged or the product itself is
damaged.
mmediately discontinue use if the product or the
charging cable comes into contact with liquid.
ever charge a battery in an environment in which the
temperature can fall to below 0°C (32 or rise above
+ 45°C (113.
ever charge batteries unsupervised.
Caution electric shockre hazard. or indoor use only.
Do not expose to moisture, liquid or heat. Only use the
power supply provided in package content for charging
your CEECOACH.
he CEECOACH communication system is equipped
with a Li-on battery with an overall capacity of
530mAh. Li-on batteries do not have a memory effect,
which means they can be recharged at all times. The
charging technology prevents the batteries from being
overcharged. Once the battery is charged, its mode
switches to charge conservation. o ensure that the
battery retains maximum capacity, it should be fully
charged at least 20 times and then be discharged again.
he average charging time of an empty battery is max. 4
hours. A charged battery allows for talk times of up to 10
hours depending on operating mode. hen not in use,
CEECOACH should be recharged once every 3 months.
he battery is equipped for 400 charging cycles at min. 80
percent charging capacity.
Improper charging
Power supply warning
Battery care
14

f you would like to dispose of your communication
system at a later time, please observe the following
his product is subject to European regulation
2002/96/EC.
All electric and electronic appliances must be disposed
of separately from normal household waste and taken
to state or municipal-approved disposal center for
this purpose.
Proper disposal of used appliances prevents potential
damages to humans and the environment.
Detailed information on the disposal of used
appliances can be obtained from local authorities,
disposal centers and the specialist dealership from
which you have purchased the device.
•
•
•
•
Our high level of safety and quality is ensured by the
constant further development of our products. his may
result in deviations between this instruction manual
and the device and accessories you have purchased.
Errors can also not be fully excluded. Please understand
that no claims can be made on the basis of information,
illustration and descriptions.
e reserve the right to make changes and updates to all
performance features and specications unannounced.
CurrentnessDisposal of the product
15

Erläuterung Symbolik
Bebilderte Geräteübersicht
evor es losgeht
ollenzuweisung Pairing
gliche erbindungsmodi
astensperre, oderator stumm schalten
erbinden mit luetooth ubehr
z.. Headset
unktionstabelle urzübersicht,
eichweite, Lautstärke regeln eset
Technische Merkmale und
Update unktion
Hinweise zum Gebrauch und chutz,
unkverbindung
Pege Akku, Entsorgung Aktualität
S 17
S 18
S 19
S20
S 21 - 23
S23
S24
S25
S 26
S 27
S28 - 29
Inhaltsverzeichnis
Bitte wenden Sie sich bei Rückfragen oder Gewährleistung
an hren Distributor
Gekauft am:
Bei:
enutzung auf eigene Gefahr
nformationen zu ulassungen des Gerätes nden ie im
beigelegten Informationsblatt.
16

Einstellung Headsets
Bitte stellen sie sicher, dass ihr CEECOACH auf das
richtige Headset eingestellt wurde. Sie können dies
mit dem nstallationsprogramm überprüfen und
ändern. enn ie ein tereo-CEECOACH mit einem
Monoheadset betreiben, können Echos auf der
Gegenseite auftreten. enn ie ein ono-CEECOACH
mit einem tereoheadset nutzen, werden ie nur auf
einem Ohr etwas hören.
Lieferumfang
siehe erpackung
Der Leuchtring um die prechtaste o zeigt etriebs-
zustände an. Der ing kann in verschiedenen arben
leuchten Grün, lau, ot , Gelb, ei und iolett,
durchgehend an sein oder blinken.
eispiele
Schnelles
Blinken
DauerlichtLicht
aus
Langsames
Blinken
Erläuterungen der Symbolik
Bitte beachten Sie die Anleitung des ggf. getrennt
mitgelieferten Headsets. Sie können auch eigene
Headsets verwenden.
*
17

Geräteübersicht
Drehbare Clip-
Halterung im
0-Grad-inkel
einrastbar
Plustaste +
Headset-
Anschluss
(3,5mm linke
Headset
Micro-USB-
Kabel
prechtaste o
Leuchtring
Micro-USB-
Anschluss
inustaste -
18

Das Gerät ist je nach Akkuzustand in maximal 4 tunden vollständig aufgeladen, wenn das gelbe Dauerlicht
auf grün umschaltet. um Laden tecken ie dazu das beigelegte Ladekabel in den icro-U-Anschluss
und schliessen ie es am mitgelieferten etzteil an oder benutzen ie einen U-Port an einen Computer.
Micro-USB-Kabel
anschlieen an
U-Doppel-
adapter oder PC
Au aden
Grünes
Dauerlicht Gerät
ist vollständig
aufgeladen
Micro-USB-Kabel
abziehen
1.
2.
3.
4.
Bevor es losgeht
Headset
anschlieen
Einschalten
eies Licht
ollenzuweisung
muss noch erfolgen
Ausschalten.
(Leuchtring blinkt
kurz rot auf.
5.
6.
7.
Alle CEECOACH-unktionen stehen nur nach Abziehen des ikro-U-teckers zur erfügung
>3Sek. = aus
max. 4Std.
Audiohinweis
beim Einschalten:
"Battery good,
battery low"
19

>2Sek. (o) & (-) Betriebsbereit
nach ca. 30 ek. angezeigt durch
langsames Blinken.
>2Sek. (o) & (+) Betriebsbereit und / oder
aximalzahl eilnehmer gefunden,
nach ca. 30 Sek. bei langsamen Blinken.
Teilnehmer zuweisen
Um dem Gerät die olle des eilnehmers zuzuweisen drücken ie bitte nach dem Einschalten die inustaste - und
die prechtaste o gleichzeitig bis das Gerät grün blinkt.
Rollenzuweisung (Pairing)
ei der Auslieferung sind den Geräten keine ollen zugewiesen alle Geräte sind gleich. Dieser organg erfolgt beim
erstmaligen Einschalten. ollen ie die Geräte einschalten, ohne die vorher zugewiesenen ollenverteilungen zu
verändern, drücken ie die prechtaste o eine ekunde lang. Die ollenzuweisung ist nur einmal am Anfang ntig.
oll die olle eines Gerätes geändert werden, knnen ie den organg jederzeit wiederholen nach einem eset. chten
ie die eilnehmerzahl erhhen, so muss ebenfalls erst ein eset der bereits verbundenen Geräte durchgeführt werden.
Moderator zuweisen
Dazu drücken ie bitte nach dem Einschalten des zukünftigen oderators die Plustaste + und prechtaste o
gleichzeitig bis das Gerät blau blinkt.
20
Table of contents
Languages:
Other PEIKER CEE Conference System manuals
Popular Conference System manuals by other brands
![Comnet CNFE3FX1TX2C[/M] Series Installation and operation manual Comnet CNFE3FX1TX2C[/M] Series Installation and operation manual](/data/manuals/1j/d/1jdqj/sources/comnet-cnfe3fx1tx2c-m-series-conference-system-manual.jpg)
Comnet
Comnet CNFE3FX1TX2C[/M] Series Installation and operation manual

Biamp
Biamp Tesira HD-1 Installation & operation guide

Audio Technica
Audio Technica ATUC-50 instruction manual

Panasonic
Panasonic WGAV120 - VIDEO TRANSMISSION operating instructions

Jabra
Jabra TOUR Get started

Creator Electronics
Creator Electronics WiFi Conference System user manual

Yealink
Yealink MeetingSpace VC880 user guide

COMMUNICATIONS-APPLIED TECHNOLOGY
COMMUNICATIONS-APPLIED TECHNOLOGY ICRI-WFM Setup and operating procedures

Poly
Poly Studio P21 user guide

Bosch
Bosch B426 Setup & troubleshooting

Polycom
Polycom RealPresence Group 500 systems Setting up

Merlin
Merlin 3070 Service and maintenance manual