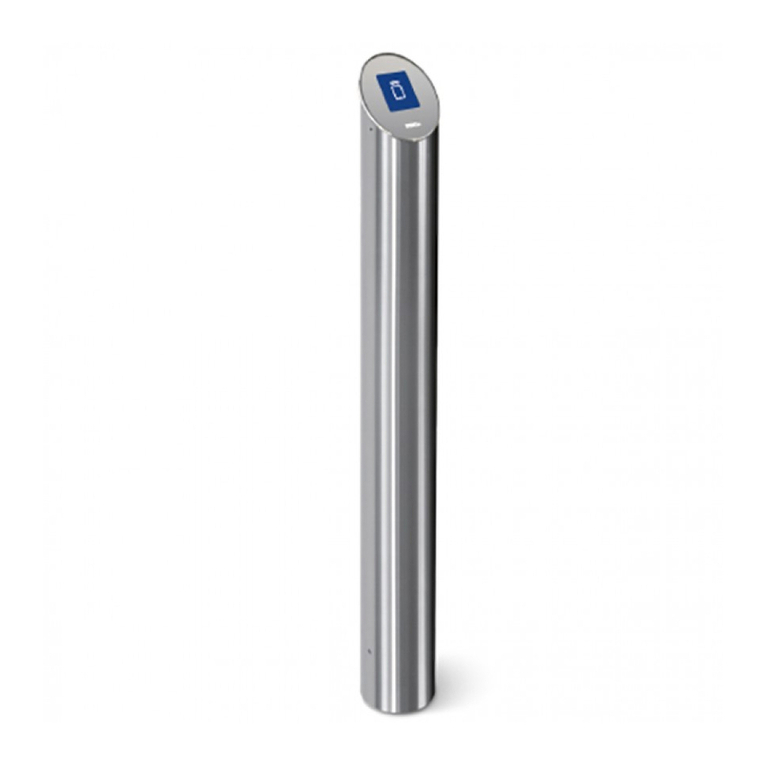
PERCo IC02.1 Installation and operating instructions

Card Capture Reader
IC02.1
ASSEMBLY AND OPERATION MANUAL

Card Capture Reader
IC-02.1
Assembly and Operation Manual

CONTENT
1Application...................................................................................................................3
2Operation conditions ...................................................................................................3
3Technical specifications ..............................................................................................4
4Delivery set..................................................................................................................4
4.1Standard delivery set ..........................................................................................4
4.2Optional equipment supplied on request.............................................................4
5Product description......................................................................................................5
5.1Main features ......................................................................................................5
5.2Design.................................................................................................................7
5.3Power supply ......................................................................................................7
5.4Control ................................................................................................................9
6Marking and packaging .............................................................................................10
7Safety requirements ..................................................................................................10
7.1Installation safety requirements ........................................................................10
7.2Operation safety requirements..........................................................................10
8Installation instructions ..............................................................................................11
8.1Installation details .............................................................................................11
8.2Installation tools ................................................................................................11
8.3Cables parameters............................................................................................11
8.4Installation.........................................................................................................12
9Software configuration...............................................................................................15
10Power-up...................................................................................................................17
11Operation instructions ...............................................................................................17
11.1Presenting a quest card ....................................................................................17
11.2Presenting a permanent card............................................................................18
11.3Blocking and resume of card capturing.............................................................18
11.4Removal and installation of the card container .................................................18
12Transportation and storage .......................................................................................19
13Troubleshooting.........................................................................................................19
14Maintenance..............................................................................................................19

IC-02.1 card capture reader
Dear Customers!
Thank you for choosing a card capture reader manufactured by PERCo.
By making this choice, you have purchased a high-quality product, which will serve you for
years to come if you follow installation and operation recommendations.
The Assembly and Operation Manual (hereinafter – the Manual) contains information on
transportation, storage, installation and operation of the IC-02.1 card capture reader. The
installation must be carried out by qualified installers in strict accordance with the Manual.
Abbreviations adopted in the Manual:
ACS – access control system;
OD – operating device.
1 APPLICATION
The IC-02.1 card capture reader (hereinafter – the card capture reader) is designed to
operate within PERCo-Web system as a device for reading, capturing and keeping
proximity cards issued to visitors and meant for return at exit (hereinafter – guest cards).
The card capture reader operates together with following controllers:
CT/L-04;
IP-Stile built-in controller.
To ensure quick and easy passage of people it is recommended to install one card capture
reader together with an OD for every 500 people.
Attention!
The card capture reader is not compatible with systems from other manufacturers.
2 OPERATION CONDITIONS
The card capture reader with regard to resistance to environmental exposure, complies
with GOST 15150-69, category U4 (operation in premises with climate control).
Operation of the card capture reader is allowed at an ambient air temperature from +1°C
to +45°C and relative air humidity up to 70% at +27°C.
3

Assembly and Operation Manual
4
3 TECHNICAL SPECIFICATIONS
DC operating voltage ...................................................................................... 12±1.2 V DC
Power consumption ............................................................................................ max. 12 W
Card container capacity........................................................................................ 350 cards
Access cards type......................................................................................... HID, EM-Marin
Interface of the reader’s connection with a controller ............................................... RS-485
Card reading distance at the rated operating voltage:
HID ........................................................................................................... min. 6 cm.
EM-Marin .................................................................................................. min. 8 cm.
Ingress Protection Rating .......................................................................... IP41 (EN 60529)
Electric shock protection class....................................................................... III (IEC 61140)
Mean time before failure................................................................ 1,000,000 card captures
Mean lifetime ............................................................................................................ 8 years
Overall dimensions (L × W × H) ............................................................ 194×194×1017 mm
Weight (net) ....................................................................................................... max. 15 kg
Overall dimensions of the card capture reader are given in Figure 1.
4 DELIVERY SET
4.1 Standard delivery set
Main equipment:
Card capture reader ................................................................................................ 1
Container lock key ................................................................................................... 2
Technical documentation:
Certificate ................................................................................................................ 1
Assembly and operation manual ............................................................................. 1
Package:
Box .......................................................................................................................... 1
4.2 Optional equipment supplied on request
The following optional items can be included in the delivery set on customer request:
Anchor PFG IR 10 («SORMAT», Finland) ............................................................... 4
Hexagon key S8 (for anchor bolts M10) .................................................................. 1

IC-02.1 card capture reader
Figure 1. Overall dimensions of the card capture reader
5 PRODUCT DESCRIPTION
5.1 Main features
Supports permanent cards (without capturing) and guest cards.
The card capture reader is supplied with the safe voltage – no more than 14 V.
The card capture reader has low power consumption – no more than 12 W.
The card capture reader features optical sensors monitoring capturing of guest
cards and allowing for correct register of the fact of capturing.
Front panel of the card capture reader is locked and ensures authorized access to
the card container.
External elements of the card capture reader (panels) are made of polished
stainless steel.
The card capture reader is equipped with a built-in reader mounted on the internal
side of the cover. On the cover there is an indication module with mnemonic
indicators.
5

Assembly and Operation Manual
Figure 2. Overall view
Standard delivery set:
1 – base; 2 – housing; 3 – panel; 4 – cover; 5 – indication module;
6 – slot for guest cards capture; 7 – electric drive with a shutter;
8 – card container lock; 9 – card container.
Not included in the standard delivery set:
10 – card capture reader power cable; 11 – cable for ACS controller connection;
12 – cable for data lines connection of the reader installed in the card capture reader.
6

IC-02.1 card capture reader
5.2 Design
The design of the card capture reader is shown in Figure 2. Numbers of the items
hereinafter refer to the item numbers as shown in Figure 2.
The cover (4) houses: on the external side – an indication module (5) with 3 mnemonic
indicators, (shown in Figure 3), on the internal side – a reader (a control board without
casing with an antenna). The cover has a slot (6) for cards capturing.
Green indicator - authorization of passage →
Yellow indicator - the passage waiting
(standby card presentation) →
Red indicator - the prohibition passes →
Figure 3. Mnemonic indicators display unit
Panel (3) is fixed to the housing (2) with screws, that when taken of gives an access to the
units that ensure operation of the card capture reader:
card capture reader control board that is located in its upper part from the panel’s
side;
electric drive with a shutter (7) that prevents card falling into the card container;
shutter position optical sensors;
card position optical sensors, the fact of capturing and overfilling of the container.
5.3 Power supply
The card capture reader is powered from a DC power supply with 12±1.2 V voltage. The
card capture reader can either be connected to a separate power supply or parallel to the
ACS controller to the general power supply.
When choosing power supply unit make sure it provides a 30% reserve of the
consumption current. Maximum consumption current of the card capture reader is 1 A.
Maximum consumption current of the ACS controller is given in its certificate.
Power cable (9)is connected to the connector block XT6 of the card capture reader
control board (see Figure 4).
Cable (9) is not included in the set of delivery.
7

Assembly and Operation Manual
Figure 4. Card capture reader control board
8

IC-02.1 card capture reader
5.4 Control
RS-485 interface lines have leads with contacts 1(A RS-485) and 2(B RS-485) of XT5
connector block of the card capture reader control board (see Figure 4).
An ACS controller controls the card capture reader by sending a signal to the “Capture
card” input of the card capture reader control board (contact 1of the connector block XT1).
Card capture reader generates a “Card captured” signal (contact 1of the connector block
XT2) and in certain cases – signal “Fault” (contact 2of the connector block XT2).
The “Capture card” input is controlled by output of “dry contact” type or “open collector” of
the ACS controller. The input is “normal open”, i.e. when a control signal is given the ACS
controller closes it to the “GND” contact (contact 2 of the connector block XT1).
Input parameters:
voltage at the open contact relative to “GND” ............................................. 5±0.5 V
voltage at the closed contact relative to “GND” .......................................max. 0.8 V
current via closed contact .....................................................................max. 1.5 mA
The “Card captured” and “Fault” outputs – of “dry contact” type. Each of these outputs is
one of two relay contacts. Other relay contacts are banded and connected to the “COM”
output (contact 3of the connector block XT2). The outputs are “normal open”, i.e. while
producing a signal the corresponding output is connected to “COM” contact.
Output parameters:
max. voltage between the corresponding output and “COM” contact ......... 42 V
max. switched current ............................................................................. 200 mA
If an access card inserted into the (6) slot requires to be captured the ACS controller gives
a signal to the “Capture card” input.At this signal the electromagnet opens the shutter that
prevents an access into the card capture reader and the card falls into the card container
(9), i.e. the card capturing occurs. If the optic sensor sees that the card at the slot is
missing then the electromagnet will not actuate and the access into the card capture
reader will remain shut.
At the card falling into the card container the optic sensor registers the fact of card
capturing. Only in this case the card capture reader gives the “Card captured” signal to the
ACS controller. On receiving this signal the ACS controller deactivates the “Capture card”
signal after which the card capture reader deactivates the “Card captured” signal.
On cards capturing the container gets full. When it is full further cards capturing is blocked
till the captured cards are extracted from the container. In this case the card capture
reader generates the “Fault” signal for the ACS controller.
To resume capturing of guest cards it is necessary to extract the full container from the
card capture reader and empty the cards
If the container is free from cards but the card capture reader is still blocked a likely reason
for this could be failure of the card capture reader units. It is recommended to apply to the
PERCo Technical Support Department.
9
Assembly and Operation Manual
6 MARKING AND PACKAGING
The card capture reader has a marking - a label placed on the internal side of the back
panel. It contains the name of the product, designation, the date of manufacture, the serial
number.
The card capture reader in the standard delivery set (see Clause 4.1) is packed in a
transportation box that protects its components from damage during transportation and
storage.
Box overall dimensions (L × W × H) ............................................................ 110×24×24 cm
Box weight ......................................................................................................... max. 18 kg
7 SAFETY REQUIREMENTS
7.1 Installation safety requirements
Installation should be carried out by qualified personnel after careful study of this Manual
in accordance with general rules for electrical and installation works.
Attention!
While installation:
all works should be performed only with the power supply switched off from the
AC mains;
only serviceable tools should be used for installation;
while the installation of the card capture reader until it is fixed, be extra cautious
and protect it from falling down;
before the first switching of the card capture reader make sure it is installed
correctly;
do not connect the card capture reader to a power supply unit with voltage and
frequency different from those given in the Manual (Chapter 3).
Installation of the power supply unit should be done in compliance with safety measures
described in its certificate.
7.2 Operation safety requirements
Observe general electrical safety rules when operating the card capture reader.
Warning! Not allowed to operate the card capture reader:
under conditions that do not comply with the requirements of Chapter 2of this
Manual.
at supply voltage that does not comply with the requirements of Chapter 3of the
Manual.
The operation of the power supply should be done in compliance with safety measures
described in its certificate.
10

IC-02.1 card capture reader
8 INSTALLATION INSTRUCTIONS
8.1 Installation details
When installing the equipment, observe precautions (see Clause 7.1).
Proper installation is critical to performance and serviceability of the card capture reader.
We strongly advise to study this section before installation work, and follow the instructions
to the latter.
Attention!
The manufacturer will not accept liability for any damage to the card capture reader
or otherwise loss caused as a result of improper installation, and will dismiss any
claims by the customer should the installation work be carried out not in accordance
with this Manual.
We recommend:
installation to be carried out by at least two persons qualified to perform assembly
and electric works;
mount the card capture reader on flat, solid concrete floors (grade 400 or higher,
SCS B22.5), stone or similar foundations at least 150 mm thick;
use reinforcing elements 300×300×150 mm for installation on less steady
foundations;
make sure the mounting foundation is horizontal and flat; the flatness deviation
must not exceed 1,5 mm;
use “SORMAT” anchor bolts to fix the card capture reader.
8.2 Installation tools
We advise to use the following tools for the installation work:
hammer drill 1.21.5 kW;
16 mm, 30 mm hard-alloyed drill bits;
S8 hexagon wrench;
cross-head screwdriver No. 2 (150mm);
knife;
measuring tape (1 m);
level gauge.
Note:
Other tools can be used that don’t deteriorate the quality of installation work.
8.3 Cables parameters
The cables used for connection of the card capture reader are given in Table 1.
Table 1. Recommended cable types
№Connection Max.
length, m Cable type Example
1 IC-02.1 –
power supply
30
50
Twisted pair cable with
cross section min. 0.75 mm2
AWG 18; HO3VV-F 2×0.75 bi-
coloured
2 IC-02.1 – ACS
controller 50 24AWG – 18AWG
( 0,2 - 0,8 mm2)
RAMCRO SA82BI-T, W8ekw
CABS8/EC, 8C.SEC-SC,
3 Reader board –
ACS controller 50 Twisted pair cable, min.
Cat5 2×2×0,52, F/UTP2-Cat5e
11

Assembly and Operation Manual
8.4 Installation
Further installation instructions are given with the earlier mentioned recommendations (see
Clause 8.1) taken into account. Recommendations on preparation of mounting holes in the
mounting surface are given with regard to “SORMAT” PFG IR 10 anchor bolts for solid
concrete floors.
1. Unpack the card capture reader, check the delivery set completeness.
2. The card capture reader is placed at an exit from the territory before the OD.
3. Mark out mounting holes following Figure 5on the mounting surface for the card
capture reader installation, as well as mark electric raceways for the power cable
(10)1,cable for connection an ACS controller (11)1and cable (12)1for the reader’s
data lines connection to Azone of the cables input to the card capture reader with
regard to location of the power supply, ACS controller and OD.
Figure 5. Floor anchor position and cable entries (A) for IC-02.1 housing installation
Note:
Material, configuration, dimensions, wiring type (surface, buried, combined), position
at the entrance point and other characteristics of the electric raceways are chosen
by the customer in accordance with the entrance point features and layouts, other
operational factors.
4. Prepare the electric raceways and mounting holes for the card capture reader
installation. Set the anchors all the way down the prepared holes.
5. Carefully lift up the cover (4) and slightly move it for access to two screws fixing the
panel (3). When moving the cover do not disconnect the reader cable. Release the
screws and take off the panel (3).
6. Place the card capture reader on the mounting surface so that its base (1) was near
Azone (see Figure 5).
7. Through the central hole 30 mm in the base (see Figure 6) pull cables (10), (11)
and (12) inside the card capture reader in the back panel direction and further up
1Cables (10), (11) and (12) are not included in the standard delivery set.
12

IC-02.1 card capture reader
the panel to the cover (4). Use the cables given in Table 1. The length of the cables
ends that remain inside the card capture reader after their pulling should be enough
for their further connection. It is recommended to secure all cables on the internal
sides of the base (1) with cable ties and self-adhesive cable tie mounts1.
Attention!
Be extra cautious and careful when carrying out further works, make sure the card
capture reader does not fall until it is fixed in place.
Figure 6. Base (1) bottom view:
central hole Ø30 mm is intended for cables entry
8. Put the base (1) of the card capture reader to A zone. Match four holes in the base
with holes in the mounting surface. Fix the card capture reader with anchor bolts,
controlling its vertical position with a level gauge.
9. Pull the cables in the corresponding electric raceways.
10. Connect the cables to the card capture reader control board located in its upper
part from the panel (3) side. Make connection according to wiring diagram (see
Figure 7).
11.Set the panel (3) into operating position and fix it with screws. Install the card
container (9) using the lock (8). Install the cover (4) by carefully pressing it until it is
fixed by clamps.
12. Check accuracy and integrity of all cables laid. Check accuracy and reliability of all
electrical connections of the card capture reader with power supply and ACS
controller.
13. On completion of checking the card capture reader is ready for operation.
1Cable ties and self-adhesive cable tie mounts are not included in the set of delivery.
13

Assembly and Operation Manual
Figure 7. Wiring diagram card capture reader - CT/L-041controller
Table 2. Wiring diagram elements
Position Name Q-ty
A1 RC panel 1
A2 IC-02 card capture reader 1
A3* CT/L-04 controller 1
A4* Power supply 1
A5* Reader for opposite to the card capture reader direction 1
1* Card capture reader power cable 1
2* Cable for ACS controller connection 1
3* Cable for connection of the reader installed in a card capture reader (RS-485) 1
4* Reader cable 1
* - equipment is not included in the standard delivery set.
1Contact 1 “Card Captured” (**) at the XT2 connector block of the card capture reader is
connected parallel to RC panel (A1) to contact 2 «DU A» or 4 «DU B» of the XT2 connector block.
The choice of the contact depends on the passage direction “A” or “B” set for collecting guest
cards.
14

IC-02.1 card capture reader
9 SOFTWARE CONFIGURATION
After the card capture reader installation and power up it should be configured in PERCo-
Web network software. In the connected controller Section «Administration» the following
parameters should be set:
1. For controller Auxiliary output №3, parameter Type set as Standard. Parameter
Normal state set as Not energized:
2. For controller Reader №…, corresponding to the card capture reader.
2.1. Parameter Confirmation from the remote control: in “Control” mode set as
Yes. In the opened list mark by flags Verify identifiers of VISITORS: when
passing; when passing with VIOLATED TIMING; when passing with
LOCATION VIOLATION.The “Card captured” will be a confirmation signal to the
controller at that:
15

Assembly and Operation Manual
2.2. Set the Waiting period for verification confirmation. Within that time the
controller will wait for the “Card captured” signal.
2.3. For parameter Auxiliary outputs activated on VISITORS valid identifiers
presentation set the Activation criterion as For the operation time. After that
mark by flag Auxiliary output №3. Activation of this output will be a signal for
“Card capture” to the card capture reader:
3. The card capture reader generates the “Fault” signal to the auxiliary input №1 and
“Activation of auxiliary input” is registered at that. The system response can be
configured. For controller Auxiliary input №1, parameter Type set as Standard.
Parameter Normal condition of the contact set as Disconnected. Using the other
parameters configure the system response:
16

IC-02.1 card capture reader
10 POWER-UP
1. Connect power supply unit to the mains with voltage and frequency given in its
Certificate.
2. Switch on the power supply unit.
3. The indication module will light up in accordance with operating mode set by ACS
controller.
4. Check operation of the card capture reader together with the ACS controller in all
modes according to the operation algorithm (see Clause 11.1, 11.2).
11 OPERATION INSTRUCTIONS
Attention!
When operation the equipment, observe precautions (Clause 7.2).
Warning! Don’ts:
dismantle and/or adjust operational units of the card capture reader;
clean the card capture reader with substances that may cause damage or
corrosion;
keep the card capture reader out of jerking and thrusting.
At the standby state the ACS controller is switched into “Control” mode and blocks the
operating device. Control over indication of the built-in reader inside the card capture
reader is made by the ACS controller and the yellow LED indicator lights up on the
indication module.
On leaving the site visitors and employees present their cards to the card capture reader.
Code reading is confirmed by momentary change of yellow LED indicator and sound
signal.
11.1 Presenting a quest card
The guest card is presented by inserting it into the slot of the card container.
At the guest card presentation, considering that card is operative and its validity
corresponds to the time of passage, the ACS controller sends a signal to the card capture
reader to capture the card and switches into the “Verification” mode. The simultaneous
blinking of green and red LED indicators is present on the indication module at that.
In case of the ban on passage (card fault, card invalidity corresponding to the time of
passage or access wright) the ACS controller does not switch to “Verification” mode. The
red indicator and sound signal is switched on for 2 sec. on the indication module at that.
After that the ACS controller blocks the operating device and switches back to the
“Control” mode.
Being in the “Verification” mode the ACS controller receives the “Card captured” signal at
the card falling into the card container. After receiving this signal the ACS controller will
unblock the operating device for the time set by its Passage waiting time parameter. The
green indicator on the indication module showing authorization of passage is switched on
at that.
After the passage through operating device is made or its Passage waiting time is lapsed
the ACS controller switches back to the “Control” mode and blocks the operating device.
17

Assembly and Operation Manual
If at the “Verification” mode expiration the ACS controller does not receive the “Card
captured” signal from the reader it will not unblock the operating device. The red indicator
and sound signal is switched on for 2 sec. on the indication module at that. After that the
ACS controller switches back to the “Control” mode. The missing of the signal “Card
captured” shows that the card has not fallen into the card container. The reason can be
blocking of the card container, card capture reader failure or if the card was not inserted
into the slot.
Attention!
If the passage was not authorized the visitor shall take the card out of the slot and
refer to the entrance operator.
11.2 Presenting a permanent card
The permanent card is presented to the top cover of the card capture reader.
At the permanent card presentation, considering that card is operative and its validity
corresponds to the time of passage, the ACS controller sends a signal to unblock the
operating device for the time set by its Passage waiting time parameter. The green
indicator on the indication module showing authorization of passage is switched on at that.
After the passage through operating device is made or its Passage waiting time is lapsed
the ACS controller switches back to the “Control” mode and blocks the operating device.
In case of the ban on passage (card fault, card invalidity corresponding to the time of
passage or access wright) the red indicator and sound signal is switched on for 2 sec.
After that the ACS controller blocks the operating device and switches back to the
“Control” mode.
11.3 Blocking and resume of card capturing
On cards capturing the container gets full. When it is full further cards capturing is blocked
till the captured cards are extracted from the container. In this case the card capture
reader generates the “Fault” signal for the ACS controller.
At blocking of the guest card capturing the following indication is present: at first blinking of
the green and red indicators, after that switch on for 2 sec. the red indicator and sound
signal. After that the ACS controller switches back to the “Control” mode and the yellow
LED indicator lights up on the indication module.
Note:
While the capturing of guest cards is blocked the permanent cards are operated in
normal order.
To resume capturing of guest cards it is necessary to extract the full container from the
card capture reader and empty the cards (the order of the container extraction and
installation is described in Clause 11.4.
If the container is free from cards but the card capture reader is still blocked a likely reason
for this could be failure of the card capture reader units. It is recommended to apply to the
PERCo Technical Support Department.
11.4 Removal and installation of the card container
To take out the card container (9) from the card capture reader proceed as follows:
1 Switch off the power supply of the card capture reader.
2 Insert the key into the card container lock (8).
3 Turn the key all the way (open the lock).
4 Tilt the card container.
18

IC-02.1 card capture reader
19
5 Lightly lift the card container and take it out.
To insert the card container into the card capture reader proceed as follows:
1. Insert the card container upright into the card capture reader so that the guiding rail
in the base of the card container entered a channel in the lower part of the card
capture reader.
2. Keeping the card container vertical, gently push the bottom part of it all the way, its
upper part will properly lock by the side clips at that.
3. Turn the key in the lock all the way (close the lock); after the lock closing the card
container should lean tightly on the panel (3) without distortions.
4. When necessary to continue operation of the card capture reader switch on its
power supply.
12 TRANSPORTATION AND STORAGE
The card capture reader in the original package should be transported only in closed
freight containers or other closed type cargo transport units.
During storage and transportation the boxes can be stacked no more than 5 layers high.
The card capture reader should be stored in dry indoor facilities at ambient temperatures
between –40°C and +45°C and at relative air humidity of up to 98% at +25°C. The storage
room should be free from vapors of acids, alkalis, and gases that cause corrosion.
After transportation or storage at below-zero temperatures or high air humidity, the card
capture reader should be kept unpacked for no less than 24 hours under normal climate
conditions.
13 TROUBLESHOOTING
Possible faults to be corrected by the customers themselves are listed in Table 3.
For faults not listed in Table 3 we advise to consult PERCo Technical Support Department.
Table 3. Possible failures and troubleshooting
Fault Probable cause Remedy
Power supplies are on, but the card
capture reader does not function, the LED
indicators are off
Faulty connection or
breakdown of power
supply cable (10). Faulty
power supply unit.
Replace the cable (10).
Replace the power supply
unit.
The LED indicators are on but the card
capture reader is not controlled by the
ACS controller
Faulty connection or
breakdown of connection
cable (11) of the ACS
controller
Replace the connection
cable (11)
14 MAINTENANCE
Maintenance of the card capture reader during operation is reduced to periodic cleaning of
its outer surfaces. To remove dirt it is recommended to use liquid cleaners without
abrasives containing ammonia.
Table of contents
Other PERCo Card Reader manuals

PERCo
PERCo IR-04.1 Installation and operating instructions

PERCo
PERCo IRP-01 Installation manual

PERCo
PERCo RP-15.2 User manual

PERCo
PERCo IR-10 User manual

PERCo
PERCo IC-05 Installation and operating instructions

PERCo
PERCo IC-03.1 Installation and operating instructions

PERCo
PERCo IR-03.1 Installation and operating instructions