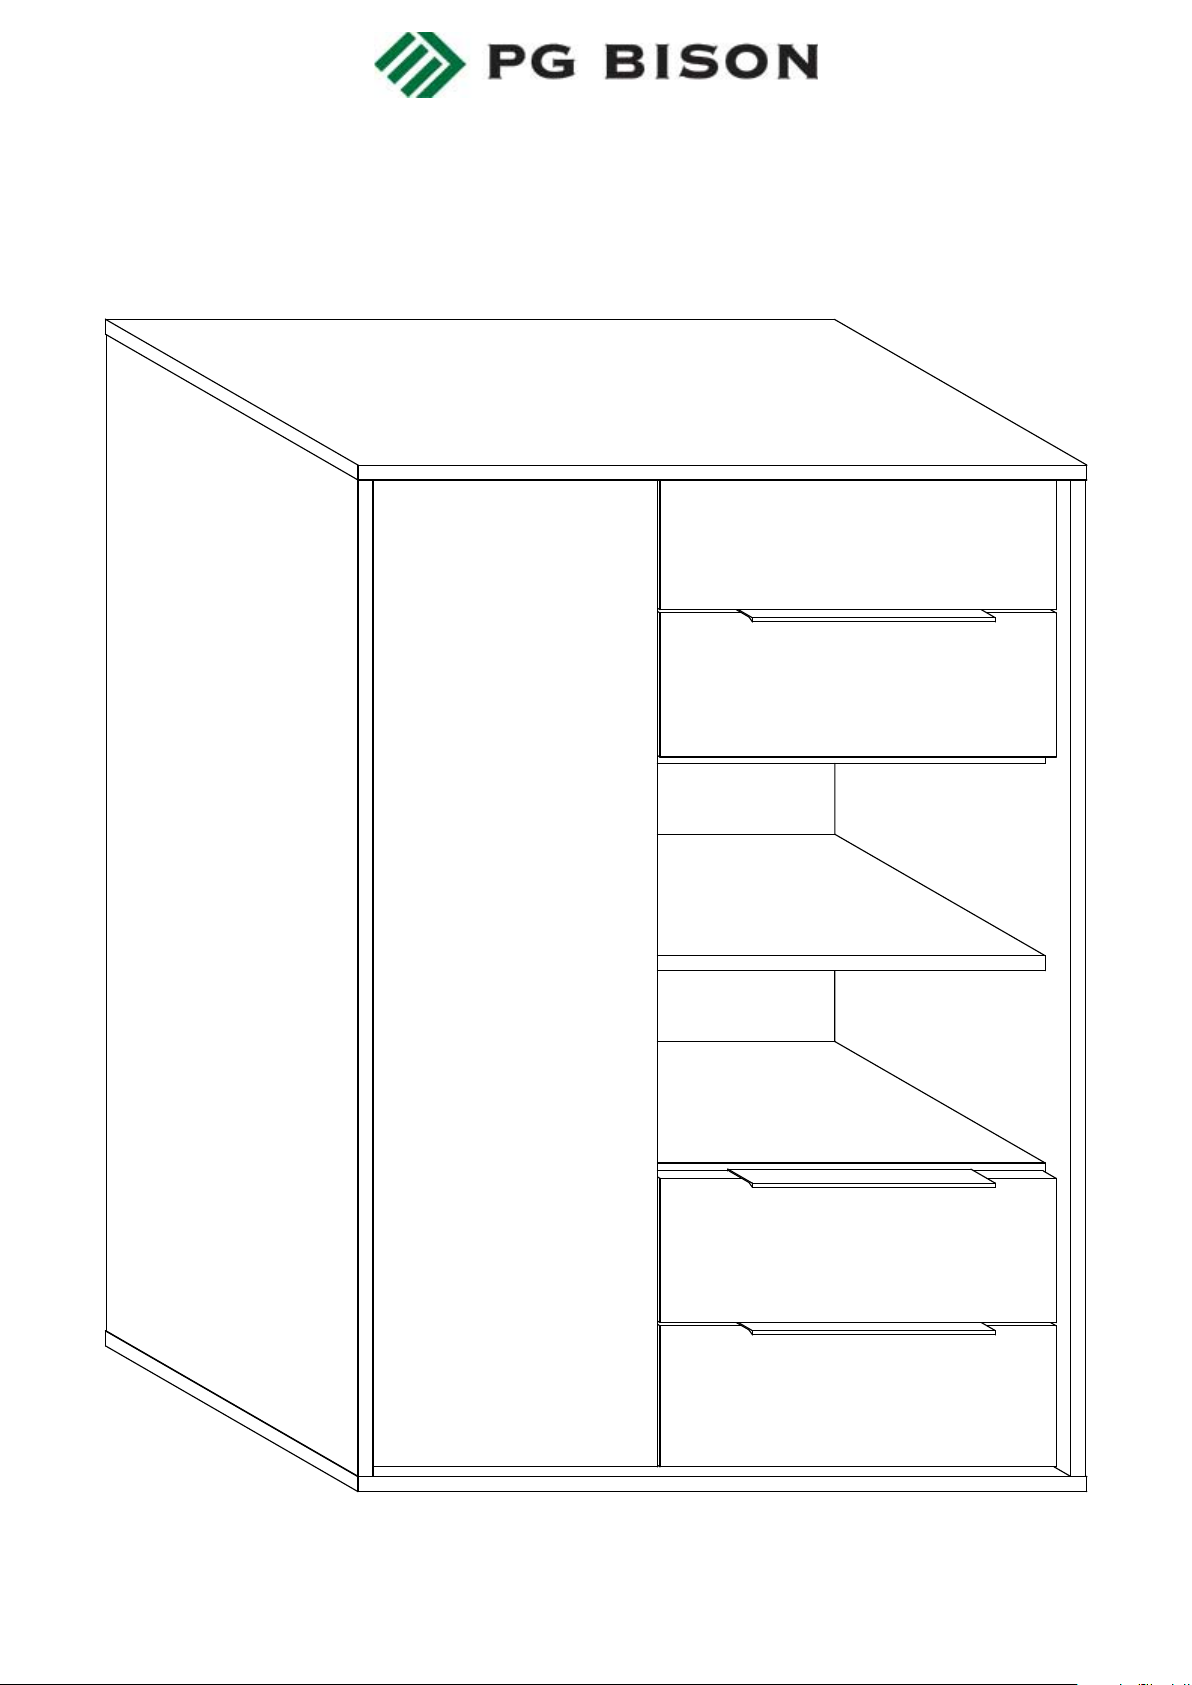
PG BISON OFFICE FURNITURE BLUM FLATPAX User manual

GSPublisherVersion 241.1.7.100
BLUM FLATPAX OFFICE FURNITURE RANGEASSEMBLY GUIDESTORAGE CABINET 1268mm1TOTAL NUMBER OF PANELS: 40

GSPublisherVersion 241.1.7.100
DufixMinifixModul Inset Application Hinge Kit3Handle J9913 260mm2TOOLS REQUIREDScrew Driver(Pozidriv Head)Cordless DrillPozi Bit (PZ2)Rubber Mallet8mm Drill BitPRODUCTQTYScrew 3.5 x 16mm64Wooden Dowel768464Tandem Single Extension Runners 270mmLeft & Right4 pairsScrew 4 x 30mm8Front Adjusters8Dome Screws8Locking Devices Left & Right4 pairsGlides4H - Profile Backer Connector43HARDWAREIMAGE

GSPublisherVersion 241.1.7.100
CARCASS ASSEMBLYK - Back RailE - Fixed ShelfF - Fixed ShelfG - Fixed ShelfB - Visible Side RightJ - Back RailH - PartitionI - PartitionO - BackN - BackM - BackL - BackC - Floor BottomD - TopA - Visible Side Left3NUMBER OF PANELS: 15

GSPublisherVersion 241.1.7.100
42 O'ClockPosition230°PANEL CONNECTION AND FASTENINGDet. 1Det. 2Det. 3IIIIIIIVI - Insert the Minifix (1), Dufix (1) and wooden dowels (2) in the shown positions.Gently knock in the wooden dowels using a rubber mallet where necessary.II - Confirm that the Minifix orientation is as shown in Det. 1 then connect thepanels.III - Using a screw driver, turn the Minifix 230° clockwise to fasten the panelstogether. Refer to Det. 2.IV - See Det. 3 for Minifix orientation when fastened. Reset the Minifixorientation to that shown in Det.1 to disconnect the panels. 1. Confirm that all panels (15) are in the package before assembling. 2. Check the white sticker on each panel for the labelling (A - O). 3. Ensure that the panels are laid on a non-abrasive surface when assembling. 4. Note that all panel connections are done using the system described below unless otherwise stated.GENERAL INSTRUCTIONS

GSPublisherVersion 241.1.7.100
STEP 1STEP 2Connect panel H to panel G as shown. Refer to the holes and/or grooves on the diagram todetermine the panel orientation.Connect panel I to panel E as shown. Refer to the holes and/or grooves on the diagram todetermine the panel orientation.5GHEI

GSPublisherVersion 241.1.7.100
STEP 3STEP 4Connect panels G, F, & E to panel B as shown. Refer to the holes and/or grooves on the diagramto determine the panel orientation.6BEHGFIConnect panels J & K to panel B as shown. Note the different Dowel-Dufix arrangement detailed inDet. 1 above. Refer to the holes and/or grooves on the diagram to determine the panelorientation.KJHGFEIBDet. 1

GSPublisherVersion 241.1.7.100
STEP 5STEP 6Connect panel A to panels G, F, E, J & K as shown. Refer to the holes and/or grooves on thediagram to determine the panel orientation.7AJHGFEIBKUsing a rubber mallet, knock in the Plastic Glides in the shown positions on panel C. Refer to theindicated dimensions for positioning. Note that the glides go on the face without holes.C50 mm10 mm10 mm10 mm10 mm50 mm50 mm50 mm

GSPublisherVersion 241.1.7.100
STEP 7With panel C sitting on the glides, connect panels A, B & H to panel C as shown. Refer to the holesand/or grooves on the diagram to determine the panel orientation.8ABHJGFEIKC

GSPublisherVersion 241.1.7.100
STEP 8Install panels L, M, N & O and the H-Profile Backer Connecters in the shown sequence. Refer to Det.4 - 6 and the text on the left.9BACHGFIJKLMNO1234567Det. 4Det. 5Det. 63. Slide panel M through the grooves on panels A and Band into the slot on the H - Profile Backer Connector2. Insert the slot on the H - Profile Backer Connector intothe shown egde on panel L1. Slide panel L through the grooves on panels A and Band into the groove on panel C.LMNMNO5. Slide panel N through the grooves on panels A and Band into the slot on the H - Profile Backer Connector4. Insert the slot on the H - Profile Backer Connector intothe shown egde on panel M7. Slide panel O through the grooves on panels A and Band into the slot on the H - Profile Backer Connector6. Insert the slot on the H - Profile Backer Connector intothe shown egde on panel NE

GSPublisherVersion 241.1.7.100
STEP 9STEP 10Connect panel D to panels A & B as shown. Note that the groove on panel D goes into therevealed edge on panel O (See Det. 9). Refer to the holes and/or grooves on the diagram todetermine the panel orientation.Screw in the Left Tandem Runners in the shown positions on panels H & I. Det. 10 is applicable forthe four runners.10OJNKDBALMDet. 9ABFirst, use these screwsto align the runnerholes with thepredrilled pilot holes.Then, reinforce therunners by addingscrews in the shownpositions.Left RunnerHICGLMFNEODDet. 10HC

GSPublisherVersion 241.1.7.100
STEP 11Screw in the Right Tandem Runners in the shown positions on panel B. Det. 11 for is applicable forthe four runners.11First, use these screwsto align the runnerholes with thepredrilled pilot holes.Then, reinforce therunners by addingscrews in the shownpositions.Right RunnerDet. 11ABHNCILGMFOED

GSPublisherVersion 241.1.7.100
STEP 1312N1 DOOR INSTALLATIONSTEP 1Using Screw 3.5 x16mm, screw in the Hinge Plates in the shown positions on panel A. See Det. 12.Det. 12Using Screw 3.5 x16mm, screw in the Hinges in the shown positions on panel N1.ABCOHGFIEDMLN

GSPublisherVersion 241.1.7.100
STEP 213Det. 14Connect the hinges on panel N1 to the corresponding hinge plates on panel A as shown. See Det.13, Fig. 1 and Fig. 2.Det. 13Fig. 1Fig. 2STEP 3Fig. 3Fig. 4Fig. 52.5 mm12.7 mmAdjust the door (Panel N1) to leave the clearances shown in Det. 14. See Fig. 3-5 for adjustmentinstructions.BCIGFN1EDHABCILHGFEDMNON1LMNO

GSPublisherVersion 241.1.7.100
DRAWER BOX ASSEMBLYDL - Left Box Side (4)DF - Drawer Box Sub Front (4)DP - Drawer Box Bottom (4)DR - Right Box Side (4)DB - Drawer Box Back (4)TOTAL NUMBER OF PANELS: 2014 1. Confirm that all panels (20) are in the package before assembling. 2. Check the white sticker on each panel for the labelling (DF, DL, DR, DB & DP). 3. Ensure that the panels are laid on a non-abrasive surface when assembling. 4. Note that all panel connections are done using the system described below.GENERAL INSTRUCTIONS2 O'ClockPosition230°PANEL CONNECTION AND FASTENINGDet. 1Det. 2Det. 3IIIIIIIVI - Insert the Minifix (2), Dufix (2) and wooden dowels (1) in the shown positions.Gently knock in the wooden dowel using a rubber mallet where necessary.II - Confirm that the Minifix orientation is as shown in Det. 1 then connect thepanels.III - Using a screw driver, turn the Minifix 230° clockwise to fasten the panelstogether. Refer to Det. 2.IV - See Det. 3 for Minifix orientation when fastened. Reset the Minifixorientation to that shown in Det.1 to disconnect the panels.

GSPublisherVersion 241.1.7.100
STEP 1STEP 2Connect panel DB to panel DR as shown. Refer to the holes and/or grooves on the diagram todetermine the panel orientation.Connect panel DL to panel DB as shown. Refer to the holes and/or grooves on the diagram todetermine the panel orientation.15DRDBDLDBDR

GSPublisherVersion 241.1.7.100
STEP 3STEP 4Connect panels DL & DR to panel DF as shown. Refer to the holes and/or grooves on the diagramto determine the panel orientation.Slide 3mm panel DP through the grooves on panels DR & DL and into the groove on panel DF asshown. Refer to the holes and/or grooves on the diagram to determine the panel orientation.16DRDBDLDBDRDLDFDFDP

GSPublisherVersion 241.1.7.100
STEP 5STEP 6Secure the 3mm panel DP onto panel DB using Screw 3.5 x 16mm. Refer to the holes and/orgrooves on the diagram to determine the panel orientation.Place the Tandem Locking Devices in the shown positions, aligning them with the pre-drilled pilotholes. Secure the locking devices onto panel DF using Screw 3.5 x 16mm.17DRDBDBDRDPDPScrew 3.5 x 16mmX 6Screw 3.5 x 16mmX 4Locking DeviceLeft & Right

GSPublisherVersion 241.1.7.100
STEP 7STEP 8Using a rubber mallet, gently knock in the Front Adjustment Brackets into panels J1, K1, L1 & M1 inthe shown positions. Confirm that they go all the way in such that no part appears above thesurface of the panel.Place the four drawer boxes on panels J1, K1, L1 & M1 as shown. In each, connect panels DF topanels J1, K1, L1 & M1 using Dome Screw M4 x 25 through the 5mm through hole and into the FrontAdjustment Brackets. See Det. 4.18DBDFFront AdjustmentBracketX 2DLDPDRDome Screw M4x 25X 2J1, K1, L1, M1J1, K1, L1, M1DRDFDet. 4

GSPublisherVersion 241.1.7.100
STEP 9STEP 10Using Screw 3.5 x 16mm, screw in the handles onto panels J1, K1, L1 & M1 in the shown position.Confirm that the holes on the handles align with the pilot holes on panels J1, K1, L1 & M1.19X 2
J1, K1, L1, M1
DFDBDRDLDPScrew 3.5 x 16mmJ1K1L1M1Insert the Drawer Boxes as shown. Push the drawers all-in ensuring that the locking devices snapinto the Tandem Single Extension runners and that the hook at the rear end of the runners entersthe holes at the back of panels DB. If the holes are too small for the hook, expand them using a6mm drill bit. Ensure that panels J1, K1, L1 & M1 go in the shown positions.

GSPublisherVersion 241.1.7.100
STEP 1120Adjust panels J1, K1, L1 & M1 to achieve the clearances shown in Det. 5-7. This is done by knockingthe drawer faces (Panels J1, K1, L1 & M1) in the desired direction until the clearances in Det. 5-7are attained. When done, reinforce the Drawer Boxes-Drawer Face connection by adding Screws4.0 x 30mm in the remaining holes on panels DF. See Fig. 1.Det. 5Det. 6Det. 74 mm3 mm3 mm6.5 mm6.5 mmFig. 1
J1, K1, L1, M1
DFDBDRDLDPJ1K1L1M1N1K1L1Screw 4.0 x 30mmX 2N1AD
This manual suits for next models
3
Table of contents