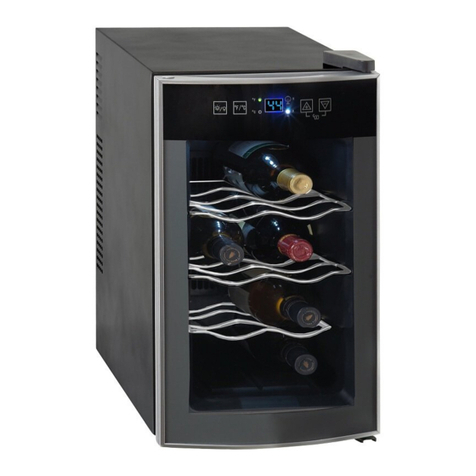
Philco PW 24 FD User manual

Wine cooler
OWNER’S MANUAL
PW 24 FD

Thank you very much for buying this product.
Before using your new refrigerator, please read this operation manual to ensure that you gain the
maximum benet from it.
Copyright © 2018, Fast ČR, a. s. Revision 05/2018

Copyright © 2018, Fast ČR, a. s. Revision 05/2018
EN - 1
CONTENTS
1. INDICATION OF PARTS ................................................................................................................................2
CONTROL PANEL ............................................................................................................................................................................... 2
2. TEMPERATURE CONTROL............................................................................................................................3
SETTING THE TEMPERATURE CONTROL...................................................................................................................................3
3. INSTRUCTION FOR USERS...........................................................................................................................4
4. INSTALLATION INSTRUCTION ....................................................................................................................5
BEFORE USING YOUR WINE CHILLER.........................................................................................................................................5
INSTALLATION OF YOUR WINE CHILLER .................................................................................................................................. 5
5.TROUBLE SHOOTING GUILDS.....................................................................................................................6
6. ELECTRIC DIAGRAM.....................................................................................................................................6
ENERGY SAVING TIPS....................................................................................................................................................................... 7
7. TECHNICAL DATA .........................................................................................................................................8
DATA SHEET......................................................................................................................................................................................... 8

Copyright © 2018, Fast ČR, a. s. Revision 05/2018
EN - 2
1. INDICATION OF PARTS
1 Cabinet
2 Ventilation holes
3 Cold sink fan cover
4 Shelf (Total 4)
5 Leveling Legs
6 Upper Door Hinge w/ Cover
7 Door gasket
8 Glass door
9 Bottom hinge
CONTROL PANEL
You can select temperature display setting from Fahrenheit to Celsius degree by pushing
this button approximately for 3 seconds. The degrees will appear in blue color in the
temperature display window.

Copyright © 2018, Fast ČR, a. s. Revision 05/2018
EN - 3
2. TEMPERATURE CONTROL
It is recommended you install the Wine Chiller in a place where the ambient temperature is between
23°-26°C/ 72°-78°F. If the ambient temperature is above or below recommended temperatures, the
performance of the unit may be aected. For example, placing your unit in extreme cold or hot conditions
may cause interior temperatures to uctuate. The range of 8°-18°C/46°-64°F may not be reached. The default
temperature set at the factory is 12°C / 54°F.
Recommended Temperatures for Chilling Wine.
Red Wines 14°-18° C 58- 64° F
Dry/White Wines 9° -14° C 48-58° F
Rose Wines 10°-11°C 50-52° F
Sparkling Wines 7°-9° C 45-48°F
Temperature Ranges For Your Wine Chiller
Upper Zone 8°-18° C 46- 64° F
Lower Zone 12° -18° C 54-64° F
SETTING THE TEMPERATURE CONTROL
• Upperzoneandbottomzoneareeachcontrolledseparatelywhenpress„SET“,theupperdisplaywillush
andcanchangetheupperzonetemperatureaccordingly,press„SET“again,thelowerdisplaywillush
andcanchangetthelowerzonetemperatureaccordingly.
• YourWineCellarhasbeenequippedwithan„automatic“controlpanellock,thatwillactivate12seconds
after the last time a button has been touched.
Push the and button simultaneously for 3 seconds to unlock the control panel. You will hear a
„BEEP“soundtoalertyouthatthecontrolisnowactive.
• Youcansetthetemperatureasyoudesirebypushingthe or button on the control panel for each
zone.Thetemperaturethatyoudesiretosetwillincrease1°For1°Cifyoupushthe button once, on
the contrary the temperature will decrease 1°F or 1°C if you push the button once.
Temperature settings applicable when storing mostly one type of wine:
Red Wines 14°-18° C 58- 64° F
White / Rose / Dry Wines 9° -14° C 48-58° F
Sparkling Wines 7°-9° C 45-48°F

Copyright © 2018, Fast ČR, a. s. Revision 05/2018
EN - 4
3. INSTRUCTION FOR USERS
1. Note
1.1. Position your refrigerator so that the plug is accessible.
1. 2. Keep your refrigerator out of direct sunlight.
1.3. Do not place next to heat generating appliance.
1.4. Do not place directly on the ground. Provide suitable stand.
2. Very important:
2.1. The minibar will have better performance at ambient of 20-25 degree; We suggest the minibar be
powered o if the ambient temperature is lower than 10 degree.
2.2. After plugging the appliance, allow the unit to cool down for 2-3 hours before placing beverage into the
refrigerator compartment.
2.3. Ventilation is very important for this kind thermoelectric refrigerator; The inside PCB will be broken
easily if the ventilation is bad; It will also reduce the life of the refrigerator.
2.4. If leakage occurs (which can be easily detected due to the unpleasant smell), please
A. Switch o the minibar immediately
B. Ventilate the room thoroughly
C. Call for the after sales service department
2.5. This model uses a heat-pipe cooling system with automatic defrosting system, so there is no need to
defrost it manually.
3. Power supply:
3.1. The refrigerator must be connected to a properly earthed socket in line with relevant valid country
regulations before operating;
3.2. Checkthedatalabel(whichisonthesideoftherefrigerator)forvoltageandfrequencycorrespondsto
your local one; If not, don’t plug your cable into the socket;
4. Cleaning Your Refrigerator
• UNPLUGtherefrigerator,andremovetheshelf.
• Washtheinsidesurfaceswithawarmwaterandbakingsodasolution.Thesolutionshouldbeabout2
tablespoonsofbakingsodatoaquartofwater.
• Washtheshelfwithamilddetergentsolution.
• Theoutsideoftherefrigeratorshouldbecleanedwithmilddetergentandwarmwater.
• Wringexcesswateroutofthespongeorclothbeforecleaningtheareaofthecontrols,oranyelectrical
parts.
• Washtheoutsidecabinetwithwarmwaterandmildliquiddetergent.Rinsewellandwipedrywitha
clean soft cloth.

Copyright © 2018, Fast ČR, a. s. Revision 05/2018
EN - 5
4. INSTALLATION INSTRUCTION
BEFORE USING YOUR WINE CHILLER
• Removetheexteriorandinteriorpacking.
• Checktobesureyouhaveallofthefollowingparts:
(4) Shelves
(1) Instruction manual
• CleantheInteriorsurfacewithlukewarmwaterusingasoftcloth.
INSTALLATION OF YOUR WINE CHILLER
• ThisWineChillerIsdesignedtobefreestandingInstallationonly,andshouldnotberecessedorbuilt-in
(Fully recessed).
• PlaceyourWineChilleronasurfacethatIsstrongenoughtosupportItwhenItIsfullyloaded.
• Allow5inchesofspacebetweenthebackandsidesofthewinechiller,whichallowstheproperair
circulation to cool the heat sink.
• LocatetheWineChillerawayfromdirectsunlightandsourcesofheat(stove,heater,radiator,etc).Direct
sunlight may aect the acrylic coating and heat sources may Increase electrical consumption. Extreme
cold ambient temperatures may also cause the unit not to perform properly.
• ThisWineChillerusessuperconductorrefrigerationtechnology(nocompressor)andIsnotdesignedfor
storage In hot areas like garages, warehouses or outdoors since it is designed to operate at a maximum of
30 degrees below the ambient temperature.
• Avoidlocatingtheunitinmoistareas.
• PlugtheWineChillerIntoanexclusive,properlyinstalled-groundedwalloutlet.Donotunderany
circumstancescutorremovethethird(ground)prongfromthepowercord.Anyquestionsconcerning
powerand/orgroundingshouldbedirectedtowardacertiedelectricianoranauthorizedAvanti
Products service center.
• AfterpluggingtheWineChillerintoawalloutlet,allowtheunittocooldownfor2-3hoursbeforeplacing
any items in the compartment.

Copyright © 2018, Fast ČR, a. s. Revision 05/2018
EN - 6
5. TROUBLE SHOOTING GUILDS
PROBLEM POSSIBLE CAUSE
Wine Chiller does not operate or cool. Not plugged in.
The circuit breaker tripped or a blown fuse.
Control panel is locked Push the and button simultaneously for 3 seconds to
unlock the control panel. Wait for beep sound.
Wine Chiller is not cold enough. Check the temperature control setting.
Externalenvironmentmayrequireahighersetting.
The door is opened too often.
The door is not closed completely.
The door gasket does not seal properly.
The Wine Chiller does not have the correct clearances.
Abnormal voltage.
The light does not work. Not plugged in.
The circuit breaker tripped or a blown fuse.
Thelightbuttonis„OFF“.
Vibrations. Check to assure that the Wine Chiller is level.
The door will not close properly. The Wine Chiller is not level.
The door was not properly installed.
The gasket is dirty.
The shelves are out of position.
6. ELECTRIC DIAGRAM
PLUG
Cooling unit

Copyright © 2018, Fast ČR, a. s. Revision 05/2018
EN - 7
ENERGY SAVING TIPS
The refrigerator should be located in the coolest area of the room, away from heat producing appliances,
and out of the direct sunlight. Overloading the refrigerator forces the superconductor cooling system to run
longer. Reduce door openings and extended searches, remove as many item as needed at one time, and
close the door as soon as possible. One characteristic of superconductor heat-pipe units is the length of time
itrequirestorecoverfromhavingthedooropenedandshutfrequently.Itmaybenecessarytowaitlonger
for the temperature to return to its former level once the door has been opened for too long. This is normal
for the type of unit. Superconductor heat-pipe technology costs just pennies to operate. It is environmental
friendly due to the lack of CFC’s.
Warning
• Ifthesupplycordisdamaged,itmustbereplacedbythemanufacturer,itsserviceagentorsimilarly
qualiedpersonsinordertoavoidahazard.
• Thisapplianceisnotintendedforusebypersons(includingchildren)withreducedphysical,sensoryor
mental capabilities, or lack of experience and knowledge, unless they have been given supervision or
instruction concerning use of the appliance by a person responsible for their safety.
• Childrenshouldbesupervisedtoensurethattheydonotplaywiththeappliance.
• WARNING:Toavoidahazardduetoinstabilityoftheappliance,itmustbexedinaccordancewiththe
instruction.

Copyright © 2018, Fast ČR, a. s. Revision 05/2018
EN - 8
7. TECHNICAL DATA
DATA SHEET
DATA SHEET: Philco
Philco trademark:
Brand: Philco
Model name PW 24 FD
Appliance category 3) 10
Energy eciency class (A… low electricity consumption to G…
high electricity consumption)
C
Energy consumption over a 365 day period 1) (kWh) 216
Energy consumption (kWh/24h) 0,593
Total usable volume (l) 70
of that: refrigerating section volume (l) 70
ofthat:freezersectionvolume(l) 0
Cooling performance (temperature range) upperzone:8-18°C/46-64°F,
bottomzone:12-18°C/54-64°F
Numberoftemperaturezones 2
Number of bottles 24
Inner humidity 50-80%
Climate class 2) N
Installation Free-standing
Voltage 220-240v/50Hz
Noise level 4) (dB) (re 1pW) 33
Dimensions (mm) (H x W x D) 430 x 520 x 740
Weight (kg) 19,5
This appliance is designed exclusively for storing wine
1) AnnualenergyconsumptioninkWh/yearisbasedontheresultsofanormalized24hr.test.
The actual energy consumption depends on usage conditions and location of the appliance.
2) SN: ambient temperature from +10 °C to +32 °C
ST: ambient temperature from +18 °C to +38 °C
N: ambient temperature from +16 °C to +32 °C
3) 1=Refrigeratorwithoutfreezersections
2 = The appliance is intended for storing wine
7=Refrigerator/freezerwithfreezersections*(***)
8=Uprightfreezer
4) Noise level according to the European standard EN 60704.
*FS-free-standingappliance
BI - built-in appliance

Copyright © 2018, Fast ČR, a. s. Revision 05/2018
EN - 9
INSTRUCTIONS AND INFORMATION REGARDING THE DISPOSAL OF
USED PACKAGING MATERIALS
Dispose of packaging material at a public waste disposal site.
DISPOSAL OF USED ELECTRICAL AND ELECTRONIC APPLIANCES
The meaning of the symbol on the product, its accessory or packaging indicates that this product
shall not be treated as household waste. Please, dispose of this product at your applicable
collectionpointfortherecyclingofelectrical&electronicequipmentwaste.Alternativelyinsome
states of the European Union or other European states you may return your products to your local
retailerwhenbuyinganequivalentnewproduct.Thecorrectdisposalofthisproductwillhelpsave
valuable natural resources and help in preventing the potential negative impact on the
environmentandhumanhealth,whichcouldbecausedasaresultofimproperliquidationof
waste. Please ask your local authorities or the nearest waste collection centre for further details.
The improper disposal of this type of waste may fall subject to national regulations for nes.
For business entities in the European Union
Ifyouwishtodisposeofanelectricalorelectronicdevice,requestthenecessaryinformationfrom
your seller or supplier.
Disposal in other countries outside the European Union
Ifyouwishtodisposeofthisproduct,requestthenecessaryinformationaboutthecorrectdisposal
method from local government departments or from your seller.
ThisproductmeetsallthebasicEUregulationrequirementsthatrelatetoit.
Changes to the text, design and technical specications may occur without prior notice and we reserve the
right to make these changes.

Copyright © 2018, Fast ČR, a. s. Revision 05/2018
EN - 10
Manufacturer/Importer:
Fast ČR, a.s.
Praha 10, Černokostelecká 2111
CZ-10000; CZECH REPUBLIC
is a registered trademark used under license from
Electrolux Home Products, Inc.

Vinotéka
NÁVOD K OBSLUZE
PW 24 FD

Děkujeme, že jste si vybrali tento výrobek.
Před požíváním své nové chladničky si prosím přečtěte tento návod k obsluze, abyste z ní získali co
největší užitek.
Copyright © 2018, Fast ČR, a. s. Revize 05/2018

Copyright © 2018, Fast ČR, a. s. Revize 05/2018
CZ - 1
OBSAH
1. POPIS JEDNOTLIVÝCH ČÁSTÍ......................................................................................................................2
OVLÁDACÍ PANEL..............................................................................................................................................................................2
2. OVLÁDÁNÍ TEPLOTY....................................................................................................................................3
NASTAVENÍ OVLADAČE TEPLOTY ............................................................................................................................................... 3
3. POKYNY PRO UŽIVATELE ............................................................................................................................4
4. INSTALAČNÍ POKYNY...................................................................................................................................5
PŘED POUŽÍVÁNÍM VINOTÉKY..................................................................................................................................................... 5
INSTALACE VINOTÉKY......................................................................................................................................................................5
5. ODSTRANĚNÍ MOŽNÝCH PROBLÉMŮ........................................................................................................6
6. ELEKTRICKÉ SCHÉMA ..................................................................................................................................6
TIPY NA ÚSPORU ENERGIE ............................................................................................................................................................7
7. TECHNICKÉ ÚDAJE.......................................................................................................................................8
INFORMAČNÍ LIST ............................................................................................................................................................................. 8

Copyright © 2018, Fast ČR, a. s. Revize 05/2018
CZ - 2
1. POPIS JEDNOTLIVÝCH ČÁSTÍ
1 Skříňka
2 Větrací otvory
3 Kryt chladicího ventilátoru
4 Regál (celkově 4)
5 Vyrovnávací nožičky
6 Horní závěs dvířek/Kryt
7 Těsnění dvířek
8 Skleněná dvířka
9 Spodní závěs
OVLÁDACÍ PANEL
Stisknutím tohoto tlačítka na přibližně 3 sekundy můžete zvolit nastavení zobrazení
teploty na stupně Fahrenheita a na stupně Celzia. Stupně se budou zobrazovat modrou
barvou v okénku zobrazení teploty.

Copyright © 2018, Fast ČR, a. s. Revize 05/2018
CZ - 3
2. OVLÁDÁNÍ TEPLOTY
Doporučuje se nainstalovat vinotéku na místo, kde je okolní teplota mezi 23° - 26 °C/ 72° - 78 °F. Pokud
je okolní teplota nad nebo pod doporučené teploty, může to mít vliv na výkon spotřebiče. Například při
umístění spotřebiče v extrémně studených nebo horkých podmínkách, může způsobit kolísání vnitřních
teplot. Nemusel by být dosažen rozsah teplot 8° - 18 °C/46° - 64 °F. Teplota nastavená původně ve výrobě je
12°C/54 °F.
Doporučené teploty pro chlazení vína.
Červené víno 14° - 18 °C 58 - 64 °F
Suché/Bílé víno 9° -14 °C 48 - 58 °F
Růžové víno 10° - 11 °C 50 - 52 °F
Šumivé víno 7° - 9 °C 45 - 48 °F
Rozsahy teplot pro vaši vinotéku
Horní zóna 8° - 18 °C 46 - 64 °F
Dolní zóna 12° - 18 °C 54 - 64 °F
NASTAVENÍ OVLADAČE TEPLOTY
• Hornízónaadolnízónajeovládánasamostatně,kdyžstisknetetlačítko„SET“,displejhornízónyzačne
blikatabudemožnézměnitteplotuhornízóny,opětovnýmstisknutímtlačítka„SET“začneblikatdisplej
dolní zóny a bude možné změnit teplotu dolní zóny.
• Vaševinotékajevybavena„automatickým“zámkemovládacíhopanelu,kterýseaktivuje12sekundpo
posledním dotyku tlačítka.
Chcete-li ovládací panel odemknout, stiskněte současně na 3 sekundy tlačítko a . Uslyšíte
„AKUSTICKÝ“signálnaupozornění,žeovládáníjenyníaktivní.
• Opakovanýmstisknutímtlačítka nebo na ovládacím panelu můžete nastavit požadovanou
teplotu pro každou zónu. Po jednom stisknutí tlačítka se teplota, kterou chcete nastavit, zvýší o 1 °F
nebo 1 °C, naopak po každém stisknutí tlačítka , se teplota sníží o 1 °F nebo 1 °C.
Nastavení teploty použitelné při skladování převážně jednoho typu vína:
Červené víno 14° - 18 °C 58 - 64 °F
Bílé/Růžové/Suché víno 9° -14 °C 48 - 58 °F
Šumivé víno 7° - 9 °C 45 - 48 °F

Copyright © 2018, Fast ČR, a. s. Revize 05/2018
CZ - 4
3. POKYNY PRO UŽIVATELE
1. Poznámka
1.1. Umístěte chladničku tak, aby byla snadno dostupná síťová zástrčka.
1.2. Mějte chladničku co nejdále od přímého slunečního záření.
1.3. Neumísťujte chladničku vedle spotřebiče vytvářejícího teplo.
1.4. Neumísťujte chladničku přímo na podlahu. Použijte vhodný podstavec.
2. Velmi důležité:
2.1. Spotřebič bude mít lepší výkon při teplotě okolí 20–25 stupňů; Jestliže je teplota okolí nižší než 10 °C,
doporučujeme spotřebič vypnout.
2.2. Po připojení spotřebiče k elektrické síti, nechte spotřebič nejdříve 2–3 hodiny vychladnout, než vložíte
nápoje do chladicího prostoru.
2.3. Větrání je velmi důležité pro tento druh termoelektrické chladničky; V případě nedostatečného větrání,
může dojít snadno k poškození vnitřní desky plošných spojů; Také se tak sníží životnost spotřebiče.
2.4. Pokud dojde k úniku (který je možné snadno zjistit v důsledku nepříjemného zápachu), proveďte
prosím:
A. Ihned vypněte spotřebič
B. Důkladně vyvětrejte místnost
C. Zavolejte do servisního střediska
2.5. Tento model používá chladicí systém s tepelným potrubím a automatickým systémem rozmrazování,
takže nebude nutné provádět manuálně rozmrazování.
3. Napájení elektrickou energií:
3.1. Před uvedením do provozu, musí být spotřebič připojen k řádně uzemněné elektrické zásuvce v souladu
s příslušnými platnými předpisy dané země;
3.2. Na výrobním štítku (který se nachází na boku spotřebiče) se podívejte, zda údaje o napětí a frekvenci
odpovídají údajům ve vaší místní síti; Pokud tomu tak není, nepřipojujte napájecí kabel k elektrické
zásuvce;
4. Čištění spotřebiče
• ODPOJTEchladničkuodelektrickésítěavyndejteregály.
• Vnitřníprostorumyjteroztokemteplévodyajedlésody.Roztokbymělbýttvořenpřibližně2
polévkovými lžícemi sody na litr vody.
• Regályumyjtepomocíroztokumírnéhočisticíhoprostředku.
• Vnějšípovrchspotřebičebymělbýtvyčištěnmírnýmčisticímprostředkemateplouvodou.
• Vyždímejtepřebytečnouvoduzhoubyneboutěrkypředčištěnímoblastikolemovládacíchprvků,
nebo jakýchkoli elektrických částí.
• Vnějšípovrchskříňkyspotřebičeumyjteroztokemteplévodyamírnéhotekutéhočisticíhoprostředku.
Důkladně otřete a osušte pomocí čistého měkké tkaniny.

Copyright © 2018, Fast ČR, a. s. Revize 05/2018
CZ - 5
4. INSTALAČNÍ POKYNY
PŘED POUŽÍVÁNÍM VINOTÉKY
• Vyndejteobalovémateriályzvnějšíavnitřníčásti.
• Zkontrolujte,zdamátevšechnynásledujícíčásti:
(4) Regály
(1) Návod k obsluze
• Vnitřnípovrchspotřebičevyčistětevlažnouvodouspoužitímměkkétkaniny.
INSTALACE VINOTÉKY
• Tatovinotékajenavrženapouzejakosamostatněstojícíspotřebičanemělabybýtzapuštěnanebo
vestavěna (úplně zapuštěna).
• Umístětespotřebičnapovrch,kterýjedostatečněpevnýnato,abyunesljehováhupřiúplnémnaplnění.
• Ponechte12cmprostorumezizadnístranouabočnímistranamispotřebiče,cožumožňujesprávnou
cirkulaci vzduchu na dostatečné chlazení.
• Umístětespotřebičconejdáleodpříméhoslunečníhozářeníazdrojůtepla(sporák,ohřívač,radiátoratd.).
Přímé sluneční záření může ovlivnit akrylový povrch a zdroje tepla mohou zvýšit spotřebu elektrické
energie. Extrémně nízké teploty okolí mohou také způsobit to, že spotřebič nebude fungovat správně.
• Tatovinotékapoužívátechnologiisupravodičovéhochlazení(bezkompresoru)aneníurčenakumístění
v horkých prostorách, jako jsou garáže, sklady nebo v exteriéru, protože je navržena tak, aby pracovala
maximálně 30 stupňů pod teplotou okolí.
• Vyhněteseumístěníspotřebičevevlhkýchprostorách.
• Spotřebičpřipojtedovyhrazené,správněinstalovanéauzemněnéelektrickézásuvky.Zažádných
okolností neřežte ani neodstraňujte třetí (uzemňovací) hrot z napájecího kabelu. Jakékoliv dotazy týkající
se napájení a/nebo uzemnění, byste měli nasměrovat na autorizovaného elektrikáře nebo autorizované
servisní středisko.
• Popřipojeníspotřebičekelektrickésítinechtespotřebičnejdříve2–3hodinyvychladnout,nežvložíte
jakékoliv položky do chladicího prostoru.

Copyright © 2018, Fast ČR, a. s. Revize 05/2018
CZ - 6
5. ODSTRANĚNÍ MOŽNÝCH PROBLÉMŮ
PROBLÉM MOŽNÁ PŘÍČINA
Vinotéka nefunguje nebo nechladí. Není připojena k elektrické síti.
Došlo k vypnutí jističe nebo vypálení pojistky.
Ovládací panel je uzamčen. Pokud chcete ovládací panel odemknout, stiskněte současně na
3 sekundy tlačítko a . Počkejte na akustický signál.
Vinotéka nechladí dostatečně. Zkontrolujte nastavení ovladače teploty.
Externí prostředí může vyžadovat vyšší nastavení.
Dvířka byla otevřená příliš často.
Dvířka nejsou zavřená úplně.
Těsnění dvířek netěsní správně.
Okolo spotřebiče není dostatek volného prostoru.
Nestandardní napětí.
Nesvítí světlo. Není připojena k elektrické síti.
Došlo k vypnutí jističe nebo vypálení pojistky.
Tlačítkosvětlaje„VYPNUTO“.
Vibrace. Zkontrolujte, zda je spotřebič v rovině.
Dvířka se nezavřou správně. Vinotéka není rovně.
Dvířka nebyla nainstalována správně.
Těsnění je znečištěno.
Regály nejsou ve své správné poloze.
6. ELEKTRICKÉ SCHÉMA
ZÁSTRČKA
Chladicí
jednotka
Table of contents
Languages:
Other Philco Kitchen Appliance manuals

Philco
Philco PW 17 GDFB User manual

Philco
Philco PHFD 5080 User manual

Philco
Philco PW 12 KF User manual

Philco
Philco PW 143 GLV User manual

Philco
Philco PW 18 F User manual

Philco
Philco PW 143 GLV User manual

Philco
Philco PW 15 KF User manual

Philco
Philco PHFD 7067 User manual

Philco
Philco PW 17 GDFB User manual
Philco
Philco PW 12 KF User manual

Philco
Philco PHSC 5600 User manual

Philco
Philco PHMF 1050 User manual

Philco
Philco PHFS 8010 User manual

Philco
Philco PW 15 KF User manual

Philco
Philco PHFS 6100 User manual

Philco
Philco PHFS 8000 User manual

Philco
Philco PW 8 User manual

Philco
Philco PW 40 LV User manual

Philco
Philco PW 6 BI User manual

Philco
Philco PHFS 8002 User manual