manuals.online logo
Brands
  1. Home
  2. •
  3. Brands
  4. •
  5. Philips
  6. •
  7. Kitchen Appliance
  8. •
  9. Philips HR2939/09 User manual

Philips HR2939/09 User manual

HR2939
A
B
C
D
23 4 5
67 8 9
ENGLISH
Introduction
The chopper is intended for chopping ingredients such
as onions, meat, herbs, vegetables, fruit, chocolate, rm
cheese, baby food and nuts.
The chopper is suitable for Philips blender types:
HR2074
HR2071
HR2069
HR2067
HR2066
HR2064
HR2063
HR2061
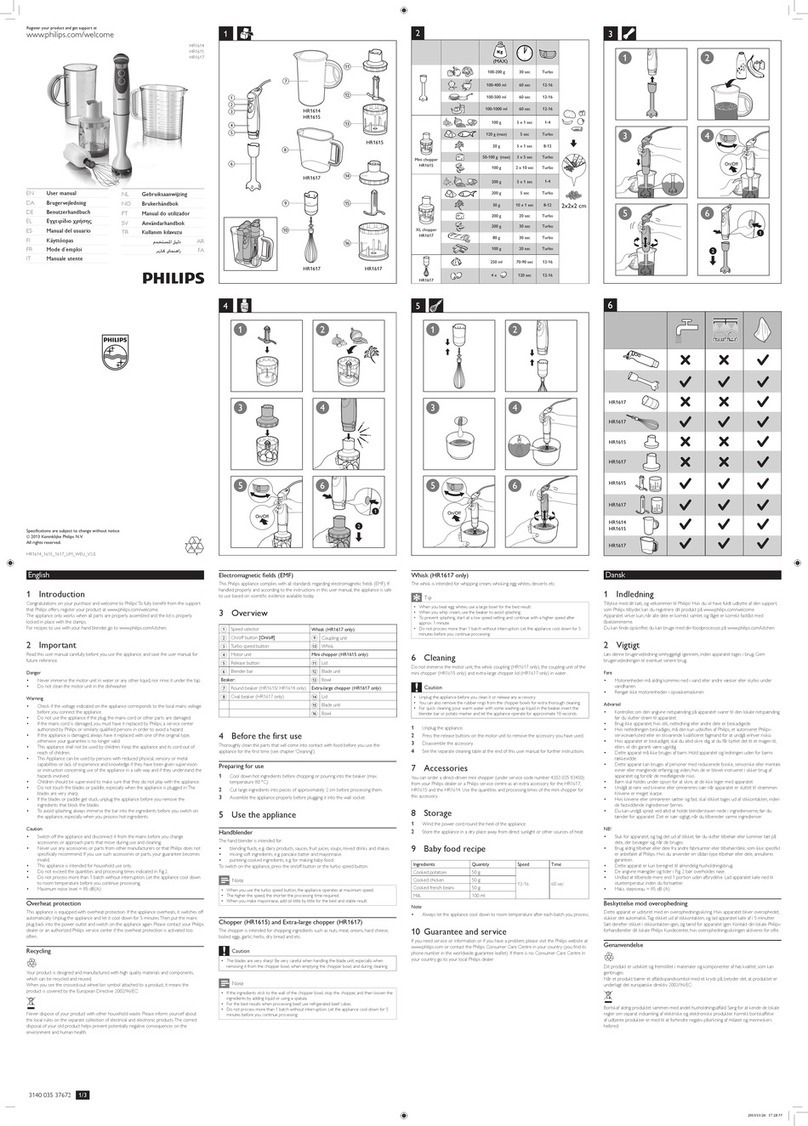
General description (Fig. 1)
ALid
BBlade unit
CChopper bowl
DCoupling unit
Important
Read this user manual carefully before you use the
chopper and save it for future reference.
To use the blender motor unit, follow the instructions in
the user manual of the blender.
Warning
Do not use the chopper if it is damaged.
Do not touch the blades, especially when the
chopper is connected to the blender motor unit.The
blades are very sharp.
Make sure the coupling unit is securely fastened
to the chopper bowl before you assemble the
chopper onto the motor unit.
Never reach into the chopper bowl with your ngers
or an object while the chopper is operating.
The chopper is not intended for use by persons
(including children) with reduced physical, sensory
or mental capabilities, or lack of experience and
knowledge, unless they have been given supervision
or instruction concerning use of the chopper by a
person responsible for their safety.
Children should be supervised to ensure that they
do not play with the chopper.
Never let the chopper operate unattended.
If the blades get stuck, unplug the blender motor unit
before you remove the ingredients that block the
blades.
Never use the chopper bowl to switch the motor
unit of the blender on and off.
Caution
Always unplug the blender motor unit before you
assemble, disassemble or make adjustments to any
of the parts.
Never use any accessories or parts from other
manufacturers or that Philips does not specically
recommend. If you use such accessories or parts,
your guarantee becomes invalid.
Do not exceed the maximum quantities indicated in
the table.
If food sticks to the wall of the chopper bowl, switch
off the blender motor unit and unplug it.Then use a
spatula to remove the food from the wall.
Always make sure the lid is properly assembled on
the chopper bowl before you switch on the blender
motor unit.
Never ll the chopper bowl with ingredients hotter
than 80ºC.
Do not use the chopper to mix liquids. Use the
blender jar instead.
Never immerse the coupling unit in water or any
other liquid.
The gearwheels inside the coupling unit have been
lubricated. Do not lubricate them again.
Before first use
Thorougly clean the parts that come into contact with
food before you use the chopper for the rst time (see
chapter ‘Cleaning’).
Using the appliance
Be careful when you place or remove the blade unit: the
cutting edges of the blade are very sharp.
-
-
-
-
-
-
-
-
-
-
-
-
-
-
-
-
-
-
-
-
-
-
-
-
-
-
1 Insert the coupling unit into the bottom of the
chopper bowl (1) and turn it anticlockwise to x it
(2) (Fig. 2).
2 Place the chopper bowl (1) on the blender motor
unit and turn it clockwise to x it (2). (Fig. 3)
3 Place the blade unit in the chopper bowl (Fig. 4).
4 Put the ingredients in the chopper bowl (Fig. 5).
See the table below for the recommended quantities.
Do not exceed the maximum quantities indicated in
the table.
Maximum quantities
Ingredients Max. quantities
Onions 50-150g
Meat (lean, uncooked) 50-200g
Herbs (e.g. parsley) 10-20g
Vegetables/fruit (uncooked) 75-150g
Chocolate 50-75g
Cheese (rm, crustless) 50-100g
Baby food 100-200g
Nuts (shelled) 25-150g
Tip: Precut large pieces of food into pieces of 1-2cm.
5 Put the lid on the chopper bowl (1) and turn it
clockwise to x it (2) (Fig. 6).
Note: Make sure the lid is properly xed before you switch
on the blender motor unit.
6 Switch on the blender motor unit.
Note: If the appliance shakes because the food is not evenly
distributed, put your hand on the lid.
Note: The chopper does its work in a few seconds. Never let
it run longer than a few seconds.
7 When you have nished chopping, switch off the
blender motor unit and unplug it.
8 Turn the chopper anticlockwise (1) and remove it
from the blender motor unit (2). (Fig. 7)
Always remove the chopper from the motor unit
before you empty the chopper bowl.
9 Turn the coupling unit clockwise (1) and remove it
from the bottom of the chopper bowl (2) (Fig. 8).
10 Remove the lid and the blade unit from the
chopper bowl.
11 Empty the chopper bowl.
Cleaning
Always unplug the blender motor unit before you clean
the chopper.
Never use scouring pads, abrasive cleaning agents or
aggressive liquids such as petrol or acetone to clean the
chopper.
1 Disassemble the chopper.
2 Clean the coupling unit with a moist cloth.
Never immerse the coupling unit in water or any other
liquid. Do not clean the coupling unit in the dishwasher.
3 Clean the chopper bowl, the lid and the blade unit
in warm water with some washing-up liquid.
Note: You can also clean these parts in the dishwasher.
Environment
Do not throw away the appliance with the normal
household waste at the end of its life, but hand it in
at an ofcial collection point for recycling. By doing
this, you help to preserve the environment (Fig. 9).
-
Guarantee & service
If you need information or if you have a problem, please
visit the Philips website at www.philips.com or contact
the Philips Customer Care Centre in your country
(you nd its phone number in the worldwide guarantee
leaet). If there is no Customer Care Centre in your
country, go to your local Philips dealer or contact the
Service Department of Philips Domestic Appliances and
Personal Care BV.
4222.002.3023.2
2/3
INDONESIA
Pendahuluan
Perajang ini dimaksudkan untuk merajang bahan makanan
seperti bawang bombai, daging, bumbu, sayuran, buah,
coklat, keju keras, makanan bayi dan biji-bijian.
Perajang ini cocok untuk blender Philips jenis:
HR2074
HR2071
HR2069
HR2067
HR2066
HR2064
HR2063
HR2061
Gambaran umum (Gbr. 1)
ATutup
BUnit pisau
CMangkuk perajang
DUnit sambungan
Penting
Baca petunjuk pengguna ini dengan seksama sebelum
menggunakan perajang dan simpanlah sebagai referensi
nanti.
Untuk menggunakan unit motor blender, ikuti petunjuk
dalam petunjuk pengguna untuk blender.
Peringatan
Jangan gunakan perajang jika sudah rusak.
Jangan menyentuh pisaunya, khususnya bila perajang
sudah dihubungkan ke unit motor blender. Pisau-pisau
ini sangat tajam.
Pastikan unit sambungan telah terpasang erat pada
mangkuk perajang sebelum memasang perajang pada
unit motor.
Jangan sekali-kali memasukkan jari atau benda lainnya
ke dalam mangkuk perajang sewaktu perajang sedang
bekerja.
Perajang ini tidak dimaksudkan untuk digunakan
oleh orang (termasuk anak-anak) dengan cacat sik,
indera atau kecakapan mental yang kurang, atau
kurang pengalaman dan pengetahuan, kecuali jika
mereka diberikan pengawasan atau pengarahan
mengenai penggunaan perajang oleh orang yang
bertanggungjawab bagi keselamatan mereka.
Anak kecil harus diawasi untuk memastikan mereka
tidak bermain-main dengan perajang ini.
Jangan sekali-kali mengoperasikan perajang tanpa
diawasi.
Jika pisau macet, cabut steker unit motor blender
sebelum mengeluarkan bahan makanan yang
mengganjal pisaunya.
Jangan sekali-kali menggunakan mangkuk perajang
untuk menghidupkan atau mematikan unit motor
blender.
Hati-hati
Cabut selalu steker unit motor blender dari
listrik sebelum Anda merakit, membongkar,
membersihkan atau mengubah komponennya.
Jangan sekali-kali menggunakan aksesori atau
komponen apa pun dari produsen lain atau yang
tidak secara khusus direkomendasi oleh Philips.
Jika Anda menggunakan aksesori atau komponen
tersebut, jaminan Anda menjadi batal.
Jangan melebihi takaran maksimum seperti yang
ditunjukkan pada tabel.
Jika makanan lengket ke dinding mangkuk perajang,
matikan unit motor blender dan cabut stekernya.
Kemudian gunakan spatula untuk melepas makanan
tersebut dari dindingnya.
Pastikan selalu tutupnya terpasang dengan benar pada
mangkuk perajang sebelum Anda menghidupkan unit
motor blender.
Jangan mengisi mangkuk perajang dengan bahan
makanan yang lebih panas dari 80 ºC.
Jangan gunakan perajang untuk mencampur cairan.
Sebaiknya gunakan tabung blender.
Jangan merendam unit sambungan di dalam air atau
cairan lainnya.
Roda gigi di dalam unit sambungan telah dilumasi.
Jangan lumasi lagi.
-
-
-
-
-
-
-
-
-
-
-
-
-
-
-
-
-
-
-
-
-
-
-
-
-
-
Sebelum menggunakan alat pertama kali.
Bersihkan dengan seksama bagian-bagian yang akan
bersentuhan dengan makanan sebelum pertama kali
perajang digunakan (lihat bab “Membersihkan”).
Menggunakan alat
Berhati-hatilah saat Anda memasang atau melepas unit
pisau: tepi pemotong pada pisaunya sangat tajam.
1 Pasang unit sambungan ke bagian bawah mangkuk
perajang (1) dan putar berlawanan arah jarum jam
untuk mengencangkannya (2) (Gbr. 2).
2 Pasang mangkuk perajang (1) pada unit motor
blender dan putar searah jarum jam untuk
mengencangkannya (2). (Gbr. 3)
3 Pasang unit pisau dalam mangkuk perajang (Gbr. 4).
4 Masukkan bahan-bahan ke mangkuk rajang (Gbr. 5).
Lihat tabel di bawah untuk takaran yang
direkomendasikan.
Jangan melebihi takaran maksimum seperti
yang ditunjukkan dalam tabel.
Takaran maksimum
Bahan-bahan Takaran
maks.
Bawang bombay 50-150 g
Daging (tidak berlemak, mentah) 50-200 g
Bumbu (mis. peterseli) 10-20 g
Sayuran/buah-buahan (mentah) 75-150 g
Coklat 50-75 g
Keju (keras, tidak berkulit) 50-100 g
Makanan bayi 100-200 g
Biji-bijian (berkulit keras) 25-150 g
Tip Potong-potong dahulu bagian yang besar menjadi
seukuran 1-2 cm.
5 Pasang tutupnya pada mangkuk perajang (1) dan
putar searah jarum jam untuk mengencangkannya
(2) (Gbr. 6).
Catatan: Pastikan tutupnya telah dikencangkan dengan
benar sebelum Anda menghidupkan unit motor blender.
6 Hidupkan unit motor blender.
Catatan: Jika alat bergetar karena makanan tidak terbagi
merata, pegang tutupnya.
Catatan: Perajang bekerja selama beberapa detik. Jangan
sekali-kali membiarkan beroperasi lebih lama dari beberapa
detik.
7 Bila Anda selesai merajang, matikan unit motor
blender dan cabut stekernya.
8 Putar perajang berlawanan arah jarum jam (1) dan
lepaskan dari unit motor blender (2). (Gbr. 7)
Lepaskan perajang dari unit motor sebelum Anda
mengosongkan mangkuk perajang.
9 Putar unit sambungan searah jarum jam (1)
dan lepaskan dari bagian bawah mangkuk
perajang (2) (Gbr. 8).
10 Lepas tutupnya dan unit pisau dari mangkuk
perajang.
11 Kosongkan mangkuk perajang.
Membersihkan
Lepaskan selalu steker unit motor blender sebelum
membersihkan perajang.
Jangan sekali-kali menggunakan sabut gosok, bahan
pembersih abrasif atau cairan agresif seperti minyak
tanah atau aseton untuk membersihkan perajang.
1 Bongkar perajang.
2 Bersihkan unit sambungan dengan lap basah.
Jangan sekali-kali merendam unit sambungan dalam air
atau cairan lainnya. Jangan bersihkan unit sambungan
dalam mesin cuci piring.
3 Bersihkan mangkuk perajang, tutupnya dan unit
pisau dalam air hangat dengan sedikit cairan
pembersih.
Catatan: Anda juga dapat membersihkan komponen-
komponen ini dalam mesin cuci piring.
Lingkungan
Jangan membuang alat bersama limbah rumah
tangga biasa jika alat sudah tidak bisa dipakai lagi,
tetapi serahkan ke tempat pengumpulan barang
bekas yang resmi untuk didaur ulang. Dengan
melakukan hal ini, Anda ikut membantu melestarikan
lingkungan (Gbr. 9).
Garansi & servis
Jika Anda memerlukan informasi atau mengalami masalah,
silakan kunjungi situs web Philips di www.philips.com atau
hubungi Pusat Layanan Pelanggan Philips di negara Anda
(Anda dapat memperoleh nomor teleponnya dalam leaet
garansi yang berlaku di seluruh dunia). Jika tidak ada Pusat
Layanan Pelanggan di negara Anda, silakan datang ke dealer
Philips setempat atau hubungi Bagian Servis dari Philips
Domestic Appliances and Personal Care BV.
-
4222.002.3023.2
3/3

This manual suits for next models

1

Other Philips Kitchen Appliance manuals

Philips Avance HD3060 User manual

Philips

Philips Avance HD3060 User manual

Philips PerfectCare PSG7025/20 User manual

Philips

Philips PerfectCare PSG7025/20 User manual

Philips HR2725/00 User manual

Philips

Philips HR2725/00 User manual

Philips HR2727/50 User manual

Philips

Philips HR2727/50 User manual

Philips Cucina HR1350 User manual

Philips

Philips Cucina HR1350 User manual

Philips HD9120/55 User manual

Philips

Philips HD9120/55 User manual

Philips HD9170/91 User manual

Philips

Philips HD9170/91 User manual

Philips ClearTouch GC536 User manual

Philips

Philips ClearTouch GC536 User manual

Philips 8000 Series User manual

Philips

Philips 8000 Series User manual

Philips HD986X User manual

Philips

Philips HD986X User manual

Philips HD4907 User manual

Philips

Philips HD4907 User manual

Philips HD9240 User manual

Philips

Philips HD9240 User manual

Philips HD9270 User manual

Philips

Philips HD9270 User manual

Philips HR1610 User manual

Philips

Philips HR1610 User manual

Philips HR1680 User manual

Philips

Philips HR1680 User manual

Philips HD9185/00 Instruction Manual

Philips

Philips HD9185/00 Instruction Manual

Philips Airfryer XXL User manual

Philips

Philips Airfryer XXL User manual

Philips HD3038 User manual

Philips

Philips HD3038 User manual

Philips Comfort HD4503 User manual

Philips

Philips Comfort HD4503 User manual

Philips ClearTouch Air GC568 User manual

Philips

Philips ClearTouch Air GC568 User manual

Philips HD3137/03 User manual

Philips

Philips HD3137/03 User manual

Philips Verismo CA6500/65 User manual

Philips

Philips Verismo CA6500/65 User manual

Philips HD7007/01 User manual

Philips

Philips HD7007/01 User manual

Philips HR7954 User manual

Philips

Philips HR7954 User manual

Popular Kitchen Appliance manuals by other brands

Varimixer MRM5T-KH operating instructions

Varimixer

Varimixer MRM5T-KH operating instructions

Parkinson Cowan Metropolitan Owner's and installation guide

Parkinson Cowan

Parkinson Cowan Metropolitan Owner's and installation guide

Magnani MI-HA-SLC03-B user manual

Magnani

Magnani MI-HA-SLC03-B user manual

Eldom Elin SG500 manual

Eldom

Eldom Elin SG500 manual

Moulinex FRUTTI PRO JU 4001 manual

Moulinex

Moulinex FRUTTI PRO JU 4001 manual

CASO DESIGN SV 1200 Smart instruction manual

CASO DESIGN

CASO DESIGN SV 1200 Smart instruction manual

AGA eR3 Series User's guide & installation instructions

AGA

AGA eR3 Series User's guide & installation instructions

Lund 68260 manual

Lund

Lund 68260 manual

Pioneering Technologies RangeMinder Care and use manual

Pioneering Technologies

Pioneering Technologies RangeMinder Care and use manual

Bartscher 116050 Original instruction manual

Bartscher

Bartscher 116050 Original instruction manual

Black & Decker TS54 instruction manual

Black & Decker

Black & Decker TS54 instruction manual

Hamilton Beach 59998 user manual

Hamilton Beach

Hamilton Beach 59998 user manual

Monogram ZEP30 installation instructions

Monogram

Monogram ZEP30 installation instructions

KitchenAid KPRA Instructions and recipes

KitchenAid

KitchenAid KPRA Instructions and recipes

VEVOR JS-75-GD-01 instruction manual

VEVOR

VEVOR JS-75-GD-01 instruction manual

Sinbo SK 7381 instruction manual

Sinbo

Sinbo SK 7381 instruction manual

Trebs 9920 manual

Trebs

Trebs 9920 manual

Fakir NOSSO manual

Fakir

Fakir NOSSO manual

manuals.online logo
manuals.online logoBrands
  • About & Mission
  • Contact us
  • Privacy Policy
  • Terms and Conditions

Copyright 2025 Manuals.Online. All Rights Reserved.