Philips MF-JET 500 User manual

PHILIPS

Description of MF-JET 500 (for machine with automatic
document feeder)
paper tray
paper feeder
document tray
automatic document feeder
scanner cover
control panel
paper exit tray
Symbols on the display
Selected options will be highlighted with an arrow (»).
Resolution:
ffor text and graphics
%for very small print and graphics
Ffor photographs.
:transmission of faxes or SMS.
;on: faxes will be received automatically
flashing: faxes are stored in the memory
off: memory is full or you have disabled automatic fax reception.
The four arrows (d) in the middle of the display show how full the memory is.
Description of MF-JET 440 (for machine without automatic
document feeder)
paper tray
paper feeder
scanner cover
control panel
paper exit tray

Overview of functions
Lredial
Ocontrast
&broadcast – send a fax
or SMS to several recipi-
ents
f%F resolution
Ystart fax transmission or
copying
K colour copy
K black-and-white copy
whelp
Z scan
X stop, return
to stand-by
mode
Mto select functions
vif this symbol flashes
please read the dis-
play
Wflashes if there are
new messages in the
memory; for reading,
printing and sending
SMS-messages
}call up directory
entries
/choose between op-
tions, move the cursor
on the display
Creturn to pre-
vious menu;
to delete
OK confirm
selection
keypad for numberskeypad for text input

4
Contents
Contents
Safety instructions...................5
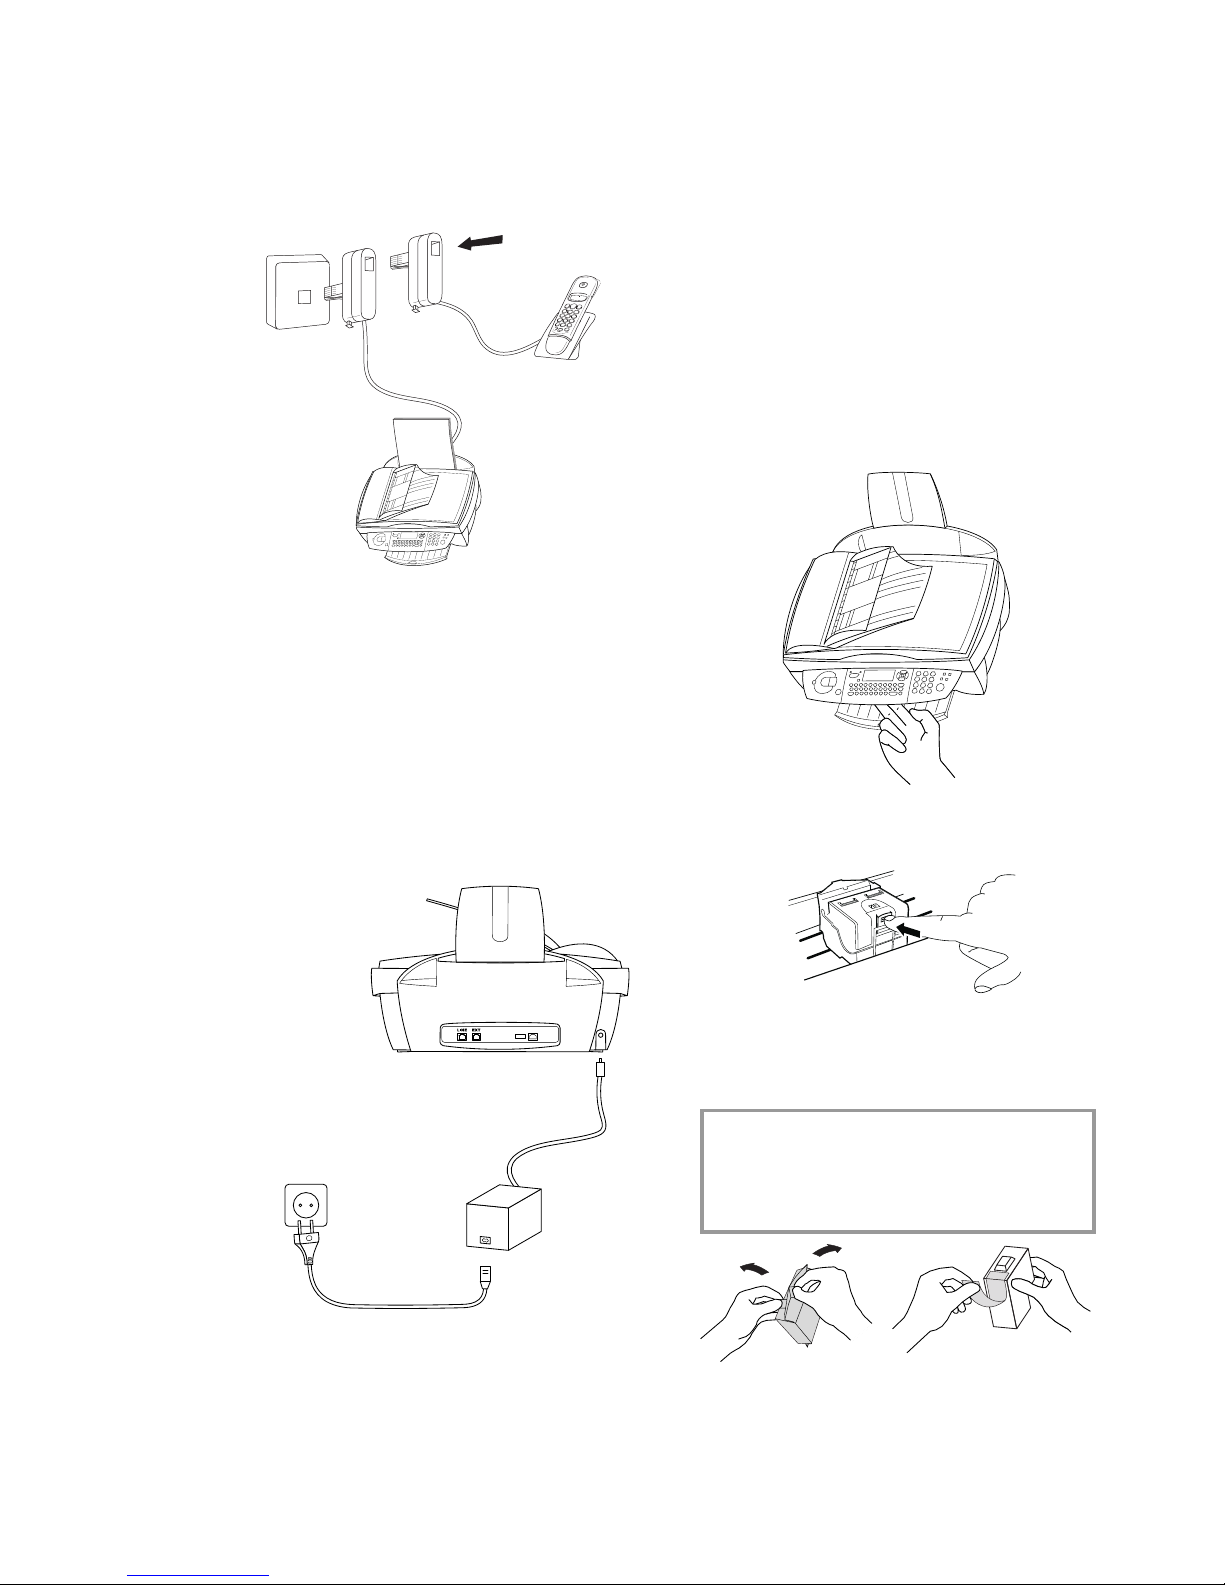
Installation ...............................6
Unpacking .............................................................6
Set-up .....................................................................6
Loading paper.......................................................6
Connections ..........................................................7
Additional devices................................................7
Power supply.........................................................8
Country selection .................................................8
Inserting cartridges ..............................................8
Cartridge alignment .............................................9
Your name and number ......................................9
Time and date .......................................................9
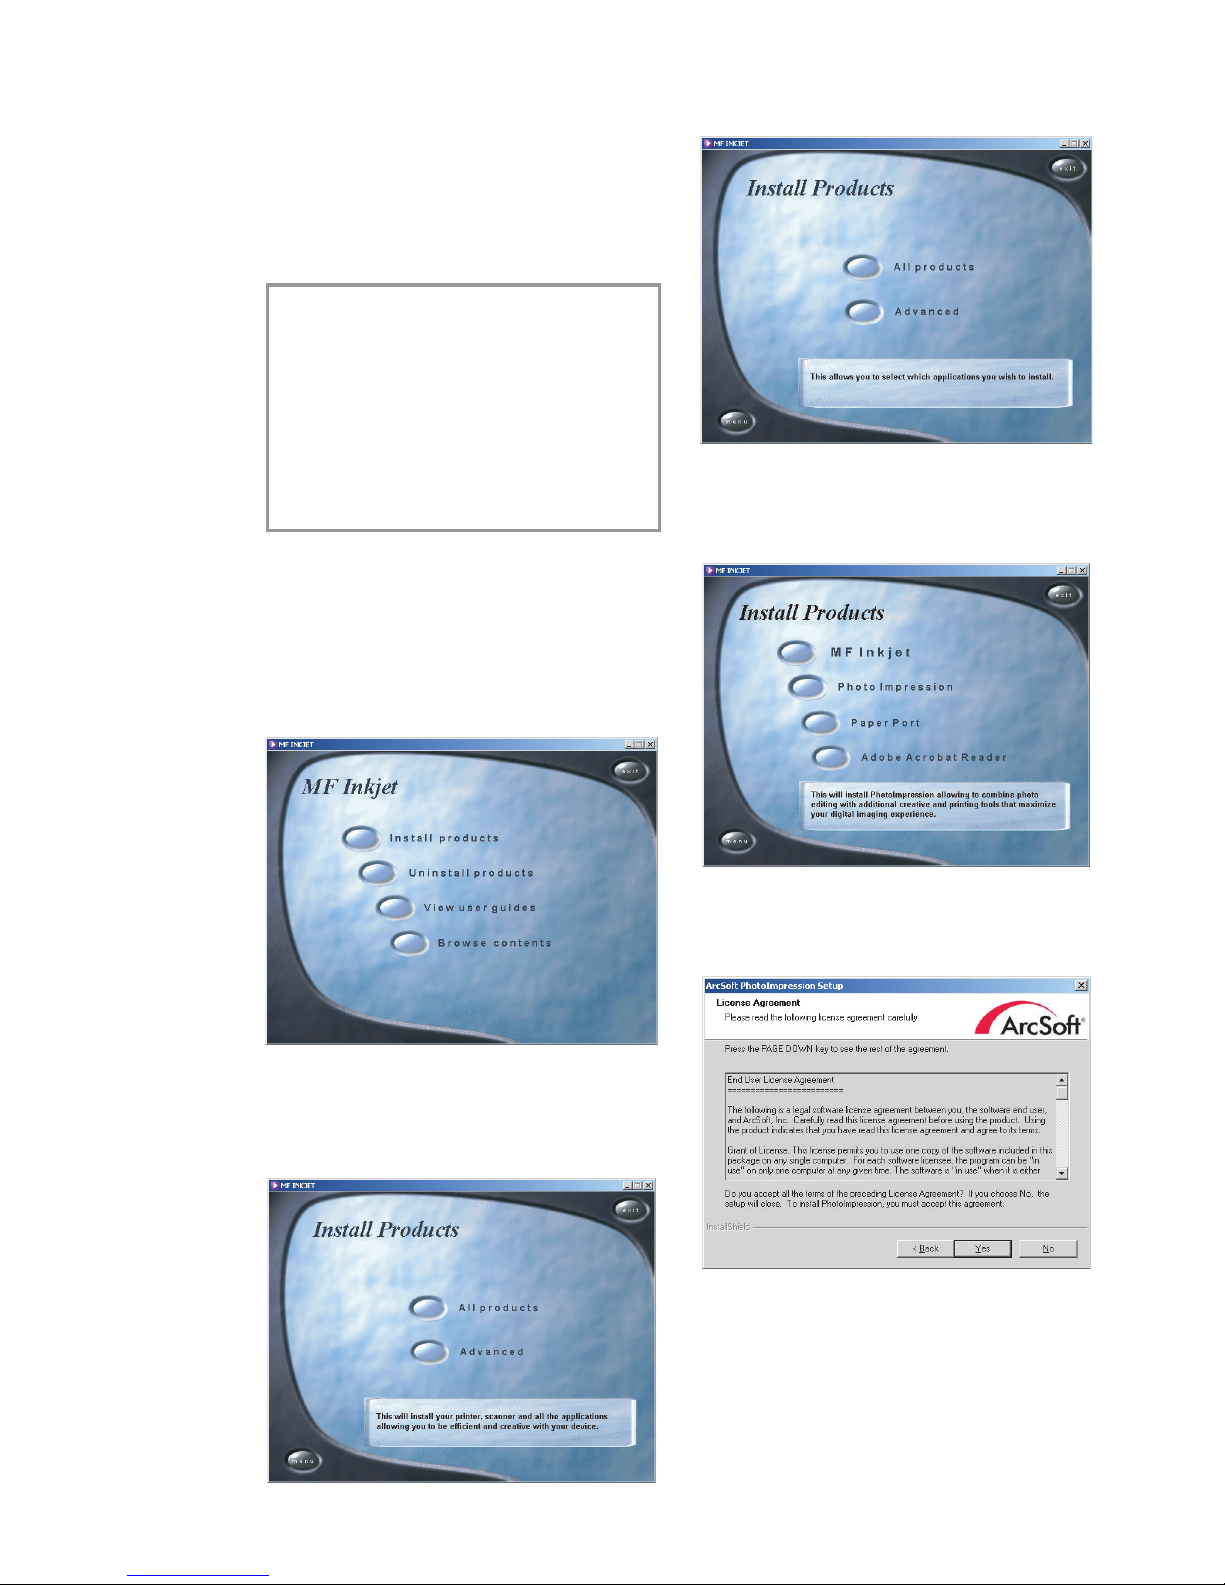
PC connection ......................................................9
Software installation.............................................9
Settings....................................13
Date and time ......................................................13
Your number and name .....................................13
Help function.......................................................13
Network type (PABX) ........................................13
Country and language.........................................13
Additional telephone ..........................................13
Directory.................................14
Add name .............................................................14
Add list..................................................................14
Modify...................................................................14
Cancel....................................................................14
Print.......................................................................14
Transfer to a PC ..................................................14
Fax ...........................................16
Sending a fax Y.................................................16
Directory }...............................................17
Redial L...........................................................17
Broadcast &.....................................................17
Resolution f%F ..........................................17
Contrast O..........................................................17
Receiving faxes ....................................................17
Fax answering device..........................................17
Send report...........................................................18
Delayed transmission..........................................18
Polling ...................................................................18
Additional telephone ..........................................18
Copy.........................................19
Inserting a document..........................................19
Standard copy K................................................19
Creative copy K.................................................19
Scan to PC ..............................21
Inserting a document..........................................21
Scanning a document .........................................22
SMS..........................................23
Send SMS .............................................................23
Receiving an SMS ...............................................23
Advanced settings ..................24
Settings list ...........................................................24
Fax settings...........................................................24
SMS settings.........................................................24
Scan settings.........................................................25
Printer settings.....................................................25
Hints & tips .............................26
Ordering information.........................................26
Change cartridges................................................26
Cartridge capacity................................................28
Logs.......................................................................28
Commands ...........................................................28
Lock.......................................................................28
Care and maintenance ........................................29
Appendix.................................31
Functions list........................................................31
Technical settings ................................................32
Technical data ......................................................32
Guarantee.............................................................33
Index .....................................................................35

5
Safety instructions
Safety
instructions
Please read and follow all warning notices and
instructions.
The MF-JET should be installed on a level and
stable surface. The surface should be smooth
and horizontal. The machine may be damaged if
it falls and may cause serious injury, especially to
small children. Place the MF-JET at least 10 cm
away from other electrical devices and objects.
Do not place the MF-JET in direct sunlight. Do
not place it near to a radiator, heater, radio, televi-
sion or air conditioning unit. Do not allow it to
come into contact with dust, water or chemicals.
Make sure that air can circulate freely around
the MF-JET. Do not operate the MF-JET in en-
closed spaces such as boxes, cupboards, cabinets
etc. Do not cover the MF-JET. Do not place the
MF-JET on soft surfaces such as beds, duvets,
cushions, sofas or carpets as there is a risk of
overheating and fire.
Only use the power supply included with the
product. Using an unauthorised power supply
may damage the MF-JET.
Do not touch telephone wires or mains cables
where the insulation is missing or damaged un-
less they are already disconnected.
If the housing of your MF-JET or the power
supply—in particular the power or telephone ca-
bles—, are damaged, please unplug the MF-JET.
The housing of the MF-JET may only be opened
by authorised service personnel.
Unplug the MF-JET from the mains and tel-
ephone line before cleaning. Do not use liquid
or aerosol cleaning agents such as sprays, or
polishes.
Do not expose the MF-JET to rain or any other
form of moisture. There is a risk of electric shock
or fire. If any liquid is accidentally spilled into the
MF-JET, immediately remove the power plug
and have the MF-JET professionally inspected.
If you want to use another cordless phone, en-
sure that the fax machine and the base station of
the other cordless phone are at least 15 cm apart
otherwise you may get acoustic interference in
your handset.
Your MF-JET has been tested to EN 60950 or
IEC 60950 and may only be operated on tel-
ephone networks and power supplies that con-
form to these standards.
In a thunderstorm, disconnect the MF-JET
from both the mains and the telephone line. If
you are unable to disconnect the MF-JET, avoid
using the fax machine or the telephone during
the storm. There is a risk of electric shock from
lightning and risk of damage to the machine.
Your MF-JET is only intended for use in the
country in which it was purchased. It may only
be operated with telephone systems and power
equipment which meet these standards.

6
Installation
Installation
Unpacking
Unpack the box and check that it includes the
following:
Set-up
Please read all warning notices and instructions
and follow them precisely.
1Insert the paper tray in the slots provided be-
hind the paper feed mechanism.
2Pull out the paper exit tray.
3Pull up the document tray.*
Loading paper
Please use only paper which is specifically intend-
ed for use with ink cartridge printers (standard
format is A4 210×297 mm, 80 g/m²). Follow the
instructions of the manufacturer.
telephone cable
mains cable
ink cartridges and
start card
“Plug’n’Print”
paper tray
machine
user guide
installation guide
CD-ROM
power supply
* for machine with automatic document feeder

7
Installation
vDo not load paper while the MF-JET is
printing!
1To prevent several sheets being drawn into
the machine at once, first fan out the paper
to separate the sheets and then straighten the
stack on a flat surface before inserting it into
the paper feed.
2Insert up to 100 sheets of paper up to the
end-stop in the paper feed mechanism.
Connections
First connect the telephone cable plug socket la-
belled LINE on the back of the machine.
Next connect the telephone plug to the line
socket on the wall.
In the UK
For all other countries
Additional devices
You can operate other equipment on a single
telephone line in addition to your fax machine,
and cordless handset, such as other telephones,
cordless phones, answering machines, charge
counters and modems (also see Settings / Ad-
ditional telephone).
If you operate another SMS-compatible cordless
phone on the same line there is no guarantee that
a particular SMS will be received on your fax
machine or on the other cordless handset. How-
ever, you can only receive SMS messages on one
device at any one time. Try to disable SMS recep-
tion on the additional cordless phone.
If you intend using special auxiliary devices with
your fax machine, please contact your dealer.

8
Installation
Same socket
(not in all countries)
You can connect additional devices to the same
telephone socket. Make sure the fax machine is
the first device connected to the line.
Connecting additional devices to the same socket
ensures you the optimal functionality of your
active fax switch (e.g. call transfer). Your fax ma-
chine can control the additional devices.
Power supply
Connect the power supply unit to the back of
your MF-JET (at the side), then use the mains
cable to connect the power supply unit to the
mains.
After you have connected the MF-JET to the
mains, it will prompt you to make some basic
settings as follows:
Country selection
1Press OK.
2Use /to choose your country.
3Press OK twice.
Inserting cartridges
Before you can print documents, there have to
be ink cartridges in your MF-JET. Therefore two
free cartridges for a few test pages are included
with your machine.
1Open the machine by pulling the lever under
the control panel.
2Press the lever in the middle of the cartridge
holder to open the holder.
3Take the ink cartridges out of their packaging
and remove the protective strip.
vPlease make sure that the protective strip
was removed completely.
Be careful not to touch the nozzle or the
contacts!

9
Installation
4Insert the black cartridge “nose” down in
the right-hand compartment of the cartridge
holder.
5Insert the colour cartridge in the same way
in the left-hand compartment.
6 Close the cartridge holder. You’ll hear a click
when it snaps shut.
7Close the machine.
8Push the supplied “Plug’n’Print” starter card
with the contacts at the top into the slot under
the control panel. This “Plug’n’Print” card is
used for charging the black cartridge and the
colour cartridge.
9 Changing the cartridges may take a short
while time and is completed when the display
shows:
Action completed
Remove card
Repeat the process with the same card for the
second cartridge.
Cartridge alignment
1After inserting the cartridges for the first time,
the machine will print out a page to check
their alignment. enter VALUE A
2Enter the value A where the image is the
clearest.
3Confirm with OK and repeat these steps for
values B, C and D. enter VALUE B
Your name and number
1Enter your fax number (max. twenty digits)
and press OK (to enter a plus sign hold down
the CTRL key and press Q; to enter a blank
space, press the _@ key).
2Enter your name by using the keyboard for
text input (max. twenty characters). You can
also enter a plus sign (CTRL and Q) or a
slash (CTRL and M). Press OK. If you have
entered a wrong digit or character, you can
correct it with /and C.
Time and date
Enter the date and time and confirm with OK,
e. g. 12 05 04 16 30 OK for
May 12th 2004, 4:30 p. m.
PC connection
vInstall the software first and then con-
nect the MF-JET via USB-cable to your PC,
when prompted to do so.
Minimum configuration
Your PC must have the following minimum con-
figuration:
• Pentium processor, 200 MHz or higher
• Windows®98/2000/ME/XP and 128 MB
RAM
• 300 MB free disk space for the complete in-
stallation
• USB port
Software installation
The Software-Package contains:
1 “MF-Inkjet”: installs your printer and scan-
ner.

10
Installation
2 “Photo Impression”: for creative processing
and improved print quality for your digital
photos.
3 “Paper Port”: for quicker management of
your scanned documents.
4 “Acrobat Reader”: for display and printing of
PDF data.
vInstall the software first and then con-
nect the MF-JET via USB-cable to your PC,
when prompted to do so.
Windows®XP: If you receive a warning
message that the peripheral hasn’t passed
Windows®Logo testing, choose “Continue
Anyway”. Your multifunctional device has
been tested for PHILIPS and is fully com-
patible with Windows®XP.
1Insert the installation CD in the CD-ROM
drive. Installation starts automatically. (If the
installation program does not start, find your
CD-ROM drive in Windows®-Explorer and
run the Launch.exe program.)
2In the start window, click on “Install prod-
ucts”.
3If you want to install all the products offered
(scanner, printer, “Photo Impression”, “Paper
Port”, “Adobe Acrobat Reader”), click on “All
products”.
4If you want to install specific products, click
on “Advanced”.
5Select a product by clicking on relevant but-
ton.
Example: Installing “Photo Impression”:
Click “Next” and follow the instructions on
the screen. You will be prompted to accept a
license agreement.

11
Installation
The program offers you a default directory
where “Photo Impression” will be installed.
You can choose a different directory.
If you are happy with the suggested directory
name, click on “Next”.
To complete the installation process for
“Photo Impression”, click on “Finish”.
vThe CD-ROM will also guide you through
the installation of “Paper Port”, “MF-
Inkjet” and “Acrobat Reader”.
When you have finished installing “MF-
Inkjet” you will be asked to restart your
computer.
6 To find out more about “Paper Port” and
“Photo Impression”, click on the “View user
guides” button in the start window and select
the relevant product.
7 To find out what’s on the CD-ROM, click on
the “Browse contents” button.
8 To delete a product once it has been installed,
click on the “Uninstall products” button in
the start window. If you want to uninstall all
the products, click on “All”.

12
Installation
If you want to delete specific products, click
on “Advanced”.
You can choose “Repair” or “Remove”. Fol-
low the instructions on the screen.
vClick on “Menu” at any time to return to
the start window.

13
Settings
Settings
You can print out a list of the current parameter
settings by pressing M, 54 and OK. To return
to stand-by mode, press Xas often as necessary.
Date and time
1Press M, 21 and OK.
2Enter the date and time and confirm with
OK, e. g. 12 05 04 16 30
OK for May 12th 2004, 4:30 p. m.
Your number and name
1Press M, 22 and OK.
2Enter your fax number (max. twenty digits)
and press OK. (To enter a plus sign hold
down the CTRL key and press Q; to enter a
blank space, press the _@ key.)
3Set your name by using the keyboard for text
input (max. twenty characters). You can also
enter a plus sign (CTRL and Q) or a slash
(CTRL and M). Press OK.
With C you can delete a wrong character.
Help function
Press wtwice. You will receive a printout ex-
plaining how to use the most important func-
tions. It also specifies how to obtain further
HELP pages concerning other features of your
fax machine.
Network type (PABX)
Private branch exchange systems are very com-
mon in large companies. To get a connection
from a private branch exchange to the public
network you have to dial a key to obtain the
outside line.
An additional telephone connected to a normal
telephone line together with your MF-JET must
not be confused with a private branch exchange.
If you connect the MF-JET to a PABX, you can
set the prefix for an outside line.
1Press M, 251 and OK. Use /to select
PABX and confirm with OK.
2Select function 252»PREFIX using /and
press OK. Enter the number of digits and
press OK.
vTake the longest internal number and add
a further digit (e.g. if internal numbers are
four digits long, enter 5).
3Press the key you need to reach an outside
line. This is usually 0. Confirm with OK.
If the number of digits for an internal call is
exceeded, the prefix for an outside line will be
automatically added.
Country and language
These settings will determine the language of the
display and the local telephone network settings.
1Press M, 201 and OK. Use /to select
your country. It is important that you choose
the country where you are using the machine
as the machine has to adapt to local condi-
tions! Press OK twice.
2To set another language, use /to select
function 202»LANGUAGE and press OK.
Choose with /and press OK.
Additional telephone
If you have connected an additional tel-
ephone to the same telephone line (see chapter
Installation / Connections), you can adjust the
number of rings you will hear when there is an
incoming call.
1Press M, 2912 and OK.
2Change the value (3, 4 or 5) and press OK.

14
Directory
Directory
Your MF-JET lets you create a directory by mem-
orising single entries and lists of entries.
Your machine can store up to 200 entries with
names and fax numbers. You may also group
several names together to create a list.
When entering a name, you can use +to type
capital letters (press and hold the +key and type
the desired key).
With CTRL you can type special characters
(e. g. hold down CTRL and press Wto type a
hyphen).
With /you can move the cursor within an entry
and with \you can delete a character.
Add name
For each record, you must store a name and fax
number.
1Press M, 11 and OK. Enter a name and
press OK. Enter a fax number and press
OK.
2The MF-JET automatically assigns a number
to the record. To modify this number enter
the digit required and press OK.
3Use /to choose W.ASSOC.KEY if you
want to assign a shortcut key (letter) for quick
access to the record. Press OK.
4If need be, select the appropriate transmis-
sion speed to send your faxes. With a good
telephone connection, the appropriate rate is
the highest one. Press OK.
Add list
You can group several directory entries together
f.e. to send a fax to several persons at once.
1Press M, 12 and OK. Enter a name for
this list and press OK.
2Press a shortcut number, a letter or use /
and OK to select entries to add them to the
list. Press OK.
3The list ID number will automatically appear
on the display. If you wish to modify this
number, you may do so. Confirm with OK.
Modify
1Press M, 13 and OK.
2The directory appears in alphabetic order.
Use /to select the entry or list you wish to
modify. Press OK.
3Modify the entry and confirm each step with
OK.
Cancel
1Press M, 14 and OK.
2The directory appears in alphabetic order. Use
/to select the entry or list you wish to de-
lete.
3Press OK.
4Confirm with OK.
Print
Press M, 15 and OK. The directory is printed
in alphabetical order.
Transfer to a PC
If you have connected your MF-JET to a PC, you
can transfer the directory to the PC to edit it.
On your PC, click on Start > Programs > MF
Inkjet > Directory.
You can transfer the directory from the PC to the
MF-JET (and vice versa) by clicking on the icons
on the bottom of the window.
You can add specific entries in the register win-
dow named “Entry”.

15
Directory
You can edit lists in the register window named
“List”.

16
Fax
Fax
Sending a fax Y
With the MF-JET 440 you can send faxes from
the flatbed scanner. MF-JET 500 also offers au-
tomatic document feed.
Flatbed scanner
1Open the flatbed scanner cover. Please make
sure that the scanner glass is clean before
placing the original.
2Place the document face down onto the
glass.
3Align it with back left corner of the scanner
(marked with arrows).
If you want to scan small three-dimensional ob-
jects (such as coins or flowers), use transparent
film to protect the scanner glass.
4Choose a fax number and press Y. Wait until
the warm-up phase has come to an end and
the document has been scanned into the
memory.
5If you want to send just one page, use /to
choose DONE and press OK. If you want to
scan further pages, choose NEXT PAGE and
insert another page. Then press OK.
After transmission, the MF-JET will automati-
cally print a transmission report.
If you want to cancel the transmission, press X
twice.
Automatic feeder
(for machine with automatic document feeder)
If you are working with originals of an odd size
or photos, please use the flat-bed scanner.
A5 size documents should be inserted landscape.
The following points are the most common
causes of problems when inserting documents
into the feeder. Do not insert ...
• pages that are smaller than A5.
• pages from newspapers (printer’s ink).
• stapled pages or pages with paper clips.
• creased or torn pages.
• wet pages or pages with corrections made
with correction fluid; dirty pages or pages
with a glossy or laminated surface.
• pages joined with sticky tape or glue, with
adhesive stickers such as “post-it®” notes,
or pages which are too thin or too thick.
1Place the document face up into the docu-
ment feeder (up to 10 pages printed on
60–100 g/m² paper).
aurea primasataestæ
tasq
uævindicen
ullo spontesua
sinelegefidemrectumquecolebataureap
rimasata est
ætasquævindicenullosp
onte suasinelegefidem
rectumquecolebataureaprima sataestætasq
uæ vindice
nullo spontesuasinelegefidemrectumquecolebataurea
prima sata
estætasq
uæ vindice nullo sponte suasinelegefidem
rectumquecolebataureaprimas
ata estætas quævindice
nullospontesuasinele
gefidemrectumquecolebata
urea
prima sataestætasq
uævindice nullos
pontesuasinelege
fidem rectumque
colebataureaprimasataestætasq
uæv
indice nullo
spontesuas
ine legefidemrectumquecolebataurea prima
sataestætasquæ vindice nullo spontesuas
inel
egefidem
rectumquecolebataureaprimasataestætasq
uæv
indice
nullo spontesuasinelegefidemrectumque colebat
aureap
rimasataestæ
tasquævindice nullo spontesua
sinelegefidemrectumquecolebataureaprima sataest
ætasquævin
dice nullos
pontesuasinelege fidem
rectumquecolebataureaprima sata estætasquævindice
nullospontesuasinelegef
idemrectumque colebata
urea
primasataest ætasquæ
vindice nullos
pontes
uasinelegef
idemrectumque
colebataurea
aureaprimasataestætasq
uævi
ndice nu
sinelegefidemr
ectumquecolebataurea
primas
ataestætasquævindice nullo spo
ntesuasinelegefidemrectumquecolebat
aureaprima sataestætasq
uævin
dice nullo
sponte suasinelegefidem rectumque
colebataureaprima sata
estætasq
uæv
indice nullosponte suasinelege
fidemrectumquecolebataurea prima sataest
ætasquæ vindice nullo spontesuasinelegefidem
rectumquecol
ebataureap
rima sataestætasquævi
ndice
nullos
pontesua sinelege fidemrectumque
colebat aureap
rimasataestæ
tasquævi
ndice nullo
spontes
uasinelegefidem rectumquecolebataureaprima
sataestætasquævindicenullospontesuas
inelegefidem
rectumquecolebataureaprimasataestæ
tasquævin
dice
nullos
pontesuasinelegef
idem rectumquecolebat
aurea prima sataestæ
tasquævindicenullospontesua
sine legefidemrectumquecolebataurea primasataest
ætasquævindice nullos
ponte sua sinelegefidem
rectumquecolebataureaprima sataestætasquæv
indice
nullos
pontesua sinelegef
idemrectumquecolebata
urea
primasataestætasq
uæ
vindice nullcol
ebataurea
10
2Dial the fax number.
3Press Yto start the transmission.
After transmission, the MF-JET will automati-
cally print a transmission report.
If you want to cancel the transmission, press X
twice.

17
Fax
Directory }
1Insert a document.
2Press }and use /, on the fax ma-
chine to select name and number or use the
keyboard to enter a name and then select the
record.
3Press Yto start the transmission.
Redial L
The last ten numbers dialled on the MF-JET will
be stored in the redial memory.
1Insert a document.
2Press Las often as necessary. When the de-
sired number appears on the display, press Y
to start the transmission.
Broadcast &
You may choose to send a document to several
recipients.
1Insert a document.
2Dial a number (or use the directory or L)
and press &. Repeat this step for up to ten
recipients. Press Y.
3If you want to cancel the transmission, press
Xtwice.
Resolution f%F
If necessary, you may change the resolution. Press
f%F as many times as necessary to select the
required mode. An icon on the display will show
the current mode. If no icon is highlighted, the
document will be sent in standard resolution.
standard—for good quality documents, without
drawings or small details
f—for documents with drawings or small char-
acters
%—for documents with very fine or small
drawings
F—for photos
Contrast O
If the document is too light or too dark, you may
change the contrast. Press Oas many times as
necessary to choose the desired contrast. The
current setting is shown on the display.
Receiving faxes
If you don’t change the factory settings, faxes will
be automatically printed. If the MF-JET has run
out of paper or ink, incoming faxes will be stored
in the memory.
After inserting paper or cartridges, start printing
by pressing Y.
To change the fax reception settings, please refer
to Advanced settings / Fax settings.
Fax answering device
The fax answering device allows you to keep
documents confidential by storing them. They
need not be printed as soon as you receive them.
The ;symbol on the display lets you know the
state of the fax answering device:
;on—fax answering machine is on
;flashing—documents are in the memory or
are being received
;off—memory is full
You can ensure document confidentiality by us-
ing the four-digit code. Once stored, this code
is required to print fax messages and to activate/
deactivate the fax answering device.
Storing an answer code
Press M, 343 and OK. Enter a four-digit
code and press OK.
Activate/deactivate
Press M, 342 and OK. If you have stored
an access code, enter it and press OK. Use /to
select WITH or WITHOUT and press OK.
Printing messages
Press M, 341 and OK. If you have stored an
answer code, enter it and press OK. Documents
received and stored in the memory are printed
and then deleted from the memory.

18
Fax
Send report
The MF-JET can print a transmission report
every time you have sent a document. This way
you are given confirmation that your document
has been received.
1Press M, 231 and OK. Select one of the
following options:
WITH—a report is given when the transmission
was completed successfully or when it is com-
pletely abandoned.
WITHOUT—no transmission report; however,
your MF-JET notes all transmissions that took
place in its log (see Hints & tips / Logs).
ALWAYS—a report is printed with each trans-
mission.
ON ERROR—a report is only printed if the trans-
mission fails or is abandoned.
2Confirm with OK.
Delayed transmission
1Press M, 31 and OK.
2Enter the fax number and press OK.
3Enter the time you want the fax to be sent
(within 24 hours), e. g. 17 30 for 530
p. m. Press OK.
4Set the contrast and other settings and con-
firm each entry with OK.
Polling
By means of this function documents which
have been prepared for collection from another
fax machine can be retrieved. You can also allow
a document to be polled from your fax machine.
Polling reception
1Press M, 32 and OK.
2Enter the polling number and press Y.
Delayed polling
1Press M, 32 and OK.
2Enter the polling number and press OK.
3Enter the time you wish to poll the document
(e. g. 17 30 for 530 p. m.) and press Y.
Polling transmission
You may place a document in your MF-JET and
make it available to one or more recipients who
can obtain a fax of this document by calling your
MF-JET with the polling function.
1Place the document on the flatbed scanner or,
in the case of the MF-JET 500, also in the
document feeder.
2Press M, 33 and OK.
3Use /to choose between the two options:
SIMPLE—the document can be retrieved from
memory once only, or from the document feeder
in the case of the MF-JET 500. Press OK.
MULTIPLE—the document may be polled as
many times as necessary (from the memory).
Press OK.
4If necessary, adjust the contrast and press
OK.
5Enter the number of pages and press OK
(this is only necessary when you have chosen
MULTIPLE above).
Additional telephone
You can connect an additional telephone or cord-
less telephone on the same line as your MF-JET.
When a call comes in, the additional telephone
will ring a few times, then the machine switches
to fax reception. If necessary, the number of
rings can be changed in the technical settings (see
Settings / Additional telephone).

19
Copy
Copy
Inserting a document
With the MF-JET 440 you can copy documents
with the flatbed scanner. MF-JET 500 also offers
automatic document feed.
Flatbed scanner
1Open the flatbed scanner cover. Please make
sure that the scanner glass is clean before
placing the original.
2Place the document face down onto the
glass.
3Align it with back left corner of the scanner
(marked with arrows).
If you want to scan small three-dimensional ob-
jects (such as coins or flowers), use transparent
film to protect the scanner glass.
Automatic feeder
(for machine with automatic document feeder)
Place the document face up into the document
feeder (up to 10 pages on 60–100 g/m² pa-
per).
aurea primasataestæ
tasq
uævindicen
ullos
pontesua
sinelegefidemrectumquecolebataureap
rimasata est
ætasquævindicenullosponte suasinelegefidem
rectumquecolebataureaprima sataestætasq
uæ vindice
nullo spontesuasinelegefidemrectumquecolebataurea
prima sata
estætasq
uæ vindice nullo sponte suasinelegefidem
rectumquecolebataureaprimas
ata estætas quævindice
nullospontesuasinele
gefidemrectumquecolebata
urea
primasataestæta
sq
uævin
dice nullo spontesuasinelege
fidem rectumque
colebataureaprimasataestætasq
uæv
indice nullo
spontesuas
ine legefidemrectumquecolebataurea prima
sataestætasquæ vindice nullo spontesuas
inel
egefidem
rectumquecolebataureaprimasataestætasq
uæv
indice
nullo spontesuasinelegef
idemrectumque colebat
aureap
rimasataestæ
tasquævindice nullo spontesua
sinelegef
idemrectumquecolebataureaprima sataest
ætasquævindice nullos
pontesua sinelege fidem
rectumquecolebataureaprima sata estætasquævindice
nullospontesuasinelegef
idemrectumque colebata
urea
primasataest ætasquæ
vindice nullosp
ontes
uasinelegef
idemrectumque
colebataurea
aureaprimasataestætasq
uævi
ndice nu
sinelegefidemrectumquecolebataurea
primasataestætasquævindice nullo spo
ntesuasinelege fidem rectumquecolebat
aureaprima sataestætasq
uævin
dice nullo
sponte suasinelegefidem rectumque
colebataureaprima sata
estætasq
uæv
indice nullosponte suasinelege
fidemrectumquecolebataurea prima sataest
ætasquæ vindice nullo spontesuasinelegefidem
rectumquecol
ebataureap
rima sataestætasquævi
ndice
nullospontesua sinelege fidemrectumque
colebat aureap
rimasataestæ
tasquævi
ndice nullo
spontes
uasinelegefidem rectumquecolebataurea prima
sataestætasquæ vindicenullospontesuas
inelegefidem
rectumquecolebataureaprimasataestæ
tasquævin
dice
nullos
pontesuasinelegef
idem rectumquecolebat
aurea prima sataestæ
tasquævindicenullospontesua
sine legefidemrectumquecolebataurea primasataest
ætasquævindice nullos
ponte sua sinelegefidem
rectumquecolebataureaprima sataes
tætasquæv
indice
nullos
pontesua sinelegef
idemrectumquecolebata
urea
primasatae
stæt
asq
uæ
vindice nullcolebataurea
10
If you are working with originals of an odd size
or photos, please use the flat-bed scanner.
A5 size documents should be inserted landscape.
The following points are the most common
causes of problems when inserting documents
into the feeder. Do not insert ...
• pages that are smaller than A5.
• pages from newspapers (printer’s ink).
• stapled pages or pages with paper clips.
• creased or torn pages.
• wet pages or pages with corrections made
with correction fluid; dirty pages or pages
with a glossy or laminated surface.
• pages joined with sticky tape or glue, with
adhesive stickers such as “post-it®” notes,
or pages which are too thin or too thick.
Standard copy K
1Insert a document (see above).
2Choose one of the Kkeys (copying in colour
or black and white) and press it twice.
Creative copy K
1Insert a document (see above).
2Press one of the Kkeys (copying in colour or
black and white) once. You can now make the
following settings:
3Enter the desired number of copies and press
OK. NUMBER OF COPIES

20
Copy
4The copying quality of the MF-JET is higher
than the resolutions used for fax transmission.
Use /or f%F to choose the resolu-
tion: RESOLUTION
FAST—for good quality documents, without
drawings or small details
NORMAL—for documents with drawings or
small characters
QUALITY—for maximum resolution
Press OK.
5Your MF-JET can reduce or magnify a spe-
cific part of a document from 25% to 400%.
Set the desired zoom value with the key pad
and press OK. ZOOMING
6You can change the origin of the flat-bed
scanner (by default, this is the back left angle
of the scanner window marked with arrows).
By entering new values of x and y given in
millimetres, you will move the scanning zone
as shown on the figure below. Confirm the
entries with OK. ORIGIN
7If the document is too light or too dark, you
may change the scanning contrast. Press /
or Oas many times as necessary to choose
the desired contrast, as shown by the position
of the cursor. Press OK. CONTRAST
8You can adjust the saturation. Colour satu-
ration is judged in proportion to brightness.
Use /to change the setting. -is more
grey, +is more saturated. Confirm with
OK. SATURATION
9If you have chosen colour copy, you can
adjust the RGB values. All colours can be
defined as combinations of red (R), green (G)
and blue (B). You can change the values for
each of these basic colours with /. Press
OK. RGB
10 You can adjust the luminosity (brightness) of
the printer. Use /to change the setting. -is
darker, +is lighter. Press OK. LUMINOSITY
11 Use /to set whether you use plain, coated,
or photo paper, or transparent film and press
OK. »normal PAPER
Other manuals for MF-JET 500
1
This manual suits for next models
1
Table of contents
Other Philips Printer manuals

Philips
Philips Perfection V600 User manual

Philips
Philips CRYSTAL 660 - NETWORK Instruction sheet

Philips
Philips LaserMFD LFF 6050 User manual

Philips
Philips LaserMFD 6050 WLAN User manual

Philips
Philips LaserMFD 6050 WLAN User manual

Philips
Philips LaserMFD 6050 WLAN User manual

Philips
Philips MSX NMS 1431/00 User manual

Philips
Philips VW0020 User manual

Philips
Philips MSX VW0020 User manual

Philips
Philips MSX VW 0030 User manual