Phonocar VM 173 Installation guide
MONITOR
Monitor 7” - Wide vision TFT/LCD
ISTRUZIONI DI MONTAGGIO
ASSEMBLING INSTRUCTIONS
INSTRUCTIONS DE MONTAGE
MONTAGEANLEITUNG
INSTRUCCIONES PARA EL MONTAJE
VM 173
ITALIANO
ENGLISH
FRANÇAIS
DEUTSCH
ESPAÑOL
2
IT- GBPrecauzioni • Warning
IT - L’installazione di questa unità in posti non idonei potrebbe disturbare il guidatore e far perdere la sua
concentrazione pericolosamente. Il produttore non si assume responsabilità per chi non segue le avver-
tenze.
Fare attenzione:
1. Si prega di tenere lontano dall’umidità e dalla luce diretta del sole.
2. Si prega di pulire il monitor con un panno secco e morbido. Non pulire il monitor con prodotti alcolici o
chimici.
3. Si prega di tenere il telecomando lontano dalla portata dei bambini.
4. Il monitor potrebbe mostrare alle volte dei pixel (quadratini chiari o scuri) durante il suo utilizzo.
Ciò è normale e non indica malfunzionamenti.
GB - Installation of this unit where it may impair the driver’s concentration is dangerous.
The manufacturer or retailer assumes no responsibility for failing to obey the above warnings.
Caution:
1. Please keep away from moisture and direct sunlight.
2. Please clean the display with a dry and soft cloth.Do not clean the display with any alcohol or chemical
cleanser.
3. Please keep the remote control away from children.
4. The display may sometimes show pixels (light or dark dots) during use. This is normal and does not
indicate any misfunction.
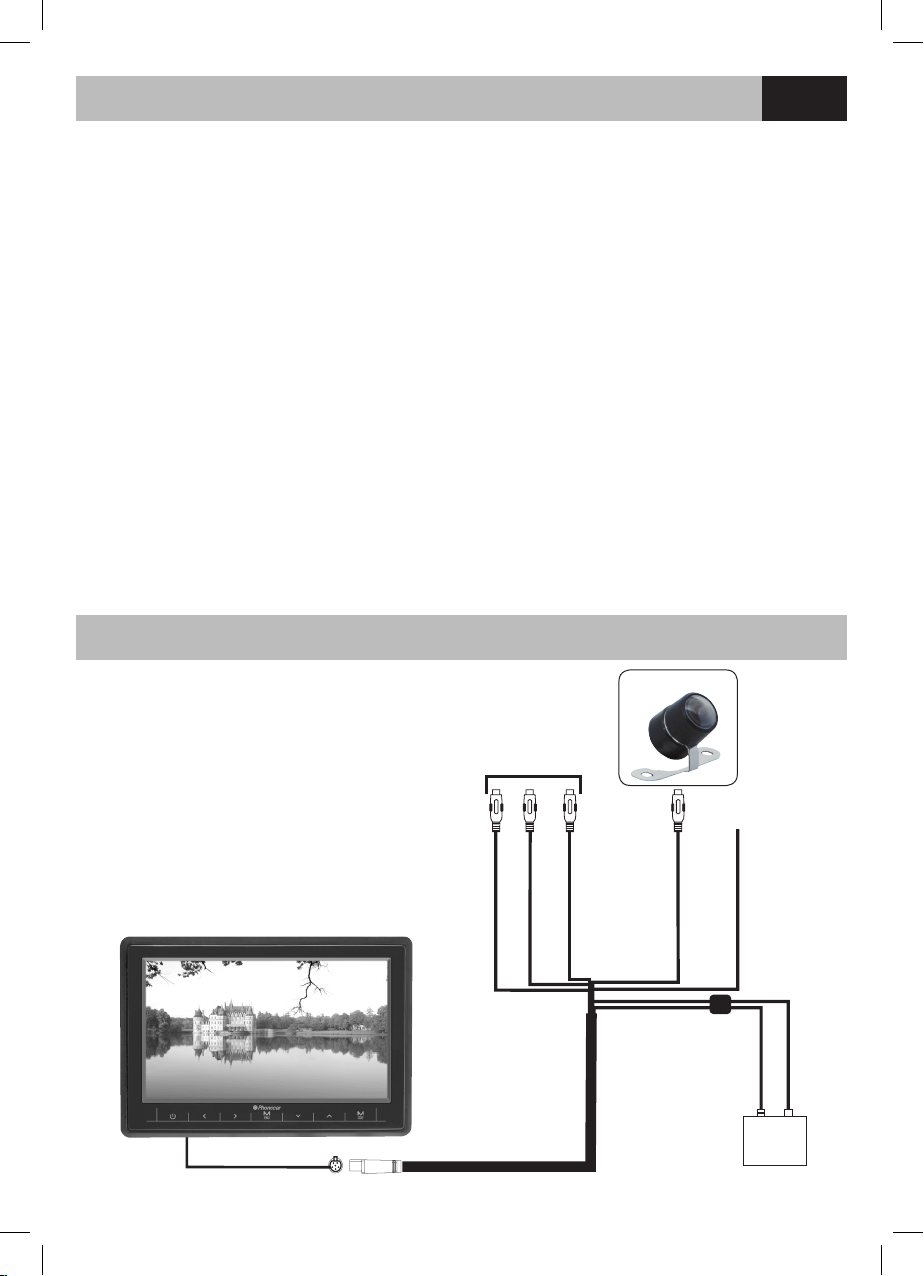
Collegamenti • Connections
BIANCO/WHITE AUDIO 1
AV 1
ROSSO/RED AUDIO 1
GIALLO/YELLOW VIDEO 2
GIALLO/YELLOW VIDEO 1
VERDE +12 V
LUCI RETROMARCIA*
GREEN +12 V
REAR BACKLIGHT*
ROSSO/RED
NERO/BLACK
2A
+
+12V
CAMERA
* Quando il cavo verde è collegato a +12 V
attiva il monitor sull’ingresso V2
* When the GREEN cable is connected to +12V,
the Screen gets activated on the V2-Input.
3
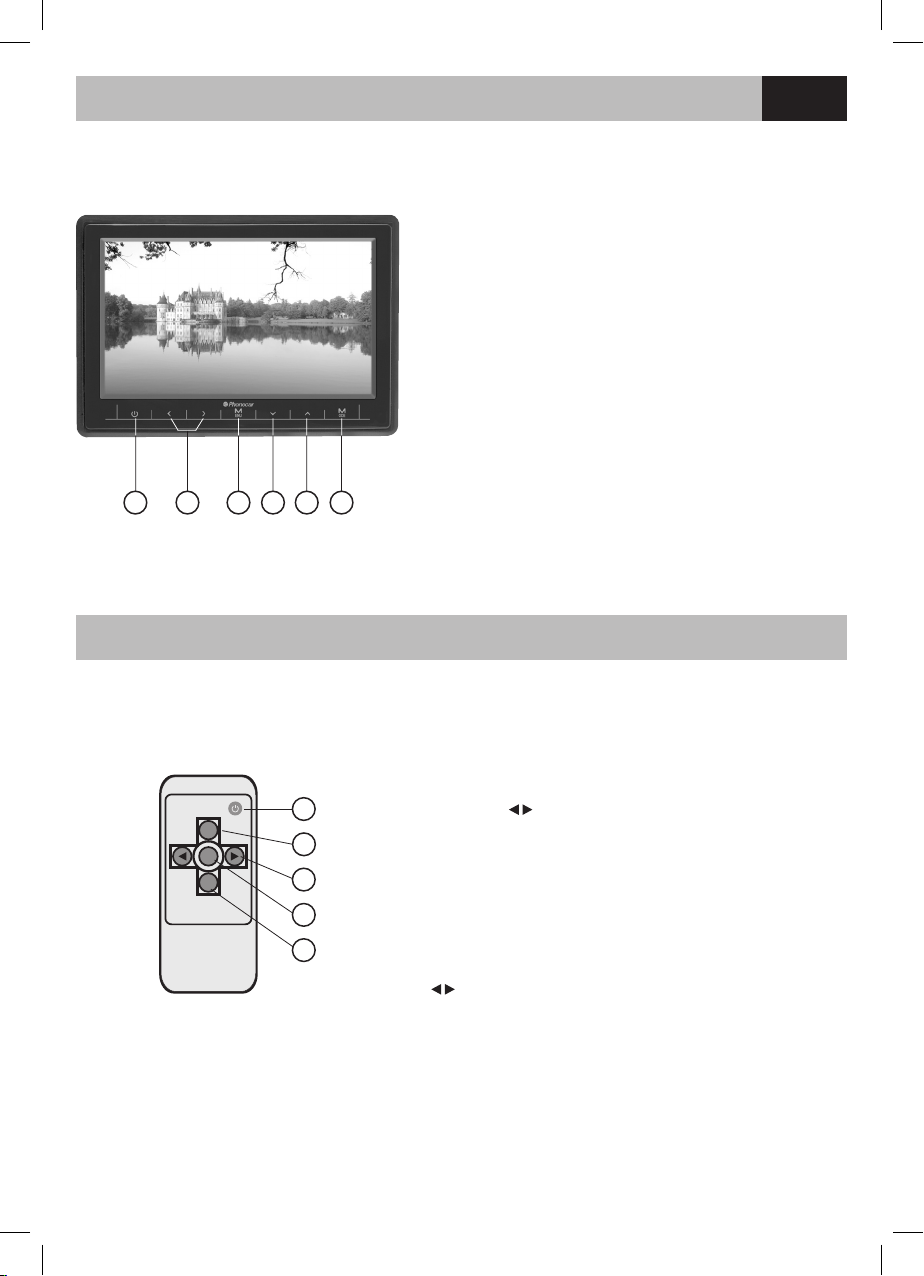
IT- GBFunzioni monitor • Monitor functions
IT
1. Accende/Spegne.
2. Selezione funzioni menù.
3. Menù Brightness/Contrast/Color/Rotation/IR send/Reset.
4. Formato schermo (16:9 - 4:3).
5. Rotazione schermo.
6. Seleziona sorgente AV1/AV2.
GB
1. On/Off.
2. Selecting the Menu-Functions.
3. Menù Brightness/Contrast/Color/Rotation/IR send/Reset.
4. Screen-Format.
5. Screen-Rotation.
6. Select Source AV1/AV2.
Funzioni telecomando • Remote control functions
IT
1. Accende/Spegne.
2. Seleziona sorgente AV1/V2.
3. Selezione funzioni menù.
4. Menù.
5. Formato schermo (16:9 - 4:3).
GB
1. Power: On/Off.
2. Video Select: AV1 or V2 inputs.
3. Enter to function menu.
4. Menu.
5. Picture-format 16:9-4:3.
VIDEO
SELECT
MENU
MODE
SELECT
LCD REMOTE
1
2
3
4
5
1 2 3 4 5 6

4
FR-D
FR - Son installation en lieu non apte pourrait distraire le chauffeur et lui faire perdre dangereusement la
concentration. Le producteur n’est pas responsable pour qui ne suit pas les recommandations.
Attention:
1. Le tenir à l’abris de l’humidité et éviter de l’exposer au soleil
2. Nettoyer l’écran avec un chiffon doux et sec. Ne pas le nettoyer avec des produits alcooliques ou chi-
miques.
3. Tenir la télécommande loin des enfants
4. L’écran pourrait faire voir quelques fois des pixels (petit carrés claires ou sombres) pendant son
utilisation. Ceci est normale et n’indique pas un mauvais fonctionnement de l’appareil.
D- Die Installation des Geräts könnte entweder beim Fahren im Wege stehen oder die Konzentration des
Fahrers in Gefahr bringen. Der Hersteller übernimmt keine Haftung bei Nichteinhalten der vorliegenden
Sicherheits-Hinweise.
Bitte beachten:
2. Gerät vor Feuchtigkeit und Sonnenbestrahlung schützen
4. Bildschirm mit einem trockenen, weichen Tuch reinigen. Niemals Alkohol oder chemische
Reinigungsmittel verwenden.
7. Fernbedienung besser nicht in Reichweiter von Kindern aufbewahren
8. Bei eingeschaltetem Gerät könnten Pixel zeitweise ersichtlich sein (helle oder dunkle Klein-Quadrate).
Dies ist normal und ist kein Anzeichen eines Defekts.
Précautions • Vorsichtsmaßnahmen
Connexions • Anschlüsse
BLANC/ WEISS AUDIO 1
AV 1
ROUGE/ROT AUDIO 1
JAUNE/GELB VIDEO 2
CAMERA
JAUNE/GELB VIDEO 1
ROUGE/ROT
2A
+
+12V
NOIR/SCHWARZ
VERT +12 V
FEUX DE RECUL*
GRÜNE +12 V
RÜCKFAHRLEUCHTEN*
* Lorsque le câble vert est branché à +12V,
activer le monitor sur l’entrée V2
* Wenn das GRÜNE Kabel an +12V angeschlossen ist,
dann aktiviert sich der Bildschirm auf dem V2-Eingang.

5
FR-D
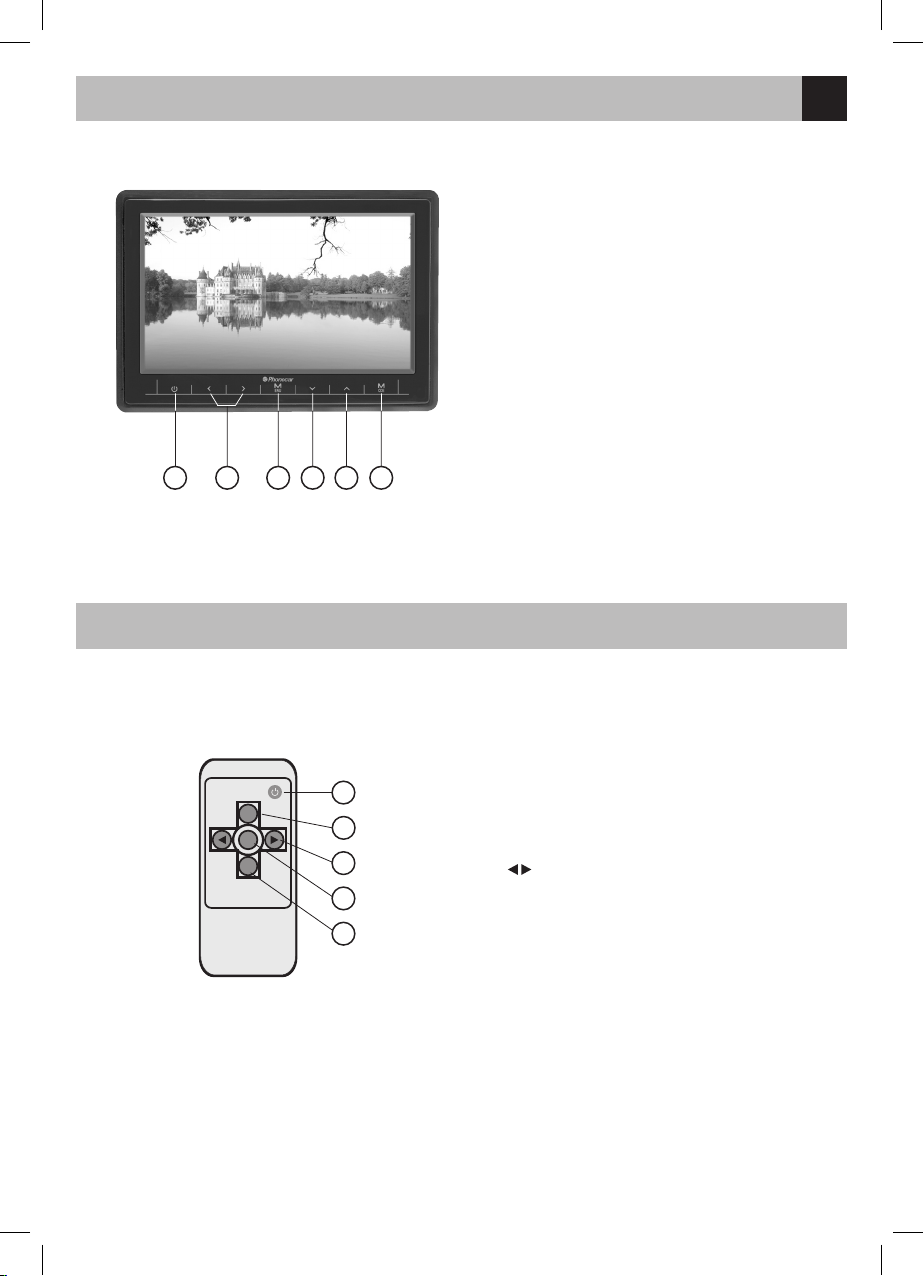
Touches écran • Bildschirm-Tasten
FR
1. Allume / Eteint.
2. Sélectionne les fonctions du menu.
3. Menu.
4. Format de l’écran (16:9 - 4:3).
5. Rotation de l’écran.
6. Sélectionne la source AV1 / V2.
D
1. Ein/Aus
2. Wahl der Menü-Funktionen
3. Menü Brightness/Contrast/Color/Rotation/IR send/Reset.
4. Bildschirm-Größe (16:9 - 4:3)
5. Bildschirm-Drehung
6. Wahl der Quelle AV1 / V2
Touches Télécommande • Fernbediennugs-Tasten
FR
1. Appuyer ce bouton pour On et Off.
2. Vidéo sélection: AV1 / V2.
3. Accéder à la fonction menu.
4. Menu.
5. Format de l’image 16:9 - 4:3.
D
1. Einschalten: hierzu Taste ON/OFF drücken.
2. Video-Einstellung: AV1 / V2.
3. betreten der Menü-Funktion
4. Menü.
5. Bild-Format zu ändern 16:9 - 4:3.
VIDEO
SELECT
MENU
MODE
SELECT
LCD REMOTE
1
2
3
4
5
1 2 3 4 5 6

6
Esta unidad no ha sido estudiada para ser instalada en la parte anterior del habitáculo en el área destinada
al conductor y acompañante en cuanto podría ser vista por quien conduce, aspecto que esta prohibido
por las normas de circulación y por ser potencialmente peligroso en cuanto podría distraer la atención del
conductor mientras conduce. El fabricante no se hace responsable del uso impropio que se destina este
aparato, y de quien no sigue las advertencias.
Tener cuidado:
1. Se ruega de tener alejado de la humedad y de los rayos directos del sol
2. Se ruega de limpiar el monitor con un paño seco y suave. No limpiar el monitor con productos químicos
o que contengan alcohol o petróleo
3. Se ruega de tener el mando a distancia fuera del alcance de los niños
4. El monitor podría mostrar a veces algunos píxel (cuadraditos claros u oscuro) durante su utilización. Este
fenómeno es normal y no indica mal funcionamiento.
Precauciones
Conexiones
BLANCO AUDIO 1
AV 1
ROJO AUDIO 1
AMARILLO VIDEO 2
CAMERA
AMARILLO VIDEO 1
ROJO
NEGRO
2A
+
+12V
LUZ VERDE 12 V
REVERSE *
* Cuando el cable verde esta’ conectado
a +12 Voltios, activa el monitor en la entrada V2.
7
E
Mando a distancia
Panel de control
1. Enciende/Apaga.
2. Selección Funciónes menú.
3. Menú.
4. Formato pantalla (16:9 - 4:3).
5. Rotación pantalla.
6. Selecciona fuente de entrada AV1 / V2.
1. Para encender / apagar el monitor On / Off.
2. Para pasar de AV1 a V2 video select.
3. Acceder a la función menú
4. Menú
5. Formato de la imagen 16:9 - 4:3.
1 2 3 4 5 6
VIDEO
SELECT
MENU
MODE
SELECT
LCD REMOTE
1
2
3
4
5

S.p.A. - Via F.lli Cervi, 167/C • 42124 Reggio Emilia (Italy) • Tel. ++39 0522 941621 • Fax ++39 0522 942452
www.phonocar.com • e-mail:info@phonocar.it
FRANCE
Vente et Assistance assurées par le Fabricant italien • Tél/Fax N° Vert 0800.90.43.99
www.phonocar.fr • e-mail:info@phonocar.fr
DEUTSCHLAND
71711 - MURR - Rudolf Diesel Strasse, 13 • Tel. 07144 82302-0 / Fax 07144 282114
www.phonocar.de • e-mail:info@phonocar.de
ESPAÑA
Delegado Comercial Sr. VERDERESE DOMENICO • Tel. 958 302295 - Fax 958 302470 - Movil 607592406
e-mail: info@phonocar.es
Specifiche • Specications • Características
IR transmitter: .......................... Achannel frequency 2.3 MHZ, B channel frequency 2.8 MHZ
Type: ........................................TFT LCD
Screen size: .............................7.0”
Display format: ........................ 16:9
Mode: .......................................16:9 / 4:3
Image regolations:.................... Contrast/Color/Brightness/Rotation 90°-180°-270°-360°
Power consumption: ............... 8.5W
Power supply: .........................DC 12V
Brightness: ..............................250 nits
System: ...................................PAL/NTSC
Audio/Video input: ................... AV1
Video input ...............................V2
Operation Temperature: ..........-10°C ~ + 60°C
Storage Temperature: .............-20°C ~ + 70°C
Resolution: ..............................480(W)R/G/B×234(H)
Table of contents
Other Phonocar Monitor manuals

Phonocar
Phonocar VM188 User manual

Phonocar
Phonocar VM171 Installation guide

Phonocar
Phonocar VM184 Installation guide

Phonocar
Phonocar VM189 Installation guide

Phonocar
Phonocar VM 198 User manual

Phonocar
Phonocar VM 155 User manual

Phonocar
Phonocar VM 173 User manual

Phonocar
Phonocar VM001D User manual

Phonocar
Phonocar VM 191 User manual


