Phonocar VM188 User manual

FR
DE
EN
IT
ES
MONITOR DA TETTO 21.5” LED/LCD FULL HD
FULL HD 21.5” LED/LCD ROOF MONITOR
Manuale istruzioni
Instructions manual
Notice de montage et d’emploi
Gebrauchsanweisungen
Manual de instrucciones
VM188
07/2019

2
IT
Avvertenze
VM188 Monitor da tetto
Modello progettato appositamente per l’intrattenimento su autobus, minivan, treni. Al fine di garantire un
corretto utilizzo del prodotto, vi invitiamo a leggere con attenzione il presente manuale prima dell’installazione,
specialmente nella parte relativa alla sicurezza. Si prega di conservare il presente manuale d’uso per poterlo
consultare in qualsiasi momento.
·Nuovo pannello LED/LCD di qualità superiore.
·Risposta dinamica veloce.
·Alta risoluzione & nitidezza del colore e dell’immagine
·Ampio angolo di visione, alta luminosità e ottimo contrasto.
·Ritardo di accensione 15 sec, con protezione in caso di sovratensione e cali di tensione
·Supporto riproduzione video 1080P.
·Evitare l’utilizzo di strumenti per far leva sullo schermo
·Ingresso in tensione: 9v-33 V.
·Tenere al riparo da pioggia e umidità.
·Pericolo di alta tensione all’interno! Vietata l’apertura del prodotto a persone non specializzate.
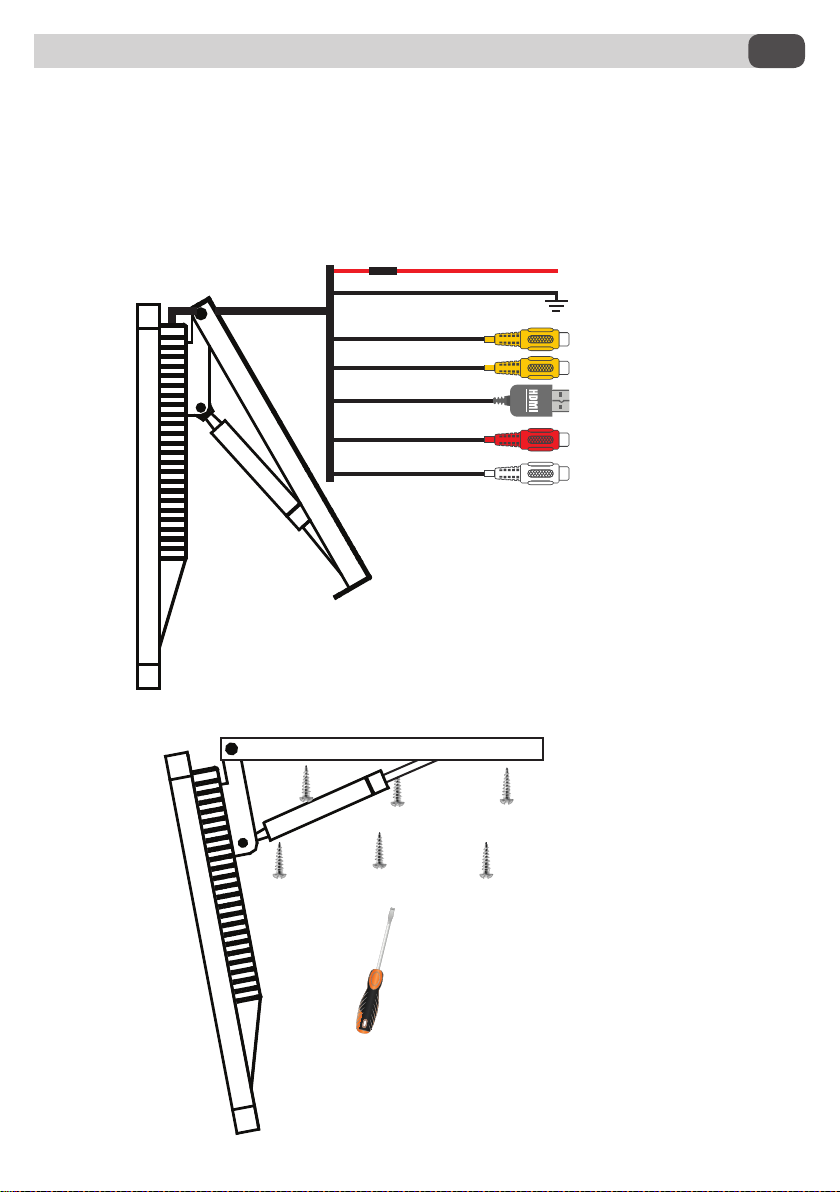
·La posizione scelta deve garantire un’installazione sufficientemente stabile e solida, che sostenga il peso del
dispositivo e resista ad eventuali urti durante la guida.
·Tenere al riparo dalla luce diretta del sole e da altre fonti di calore.
·Spegnere subito l’alimentazione laddove del materiale solido o liquido entri nel monitor. Rivolgersi dunque ad
un meccanico professionista prima di ogni utilizzo.
·Evitare l’utilizzo di oggetti appuntiti sulla superficie del monitor.
·Spegnere l’alimentazione e utilizzare un batuffolo di cotone pulito o un panno morbido per pulire eventuali
residui di sporco sullo schermo.
·Non utilizzare altri solventi inorganici e organici.
Sistema video: NTSC/PAL System
Schermo: LED/LCD
Risoluzione: FullHD 1920 x 1080 Pixel
Ingressi: 2 RCA Video Standard + 1 HDMI
Angolo di visione verticale: 80°/ 80°
Angolo di visione orizzontale: 85°/ 85°
Alimentazione: 9 - 33 V
Dimensioni: 55 x 34 x 4,8 cm
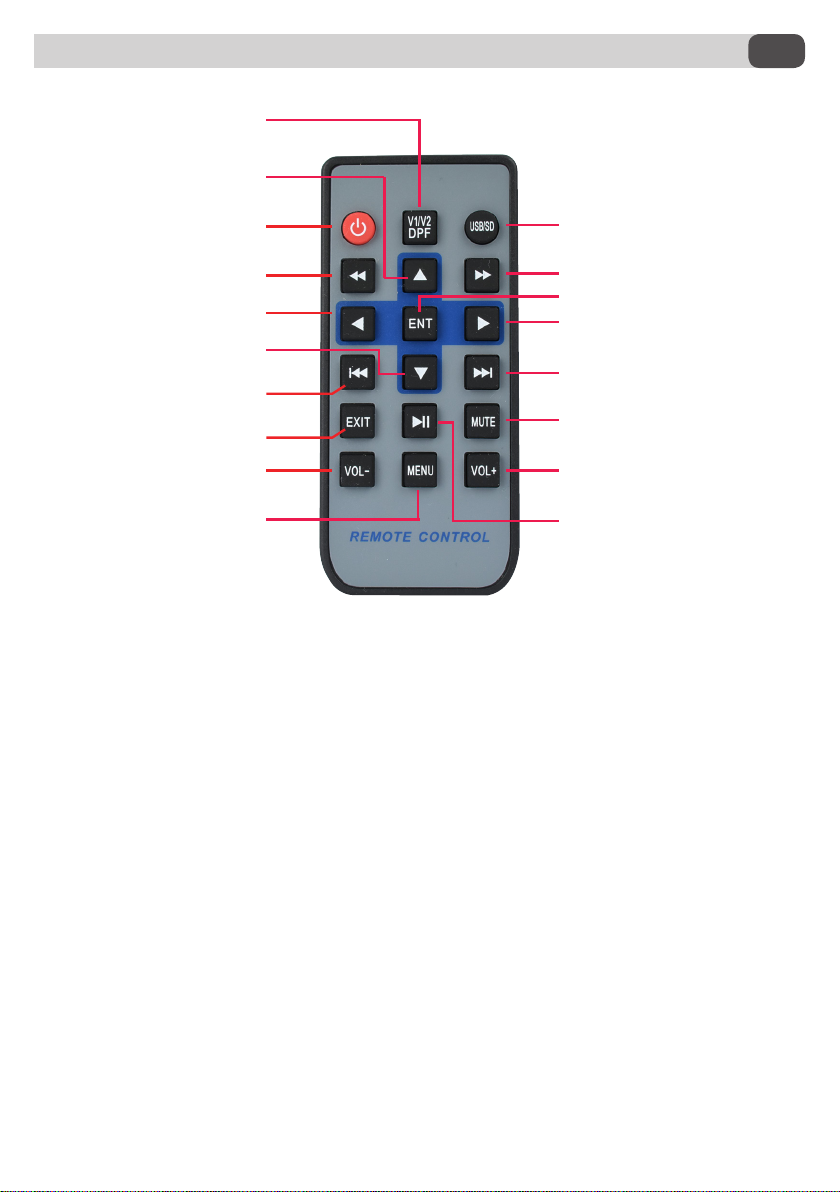
Telecomando Incluso
Specifiche tecniche
Caratteristiche tecniche

3
IT
1) Collegamento:
Il dispositivo deve essere alimentato con una tensione compresa tra 9 V e 33 V.
2) Connessione del segnale video:
Collegare l’uscita del segnale video all’ingresso video del dispositivo AV1/AV2/HDMI.
Collegamenti e installazione
Servirsi di una vite M5 x 40 a testa svasata,
per avvitare la parte superiore del montante
sul tetto del veicolo.
AV1 INPUT (YELLOW)
FUSE BOX RED + 9V --> 33V
BLACK - Ground
HDMI INPUT
AV2 INPUT (YELLOW)
NOT ACTIVE (RED)
NOT ACTIVE (WHITE)

4
IT
Funzioni telecomando
Seleziona le sorgenti
AV1/AV2
Spostamento verso
destra nel menù
Non attivo
Conferma selezione
Non attivo
Non attivo
Tasto per
silenziare l’audio
Tasto per funzione
PLAY/PAUSA
Spostamento verso
l’alto nel menù
Tasto di accensione
Spostamento verso
sinistra nel menù
Non attivo
Spostamento verso
il basso nel menù
Non attivo
Uscita dal menu
o dalla schermata
Volume- Volume+
Tasto per entrare
nel menù

5
EN
Warnings
VM188 Roof monitor
This type is specially designed for Bus, Marine, MPV, Train entertainment. In order to ensure that you will use the
monitor correctly, please read this manual carefully before installation. Moreover, the safety items are supposed
to be paid more attention to. Please do keep this user manual for later review.
• Brand New A grade LED/LCD Screen Panel.
• Fast dynamic response.
• High resolution & Real color and image (Truly display image).
• Wide Viewing Angle, High brightness and good contrast.
• 15 seconds power delay, with overvoltage and undervoltage protection, not impulsed by the high / low voltage
to extend the device’s lifespan.
• Support to play 1080P video.
• Don’t pry the screen by tools
• Voltage input: 9v-33 V.
• Keep away from rain and damp places.
• Danger high voltage inside!Laypeople is forbidden to open it.
• Installation position must strength enough to keep the weight and bumped while driving.
• Keep away form the direct sunlight and other heat source.
• Turn off the power first when something or liquid falls into the monitor, and send to professional mechanic
for repairing before using.
• Don’t use the sharp objects carved the monitor surface.
• Turn off the power and using the clean cotton ball or soft cloth to wipe when there is dirt on screen.
• Don’t use any other Inorganic and organic solvents.
Video System: NTSC/PAL System
Picture: LED/LCD
Resolution: FullHD 1920 x 1080 Pixel
Input: 2 RCA Video Standard + 1 HDMI
Vertical vision-angle: 80°/ 80°
Orizzontal vision-angle: 85°/ 85°
Power: 9 - 33 V
Dimensions: 55 x 34 x 4,8 cm
Remote control included
Technical specifications
Product Features

6
EN
1) Connection:
The device must be supplied with a voltage between 9 V and 33 V.
2) Video signal connection
Connect the video signal output to the video input of the AV1/AV2/HDMI device.
Connections and installation
Using M5 x 40 with full thread drill tail
screw the top frame on the vehicle’s
roof.
AV1 INPUT (YELLOW)
FUSE BOX RED + 9V --> 33V
BLACK - Ground
HDMI INPUT
AV2 INPUT (YELLOW)
NOT ACTIVE (RED)
NOT ACTIVE (WHITE)

7
EN
Remote controls functions
Select source
AV1/ AV2
UP
Power
Not active
Left
Down
Not active
Exit
Volume -
Menu
Not active
Not active
OK
Right
Not active
Mute
Volume +
Play/Pause

8
FR
Avertissements
VM188 Écran de toit
Modèle réalisé pour le divertissement dans les bus, les minibus, les trains.
Pour une utilisation correcte de l’appareil, lire attentivement cette notice avant l’installation, surtout la partie
dédiée à la sécurité.
Il est conseillé de garder cette notice d’utilisation pour une consultation future.
. Nouveau panneau LED/LCD de haute qualité
. Réponse dynamique rapide
. Haute résolution & netteté de la couleur et de l’image
. Vision grand-angle, haute luminosité et excellent contraste .
. Retard d’allumage 15 sec, avec protection contre surtension et baisse de tension.
. Support pour reproduction vidéo 1080
• Éviter d’utiliser des outils pour ouvrir l’écran
• Tension d’entrée: 9v-33V.
• Tenir à l’abri de la pluie et de l’humidité.
• Risque de haute tension à l’intérieur ! L’ouverture est réservée aux personnes qualiées.
• Choisir une position qui garantit une installation susamment stable et solide, permettant au produit de sup-
porter d’éventuelles chocs pendant la conduite.
• Tenir à l’abri de la lumière directe du soleil et des autres sources de chaleur.
• Couper immédiatement l’alimentation si des substances solides ou liquides pénètrent dans l’écran et contacter
immédiatement un technicien professionnel avant la ré-utilisation.
• Évitez d’utiliser les objets pointus sur la surface de l’écran.
• Couper l’alimentation et utiliser un coton-tige propre ou un chion doux pour nettoyer toutes taches éventuel-
les sur l’écran
• Ne pas utiliser des solvants inorganiques et organiques.
Système vidéo : Système NTSC/PAL
Écran : LED/LCD
Résolution : FullHD 1920 x 1080 pixels
Entrées : 2 RCA Standard Vidéo + 1 HDMI
Angle de vision vertical : 80°/80°.
Angle de vision horizontal : 85°/85°.
Alimentation : 9 - 33 V
Dimensions : 55 x 34 x 4,8 cm
Télécommande incluse
Caractéristique téchniques
Caractéristiques téchniques

9
FR
1) Branchement :
La tension d’alimentation de l’appareil doit etre entre 9 V et 33 V.
2) Connexion du signal vidéo :
Brancher la sortie du signal vidéo à l’entrée vidéo de l’appareil AV1/AV2/HDMI
Branchements et installation
Utiliser une vis M5 x 40, tête fraisée pour visser la partie
supérieure de la base sur le toit du véhicule.
AV1 INPUT (YELLOW)
FUSE BOX RED + 9V --> 33V
BLACK - Ground
HDMI INPUT
AV2 INPUT (YELLOW)
NOT ACTIVE (RED)
NOT ACTIVE (WHITE)

10
FR
Fonctions télécommande
Séléction des sources
AV1/AV2
Pour aller vers droite
dans le menu
Pas active
Conrmer la sélection
Pas active
Pas active
Touche pour
désactiver le son
Touche
PLAY/PAUSE
Parcourir le menu
vers le haut
Touche d’allumage
Parcour vers la gauche
dans le menu
Pas active
Descendre dans le menu
Pas active
Sortir du menu
ou de la page
Vol - Vol +
Touche pour entrer
dans le menu

11
DE
WARNUNGEN
VM188 Dachmonitor
Ein Modell, das speziell für die Unterhaltung in Bussen, Minivans und Zügen entwickelt wurde.
Bevor Sie das Produkt installieren, lesen Sie bitte diese Anleitung besonders im Sicherheitsbereich sorgfältig
durch.
Bewahren Sie diese Bedienungsanleitung auf, um sie jederzeit nachschlagen zu können.
• Neues hochwertiges LED/LCD-Panel.
• Schnelle und dynamische Antwort
• Hohe Auflösung & Bild- und Farbschärfe
·Großer Betrachtungswinkel, hohe Helligkeit und ausgezeichneter Kontrast.
• 15 Sekunden Einschaltverzögerung, mit Schutz bei Überspannung und Spannungseinbrüchen
• 1080P-Video-Wiedergabe.
• Vermeiden Sie die Verwendung von Werkzeugen zum Öffnen des Produkts.
• Spannungseingang: 9v-33V.
• Vor Regen und Feuchtigkeit schützen.
• Gefahr durch Hochspannung innerhalb des Produktes! Das Produkt darf nicht von unqualifizierten Personen
geöffnet werden.
• Die gewählte Position muss eine ausreichend stabile Installation gewährleisten, die das Gewicht des Produkts
trägt und die das Produkt so weit wie möglich schützt.
• Von direkter Sonneneinstrahlung und anderen Wärmequellen fernhalten.
• Schalten Sie das Gerät sofort aus, wenn festes oder flüssiges Material in den Monitor gelangt. Kontaktieren Sie
daher einen qualifizierten Fachmann vor dem Gebrauch.
• Verwenden Sie keine scharfen Gegenstände auf der Oberfläche des Monitors.
• Schalten Sie das Gerät aus und verwenden Sie ein sauberes Wattestäbchen oder ein weiches Tuch, um etwaige
Schmutzrückstände auf dem Bildschirm zu entfernen.
• Verwenden Sie keine anderen anorganischen oder organischen Lösungsmittel.
Videosystem: NTSC/PAL-System
Bildschirm: LED/LCD
Auösung: FullHD 1920 x 1080 Pixel
Eingänge: 2 RCA Standard Video + 1 HDMI Eingang
Vertikaler Betrachtungswinkel: 80°/ 80°.
Horizontaler Betrachtungswinkel: 85°/ 85°.
Stromversorgung: 9 - 33 V
Abmessung 55 x 34 x 4,8 cm
Fernbedienung im Lieferumfang enthalten
TECHNISCHE DATEN
TECHNISCHE MERKMALE

12
DE
1) Anschluss:
Das Gerät ist mit einer Spannung zwischen 9 V und 33 V zu versorgen
2) Anschluss des Videosignals:
Schließen Sie den Videosignalausgang an den Videoeingang des Gerätes. AV1/AV2/HDMI.
Anschluss und Installation
Verwenden Sie eine Schraube M5 x 40, um den
oberen Teil des Monitors in den Dachhimmel des
Fahrzeugs einzuschrauben.
AV1 INPUT (YELLOW)
FUSE BOX RED + 9V --> 33V
BLACK - Ground
HDMI INPUT
AV2 INPUT (YELLOW)
NOT ACTIVE (RED)
NOT ACTIVE (WHITE)

13
DE
FERNBEDIENUNG-FUNKTIONEN
Auswahl der Quellen
AV1/AV2
Nach oben im Menü
Einschalttaste
Nicht aktiviert
Nicht aktiviert
EXIT
Vol -
Nach links im Menü
Nach unten im Menü
Taste zum Aufrufen des
Menüs
Nicht aktiviert
Nicht aktiviert
OK
Nach recht im Menü
Nicht aktiviert
Taste zum Stummschalten
des Audios
Vol +
Taste zu Play/Pause

14
ES
Advertencias
VM188 Monitor de techo
Modelo proyectado específicamente para el entretenimiento en autobús, mini bus, trenes etc..
Con el fin de garantizar el correcto funcionamiento del dispositivo, os invitamos a leer con atención el presente
manual de usuario antes de la instalacion, en especial modo la parte referente a la seguridad. Os rogamos de
guardar este manual para poderlo consultar en cualquier momento.
· Nuevo panel LED/LCD de calidad superior.
· Respuesta dinámica veloz.
· Alta resolución & nitidez del color y de la imagen
· Amplio angulo de visión, alto brillo y optimo contraste.
· Retraso de encendido 15 s, con protección en caso di sobre tension o bien de caídas de tension
· Compatible con reproducciones de vídeo de 1080P.
· Evitar la utilización de herramienta para hacer leva sobre la pantalla
· Alimentación : de 9 V. hasta 33 Voltios.
· Tener lejos de lluvia y humedad.
·¡ Peligro de alta tension en el interior! Esta prohibida la apertura del dispositivo a personas no especializadas .
· La posicion elegida debe garantizar una instalacion suficientemente estable y solida, que soporte el peso del
dispositivo y que aguante eventuales golpes en conduccion.
· Tener alejado de la luz directa del sol y de fuentes de calor.
· Apagar enseguida la alimentaciom en el caso de que entre agua u otro liquido o bien de otra naturaleza.
Ponerse en contacto con personal especializado antes de reutilizar .
· Evitar utilizar objetos puntiagudos en la superficie del monitor .
· Apagar el monitor y utilizar un fajo de algodón o un paño blandido para limpiar eventuales residuos de
suciedad de la pantalla.
· No utilizar solventes orgánicos u inorgánicos
Sistema vídeo: NTSC/PAL System
Monitor : LED/LCD
Resolución: FullHD 1920 x 1080 Pixel
Entradas 2 RCA Video Standard + 1 HDMI
Angulo de visión vertical: 80°/ 80°
Angulo de visión horizontal: 85°/ 85°
Alimentación: 9 - 33 V
Dimensiones 55 x 34 x 4,8 cm
Mando a distancia incluido
Características técnicas

15
ES
1) Conexión
El aparato debe alimentarse con una tensión entre 9 y 33 Voltios.
2) Conexión señal vídeo
Conecte la salida de vídeo a la entrada vídeo del aparato AV1/AV2/HDMI.
Conexiones e instalación
Utilice tornillos M5 x 40, avellanados para
atornillar la parte superior del montante al techo
del vehículo.
AV1 INPUT (YELLOW)
FUSE BOX RED + 9V --> 33V
BLACK - Ground
HDMI INPUT
AV2 INPUT (YELLOW)
NOT ACTIVE (RED)
NOT ACTIVE (WHITE)

ES
Funciones Mando a distancia
Selecciona las fuentes
AV1 /AV2
Desplazamiento hacia la
derecha en el menú
No activo
Conrmar la selección
No activo
No activo
Tecla para silenciar
el audio
Tecla función
PLAY/PAUSA
Deslazamiento hacia arriba
en el menú
Tecla de encendido
Desplazamiento hacia
izquierda en el menú
No activo
Deslazamiento hacia abajo
en el menú
No activo
Salida del menú o de la
ventana
Volumen- Volumen +
Tecla para entrar
en el menú
Phonocar S.p.A. Via F.lli Cervi, 167/C • 42124 Reggio Emilia (Italy) • Tel. +39 0522 941621
e-mail: info@phonocar.it • www.phonocar.com
MADE IN P.R.C.
Table of contents
Languages:
Other Phonocar Monitor manuals

Phonocar
Phonocar VM 198 User manual

Phonocar
Phonocar VM001D User manual

Phonocar
Phonocar VM 191 User manual

Phonocar
Phonocar VM184 Installation guide

Phonocar
Phonocar VM189 Installation guide

Phonocar
Phonocar VM171 Installation guide

Phonocar
Phonocar VM 173 Installation guide

Phonocar
Phonocar VM 155 User manual

Phonocar
Phonocar VM 173 User manual