PIEPS PRO IPS User manual

PIEPS PRO IPS
QUICK START GUIDE
PIEPS PRO IPS QUICK START GUIDE
Premium alpine performance.
The Bluetooth® word mark and logos are registered trademarks owned by Bluetooth SIG, Inc. and any use of
such marks by PIEPS is under license. Other trademarks and trade names are those of their respective owners.
PIEPS APP
Jetzt registrieren und Garantie verlängern!
Register your device today and get a warranty extension!
Enregistrez votre appareil dès aujourd’hui et protez d’une extension de garantie !
It can be wild out there!
We work hard to
create products
that keep you safe
in the mountains.
It is essential that
you are familiar with
your equipment.
Practice with your
friends and have fun
on your adventures!
PIEPS GmbH
Parkring 4, 8403 Lebring
Austria
www.pieps.com
M20241_A 04/2023
1 3 4

LANGUAGES
Deutsch 4
English 18
Français 32
Italiano 46
Español 60
Nederlandse 74
Norsk 88
Svenska 102
Suomi 116
Polski 130
Český 144
Slovenský 158
Slovenščina 172
Hrvatski 186
Русский 200
日本語 214
F
E
A
T
U
R
E
/
S
E
N
D
SYSTEM OVERVIEW
A
F
B
G
H
D
C
I
E
DEENFRITESNLNOSVFIPLCZSKSIHRRUJP
PIEPS PRO IPS
QUICK START GUIDE
Find the full manual
at pieps.com
CONTENTS
1x PIEPS PRO IPS
3x Alkaline batteries
(in battery compartment)
1x PIEPS PRO IPS carrying system
1x PIEPS Handloop
1x Quick Start Guide
1x Legal Guide
1x PIEPS Sticker
TRANSCEIVER ELEMENTS
ALCD display (backlit)
BAntenna SEND/SEARCH
CProtected ON/OFF button
DFUNCTION button
EMARK button
FSCAN button
GSpeaker
HControl LED
I Battery compartment
ANTENNA POSITIONS
SEND
Antenna folded in completely.
Pro IPS is in SEND mode.
INTERMEDIATE
If antenna is in an angled Position.
PRO IPS is in FEATURE mode
and sending.
SEARCH
Antenna extended completely.
Pro IPS is in SEARCH mode.
IMPORTANT!
Check for rmware updates
upon rst usage and
regulary aerwards.

DE
WARNUNG!
Ein LVS-Gerät schützt nicht vor Lawinen!
Um für den Ernstfall gerüstet zu sein, ist
es wichtig, regelmäßig die Verschütteten-
suche zu trainieren. Eignen Sie sich detailli-
erte Kenntnisse über die Lawinenpräven-
tion an, bevor Sie sich in Lawinengelände
begeben. Planen Sie Ihre Touren immer
sorgfältig und vergewissern Sie sich, dass
Ihr LVS-Gerät im SEND-Modus ist, bevor
Sie Ihre Tour beginnen. Denken Sie daran,
dass das Mitführen eines LVS-Geräts al-
lein nicht ausreicht: Führen Sie auf Ihren
Touren immer eine Schaufel und eine
Sonde für eine Rettung mit sich. Im Notfall
müssen die grundlegenden Maßnahmen
befolgt werden, die in Fachpublikationen
und Lehrinhalten von Lawinenkursen er-
läutert werden. Wir empfehlen Ihnen, die
bewährten Praktiken zu befolgen und vor
jedem Einsatz die SEND und SEARCH Funk-
tion an Ihrem LVS-Gerät zu überprüfen.
WIR FREUEN UNS, DASS SIE SICH FÜR DEN KAUF EINES PIEPS PRO IPS
ENTSCHIEDEN HABEN!
Registrieren Sie Ihr Gerät in der PIEPS-App und erhalten Sie:
• eine Garantieverlängerung von 2 auf 5 Jahre! und
• wichtige Informationen zu Soware-Updates!
PIEPS APP:
HOLEN SIE DAS BESTE AUS
IHREM LVS-GERÄT HERAUS!
• Verbinden Sie Ihr Gerät via Bluetooth mit der PIEPS APP.
• Verlängerung der Garantie auf 5 Jahre.
• Einfaches Verwalten der Geräteeinstellungen.
• Kostenlose und nützliche Firmware-Updates.
• Zugang zum PIEPS-Know-how.
• Erstellung spezieller Trainingsszenarien.
• Ausführlicher Gerätetest mit Hilfe der App.
PIEPS PRO IPS
KURZANLEITUNG
SYSTEMÜBERBLICK
LIEFERUMFANG
1x PIEPS PRO IPS
3x Alkaline-Batterien
(im Batteriefach)
1x PIEPS PRO IPS Tragesystem
1x PIEPS Handschlaufe
1x Kurzanleitung (Quick Start Guide)
1x Rechtliche Hinweise
1x PIEPS-Sticker
ALCD-Display (beleuchtet)
BAntennenmodi SEND/SEARCH
CGeschützte ON/OFF -Taste
DTaste
FUNCTION
ETaste
MARK
FTaste
SCAN
GLautsprecher
HSende-Kontroll-LED
I Batteriefach
ANTENNENPOSITIONEN
SEND
Die Antenne ist vollständig eingeklappt.
Pro IPS bendet sich im SEND Modus.
INTERMEDIATE
Die Antenne nimmt eine abgewinkelte
Position ein. PRO IPS bendet sich im
FEATURE Modus und sendet.
SEARCH
Die Antenne ist vollständig ausgeklappt.
Pro IPS bendet sich im SEARCH Modus.
4 5

EINSCHALTEN UND SELBSTTEST
HINWEIS: Trotz eines umfassenden Selbsttest des Gerätes ist es notwendig, vor
jeder Tour die Gerätemodi zu überprüfen (SEND-Check und SEARCH-Check)! Wir
empfehlen ebenso, dass jedes Mitglied ihrer Gruppe sich vergewissert, dass sowohl
der SEND- als auch der SEARCH-Modus bei ihren Geräten korrekt funktioniert.
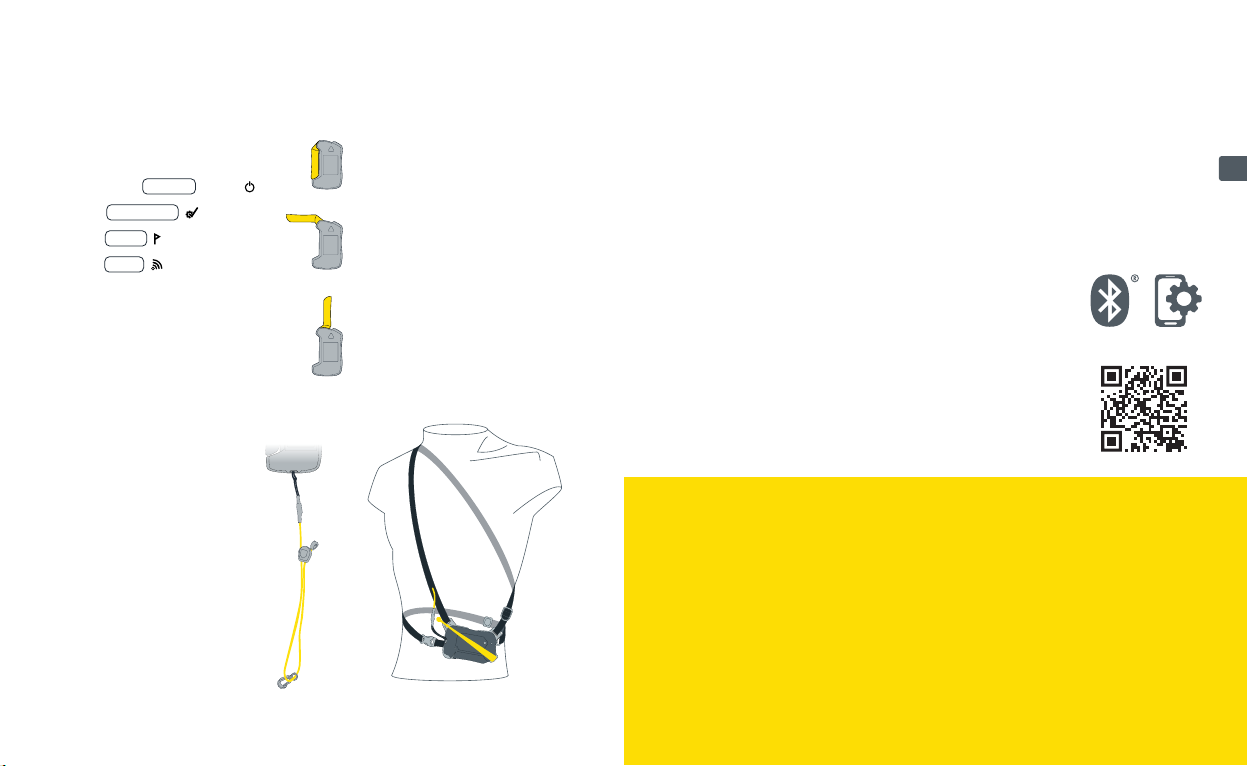
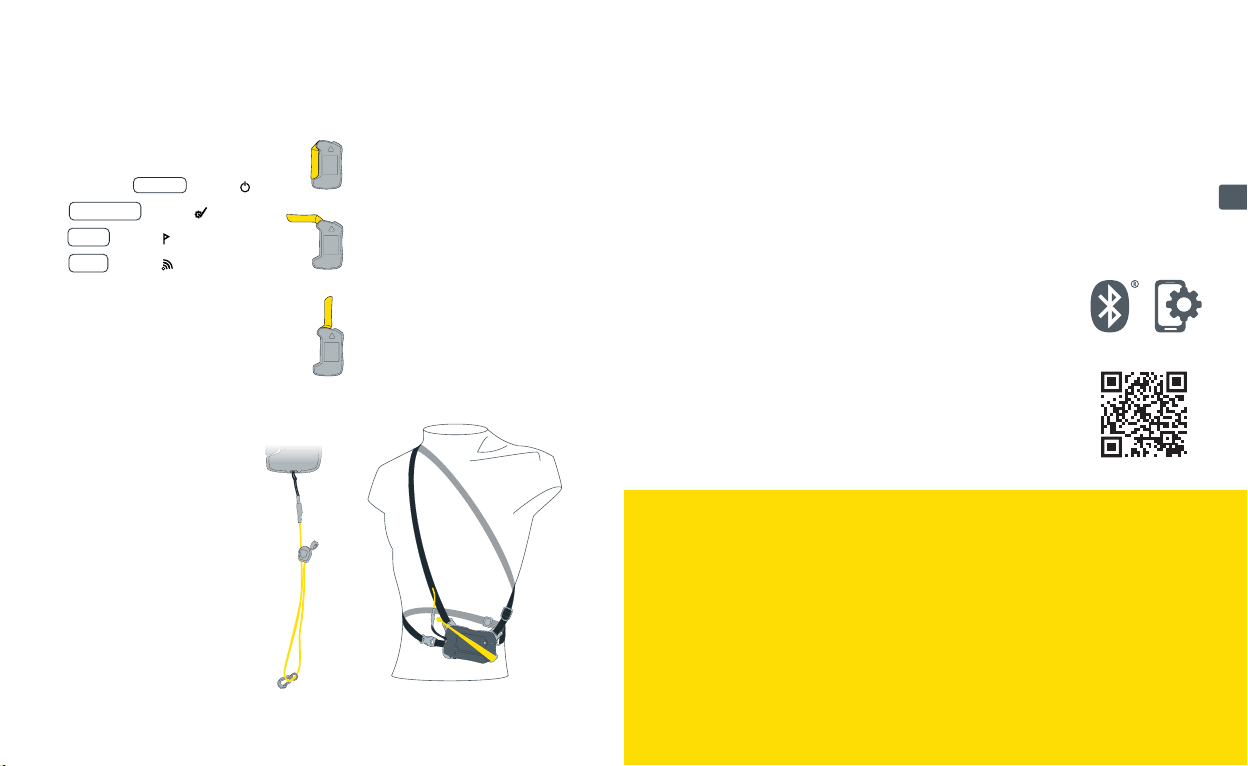
TRAGESYSTEM
Wir empfehlen die Verwendung des mitgelieferten Tragesystems oder einer
zugelassenen Bekleidungstasche. Um das Display zu schützen, tragen Sie das LVS-
Gerät mit dem Display nach innen gerichtet. Die Sendekontroll-LED bleibt sichtbar,
auch wenn das LVS-Gerät im Tragesystem verstaut ist.
Das Design sorgt dafür, dass das LVS-Gerät nach dem Einsetzen im Tragesystem
gesichert ist und zudem durch die gelbe Lasche xiert wird. Das Tragesystem muss
immer unter mindestens einer Kleidungsschicht getragen werden. Dies verhindert
den Verlust oder die Beschädigung bei einem Sturz oder einer Lawine.
Wenn Sie das LVS-Gerät in einer
zugelassenen Bekleidungstasche tragen,
vergewissern Sie sich, dass sich keine
anderen scharfen, metallischen oder
elektronischen Gegenstände (z.B.
Schlüssel, Münzen, Mobiltelefon) in der
Tasche benden, die das LVS-Gerät
beschädigen oder stören könnten.
Legen Sie das LVS-Gerät mit dem Display
nach innen in das Tragesystem und
drücken Sie es vorsichtig nach unten,
bis es „einrastet“. Sichern Sie es mit der
gelben Lasche.
Um das Gerät zu entfernen, önen Sie die
gelbe Lasche. Nehmen Sie das LVS-Gerät
in die Hand und legen Sie Ihren Daumen in
die Mitte der Oberseite des Geräts. Drehen
Sie die Oberseite des LVS-Geräts nach
außen, weg vom Tragesystem.
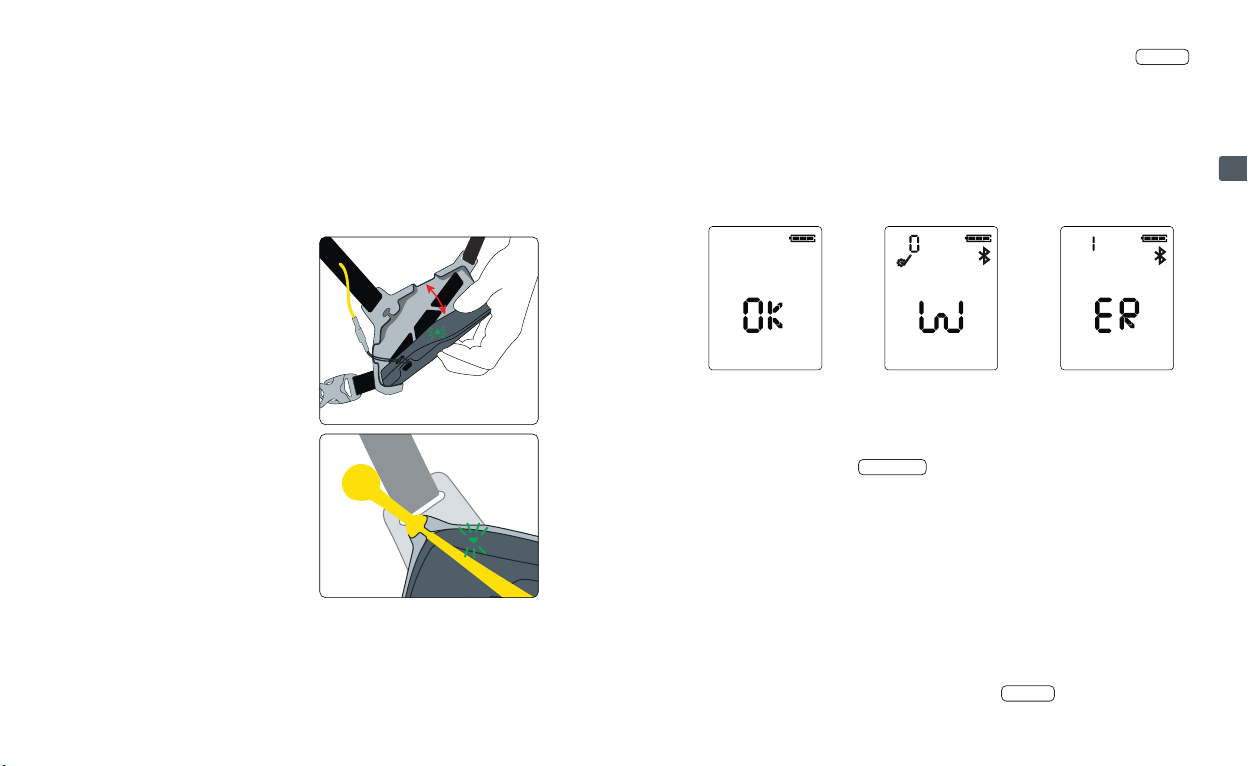
Klappen Sie die Antenne in die mittlere Position auf, drücken Sie die Taste ON/OFF
und klappen Sie die Antenne wieder zu, bis sie das Gehäuse berührt.
Nach dem Einschalten werden die folgenden Informationen angezeigt: Firmware-Version
(z.B. 1.0), Fortschritt des Selbsttests (Pfeile von links nach rechts), Ergebnis des Selb-
sttests (OK, W für Warnung, ER für Fehler), Batteriekapazität und Batterietyp. Nach dem
Countdown des Gruppentests schaltet das PRO IPS in den SEND-Modus: die Sendekon-
troll-LED beginnt, grün zu blinken, und das Gerät vibriert drei mal hintereinander.
MÖGLICHE ERGEBNISSE DES SELBSTTESTS
OK Selbsttest erfolgreich: Sie sind bereit für Ihre Tour!
WWarnung: Alle wichtigen Funktionen arbeiten ordnungsgemäß, aber einige
Zusatzfunktionen (z.B. der Vibrationsmotor) sind nicht verfügbar.
Drücken Sie die Taste FUNCTION , um in den SEND Modus zu wechseln: Sie sind
bereit für Ihre Tour!
Wir empfehlen, eine Geräteprüfung über die PIEPS App durchzuführen, um
weitere Informationen über die Warnung zu erhalten und gegebenenfalls den
PIEPS-Support zu kontaktieren.
ER Fehler (Error): Das Gerät hat eine Fehlfunktion! Verwenden Sie das LVS-Gerät nicht!
Führen Sie eine Geräteprüfung über die PIEPS App durch, um weitere Infor-
mationen über den Fehler zu erhalten und gegebenenfalls den PIEPS-Support
zu kontaktieren.
AUSSCHALTEN
Zum Ausschalten des PRO IPS halten Sie die Taste ON/OFF 3 Sekunden gedrückt.
Der Countdown wird auf dem Display angezeigt.
6 7
DE

i
GRUPPENCHECK
Das PIEPS PRO IPS bietet zwei Modi für einen Gruppencheck. Diese ersetzen nicht die
obligatorische Überprüfung des SEND- und SEARCH-Modus sind aber nützliche Funk-
tionen bei größeren Gruppen. Sowohl beim regulären, als auch beim Gruppencheck
PRO-Modus ist die Empfangsreichweite auf 1m begrenzt.
REGULÄRER MODUS
Im regulären Gruppencheckmodus können Sie testen, ob die LVS-
Geräte Ihrer Gruppe korrekt senden.
Um in den regulären Gruppencheckmodus zu gelangen, klappen Sie
die Antenne in die SEARCH -Position aus und drücken Sie die Taste
ON/OFF . Nach dem Selbsttest drücken Sie die Taste FUNCTION ,
während der Countdown für den Gruppencheck aktiv ist.
Während des Gruppenchecks muss der Abstand zwischen den
einzelnen Mitgliedern der Gruppe mindestens 5 m betragen.
Der Modus des Gruppenchecks ist 60 Sekunden lang aktiv und
wird nach Ablauf des Countdowns automatisch beendet. Um
im Gruppencheck-Modus zu bleiben, drücken Sie während des
Countdowns die Taste FUNCTION .
Sie können den Modus jederzeit durch Drücken der Taste
FUNCTION verlassen, oder die Antenne wieder einklappen.
1m
5m
WECHSEL ZWISCHEN SEND UND SEARCH
Send zu Search
Antenne ausklappen, bis sie
gerade nach oben zeigt.
Search zu Send
Antenne einklappen, bis
sie das Gehäuse berührt.
SEND-MODUS
Während Sie sich in einem lawinengefährdeten Gelände
bewegen, muss sich das Funkgerät im SEND-Modus benden,
und die Sendekontroll-LED muss grün blinken.
INTERFERENZEN
Alle LVS-Geräte sind sehr empndlich gegenüber elektronischen, magnetischen und
metallischen Störquellen. Daher empfehlen alle Hersteller, einen Mindestabstand
zu Geräten wie Mobiltelefonen, Smartwatches, Funkgeräten, Schlüsseln, beheizten
Kleidungsstücken, elektronischen Airbags, Magnetverschlüssen usw. einzuhalten.
Obwohl das PIEPS PRO IPS mit fortschrittlichen Schutztechnologien ausgestattet ist,
empfehlen wir die folgenden Mindestabstände zu möglichen Störquellen:
Mindestabstand im SEND-Modus: 20cm; Mindestabstand im SEARCH-Modus: 50cm
IPS – INTERFERENCE PROTECTION SYSTEM IM SEND-MODUS
IPS ist eine einzigartige Technologie, die die Auswirkungen
elektronischer Störungen auf das Sendegerät kontinuierlich
überwacht, indem sie die Störsignale verarbeitet und sich an
sie anpasst. Auf diese Weise liefert das PIEPS PRO IPS trotz
auretender Störungen eine optimiale Sendeleistung.
SIGNAL VERIFICATION – SCHUTZ VOR STÖRUNGEN IM SEARCHMODUS
Die PIEPS Advanced Signal Verication zeigt nur Signale von LVS-Geräten und keine
„Geistersignale“ von anderen Quellen an.
8 9
DE

KEINE SIGNAL
Kein Signal innerhalb
von 1m Reichweite
erkannt.
OK
Ergebnis des
Gruppenchecks ist OK
– LVS-Gerät sendet
korrekt, Entfernung
zum Sender wird
angezeigt.
ERROR
Achtung – das
geprüe LVS-Gerät
sendet nicht korrekt.
ZU VIELE SENDER IN
DER NÄHE
Während der Prüfung
des LVS-Geräts
sollten die einzelnen
Gruppenmitglieder
einen Abstand von
5m einhalten.
PRO-MODUS
Der Pro-Modus ermöglicht es dem Benutzer, sowohl eine Sende- als auch eine
Empfangsprüfung durchzuführen, ohne den Gruppencheck-Modus zu verlassen. Er
ist standardmäßig deaktiviert und kann über die PIEPS App aktiviert werden. Weitere
Einzelheiten nden Sie in der ausführlichen Anleitung.
SEARCH
Signalsuche
Wenn Sie kein Signal empfangen und keine Hinweise auf einen Verschütteten im
Lawinenkegel sehen, bewegen Sie sich schnell durch das Suchgebiet und folgen Sie
dabei der angegebenen Suchstreifenbreite Ihres LVS-Geräts.
80m
40m
40m
80m 80m
40m 40m
Die Suchstreifenbreite des PIEPS PRO IPS beträgt 80m, wie auf dem Display
angezeigt. Im Falle von Störsignalen zeigt das PRO IPS eine reduzierte
Suchstreifenbreite an.
GROBSUCHE
Sobald das LVS-Gerät ein Signal empfängt, beginnt es zu
vibrieren und zu piepen, wobei ein Pfeil die Richtung zum
Verschütteten anzeigt. Folgen Sie der Richtungsangabe schnell
und prüfen Sie, ob der Entfernungswert abnimmt.
Wenn der Entfernungswert zunimmt, bewegen Sie sich in die
falsche Richtung. In diesem Fall zeigt der angezeigte Pfeil auf
Sie und fordert Sie auf umzudrehen.
Wenn die Entfernung zum Verschütteten weniger als 10m
beträgt, ändert sich der Richtungspfeil in einen Umriss, um Sie
daran zu erinnern, die Suchgeschwindigkeit zu verringern.
Entfernung und Richtung
Um 180° drehen
Entfernung < 10m
10 11
DE

FEINSUCHE
Im Umkreis von zwei Metern um das Opfer verschwindet der Richtungspfeil.
Bewegen Sie das LVS-Gerät langsam und so nah wie möglich über die Schnee-
oberäche und folgen Sie dabei einem Kreuzmuster. Ermitteln Sie den niedrigsten
Entfernungswert und beginnen Sie mit der Suche.
TIPP: Für eine bis zu 3x schnellere Fein- und Punktsuche empfehlen wir die
Verwendung der PIEPS iPROBE, die mit allen LVS-Geräten kompatibel ist.
PUNKTSUCHE
Überprüfen Sie die Ergebnisse des LVS-Geräts durch systematisches Sondieren. Bei
einem Treer lassen Sie die Sonde im Schnee stecken. Benutzen Sie Ihre Schaufel,
um das Opfer auszugraben, und leisten Sie erste Hilfe.
MEHRFACHVERSCHÜTTUNG
Eine Mehrfachverschüttung wird Ihnen durch die Anzahl der
Verschüttetensymbole am Display angezeigt.
MARK
Markieren ist ab 5 m Entfernung möglich und wird durch das
Symbol MARK angezeigt . Drücken Sie kurz die Taste MARK ,
um den lokalisierten Sender „auszublenden“.
Das erfolgreiche Ausblenden wird mit einem Rahmen um das
Verschüttetensymbol bestätigt. Das LVS-Gerät zeigt jetzt die
Richtung und Entfernung zum nächststärksten Signal. Die
Markierungsreichweite kann mit der PIEPS App konguriert
werden.
SCANNEN
Wenn Sie die Taste SCAN drücken, erhalten Sie einen groben Überblick über die
Verschüttetensituation, indem die Anzahl der Verschütteten innerhalb bestimmter
Entfernungsbereiche angezeigt wird. Über die PIEPS App kann ein detaillierter Scan-
modus aktiviert werden, der die Richtung und die Entfernung für jeden Verschütteten
anzeigt und eine Selektierung der Verschütteten ermöglicht.
12 13
DE

AKTIVIERUNG VON BLUETOOTH® – MIT DER PIEPS APP VERBINDEN
Bluetooth und die PIEPS APP ermöglichen eine einfache Geräteverwaltung (z.B.
Firmware-Update oder Gerätekonguration) und bieten außerdem einen praktischen
Trainingsmodus.
Laden Sie die PIEPS APP herunter und verbinden Sie das PIEPS-LVS-Gerät und alle
Vorteile nutzen! Verfügbar für Android und Apple.
HINWEIS! Wenn Sie die PIEPS APP bereits installiert haben, achten Sie darauf, dass
Sie die aktuellste Version verwenden.
Um Bluetooth zu aktivieren, halten Sie beim Einschalten die Taste MARK gedrückt.
Sobald das Bluetooth-Symbol auf dem Display angezeigt wird, können Sie die Taste
MARK loslassen. Der Bluetooth-Modus wird akustisch (2 Pieps-Töne) und haptisch
(2 Vibrationen) bestätigt. Um Bluetooth zu deaktivieren, drücken Sie die Taste FUNCTION .
GEFAHR! Das Gerät ist bei aktiviertem Bluetooth möglicherweise nicht in der
Lage zu senden.
Verwenden Sie den Bluetooth-Modus nur für das Gerätemanagement und den Trainings-
modus. Verwenden Sie den Bluetooth-Modus niemals in lawinengefährdetem Gelände!
Symbol
Batterie-
ladung Batterieladung in % Empfehlung
3/3 voll 100–66% O.k.
2/3 voll 66–33% O.k.
1/3 voll 33% – 20Std. SEND O.k.
Leer 20 Std. SEND (+10°C) +
1 Std. SEND (–10°C)
Batteriewechsel
empfohlen
Leer,
blinkend
Letzte Reserve, Gerät kann
sich jederzeit ausschalten Batterien ersetzen!
ALKALINE- UND LITHIUM-BATTERIE
Wechseln Sie die Batterien spätestens, wenn die Dis-
playanzeige eine leere Batterie zeigt! Ersetzen Sie im-
mer alle drei Batterien gleichzeitig.
Önen Sie das Batteriefach und setzen Sie die neuen
Batterien in der richtigen Position ein.
Es können Batterien des Typs Alkaline (LR03) und Lith-
ium (FR03) verwendet werden. Stellen Sie sicher, dass
der richtige Batterietyp in der PIEPS App ausgewählt
ist, da sonst die Batterieanzeige nicht korrekt funk-
tioniert. Standardmäßig ist Alkaline (LR03) ausgewählt.
Entsorgen Sie das Gerät und die Batterien in Übereinstim-
mung mit den geltenden lokalen Gesetzen und Vorschrien.
ALKALINE
BATTERIELAUFZEIT LITHIUM
400Std.SEND 600Std.SEND
HINWEIS! Die Benutzer sind dafür verantwortlich, die Firmware ihrer LVS-Geräte
bei regelmäßiger Nutzung der Geräte monatlich nach Updates zu suchen.
GERÄTEMANAGEMENT MIT DER PIEPS APP
!
14 15
DE

LAGERUNG
Lagern Sie das Gerät in einem trockenen Raum bei Zimmertemperatur. Nehmen Sie
die Batterien bei längerer Lagerung (z.B. während der Sommermonate) heraus.
WARTUNG
Ein LVS-Gerät ist ein Sicherheitsprodukt, das extremen Bedingungen wie Minusgraden
und Feuchtigkeit ausgesetzt ist. Außerdem unterliegen die Komponenten einem
Alterungsprozess. PIEPS empehlt, Lawinenverschüttetensuchgeräte 3 Jahre und
5 Jahre nach dem Kaufdatum und danach jedes Jahr zur Wartung einzusenden. Für
weitere Informationen besuchen Sie pieps.com.
GARANTIEBEDINGUNGEN
Der Hersteller ist für Material und Verarbeitung des PIEPS PRO IPS für zwei
Jahre ab dem Kaufdatum verantwortlich. Ausgenommen sind die Batterien, das
Tragesystem und die Handschlaufe sowie Schäden, die durch unsachgemäßen
Gebrauch oder Demontage des Geräts durch Unbefugte entstehen. Alle anderen
Garantien und die Haung für Folgeschäden sind ausdrücklich ausgeschlossen. Für
Gewährleistungsansprüche bringen Sie bitte Ihren Kaufbeleg mit zum Verkaufsort.
TECHNISCHE DATEN
GERÄTENAME
PIEPS PRO IPS
SENDEFREQUENZ
457kHz
SENDEFELDSTÄRKE
Max. 7dBμA/m (2,23 μA/m) bei einer Entfernung von 10m
2.402–2.480GHz
STROMVERSORGUNG
3 Alkaline (AAA) LR03 1,5 V oder
3 Lithium (AAA) × FR03 1,5 V
ABMESSUNGEN(L × B× H)
120 × 75 × 24mm
TEMPERATURBEREICH
–20 +45°C
LAGERUNGSTEMPERATURBEREICH
–25 +70°C
2,5dBm
BATTERIELEBENSDAUER (SENDE-MODUS)
400Std. (Alkaline)
600Std. (Lithium)
SUCHSTREIFENBREITE
80m
GEWICHT
212g (inkl. Batterien)
Weitere wichtige Informationen, einschließlich der Konformität, nden Sie im beilieg-
enden Legalguide.
16 17

EN
WARNING!
An avalanche transceiver does not protect
against avalanches! To be prepared for
an emergency, it is essential to practice
victim rescue scenarios on a regular
basis. Detailed knowledge of avalanche
prevention is required before heading
out in avalanche hazardous terrain.
Always plan your tours thoughtfully and
make sure your transceiver is in SEND
mode before starting your tour. Bear in
mind that solely carrying a beacon is not
enough – for a rescue, always carry a
shovel and probe on your tours as well.
In an emergency the basic line of action,
as explained in specialist publications and
material from avalanche courses, must be
followed. We recommend you follow best
practices and always check both SEND
and SEARCH functions on your transceiver
prior to each use.
THANK YOU FOR PURCHASING A PIEPS PRO IPS!
Register your device in the PIEPS App and get:
• a warranty extension from 2 to 5 years!
• important information on soware updates!
PIEPS APP:
GET THE MOST OUT OF
YOUR TRANSCEIVER
• Connect your device to the PIEPS APP via Bluetooth
• Extend warranty to 5 years
• Manage device settings easily
• Free and convenient rmware updates
• Access PIEPS know-how
• Create special training scenarios
• Detailed functionality check of your device
PIEPS PRO IPS
QUICK START GUIDE
SYSTEM OVERVIEW
CONTENTS
1x PIEPS PRO IPS
3x Alkaline batteries
(in battery compartment)
1x PIEPS PRO IPS carrying system
1x PIEPS Handloop
1x Quick Start Guide
1x Legal Guide
1x PIEPS Sticker
TRANSCEIVER ELEMENTS
ALCD display (backlit)
BAntenna SEND/SEARCH
CProtected ON/OFF button
DFUNCTION button
EMARK button
FSCAN button
GSpeaker
HControl LED
I Battery compartment
ANTENNA POSITIONS
SEND
Antenna folded in completely.
Pro IPS is in SEND mode.
INTERMEDIATE
If antenna is in an angled Position.
PRO IPS is in FEATURE mode
and sending.
SEARCH
Antenna extended completely.
Pro IPS is in SEARCH mode.
18 19

SWITCHING ON & SELF CHECK
NOTICE: Despite a comprehensive self-check, a beacon mode check (SEND check
and SEARCH check) is obligatory prior to every tour! Every member of the group
must verify that both the SEND and SEARCH modes are functioning correctly.
CARRYING SYSTEM
We recommend using the included carrying system or an approved apparel pocket.
To protect the display, carry the beacon with its display facing inwards. The transmit
control LED remains visible while the beacon is stored in the carrying system.
The beacon is secured in the carrying system by design aer insertion and
additionally xated with the yellow strap. The carrying system must always be
worn under at least one layer of clothing. This way damage or loss during a fall or
avalanche can be prevented.
When wearing the beacon in an
approved apparel pocket make sure that
there are no other sharp, metallic, or
electronical objects (e.g., keys or coins)
inside that might harm or interfere with
the beacon.
Slip the beacon inside the carrying
system, display facing inwards and press
it down slightly until it “clicks”.
Secure it with the yellow strap.
To remove the beacon open the yellow
strap. Grab it with your hand and place
your thumb in the middle of the upper
side of the beacon. Twist the upper side
of the beacon outwards away from the
carrying system.
Fold out the antenna to the intermediate position, press the ON/OFF button and
close the antenna until it touches the housing.
Aer switching on the following information is indicated on the display: rmware
version (e.g. 1.0) and self check progress (arrows running from le to right), self
check result (OK, W for warning, ER for error), battery capacity and battery type.
Aer the group check countdown, the PRO IPS switches to SEND mode with the
transmit control LED blinking in green and three consecutive vibration patterns.
POSSIBLE SELF CHECK RESULTS
OK Self Check successful - Ready to go on tour!
WWarning - all crucial features are working properly, however some extra features
(e.g., vibration motor) are disabled.
Press the FUNCTION button to switch to SEND mode - ready to go on tour!
We recommend performing a device check via the PIEPS App to get further
information about the warning and contact the PIEPS Support if necessary.
ER Error - device has a malfunction! Do not use the beacon!
Perform a device check via the PIEPS App to get further information about the
error and contact the PIEPS Support.
SWITCHING OFF
To switch o the PRO IPS hold the ON/OFF button for 3 seconds.
The countdown appears on the display.
20 21
EN

i
GROUP CHECK
The PIEPS PRO IPS provides two options for a group check. These do not replace the
standard mode check, but are useful features with larger groups. In both group check
modes, the receiving range is limited to 1 m.
REGULAR MODE
With the regular group check mode you can test if your group’s
transceivers are sending correctly.
To enter the regular group check mode, fold out the antenna to
SEARCH position and press the ON/OFF button. Aer self check,
press the FUNCTION button while the group check countdown is
active.
While performing the group check, the distance between the
individual members of the group must be at least 5 m. The
group check mode is active for 60 seconds and terminates
automatically aer a countdown. To remain in group check
mode press the FUNCTION button during the countdown.
To exit at any time press the FUNCTION button.
1m
5m
SWITCHING BETWEEN SEND & SEARCH
Send to Search
Fold out antenna until it is
pointing straight forward.
Search to Send
Close antenna until it
touches the housing.
SEND MODE
While moving in an avalanche exposed terrain the transceiver
must be in SEND mode with the transmit control LED blinking
in green.
INTERFERENCES
All beacons are very sensitive to electronic, magnetic and metallic sources of
interference. Therefore, all manufacturers recommend keeping a minimum distance
from devices such as mobile phones, smart watches, radios, keys, heated garments,
electronic airbags and magnetic closures, etc..
Despite the PIEPS PRO IPS being equipped with advanced protection technologies the
following safety distances to potential interfering sources are recommended:
Minimum distance in SEND mode: 20 cm | Minimum distance in SEARCH mode: 50 cm
IPS – INTERFERENCE PROTECTION SYSTEM IN SEND MODE
IPS is a unique technology that continuously monitors the
inuence of electronic interferences on the transmitting device
by processing and adapting to the interference signals. Hence
the PIEPS PRO IPS delivers the optimal transmitting power with
respect to interfering signals.
SIGNAL VERIFICATION – INTERFERENCE PROTECTION IN SEARCH MODE
The PIEPS Advanced Signal Verication only displays avalanche transceiver signals
and no “ghost” signals from other sources.
22 23
EN

NO SIGNAL
IN RANGE
No signal detected
within 1m range.
OK
Group check outcome
OK – transceiver
sending correctly,
distance to sender
is indicated.
NOT OK
Caution - checked
transceiver is not
sending correctly.
TOO MANY SENDERS
TOO CLOSE
Group members
should maintain at
least 5m distance
during the transceiver
check.
PRO MODE
Pro mode allows the user to perform a transmit check as well as a receive check
without exiting the group check mode. It is disabled by default and can be enable via
the PIEPS app. Check the manual for more details.
SEARCH
SIGNAL SEARCH
If you do not receive a signal or see signs of a buried victim on the avalanche debris,
move quickly through the search area, while minding the stated search strip width
of your beacon.
80m
40m
40m
80m 80m
40m 40m
The search strip width for the PIEPS PRO IPS is 80m as indicated on the display.
In the event of interfering signals, the PRO IPS will indicate a reduced search strip
width.
COARSE SEARCH
As soon as the beacon is receiving a signal, it will start to
vibrate and “beep”, indicating the direction to the victim via
an arrow. Follow the direction indication quickly and see if
the distance value decreases.
If the distance reading increases, you are moving in the
wrong direction. In this case, the displayed arrowhead
will point towards you, instructing you to turn around.
When the distance to the buried victim is below 10m, the
direction arrow changes to outlines only, as a reminder to
reduce the search speed.
Distance and direction
Turn around 180°
Distance < 10m
24 25
EN

FINE SEARCH
Within two meters of the victim, the direction arrow will disappear.
Move the transceiver slowly and as close as possible over the snow surface following
a cross pattern. Determine the lowest distance reading and start probing.
TIP: Be up to 3x faster by using a PIEPS iPROBE for ne search and pinpointing –
compatible with all transceivers.
PINPOINTING
Check the beacon search results by systematic probing. On a hit, leave the probe
stuck in the snow. Use your shovel to dig out the victim and provide rst aid.
MULTIPLE BURIALS
A multiple burial is indicated on the display by the number of small human gures.
MARK
Marking is possible from a distance reading of 5m and is
indicated by the marksymbol .Press the MARK button
briey to “hide” the localized transmitter.
A successful marking is conrmed by a frame around the
human gure. The transceiver will now display the direction
and distance to the next strongest signal. The mark range
can be congured with the PIEPS App.
SCAN
Pressing the SCAN button provides a rough overview of the burial situation by
indicating the number of victims within certain distance ranges. A detailed scan mode
can be enabled via the App providing direction and distance for each victim and allows
victim selection.
26 27
EN

ACTIVATE BLUETOOTH® - CONNECT TO PIEPS APP
Bluetooth and the PIEPS APP allow for straightforward device management (e.g.
rmware update, device conguration) and additionally provide a handy training
mode.
Get the PIEPS APP (Android Play Store, iOS App Store) connect your PIEPS beacon
and take advantage of all features!
NOTICE! If the PIEPS APP is already installed, be sure to use the latest version.
To enable Bluetooth, press and hold the MARK button while switching on the
beacon. As soon as the Bluetooth symbol is shown on the display, the MARK button
can be released. The Bluetooth-mode is conrmed with an acoustic (2x Pieps-
tone) and haptic (2x Vibra) signal. You can exit Bluetooth mode by pressing the
FUNCTION button.
DANGER! Risk of a non-transmitting device due to enabled Bluetooth.
The Bluetooth mode is intended for device management and training mode only.
Never use the Bluetooth mode in avalanche terrain!
Symbol
Battery
Level Battery Level in % Recommendation
3/3 full 100% - 66% OK
2/3 full 66% - 33% OK
1/3 full 33% - 20 h SEND OK
empty 20 h SEND (+10° C / 50° F) +
1 h SEARCH (-10° C / 14° F)
battery change
recommended
empty,
blinking
Last reserve, device might
turn o any moment. replace batteries!
BATTERY ALKALINE AND LITHIUM
Replace the batteries when the empty battery symbol
appears on the display at the latest. Always replace all
three batteries at once.
Open the battery compartment and be sure to insert
the new batteries, facing in the correct direction.
It is possible to use alkaline (LR03) or lithium (FR03)
batteries. Make sure to congure the correct battery
type in the PIEPS App; alkaline (LR03) is selected by
default.
Dispose of the device/batteries in accordance with
applicable local laws and regulations.
ALKALINE
BATTERY LIFE LITHIUM
400 h SEND 600 h SEND
PIEPS recommends checking for updates at the beginning of every season,
and checking monthly when equipment is in regular use.
DEVICE MANAGEMENT WITH THE
PIEPS APP
!
28 29
EN

STORAGE
Store the device in a dry, dark place at room temperature.
Remove batteries for long term storage (e.g., over the summer).
SERVICE
A beacon is a safety product which is exposed to extreme conditions such as freezing
temperatures and humidity. Furthermore, component parts are subject to aging. PIEPS
recommends sending avalanche transceivers in for service at 3 years and 5 years aer
the date of purchase, and every year aer that. For more information visit pieps.com.
WARRANTY CONDITIONS
The manufacturer is responsible for the materials and workmanship of the PIEPS
PRO IPS for two years from the date of purchase. Exceptions are the batteries,
carrying system and hand loop as well as any damage caused by improper use or
dismantling of the unit by unauthorized persons. Any other warranties and liability
for consequential damage are expressly excluded. For warranty claims, please take
proof of purchase to the place of sale.
TECHNICAL SPECIFICATIONS
DEVICE NAME
PIEPS PRO IPS TRANSMISSION FREQUENCY
457 kHz
FIELD STRENGTH
max. 7 dBμA/m (2,23 μA/m) at a distance of 10 m
BLUETOOTH TRANSMISSION FREQUENCY
2.402 - 2.480 GHz
POWER SUPPLY
3x Alkaline (AAA) LR03 1.5 V or
3x Lithium (AAA) FR03 1.5 V
DIMENSIONS(LxWxH)
120 x 75 x 24 mm
TEMPERATURE RANGE:
-20° C to 45° C (-4° F to 113° F)
STORAGE TEMPERATURE RANGE:
-25° C to 70° C (-13° F to 158° F)
BLUETOOTH TRANSMISSION POWER
2.5 dBm
BATTERY LIFE (SENDMODE)
400 h (Alkaline)
600 h (Lithium)
SEARCH STRIP WIDTH
80 m
WEIGHT
212 g (incl. batteries)
More important information, including conformity can be found in the accompanying
LEGAL GUIDE.
30 31

FR
Un DVA ne protège pas contre les ava-
lanches! Pour savoir comment réagir en
cas d’urgence, il est essentiel de s’en-
traîner régulièrement à des scénarios de
sauvetage de victimes. Renseignez-vous
bien sur la prévention des avalanches
avant de partir en haute montagne. Plani-
ez toujours vos sorties de manière réé-
chie et assurez-vous que votre DVA est en
mode SEND avant votre départ. Gardez à
l’esprit que le port d’un DVA n’est pas suf-
sant. Emportez toujours aussi une pelle
et une sonde lors de vos sorties au cas
où vous devriez eectuer un sauvetage.
En cas d’urgence, suivez toujours les in-
structions données dans les publications
spécialisées et utilisez le matériel recom-
mandé lors des cours sur les avalanches.
Nous vous conseillons de suivre les meil-
leures pratiques et de toujours vérier les
fonctions SEND et SEARCH de votre DVA
avant chaque utilisation.
Enregistrez votre appareil dans l’app PIEPS et recevez:
• une extension de garantie de 2 à 5 ans!
• des informations importantes sur les mises à jour du logiciel!
TIREZ LE MEILLEUR DE
VOTRE DVA
• Connectez votre appareil à l’APP PIEPS via Bluetooth
• Prolongez la garantie à 5 ans
• Gérez facilement les paramètres de l’appareil
• Installez les mises à jour gratuites du micrologiciel
• Accédez au savoir-faire de PIEPS
• Créez des scénarios de formation supplémentaires
• Vériez en détail le fonctionnement de votre appareil
PIEPS PRO IPS
GUIDE DE DÉMARRAGE RAPIDE
APERÇU DUSYSTÈME
CONTENU
1x PIEPS PRO IPS
3x piles alcalines
(dans le compartiment à piles)
1x harnais PIEPS PRO IPS
1x dragonne PIEPS
1x guide de démarrage rapide
1x guide juridique
1x autocollant PIEPS
ÉLÉMENTS DU DVA
A Écran LCD (rétroéclairé)
BAntenne SEND/SEARCH
CBouton ON/OFF protégé
DBouton
FUNCTION
EBouton
MARK
FBouton
SCAN
GHaut-parleur
HLED de contrôle
I Compartiment à piles
POSITIONS DE L’ANTENNE
SEND
L’antenne est complètement repliée.
Pro IPS est en mode SEND.
INTERMEDIATE
L’antenne est à l’horizontale.
PRO IPS est en mode FEATURE
et émet un signal.
SEARCH
L’antenne est complètement déployée.
Pro IPS est en mode SEARCH.
32 33

MISE EN MARCHE ET AUTOCONTRÔLE
REMARQUE: Après un autocontrôle complet, eectuez toujours un contrôle de la
balise (contrôle SEND et contrôle SEARCH) avant chaque sortie! Chaque membre du
groupe doit vérier que les modes SEND et SEARCH fonctionnent correctement.
HARNAIS
Nous vous recommandons d’utiliser le harnais fourni ou une poche de vêtement
dédiée. Pour protéger l’écran, transportez le DVA en tournant l’écran vers l’intérieur.
La LED de contrôle de l’émission reste visible, même lorsque l’appareil est placé
dans le harnais. Une fois inséré dans le harnais, l’appareil est maintenu en place
et sécurisé grâce à la sangle jaune. Portez toujours le harnais sous une couche de
vêtements au minimum. Cela vous évitera de perdre ou d’endommager l’appareil lors
d’une chute ou d’une avalanche.
Lorsque vous portez l’appareil dans
une poche de vêtement dédiée,
assurez-vous qu’elle ne contient pas
d’autres objets pointus, métalliques
ou électroniques (clés, pièces de
monnaie, téléphone portable, etc.) qui
pourraient endommager ou interférer
avec l’appareil.
Glissez l’appareil dans le support du
harnais, l’écran tourné vers l’intérieur, et
appuyez doucement jusqu’à ce qu’il soit
bien en place. Bloquez-le à l’aide de la
sangle jaune.
Pour retirer l’appareil, libérez la sangle
jaune. Prenez l’appareil en main et
placez votre pouce sur la face supérieure
de l’appareil. Faites pivoter la partie
supérieure de l’appareil vers l’extérieur
pour le sortir de son support.
Déployez l’antenne en position intermédiaire, appuyez sur le bouton ON/OFF et
repliez l’antenne jusqu’à ce qu’elle touche le boîtier.
Lorsque l’appareil est allumé, les informations suivantes sont achées: la version du
micrologiciel (p. ex. 1.0), la progression de l’autocontrôle (èches allant de gauche à
droite), le résultat de l’autocontrôle (OK, W pour Avertissement, ER pour Erreur), le
niveau de la batterie et son type. Après le contrôle de groupe, le PRO IPS passe en
mode SEND: la LED du contrôle d’émission se met à clignoter en vert et le DVA vibre
trois fois de suite.
MESSAGES DE L’AUTOCONTRÔLE
OK Autocontrôle réussi: prêt(e) pour l’aventure!
W Avertissement: toutes les fonctions essentielles fonctionnent correctement,
mais certaines fonctions supplémentaires (p. ex. moteur de vibration) sont
désactivées.
Appuyez sur le bouton FUNCTION pour passer en mode SEND: vous êtes
prêt(e) pour l’aventure! Nous vous conseillons de vérier l’appareil avec l’appli-
cation PIEPS pour obtenir plus d’informations sur le message d’avertissement et,
si nécessaire, de contacter le service d’assistance PIEPS.
ER Erreur: l’appareil présente un dysfonctionnement! Ne l’utilisez pas!
Vériez l’appareil avec l’application PIEPS pour obtenir plus d’informations sur le
message d’erreur et contactez le service d’assistance PIEPS.
EXTINCTION
Pour éteindre le PRO IPS, maintenez le bouton ON/OFF enfoncé pendant 3 secondes.
Le décompte apparaît à l’écran.
FR
34 35

i
CONTRÔLE DE GROUPE
Le PIEPS PRO IPS ore deux options pour un contrôle de groupe. Ces options ne
remplacent pas le contrôle en mode standard, mais sont utiles pour les groupes plus
importants. Dans les deux modes de contrôle de groupe, la portée de réception est
limitée à 1 mètre.
MODE NORMAL
Le mode de contrôle de groupe normal vous permet de vérier si les
DVA de votre groupe émettent correctement.
Pour entrer dans le mode de contrôle de groupe normal, dépliez
l’antenne en position SEARCH et appuyez sur le bouton ON/OFF .
Après l’autocontrôle, appuyez sur le bouton FUNCTION pendant que
le compte à rebours du contrôle de groupe est actif.
Pendant le contrôle de groupe, la distance entre les membres
du groupe doit être d’au moins 5 m. Le mode de contrôle de
groupe est actif pendant 60 secondes et se termine automa-
tiquement une fois le décompte terminé. Pour rester en mode
contrôle de groupe, appuyez sur le bouton FUNCTION pen-
dant le décompte.
Pour quitter le mode, appuyez sur le bouton FUNCTION .
1m
5m
PASSER D’UN MODE À L’AUTRE
Send to Search
Déployez l’antenne jusqu’à ce
qu’elle soit orientée vers le haut.
Search to Send
Repliez l’antenne jusqu’à
ce qu’elle touche le boîtier.
MODE SEND
Lorsque vous vous déplacez sur un terrain propice aux
avalanches, le DVA doit être en mode SEND et la LED de
contrôle d’émission doit être verte et clignoter.
INTERFÉRENCES
Toutes les balises sont très sensibles aux sources d’interférences électroniques,
magnétiques et métalliques. Par conséquent, tous les fabricants recommandent de
maintenir une distance minimale avec les appareils tels que les téléphones portables,
les montres connectées, les radios, les clés, les vêtements chauffants, les airbags
électroniques, les fermetures magnétiques, etc.
Bien que le PIEPS PRO IPS soit équipé de technologies de protection avancées, nous
recommandons de respecter les distances minimales suivantes par rapport aux
sources potentielles d’interférences : Distance minimale en mode SEND : 20 cm |
Distance minimale en mode SEARCH: 50 cm
IPS - SYSTÈME DE PROTECTION CONTRE LES INTERFÉRENCES EN MODE SEND
IPS est une technologie unique qui surveille en permanence les
eets des interférences électroniques sur le DVA en traitant
les signaux d’interférence et en s’y adaptant. Ainsi, le PIEPS
PRO IPS fournit une puissance d’émission optimale malgré les
interférences.
VÉRIFICATION DU SIGNAL - PROTECTION CONTRE LES INTERFÉRENCES EN
MODE SEARCH
Le PIEPS Advanced Signal Verication n’ache que les signaux d’avalanche et aucun
signal «fantôme» provenant d’autres sources.
36 37
FR

PAS DE SIGNAL
Aucun signal n’est
détecté dans un
rayon de 1 m.
OK
Contrôle de groupe
OK - Le DVA émet
correctement, la
distance par rapport
à l’émetteur est
indiquée.
PAS OK
Attention - Le DVA
vérié n’émet pas
correctement.
TROP D’ÉMETTEURS
TROP PROCHES
Les membres du
groupe doivent être
à une distance d’au
moins 5 m pendant le
contrôle du DVA.
MODE PRO
Le mode Pro permet à l’utilisateur de contrôler l’émission et la réception sans quitter
le mode de contrôle de groupe. Il est désactivé par défaut et peut être activé via
l’application PIEPS. Consultez le manuel pour plus de détails.
SEARCH
RECHERCHE DE SIGNAL
Si vous ne recevez pas de signal ou si vous voyez des signes d’une victime ensevelie
dans les éboulis d’une avalanche, déplacez-vous rapidement dans la zone de
recherche, tout en suivant la largeur de recherche indiquée par votre balise.
80m
40m
40m
80m 80m
40m 40m
La largeur de la bande de recherche du PIEPS PRO IPS est de 80 m, comme indiqué
sur l’écran. En cas de signaux d’interférence, le PRO IPS indiquera une largeur de
bande de recherche restreinte.
RECHERCHE GROSSIÈRE
Dès que la balise reçoit un signal, elle se met à vibrer et à
émettre des tonalités. Une èche indique la direction à suivre
pour trouver la victime. Suivez rapidement l’indication à l’écran
et vériez si la distance indiquée diminue.
Si la distance augmente, vous vous déplacez dans la mauvaise
direction. Dans ce cas, la èche à l’écran pointe vers vous et
vous demande de faire demi-tour.
Lorsque la distance par rapport à la victime ensevelie est
inférieure à 10 m, plusieurs èches pointant vers l’extérieur
apparaissent et vous rappellent de ralentir.
Distance et direction
Faites demi-tour
Distance < 10m
38 39
FR
Other manuals for PRO IPS
1
Table of contents
Languages:
Other PIEPS Safety Equipment manuals
Popular Safety Equipment manuals by other brands

DBI SALA
DBI SALA Talon Edge web lifeline SRL Series instruction manual

CT
CT RAD micro Series user guide

FLAIM Systems
FLAIM Systems Extinguisher user manual

SKYLOTEC
SKYLOTEC Liftfix Instructions for use

Tractel
Tractel guard trac Installation, operating and maintenance manual

CRESTO
CRESTO 6711 Instructions for use