Pinell SUPERSOUND 701 User manual

User Manual
SUPERSOUND 701
DAB/DAB+ / FM / Internet Radio / Bluetooth / Spotify / CD Player

2
Important Safety Instructions
• Read these instructions
• Keep these Instructions
• Heed all Warnings
• Follow all instructions
• Do not use the speaker near water
• Clean only with dry cloth
WARNING: DO NOT EXPOSE THIS SPEAKER TO RAIN OR MOISTURE.
1. Do not place unit near any heat source such as radiators, heat registers, stoves, or other
apparatus that produce heat.
2. Do not attempt to use unit in temperatures outside the range of 0℃~40℃.
3. Do not block any ventilation openings of unit.
4. The unit shall not be exposed to dripping or splashing. No objects filled with liquids, such as
vases, shall be placed on the unit.
5. Do not place any heavy loads onto the unit, and do not step on it.
6. Please read Rating Labels at the rear of unit for power input and other safety information.
7. This unit is intended to be used only with the power supply provided.
8. Protect the power cord from being walked on or pinched particularly at the plugs,
convenience receptacles, and at any point where they exit from the unit.
9. Never unplug your unit by pulling on the power cord. Always grasp the plug firmly and pull
straight out from the outlet.
10. Replace all electric service cords that have become frayed or otherwise damaged
immediately. Do not use a cord that shows cracks or abrasion damage.
11. Unplug the unit for additional protection during thunderstorms or when the unit is not used
for prolonged periods.
12. Any service work should be carried out by qualified technicians only.
13. The cabinet may only be opened by qualified technicians.
14. The normal function of the product may be disturbed by strong Electro-Magnetic
Interference. If so, relocate the source of disturbance. Reset the product to resume normal
operation.
15. The means of disconnecting this apparatus from the mains supply is plug of adapter. The
disconnect device shall remain readily operable.
16. In the interests of safety and to avoid unnecessary energy consumption, never leave the unit
switched on while unattended for long periods of time, e.g. overnight, while on holiday or
while out of the house. Switch it off and disconnect the mains plug from the mains socket.

3
Table of Contents
Important Safety Instructions ....................................................................................................... 2
Table o f C o n t ent s ........................................................................................................................ 3
Your Radio .................................................................................................................................. 5
Front View ........................................................................................................................... 5
Rear View ............................................................................................................................ 5
Remote Control View ........................................................................................................... 6
Getting Started............................................................................................................................ 7
Setup Wizard .............................................................................................................................. 8
DAB+ Mode .............................................................................................................................. 10
Selecting DAB+ Mode ........................................................................................................ 10
Selecting a Station ............................................................................................................. 10
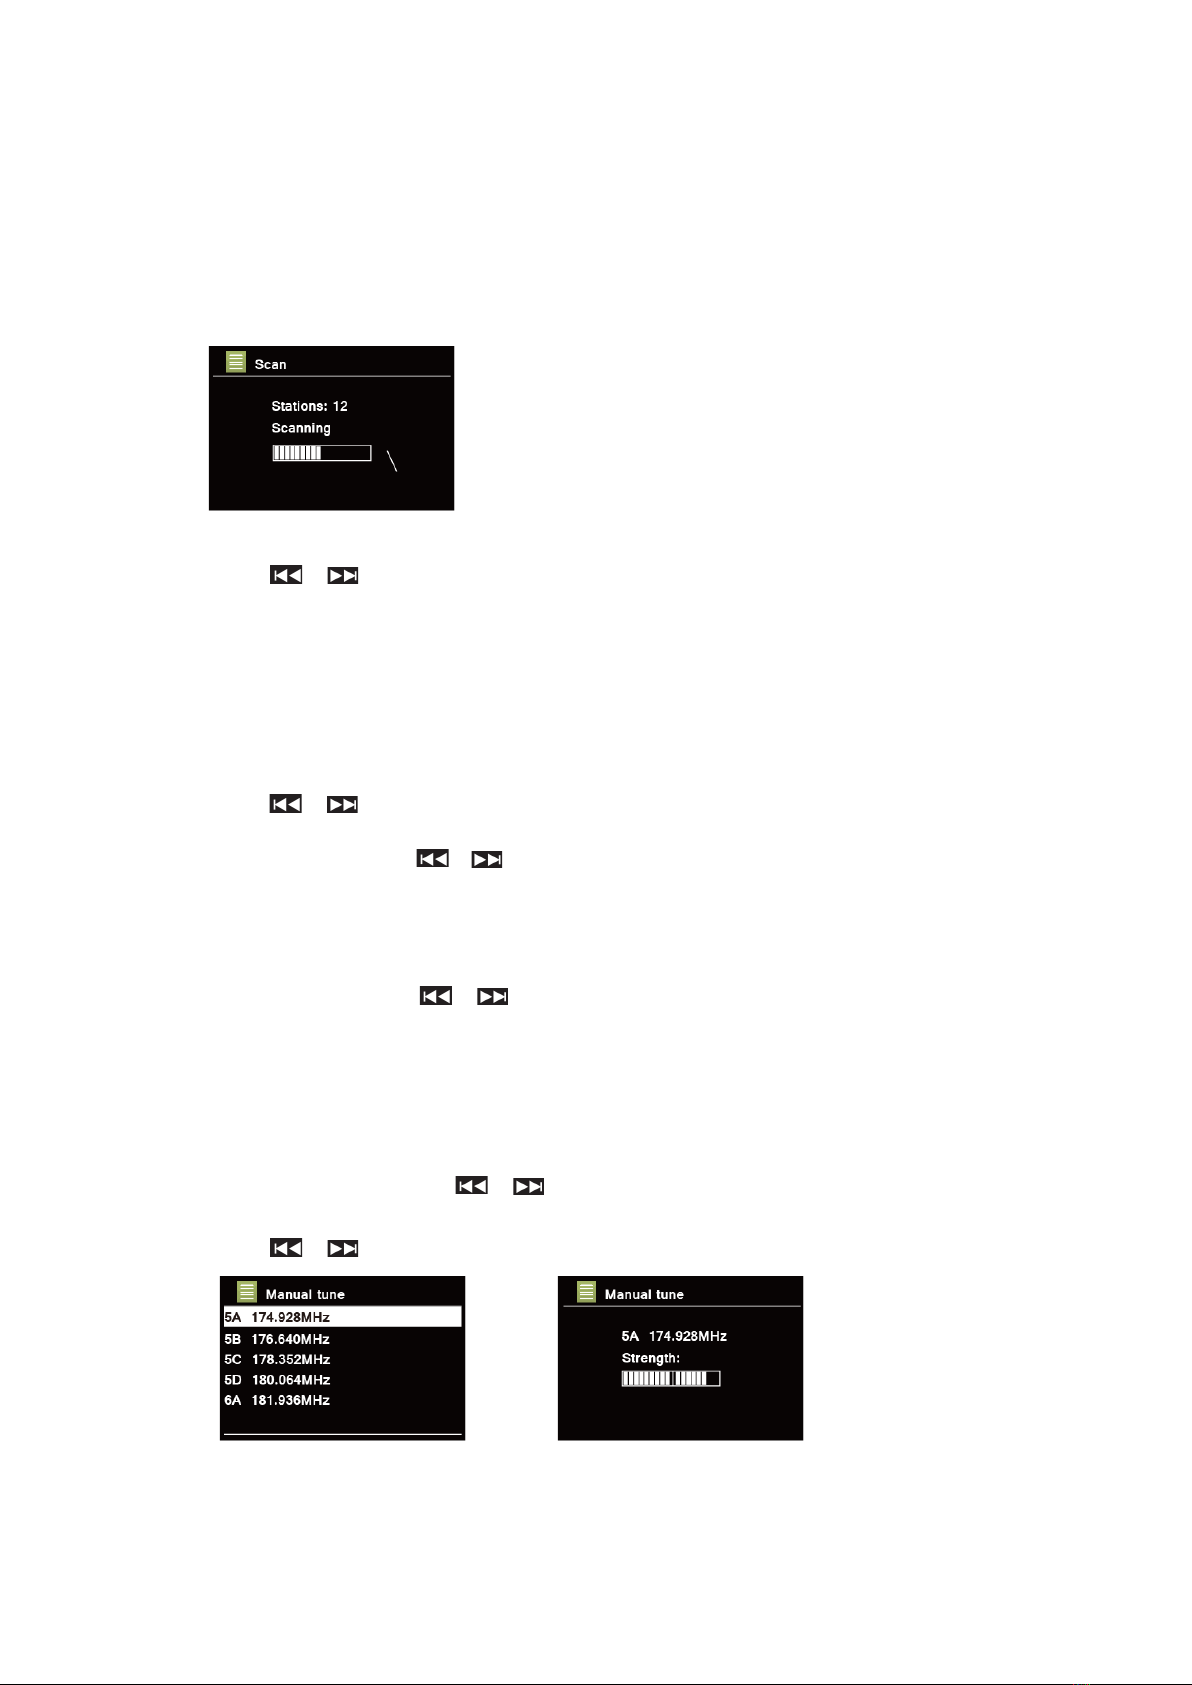
Scanning Stations .............................................................................................................. 10
Manual Tune ...................................................................................................................... 10
Prune Invalid ...................................................................................................................... 11
DRC (Dynamic Range Control) value ................................................................................. 11
Changing Station Order ..................................................................................................... 11
Viewing Station Information (via remote control) ................................................................. 11
Storing Preset Stations ...................................................................................................... 12
Recalling a Preset Station .................................................................................................. 12
FM Mode .................................................................................................................................. 13
Selecting FM Mode ............................................................................................................ 13
Scan settings ..................................................................................................................... 13
Viewing Station Information (via Remote Control) ............................................................... 13
Storing Preset Stations ...................................................................................................... 13
Recalling a Preset Station .................................................................................................. 14
Internet Radio Mode ................................................................................................................. 15
Local “Country” .................................................................................................................. 15
Selecting a station through “Stations” ................................................................................. 16
Selecting a program through “Podcasts” ............................................................................. 17
Storing Preset Stations ...................................................................................................... 17
Recalling a Preset Station .................................................................................................. 17
Getting Access Code and FAQ from “Help”......................................................................... 18
Adding station to “My Favourites” ....................................................................................... 18
View Station Information (via Remote Control) ................................................................... 19
Spotify Connect Mode ............................................................................................................... 20
Spotify Premium ................................................................................................................ 20
Play Music via Spotify Connect .......................................................................................... 20
Controlling Spotify Connect ................................................................................................ 21
Using another Spotify account with your radio .................................................................... 21
Bluetooth Mode......................................................................................................................... 22
Aux in Mode.............................................................................................................................. 22
CD Player ................................................................................................................................. 23
Adjust the CD playback (via Remote Control) ..................................................................... 23

4
Music Player Mode ................................................................................................................... 24
Sharing Media with Windows Media Player ........................................................................ 24
Playing Shared Media ........................................................................................................ 25
My Playlist ......................................................................................................................... 25
Repeat Play Mode ............................................................................................................. 25
Shuffle Play Mode .............................................................................................................. 26
Clearing My Playlist ........................................................................................................... 26
Now Playing Information (via Remote Control) ................................................................... 26
UNDOK App ............................................................................................................................. 27
General Operation .................................................................................................................... 29
Setting Sleep (via Remote Control) .................................................................................... 29
Setting Alarm ..................................................................................................................... 29
Setting Equaliser ................................................................................................................ 30
Network Setup ................................................................................................................... 30
Setting Time/Date .............................................................................................................. 31
Setting Language ............................................................................................................... 31
Factory Reset .................................................................................................................... 31
Software Update – Over the network .................................................................................. 32
Setup Wizard ..................................................................................................................... 32
Viewing System Info........................................................................................................... 32
Setting Backlight ................................................................................................................ 33
Multi-room.......................................................................................................................... 34
Troubleshooting ........................................................................................................................ 37
Specifications ........................................................................................................................... 38

5
Your Radio
Front View
1. PRESET button
2. MENU button
Press - display or close menu
3. MODE button
Press - switch between DAB, FM,
Internet Radio, Spotify, Music Player,
Bluetooth, CD und Aux In Mode
4. / Volume buttons
Press - change Volume
5. SELECT button
Press - select/confirm
6. BACK button
Press - back to previous menu
7. / STANDBY button
Press - switch on the radio or put it to
standby
Switch off alarm
8. / button
Press – select (FF/FB CD mode)
9. Display
10. CD Player
11. EJECT button
Rear View
1. DAB/FM Antenna (removable)
2. AC In power socket
3. POWER toggle switch
4. LINE OUT Cinch socket
5. AUX IN Cinch socket
R
L
CLASS 1 LASER PRODUCT
100- 240V–A C 50/60 Hz 60W LINE OUT AUX INPOWER
APPAREIL A LASER DE CLASSE 1
MADE IN CHINA
Pinell Stereo 701
TT Micro AS
Postboks 150
0619 Oslo
Norway
3 2 4 51
PRESET MODEMENU VOL-VOL+
SELECT BACK
Pinell
1
65 7 8
2 3 4
1011 9

Remote Control View
1. STB button
Press - switch on the radio or put it to standby
2. SRC button
Press - switch between DAB, FM, Internet Radio, Spotify,
Music Player, CD, Aux In and Bluetooth
3. ALARM button
Press - set Alarm 1 and/or 2
4. SLEEP / SNOOZE button
Press SLEEP – set sleep time
Press SNOOZE - activate snooze when alarm goes on
5. PRG / SHUF / REP button
For CD-mode
6. INFO button
Press - show station information step by step
7. button (CD Player, Music Player and Bluetooth)
Press - pause/play title
8. button (CD Player)
Press - stop / eject / insert CD
9. / LAUTSTÄRKE +/- button
Press - change volume
10. / button (Music Player and Bluetooth)
Press - previous/next title
Press & hold - fast forward/backward
11. SELECT button
Press - select
button
Press – select option
12. OK / MUTE button
Press - select/confirm
Press - mute on/off
13. MENU button
Press - display or close menu
14. BACK button
Press - back to previous menu
15. 1-10, 10+, P button
Press & hold - store station
Press - recall station
10+ button
Press 10+ and 1-10 for position 11-20
P button
Press - display list
SRCSTB
SLEEP ZZZ
21
PRG SHUF
OK
MUTE
REP INFO
1 3
4 6
7 9
P
2
5
8
10
1 3
4 6
7 9
P 10+
MENU
1
3
5
7
13
15
10
9
2
4
6
8
14
11
12

7
Getting Started
Carefully remove your radio from the box. You may wish to store the packaging for future use.
What you can find inside of your package
n 1x Main unit Supersound 701
n 1x Power cable
n 1x Remote control and 2x AAA alkaline battery
n 1x Quick start guide
Positioning your Radio
Place your radio on a flat / stable surface that is not subject to vibrations.
Avoid the following locations:
n Where the unit will be exposed to direct sunlight.
n Where the unit will be close to heat radiating sources.
n Where the humidity is high and ventilation is poor.
n Where it is dusty.
n Where it is damp or there is a possibility of water dripping or splashing onto unit.
Adjusting the Antenna
Fully extend antenna to ensure you receive the best reception possible in both DAB and FM radio
modes. It may be necessary to adjust the position of the radio and/or antenna to achieve the best
signal.
Turning the Unit On/Off
Connect the power cable plug to the AC IN socket on the rear of unit. Then insert the power
connector into the mains socket. Switch the POWER toggle switch to on and the radio will go to
standby.
Press STANDBY button to turn on the radio. To turn off unit completely, unplug the power cable
from the mains socket.
Replacing batteries:
1. Open the battery compartment cover at the back of your remote control.
2. Install 2pcs new AAA size batteries, referring to the marking direction inside the battery
compartment.
@ Note: do not reverse any battery and do not mix battery types, also do not mix old and new batteries.
When discard your old battery, please considering eco-friendly.
3. Re-insert the battery compartment cover.

8
Setup Wizard
1. For initial use, radio will ask you to choose the language:
Push / - select language - push SELECT to confirm
2. The “Setup wizard” screen will appear.
3. Press / to confirm “YES” and press SELECT to start setup.
Options include the following:
Date/Time
Set 12 or 24 hour format
Auto update
Synchronously update clock from the mode you select or set by manually.
l Update from DAB
l Update from FM
l Update from Network
l No update - Set date and time manually.
Keep network connected
Keeps network connected especially in non-internet mode (i.e. DAB, FM, Bluetooth and Aux
in mode) to enable you can use Spotify all the time.
Select YES or NO
4. Select wifi region “Europe” and press SELECT.
5. The Wizard will now scan your location for accessible wireless networks. When the scan has
finished, a list of networks will be displayed.
Devices that support connection via WPS (Wi-Fi Protected Setup) are identified in the list as
[WPS].
6. Press / to select your wireless and press SELECT.
1) If a WEP/WPA key (password) is required, radio will ask you to input the WEP/WPA
code and display the password entry screen as follows:

9
@ Note: If a password (WEP/WPA) isn’t required by your network, radio will connect to the
network automatically.
a. Press / to cycle through the alphanumeric character list, press SELECT
to select an appointed character.
@ Note: WEP/WPA pass codes are case-sensitive.
b. If a wrong operation is being conducted, select to delete designated
character.
@ Note: = Backspace; means return to previous track; radio will
automatically save the WEP/WPA you’ve input, so no bother to re-enter these codes.
c. After selecting the final character of your password, press / to
, and then press SELECT to confirm. The radio is connected to your
wireless network.
2) If you wish to establish a connection via WPS, press SELECT after you have selected
desired network. The radio then offers the option to initiate WPS.
Press / to select between Push Button, Pin and Skip WPS, press SELECT to
confirm.
Push Button
You must start the WPS scan on the remote station (e.g. router).
Consult the manual for your router or Access Points (AP) to learn
how to do this.
After you have done this, press SELECT on the radio and then
both devices will establish a connection.
Pin
The radio creates an 8-digit number, which you then have to enter
into the remote station.
After entering the PIN, press SELECT to establish the connection
between both devices.
Skip WPS
In addition to a WPS connection, you can also establish a
connection using a Pre-Shared-Key. The required key is often on
the rear of the router, or you may have defined it yourself.
This method is used automatically for networks without WPS. You
can call up the Pre-Shared-Key function on networks with WPS by
selecting menu item “Skip WPS”.
An input field should now appear. You can enter the required key
(PSK) by pressing / and then pressing SELECT.
Select “OK” and press SELECT to complete the entry. The radio
should now establish the connection to the network.
7. Press SELECT. The radio will now run a full DAB+ scan. Press / to select a
station and press SELECT. Setup is completed.

10
DAB+ Mode
Selecting DAB+ Mode
1. Press MODE button repeatedly to select DAB mode.
2. For initial use, radio will carry out a full scan and store stations list in memory
3. Once the scanning is completed, the DAB+ stations will be displayed in alphanumeric order.
Press / to select you desired station and then press SELECT to broadcast.
@ Note: if no DAB+ signal is found in your area, it may be necessary to relocate your radio to a stronger
signal area.
Selecting a Station
1. While a program is playing, press MENU button, press SELECT to select “Station list”.
2. Press / to select the station you want to play, and then press SELECT to confirm.
@ Note: alternatively, press / to cycle through station list
Scanning Stations
Press MENU button - press / to select “Scan” press SELECT to run full scan.
Manual Tune
This can help you when adjusting your antenna or when adding stations that were missed while
auto tuning.
1. Press MENU button, press / to select “Manual tune”, and then press SELECT to
confirm, the display will show the channel number and frequency.
2. Press / to select the channel you wanted, and then press SELECT to confirm.
→
@ Note: If there is a multiplex corresponding to the channel and frequency, the display will show signal
strength and multiplex name after a few seconds. The new station will be added to station list.
3. To play the station, first press BACK repeatedly to exit manual tune.

11
Prune Invalid
You may remove all unavailable stations from the station list.
1. Press MENU button, press / to select “Prune invalid”, and then press SELECT to
confirm.
2. Press / to select “YES”, and then press SELECT to confirm removing all invalid
stations.
DRC (Dynamic Range Control) value
If you are listening to music with high dynamic range in a noisy environment (for example
classical music while cooking), you may wish to compress the audio dynamic range. This makes
quiet sounds louder and loud sounds quieter.
1. Press MENU button, press / to select “DRC”, and then press SELECT to confirm.
2. Press / to select “DRC high”, “DRC low” or “DRC off”, and then press SELECT to
confirm.
Changing Station Order
You may want to display the stations in different order.
1. Press MENU button, press / to select “Station order”, and then press SELECT to
confirm.
2. Press / to select “Alphanumeric”, “Ensemble” or “Valid”, and then press SELECT
to confirm your selecting option.
Alphanumeric
Display all stations in alphanumeric order.
Ensemble
List currently broadcasting active stations before inactive ones.
Valid
Remove inactive stations from the station list.
Viewing Station Information (via remote control)
DAB+ stations broadcast additional information. Press INFO button repeatedly while a program is
playing to view information through DLS (Dynamic Label Segment), Ensemble, Program
Frequency, Signal Quality, Signal Strength, Bitrate, Codec, Channel and Date.
@ Note: to view station information while the display is playing slide show in full screen, press BACK to
play slide show in small image, and then you can press INFO button repeatedly to view information.
Press BACK a second time to play slide show in full screen again.

12
Showing Signal Strength
While you selected signal strength, a signal bar with the strength of the current station will show
on the display.
The indicator on the signal bar shows the
minimum acceptable signal level.
@ Note: Stations with signal strength below
the minimum signal level may not provide
a steady stream of audio.
Storing Preset Stations
Your radio can store up to 20 of your favourite DAB+ stations. This will enable you to access your
favourite stations quickly and easily.
1. While playing your favourite station, press & hold PRESET until display shows “Save to
Preset”.
2. Press / to select the position. Press SELECT and display will show “Preset stored”.
3. Preset number “ #” (# = 1-20) will show on the display.
@ Note: For preset positions 11-20 via the remote control, first press 10+ and then hold down one of the
PRESET buttons 1-10 until "Preset stored" appears on the display.
Recalling a Preset Station
1. Press PRESET – select station by pressing / / and press SELECT to confirm.
2. The display will show “Not set” or “Preset empty” if the preset position is not allocated.

13
FM Mode
Selecting FM Mode
1. Press MODE button repeatedly to select FM mode.
2. For initial use, it will start at the beginning of the FM frequency range (87.50MHz). Otherwise,
the last listened FM station will be selected.
3. To manually scan, while FM frequency shows up, push / to change frequency by
0.05MHz per step.
4. To automatically scan, while FM frequency shows up, press & hold / and your
radio will automatically search until it reached the next available station.
Scan settings
This enables you set FM scans stop at stations with strong signal or stop at any available station.
1. Press MENU button, press / to select “Scan setting”, and then press SELECT to
confirm.
2. Display will show “Strong stations only?”, press / to select “YES”, and then press
SELECT to confirm. The scans stop only at stations with good signal strength.
3. Press / to select “NO”, and then press SELECT to confirm. The scans stop at any
available station. This may result in a poor quality audio from weak stations.
Viewing Station Information (via Remote Control)
There is a variety of station information transmitted by broadcaster. To view currently playing
station information, press INFO button on the remote control repeatedly and the display will show
information referring to Radio text, Program Type, Program Name and Date.
Storing Preset Stations
Your radio can store up to 20 of your favourite FM stations. This will enable you to access your
favourite stations quickly and easily.
1. While playing your favourite station, press & hold PRESET until display shows “Save to
Preset”.
2. Press / to select the position. Press SELECT and display will show “Preset stored”.
3. Preset number “ #” (# = 1-20) will show on the display.
@ Note: For preset positions 11-20 via the remote control, first press 10+ and then hold down one of the
PRESET buttons 1-10 until "Preset stored" appears on the display.

14
Recalling a Preset Station
1. Press PRESET – select station by pressing / / and press SELECT to confirm.
2. The display will show “Not set” or “Preset empty” if the preset position is not allocated.

15
Internet Radio Mode
1. Press MODE button repeatedly to select Internet Radio mode.
2. While “Station list” is highlighted, press SELECT to confirm.
→
3. Then refer following section to choose stations. Or if failed to connect to network, please
follow:
a. Check your Router, see it working normally or not;
b. Relocate your radio to a stronger signal position is necessary.
c. Make sure your password is correct input.
Local “Country”
Local “Country” will change according to your current location (e.g. Local Norway). It displays
local stations of your current location.
1. To ent e r local stations, press MENU button - Station list - Local “Country”, press SELECT
to confirm.
→
2. Station genres are listed. Press / to select the genre you wanted, and then press
SELECT to confirm.
3. Press / to select you desired station, and then press SELECT to confirm
broadcasting.

16
Selecting a station through “Stations”
Stations enables you to select a station from categories: Location, Genre, Popular stations or
New stations, or search stations.
1. Press MENU button - Station list - Stations, press SELECT to confirm.
→
2. In “Stations” menu:
n “Location” enables you to choose from the radio stations provided by any country which you
choose from a list.
a. While “Location” is highlighted, press SELECT to confirm.
b. Press / to select the region you wanted, and then press SELECT to confirm.
c. Press / to select the country you wanted, and then press SELECT to confirm.
d. Press / to select the station you wanted, and then press SELECT to confirm.
The station will be broadcast.
n “Genre” enables you to choose radio stations according to their content, for example Classic
Rock, Sport, News, etc.
a. While “Genre” is highlighted, press SELECT to confirm.
b. Press / to select the genre you wanted, and then press SELECT to confirm.
c. Press / to select through All Stations, Highlighted Stations or the country you
wanted, and then press SELECT to confirm.
d. Press / to select the station you wanted, and then press SELECT to confirm.
The station will be broadcast.
n “Search stations” enables you to enter all or part of station name to find a station.
n “Popular stations” enables your radio to list the stations that have the most listeners.
n “New stations” enables your radio to list the stations that have recently joined the Internet
radio network.
@ Note: Some radio stations do not broadcast 24 hours per day, and some stations are not always on-
line.

17
Selecting a program through “Podcasts”
Podcasts enables you to select a podcast from categories: Location or Genre, or search
podcasts.
1. Press MENU button - Station list - Podcasts, press SELECT to confirm.
→
2. In “Podcasts” menu:
n “Location” enables you to choose from the podcasts provided by any country which you
choose from a list.
a. While “Location” is highlighted, press SELECT to confirm.
b. Press / to select the region you wanted, and then press SELECT to confirm.
c. Press / to select the country you wanted, and then press SELECT to confirm.
d. Press / to select All Shows or By Genre, and then press SELECT to confirm.
e. Press / to select the podcast you wanted, and then press SELECT to confirm.
The podcast will be played.
n “Genre” enables you to choose radio stations according to their content, for example Classic
Rock, Sport, News, etc.
a. While “Genre” is highlighted, press SELECT to confirm.
b. Press / to select the genre you wanted, and then press SELECT to confirm.
c. Press / to select the podcast you wanted, and then press SELECT to
confirm. The podcast will be played.
n “Search stations” enables you to enter all or part of podcast name to find a podcast.
Storing Preset Stations
Your radio can store up to 20 of your favourite Internet Radio stations. This will enable you to
access your favourite stations quickly and easily.
1. While playing your favourite station, press & hold PRESET until display shows “Save to
Preset”.
2. Press / to select the position. Press SELECT and display will show “Preset stored”.
3. Preset number “ #” (# = 1-20) will show on the display.
@ Note: For preset positions 11-20 via the remote control, first press 10+ and then hold down one of the
PRESET buttons 1-10 until "Preset stored" appears on the display.
Recalling a Preset Station
1. Press PRESET – select station by pressing / / and press SELECT to confirm.
2. The display will show “Not set” or “Preset empty” if the preset position is not allocated.

18
Getting Access Code and FAQ from “Help”
1. Press MENU button - Station list - Help, press SELECT to confirm.
2. Press / to select “Get access code” or “FAQ”, and then press SELECT to confirm
Get access code
The code is used for creating an account when registering your
radio on the portal www.wifiradio-frontier.com
FAQ
Press / to select question, and then press SELECT
Adding station to “My Favourites”
1. Register your radio with the portal: www.wifiradio-frontier.com
2. Create account login, enter Access code. Access code can be found from Station list -
Help - Get access code.
3. To add a Favourite Station, first find a station and then click the “Add” icon.
4. After you added the stations, in order to have your radio access your new settings, get your
radio power off for several minutes is necessary.
5. The added stations are accessible by pressing MENU button - Station list - My favourites.
@ Note: doing a “factory reset” cannot erase “my favourites stations”.

19
View Station Information (via Remote Control)
Internet programs send additional information. Press the INFO button on the remote control
repeatedly while a program is playing. The display will show information about station description,
genre, country, reliability, bitrate, codec, sample rate, playback buffer, and date.

20
Spotify Connect Mode
Your radio has Spotify Connect built in. Spotify Connect lets you control the music playing on your
device, using the Spotify app on your mobile, tablet or PC. Listening is seamless. You can take
calls, play games, even switch your phone off – all without interrupting the music.
Learn more at spotify.com/connect
Spotify Premium
You’ll need a Spotify Premium account to use Spotify Connect.
Spotify Premium lets you listen to millions of songs ad-free – the artists you love, the latest hits and
discoveries just for you. Simply hit play to hear any song you like, at the highest sound quality.
Check out our current Premium offers at spotify.com/premium
Play Music via Spotify Connect
1. Download Spotify app for your smartphone or tablet (iOS or Android).
2. Add your speakers to your wifi network, and then press MODE button on your radio
repeatedly to select Spotify Connect mode.
3. Fire up the Spotify app on your smartphone or tablet using the same wifi network as above.
4. Play a song on Spotify and hit “DEVICES AVAILABLE”.
5. Ta p “Pinell Stereo 701” or “Pinell Supersound 701” from
the list and your music will start playing out loud.
If you can’t see it, just check it’s connected to the same
network as your phone of tablet.
You will notice that your radio is currently listed as “Pinell
Stereo 701 000000000000” or “Pinell Supersound 301
xxxxxxxxxxxx” (the 12 digit alphanumeric code is the
MAC address of your radio) in the Spotify App.
6. Your Spotify app will only recognize your radio when the radio is connected to the internet (i.e.
in Internet Radio, Spotify Connect or Music Player mode). To use Spotify when your radio is
in non-internet modes (i.e. in DAB, FM, Bluetooth or Aux in mode) you need to select System
settings - Network - Keep network connected - YES. This also allows you to wake the radio
from standby using your Spotify app.
@ Note: If unattended to use radio for long periods of time, e.g. overnight, while on holiday or while out of
the house, select “NO” to avoid unnecessary energy consumption.
Table of contents
Other Pinell Radio manuals

Pinell
Pinell SUPERSOUND 201W User manual

Pinell
Pinell Go radio User manual

Pinell
Pinell Supersound II User manual

Pinell
Pinell SUPERSOUND 201 User manual

Pinell
Pinell North User manual

Pinell
Pinell SUPERSOUND 101 User manual

Pinell
Pinell Supersound 301 User manual

Pinell
Pinell North User manual

Pinell
Pinell SUPERSOUND MICRO User manual

Pinell
Pinell SUPERSOUND 202 User manual