SDC2035C Communication Device Advanced Setup Guide
EN
<< Return to Contents
Setting up a wireless (Wi-Fi) network connection (continued)
3. Restart the Communication Device (continued)
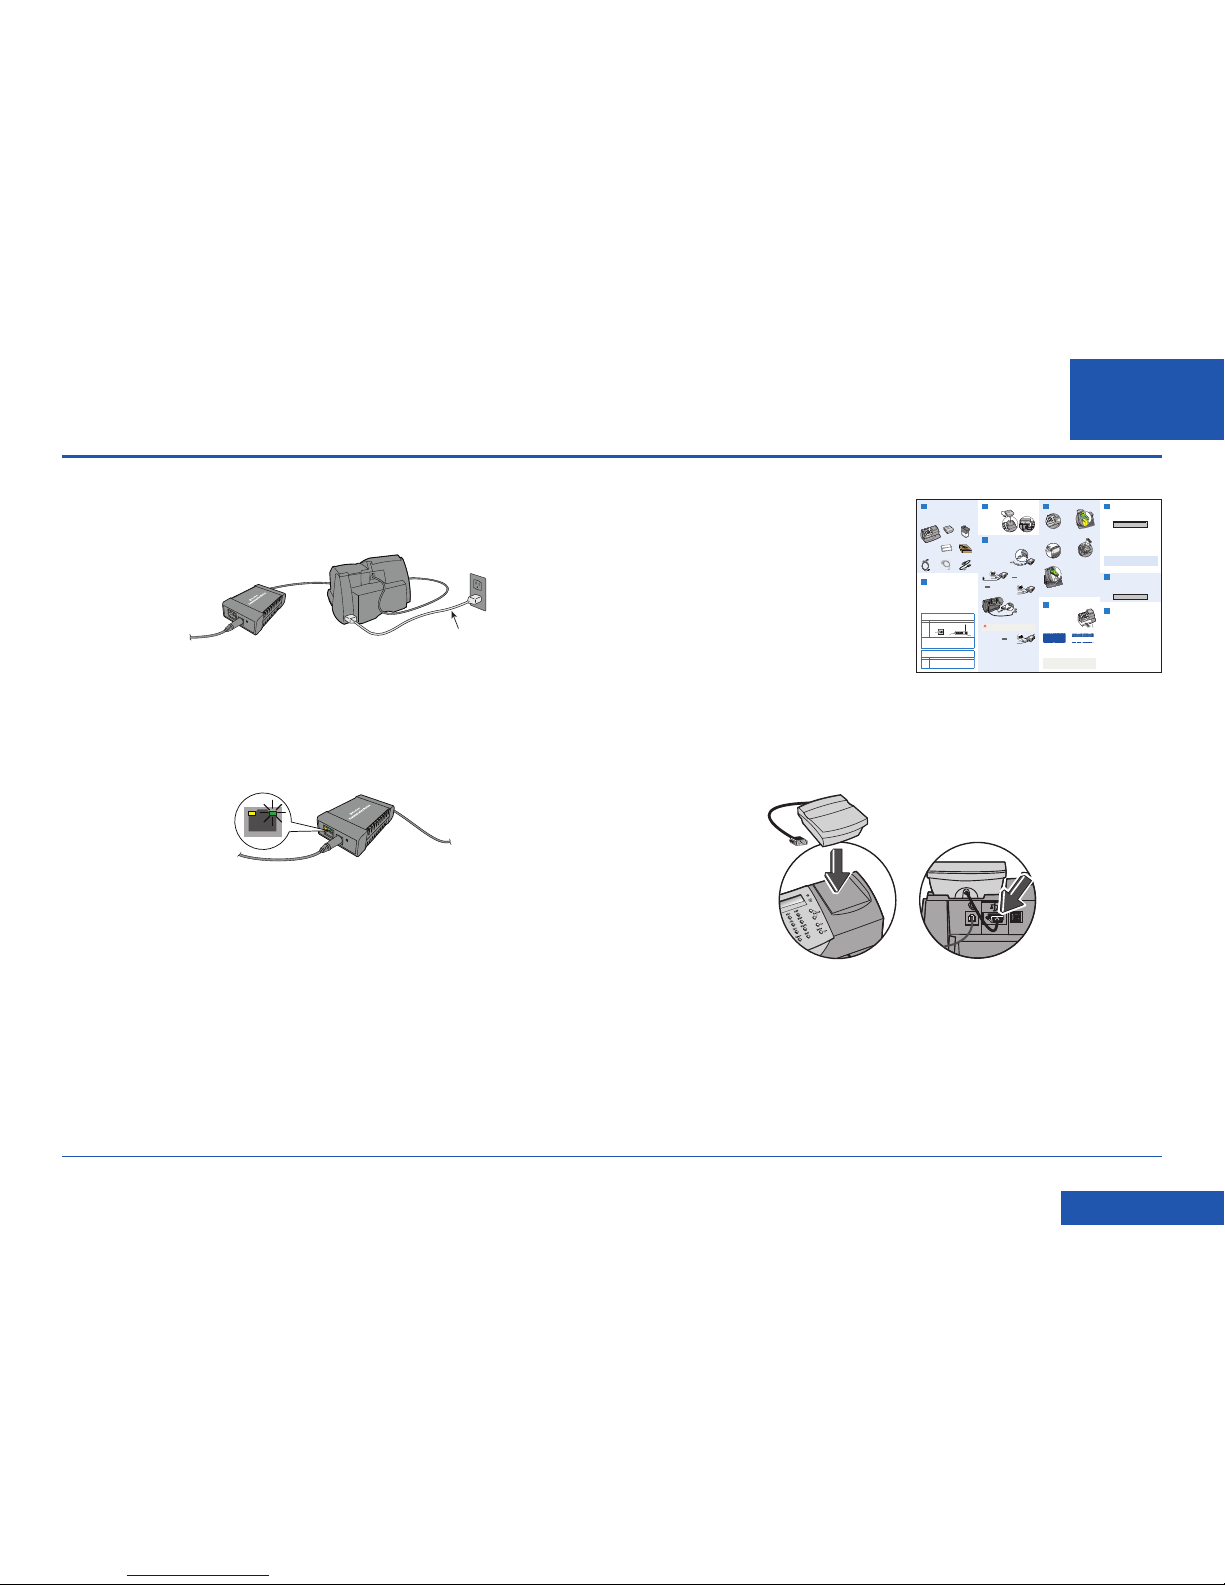
c. Connect power to the Franking Machine. If your Franking Machine is already
installed, the power may already be connected.
d. After 60 seconds, check that the right LED on the Communication Device is
blinking green.
Power Cable
4. Continue with Franking Machine Installation
Once your Communication Device is
configured using the setup software, your
Franking Machine should be displaying
“Add ink cartridge” or “Select Language”.
You can now continue with the Franking
Machine installation as described in the
printed Installation Guide supplied with the
machine.
a. Before proceeding, make sure that the Scale has been fitted as described in the
printed Installation Guide.
b. Now continue from “Install the Ink Cartridge” or “Select Language” (as
appropriate) in the printed Installation Guide to complete installation. Once
installation is complete, see the reverse of the Guide for useful information and
tips on using your Franking Machine.
ACAdapter
LEDs
3. Connect to the outside world
Followthe relevant section belowfor the connection method you‘ve chosen:
Option1 - LAN (network) connection
4.1 Connect the Communication Device
toyour network as shown.
6. Carry out a test print
Whenprompted, insert a spare envelope or tape/
labelstrip for a test print. Insert the item into the
frankingmachine from the front, making sure it
ispushed up to the right registration wall. The
frankingmachine automatically begins printing.
Donot remove the item until the printing has
finished.
Reviewthe quality of the test print.
Goodquality – press Enter/Yes.
Poorquality – press No, the franking machine goes through another set-up cycle
andwhen complete you should try the test print again.
8. Check for updates
Yourfranking machine now automatically checks and installsany new software,
includingany new Envelope Messages associated with your account. The display
showsthe status of the update.
Oncecomplete, the Home Screen displays and your franking machine is ready to
beused.
7. Add postage funds
Youneed to add funds to your franking machine beforeyou can use it.
Connectto Pitney Bowes Data Centre
Thefranking machine automatically connects with the Data Centre and, after a
shortdelay, displays your account balance:
Addingfunds
Younow need to add postage to your franking machine.
•Press Enter/Yes - an amount of £50 will be suggested. Toaccept this amount,
pressEnter/Yes or pressClear/Back to change it.
•If you pressed Clear/Back you will be prompted to enter a new amount. Enter the
amountand then press Enter/yes. This new refill amount must be in increments
of£10.
•Confirm the amount to add by pressing Enter/yes again.
•The franking machine communicates with the Data Centre to add postage and
confirmswhen complete. Press Enter/yes.
•The display asks if you would like a receipt. Press Enter/Yesand print an
envelopeor label as you did for the test print at step 6.
9. Frank an envelope
Let’snow create your first piece of frankedmail...
•Place your item of mail on the scale and the display will show the cost, weight,
classand date.
•If you want to change the Class, press the Class button and scroll
tohighlight the Class you wish to use and then press Enter/yes.
•Envelope Messaging prints alongside your frank. Toselect your preferred
EnvelopeMessage, press the down Review ▼key until ‘Ad’displays, then press
Enter/yes.Scroll to the required Envelope Messageusing the Review ▼▲ keys,
thenpress Enter/yes. (To ensureyour Envelope Message prints automatically in
future,see Pre-setting Options, overleaf).
•Insert the item of mail into the franking machine exactly as you did at step 6 to
createyour first piece of franked mail.
Problems?
•Can’t see the personalised Envelope Message you ordered? See Envelope
Messagingoverleaf.
•Want to pre-set the franking machine to automatically print your preferred Envelope
Message?See Pre-setting Options overleaf.
•Want to learn more about using you new franking machine? See Using your
frankingmachine overleaf.
Prepaid: £xxxxx.xx
0.00 0g
postalclass date
IMPORTANT
Onceyou have printed the receipt, check the Postage by Phone account number
onthe receipt and ensure it matches the account number on the dispatch note
receivedwith the franking machine. If the numbers do NOT match, do not go any
furtherwith this installation and contact Pitney Bowes on 08444 992992.
IMPORTANT
Itis very important that the print from your franking machine is of a good
quality.If you do not have a good quality print, Royal Mail may refuse or be
unableto read the information automatically, this might resultin a delay in
deliveringyour post.
RightRegistration Wall
5 . Install the ink cartridge
123
4
56
789
C0
.
Sperren
Versandarten
Zählerstände
Einstellungen Eingabe
blätternvor/zurück
Nein
Ja
*#_ ABC DEF
GHI JKL MNO
PQRS TUV WXYZ
zurückLeertaste Eingabe
123
4
56
789
C0
.
Lock
Class
Funds
Options Enter
Review
no
yes
*#_ ABC DEF
GHI JKL MNO
PQRS TUV WXYZ
Clear/BackSpace Shift
PitneyBowes
2. Decide where to site your
system and how to connect it
PleaseDO NOT connect power until instructed.
Your franking machine has to connect to the Pitney Bowes Data Centreto add
postagefunds, get software updates, and carry out the required PostalAuthority
inspections.
Choosewhich of the two connection methods described in the table below best
suitsyour needs. Consider the requirements and ensure that there is a suitable
networksocket or internet enabled PC within reach of the supplied cables. You
mustalso ensure that the franking machine has a constant power supply and you
havespace around it to work. When you have decided, continue with step 3.
Ifyou cannot meet the requirements of either connection method, referto
Troubleshootingoverleaf.
5.2 Whenprompted, lift the top cover
andpress the unlock symbol on the
cartridgelatch. Remove and discard
theyellow packaging material.
5.3 Open the packaging for the ink
cartridgeand take off the protective
tapefrom the bottom.
5.6 Close the top cover and press Enter/
yes.When you see ‘IMPORTANT – is
theink cartridge installed?’ displayed,
pressEnter/yes again.
Thefranking machine will now go
througha set-up cycle which takes up
to2 minutes.
1 Open the box and unpack
Here’sa diagram and explanation of the items you should find in your box,if
anythingis missing give us a call on 08444 992992. Dependingon how you install
yourfranking machine, you might not need all of these items.
Ifyou have any problems during this installation, refer to‘Troubleshooting’
overleaf.
FrankingMachine Scale InkCartridge
PostageMeter
Labels
USBCable
NetworkCable PowerCord
Communication
Device
1 5 7
8
9
2
6
5.1 When the display shows ‘Add ink
cartridge’,press Enter/yes.
5.4 Insertthe ink cartridge. Insert the
baseof the cartridge first before
pushingthe top back.
5.5 Press the ink cartridge latch down
untilit clicks and holds the cartridge
inplace.
Goodprint - no broken lines in the
centreof the test print
Badprint - broken lines in the centre
ofthe test print
CommunicationDevice
ForPitneyBowesDigitalMailing System
BEST- LAN (Network) Connection
Youcan use a suitablyconfigured network connection (LAN) that gives access to the
internet.Pitney Bowes highly recommends LAN connection.
Benefits Requirements
Fast.
Always
connected.
Saves
phonecall
costs.
Astandard (RJ45) network connection on your router(as found in a normal
domesticwired setup) or an active network wall socket.
Thetechnical stuff...
Theconnection must use DHCP (automatic configuration), be open to all HTTP, HTTPS
andFTP traffic and must NOT be using a PROXY server.
Ifyou’re unsure about the requirements for LAN connection or if you wish to connect
usingWi-Fi, our online Communication Device Advanced Setup Guide can help.
Goto www.europe.pb.com/docs and enter the code 10936 to downloadthe guide.
GOOD- PCMC Connection (Internet connection via your PC)
Ifyou have a PC with an internet connection nearby, you can install the freePitney Bowes
PCMeter Connect™ (PCMC) software and use the PC’s internet connection.
Benefits Requirements
Fast.
Saves
phonecall
costs.
Requiresa PC with an active internet connection to be nearby and turned
on.
ThePC must run Windows XP, Vista or 7 and have Pitney Bowes PCMC
softwareinstalled.
PCMCis not available for Mac.
3. Fit the Scale
Removeall shipping
tapefrom the machine.
Positionthe scale on
thefranking machine
andplug in the scale
connectoras shown in
thesediagrams. Tighten
theconnector screws.
3
WARNING:Always plug the equipment into a properly grounded wall
outlet.The socket outlet should be near the equipment and should be easily
accessible.Use the mains lead supplied with your equipment.
LANconnection (Router,
Hub,Wall socket)
Communication
Device
NetworkCable
LEDs
LEDs
4
4.2 Plug the AC adapter into the
CommunicationDevice and a
poweroutlet. The left LED is lit
yellow whenit is on.
4.3 After 45 seconds, the right LED will blink
orange.
Iftheright LED lights orange continuously
(notblinking), follow Communication Device
Troubleshooting1 overleaf.
4.4 Connnect the Franking
Machineto the
CommunicationDevice
usingthe supplied USB
cable.
4.5 Connnectthe Franking Machine to a power outlet using the cord supplied. The
FrankingMachine displays its startup screens and you will hear noises as the
FrankingMachine initialises.
4.6 About 10 seconds after it initialises, the Franking
Machinewill display ‘Meter connected to internet
-Press Enter’. Also, the right LED changes from
blinkingorange to blinking green .
PressEnter/Yesto continue with step5.
Iftheright LED stays orange (either blinking
orcontinuous), follow Communication Device
Troubleshooting2 overleaf.
Option2 - PCMC Connection (Internet connection via your PC)
Beforeyou connect your franking machine to your PC, you need to install our
FREEPC Meter Connect™software. To do this, you must haveadministrator rights
onyour PC which may require you to contact your IT department. Pleasenote that
thesoftware is not Mac compatible.
Toinstall, visit www.europe.pb.com/PCMeterConnect/setup.exeand choose the
‘Run’option. Select ‘English (United Kingdom)’ as your installation language and
followthe on-screen instructions. This process installsthe software and tests
yourfranking machine connection. When complete, you are asked toreturn to this
guideto complete the franking machine installation.
USBCable
Power
Cord