PIXO C2+ User manual

PIXO C2+
Bedienungsanleitung
PIXO C2+ Universal-Ladegerät
Instruction manual
PIXO C2+ Universal Charger
Mode d’emploi
Chargeur universel PIXO C2+
Manual de Instrucciones
PIXO C2+ Cargador universal
Istruzioni per l’uso
Caricatore universale PIXO C2+
www.pixo.de

B/CD/T
Achtung! Info / Data / Security Li-Ion / Li-Po Accupacks haben mehr als zwei
Kontakte. Für den Ladevorgang dürfen nur der Pluspol und der Minuspol
kontaktiert werden. Die anderen Kontakte dürfen nicht kontaktiert werden.
Eine Kontaktierung der Info / Data / Security Kontakte B / C / D / T kann den
Accupack beschädigen. Pixo oder der Händler haftet nicht für Schäden die
durch fehlerhafte Einstellung der Kontakte entstanden sind.
Caution! Info / Data / Security Li-Ion / Li-Po battery packs have more then
two contacts. Only the positive and negative poles should be contacted for
charging. The other contacts should not be contacted. Contacting the Info /
Data / Security contacts B / C / D / T can damage the battery pack. Pixo and
the dealer does not accept any liability for damage caused by incorrect set-
ting of the charger contacts.
Attention! Les batteries Li-Ion / Li-Po Info / Data / Security ont plus de deux
contacts. Seuls les pôles positif et négatif doivent être connectés pour la
charge. Les autres contacts ne doivent pas être connectés. Une connexion
des contacts Info / Data / Security B / C / D / T risque d’endommager la bat-
terie. Pixo ou le revendeur décline toute responsabilité pour les dommages
résultant d’un réglage incorrect des contacts.
¡Atención! Info / Data / Security Los packs de baterías Li-Ion / Li-Po disponen
de más de dos contactos. Para la operación de carga, sólo deben hacer con-
tacto el polo positivo y el polo negativo. Los otros contactos no deben hacer
contacto. Un contacto de los contactos Info / Data / Security B / C / D / T puede
dañar el pack de baterías. Pixo o el distribuidor no se harán responsables
por los daños ocasionados por un ajuste erróneo de los contactos.
Attenzione! Info / Data / Security Le batterie Li-Ion / Li-Po dispongono di più
di due contatti. Per il ciclo di carica vengono messi a contatto solo il polo po-
sitivo e quello negativo. Gli altri contatti non sono necessari. Un contatto dei
contatti Info / Data / Security B / C / D / T può danneggiare la batteria. Pixo o
il commerciante non rispondono dei danni causati da un'errata impostazione
dei contatti.


Achtung! Die Ladekontakte dürfen nur sehr vorsichtig mit einem Stift
verschoben werden! Verschieben Sie die Ladekontakte nicht mit den Fingern!
Gewaltsames Verschieben oder Drücken beschädigt die Kontakte!
Beschädigte Kontakte sind kein Garantiefall!
Caution! Move contacts very carefully! Use only a pen to move the contacts!
Do not use your ngers to move the contacts! Violence can damage the
contacts! Damaged contacts are out of guarantee!
Attention ! Déplacez les contacts de charge très prudemment et unique-
ment avec un crayon ! N’utilisez pas les doigts pour déplacer les contacts
! L’emploi de la force endommage les contacts ! Les contacts endommagés
sont exclus de la garantie !
PRECAUCION! Mueva los contactos cuidadosamente! Utilice únicamente un
bolígrafo para mover los contactos¡ No utilice sus dedos para moverlos¡ La
brusquedad puede dañar los contactos¡ Los daños en los contactos quedan
fuera de garantía¡
Attenzione! I contatti di carica vanno spostati con molta cautela utilizzando
una matita! Non spostarli utilizzando le dita! Lo spostamento forzato o la
pressione danneggia i contatti! I contatti danneggiati non sono coperti da
garanzia!


Bedienungsanleitung
C2+ Universal-Ladegerät
Wir beglückwünschen Sie zum Erwerb des Pixo C2+. Mit diesem Universal-
Ladegerät können Sie folgende Accus laden:
Alle* 3.6-3.7 V oder 7.2-7.4 V Li-Ion Accupacks aus Digital- und Videoka-
meras
* Die folgende Typen können nicht geladen werden:
Accus, die mit der Kamera oder dem Original-Ladegerät Daten austauschen.
Zum Beispiel Canon BP-809, BP-819, BP-827 oder Canon LP-E6. Accus mit
anderen Spannungen. Zum Beispiel CR-V3 und CR123A mit 3V oder Nikon
EN-EL4 mit 11.1V. Accus mit besonderen Kontaktierungen. Zum Beispiel
Koyocera BP-800/1000 oder Leica M8.
Aktuelle Informationen nden Sie auf www.pixo.de
1-2 Standard 1.2 V NiMH / NiCd AA Mignon oder AAA Micro Rundzellen
Li-Ion / Li-Po Accus in Mobiltelefonen, PDAs, mp3 Playern und Navi-
gationsgeräten

Technische Daten
Li-Ion Ladefunktionen
• Einzigartige Klemmvorrichtung und Kontaktierung ohne zusätzliche Ad-
apterplatten
• Spezial-Microcontroller zur Steuerung und Überwachung aller Ladevor-
gänge
• Absolut kurzschlußfest durch automatische Erkennung der Polarität und
der Accuspannung
• Intelligente Vmax Impulsladung mit Accudefekterkennung
• Nachladephase mit Überladeschutz und 11 Stunden Sicherheitstimer
• Li-Ion Battery Activator Funktion zur Auadung von tiefentladenen Accus
• Ladezeiten ab einer Stunde je nach Ladezustand und Kapazität des Accus
• Li-Ion Ladeausgang: 4.2-8.4 VDC ~700 mA
NiMH / NiCd Ladefunktion
• Einzigartige Klemmvorrichtung und Kontaktierung für 1-2 NiMH / NiCd
1.2 V AA Mignon oder AAA Micro Accus
• Spezial-Microcontroller zur Steuerung und Überwachung aller Ladevor-
gänge
• Intelligente und batterieschonende deltaV Ladung (Cold-Charge-Methode)
mit Erhaltungsladung
• Ladezeiten von 2-8 Stunden je nach Ladezustand und Kapazität der Accus
• NiMH / NiCd Ladeausgang: 2 x 1.4 VDC ~700 mA
Mobiltelefon- und USB Ladefunktion
• Mobiltelefone über das mitgelieferte USB-Ladekabel mit Adaptersteckern
für die aktuellen Mobiltelefone von Nokia, Sony Ericsson, Motorola und
Samsung.
• Alle anderen Geräte über Standard USB-Kabel.
• Der Ladevorgang wird über die interne Electronic des Endgerätes ge-
steuert. Es können daher auch alle Accutechnologien geladen werden.
Die Ladezustände werden vom Endgerät angezeigt. Die Ladezeiten
werden durch das Endgerät bestimmt. Angaben zu den Ladezeiten sind
also nicht möglich.
• USB Ausgang: 5.3 VDC maximal 500mA

Allgemeine Technische Daten
• Optische Anzeige der Li-Ion, NiMH oder NiCd Ladevorgänge durch Leucht-
dioden
• Kompakte und leichte Ladeeinheit mit 125 x 65 x 27 mm und 85 Gramm
Gewicht
• Weltweit einsetzbar durch ein besonders leichtes und kompaktes 100-240 V
Schaltnetzteil mit 12 VDC 1200 mA
• Mobil einsetzbar durch 12V Autoadapter
Lieferumfang
Ladeeinheit, Netzteil, Autoadapter, Spezial USB-Ladekabel mit 9 x Adapter-
steckern, Anleitung
Ladevorgänge
Verbinden Sie das Ladegerät mit dem Netzteil oder dem Autoadapter. Das Gerät ist be-
triebsbereit, wenn die rote Power-Leuchtdiode aufleuchtet. Danach können Sie entwe-
der 1-2 NiMH / NiCd Rundzellen oder ein Li-Ion Accupack laden.
Achtung! Gleichzeitiges Laden von NiMH / NiCd Rundzellen und Li-Ion Ac-
cus ist nicht möglich!
Über den USB-Stromversorgungsstecker kann zusätzlich und gleichzeitig ein
Mobiltelefon, ein PDA, ein mp3 Player, oder auch ein Navigationsgerät geladen
werden, wenn die maximalen Ladeströme dabei nicht überschritten werden.
NiMH / NiCd Ladevorgang
Die Rundzellen werden in der Klemmvorrichtung kontaktiert. Achten Sie beim
Einlegen der NiMH / NiCd Rundzellen auf die richtige Polarität. Nach dem Einle-
gen der Accus wird der Ladevorgang automatisch gestartet. Der Ladevorgang wird
durch die grüne Charge-Leuchtdiode angezeigt. Die Funktion der Leuchtdioden
wird nachfolgend in der Tabelle erklärt.
Achtung!
Keine Trockenbatterien auaden. Explosionsgefahr! Laden Sie nur hoch-
wertige und schnellladefähige Accus. Schäden, die durch ausgelaufene Accus
minderer Qualität verursacht wurden, sind kein Garantiefall!
Li-Ion Ladevorgang
Alle Li-Ion Accupacks verfügen über mindestens zwei oder mehr Kontakte.
Für den Ladevorgang werden jedoch nur die Kontakte mit dem Pluspol und
dem Minuspol benötigt. Der Pluspol und der Minuspol sind auf dem Li-Ion
Accupack entsprechend gekennzeichnet. Die anderen Kontakte werden für

den Ladevorgang nicht benötigt und sollten daher auch nicht kontaktiert
werden. Das Ladegerät erkennt automatisch die Polarität und die Accuspan-
nung von Li-Ion Accus. Es ist daher egal wie das Li-Ion Accupack eingelegt
wird. Wichtig ist nur eine sichere Kontaktierung. Die Li-Ion Ladefunktion des
C2+ ist absolut kurzschlußfest.
1. Fixieren Sie das Li-Ion Accupack zunächst provisorisch in der Klemmvor-
richtung. Das Accupack kann von links liegend, von rechts liegend oder senk-
recht über den Ladegerätekontakten xiert werden. Also bei 0 Grad, 90 Grad
oder 180 Grad. Die Accukontakte müssen dabei in Richtung der Ladegeräte-
kontakte ausgerichtet werden.
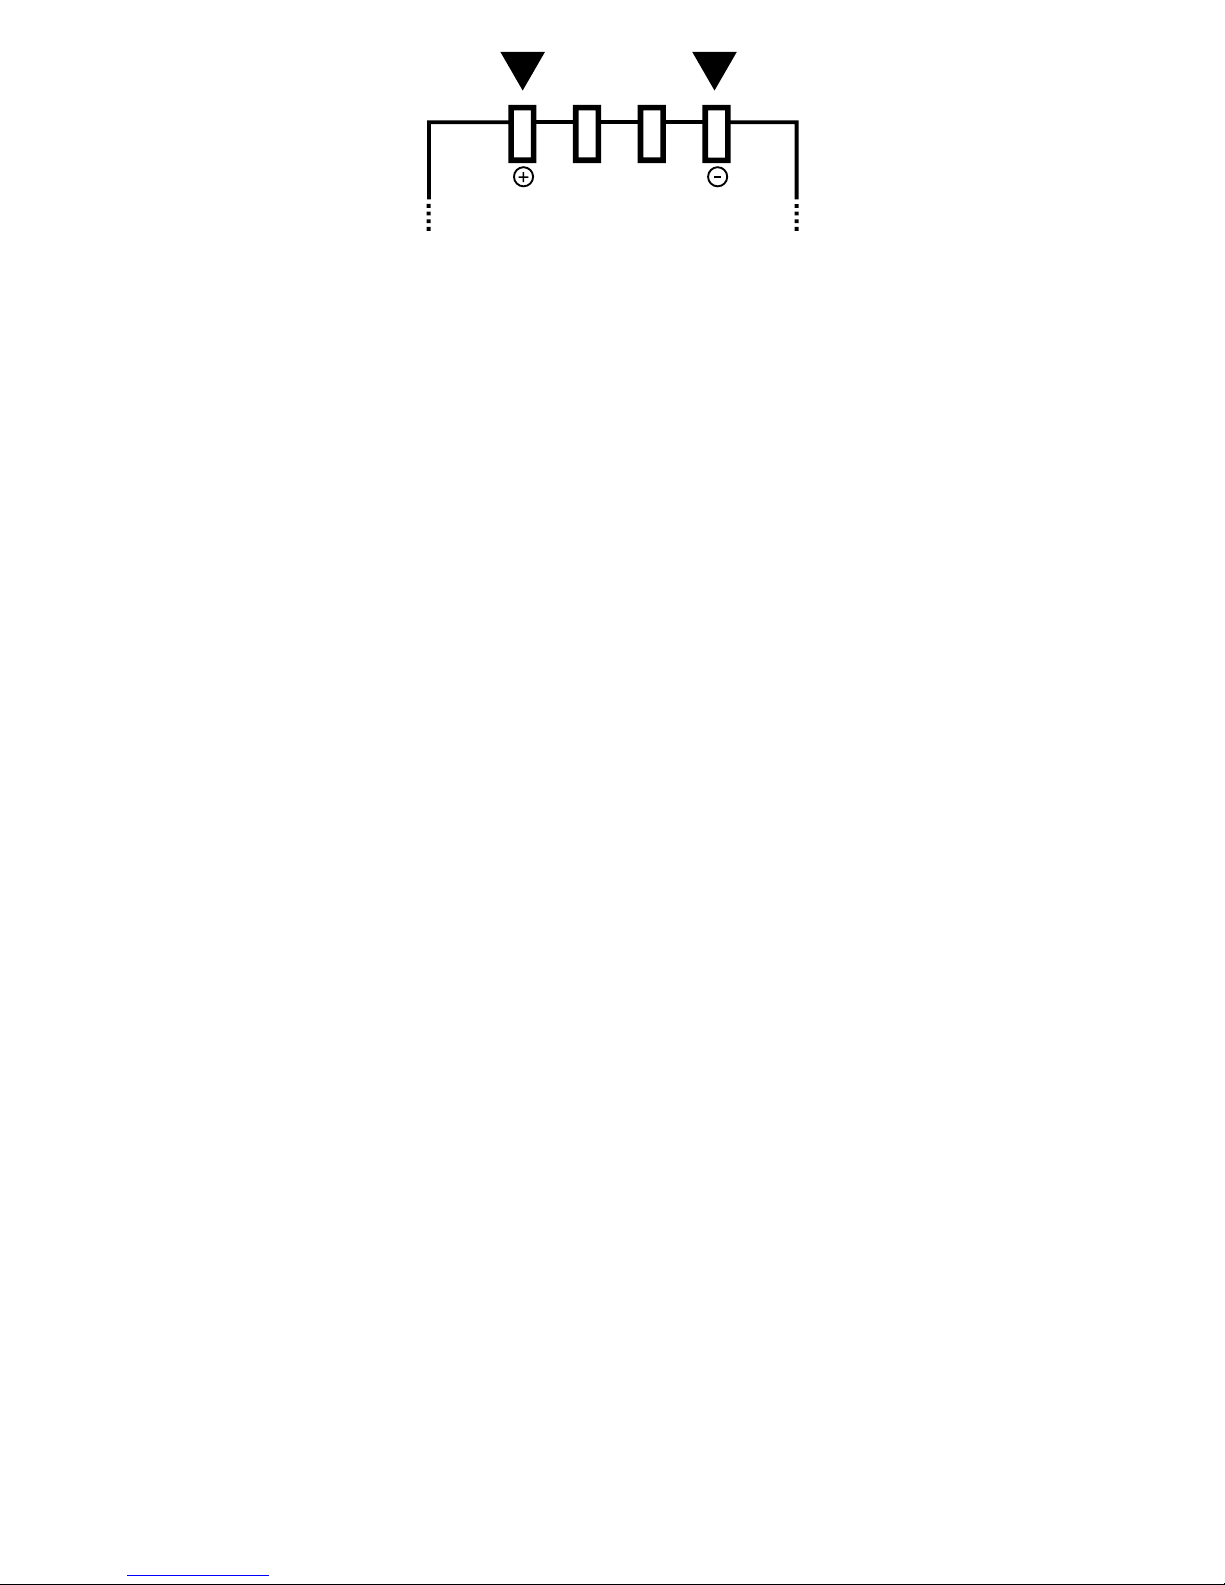
2. Danach müssen die Ladegerätekontakte auf die Abstände des Plus- und
des Minuspols des Li-Ion Accupacks angepasst werden.
Achtung! Die Ladekontakte dürfen nur sehr vorsichtig mit einem Stift
verschoben werden! Verschieben Sie die Ladekontakte nicht mit den Fin-
gern! Gewaltsames Verschieben oder Drücken beschädigt die Kontakte!
Beschädigte Kontakte sind kein Garantiefall!
3. Danach wird das Li-Ion Accupack dann entgültig über den Ladegeräte-
kontakten xiert. Das Accupack muss dabei nicht auf der Bodenplatte des
Ladegerätes auiegen. Eine schwebende Fixierung ist ausreichend und
schont die Kontakte.
Die Schritte 1 bis 3 müssen für jeden Li-Ion Accutyp wiederholt wer-
den. Ist das Akkupack richtig kontaktiert, leuchtet oder blinkt die grüne
Charge-Leuchtdiode. Leuchtet oder blinkt die grüne Leuchtdiode nicht,
ist das Accupack fehlerhaft kontaktiert. Überprüfen Sie bitte erneut die
Kontaktierung. Ist die Kontaktierung in Ordnung wurde ein falscher Accu-
typ oder ein defektes Accupack eingelegt. Die Funktion der Leuchtdioden
wird nachfolgend in der Tabelle erklärt. Die Battery Activator Funktion zur
Aufladung von tiefentladenen Accus arbeitet mit etwas Verzögerung und
startet den Ladevorgang erst nach einer Testphase.
Achtung!
9 V NiMH / NiCd Block-Accus dürfen nicht geladen werden!
Mobiltelefon Ladevorgang
Zum Lieferumfang gehört ein spezielles USB-Ladekabel mit Adaptersteckern
für die aktuellen Mobiltelefone der Firmen Nokia, Sony Ericsson, Motorola

und Samsung. Wählen Sie einen geeigneten Stecker für Ihr Mobiltelefon aus und
verbinden Sie diesen mit dem Mobiltelefon und dem USB-Steckverbinder des
Pixo C2+. Der Ladevorgang wird dann wie gewohnt automatisch gestartet.
Weitere Information über den Ladevorgang nden Sie in den technischen Daten
des Pixo C2+ und in der Anleitung Ihres Mobiltelefons.
Achtung!
Verwenden Sie das spezielle USB-Mobiltelefonladekabel nur mit dem PIXO
C2+ Ladegerät! Das Kabel darf nicht an Standard-USB-Schnittstellen oder mit
sonstigen Fremdnetzgeräten betrieben werden!
USB Ladevorgang
Unterstützt werden alle Geräte bei denen der interne Accu über eine USB-
Verbindung (Mini USB-Stecker) geladen wird. Diese Funktion ist jedoch
stark von den Geräten abhängig und kann nach dem Stand der Technik
nicht für alle Geräte garantiert werden. Zum Laden wird ein Standard USB
Kabel (A Stecker auf Mini) benötigt. Das Kabel gehört nicht zum Liefer-
umfang des Pixo C2+, da es bei vielen Geräten bereits mitgeliefert wird.
Verbinden Sie das USB Kabel einfach mit dem Gerät und dem USB-Steck-
verbinder des C2+. Der Ladevorgang wird dann wie gewohnt automatisch
gestartet. Weitere Information über den Ladevorgang finden Sie in den
technischen Daten des Pixo C2+ und in der Anleitung Ihres Gerätes.
Achtung!
Der USB-Stromversorgungsstecker des Pixo C2+ ist keine USB-Schnitt-
stelle zur Datenübertragung. Der USB-Stromversorgungsstecker liefert
eine Ausgangsspannung von 5.3 V und ist mit maximal 500 mA belastbar.
Die Ausgangleistung ist nicht ausreichend für mobile Geräte mit Festplat-
ten, da diese Geräte zeitweilig über 1000 mA benötigen.

Funktion der Leuchtdioden
Die grüne CHARGE Leuchtdiode zeigt nur die NiMH / NiCd oder Li-Ion Lade-
vorgänge an. Für den USB-Stromversorgungsausgang hat die grüne Leucht-
diode keine Funktion.
CHARGE grün POWER rot
Aus Aus Keine oder fehlerhafte Strom-
versorgung.
Blinken Ein Ladevorgang läuft
Ein Ein Accu vollständig geladen.
Aus Ein Stromversorgung über Netzteil
oder Autoadapter.
Kein Accu eingelegt. Accu
fehlerhalt kontaktiert.
Falscher Accutyp oder defekter
Accu.
Blinken Blinken Ladevorgang nach 11 Stunden
durch Sicherheitstimer abge-
brochen.
Accu konnte nicht vollständig
geladen werden. Accu defekt.
Programmfehler. Accu ent-
nehmen und einfach erneut
versuchen.
Sicherheitshinweise
Betreiben Sie das Gerät nur mit dem Original-Netzteil oder dem Original-
Autoadapter. Der Accu und das Gerät erwärmen sich während des Ladens.
Die Erwärmung ist kein technischer Defekt. Accus dürfen nur unter Aufsicht
geladen werden. Entfernen Sie den Accu aus dem Ladegerät und trennen Sie
das Gerät von der Stromversorgung nach Beendigung des Ladevorganges.
Behandeln Sie das Ladegerät mit Sorgfalt. Setzen Sie das Ladegerät keinen
mechanischen Belastungen, hohen oder niedrigen Temperaturen, Feuch-
tigkeit, Schmutz, Staub oder Flüssigkeiten aus. Das Gerät gehört nicht in
Kinderhände. Das Gerät nur in trockenen Räumen verwenden. Achtung!
Keine Trockenbatterien auaden. Explosionsgefahr!
Handhabung der Accus
Ein neuer Accu sollte direkt nach dem Kauf geladen und benutzt werden. Der
Accu erreicht seine volle Kapazität erst nach mehreren Lade- und Entlade-
vorgängen. Entfernen Sie den Accu aus den Geräten, wenn Sie diese längere
Zeit nicht benutzen. Lagern Sie Li-Ion Accus in entladenem, aber nicht in

tiefentladenem (< 3 V / 6 V) Zustand. NiMH / NiCd Accus sollten jedoch in
geladenem Zustand gelagert werden. Benutzen Sie den Accu alle 6 Monate.
Accus sind Verschleißteile und müssen bei nachlassender Kapazität durch
einen Neuen ersetzt werden. Behandeln Sie den Accu mit Sorgfalt. Setzen
Sie den Accu keinen mechanischen Belastungen, hohen oder niedrigen Tem-
peraturen, Feuchtigkeit, Schmutz, Staub oder Flüssigkeiten aus. Den Accu
nicht kurzschließen, nicht zerlegen oder ins Feuer werfen. Der Accu erwärmt
sich während des Ladens und Entladens. Die Erwärmung ist kein technischer
Defekt. Laden Sie den Accu nur mit geeigneten Ladegeräten. Unbrauchbare
Accus gehören in die Sammelbehälter des Handels oder der Gemeinde, nicht
in den Hausmüll. Accus gehören nicht in Kinderhände.
Technische Änderungen und Irrtümer vorbehalten. Alle Warenzeichen sind
Eigentum der jeweiligen Inhaber.

Instruction manual
PIXO C2+ Universal Charger
Congratulations on purchasing the Pixo C2+! You can charge the following
batteries with this universal charger:
All* 3.6-3.7 V or 7.2-7.4 V Li-Ion Battery Packs from Digital Cameras and
Camcorders
*The following battery packs cannot be charged:
Battery packs which communicate with the camera or the original charger.
For example Canon BP-809, BP-819, BP-827 or Canon LP-E6. Battery packs
with different voltage. For example CR-V3 und CR123A with 3V or Nikon
EN-EL4 with 11.1V. Battery packs with special contacts. For example
Koyocera BP-800/1000 or Leica M8.
Please visit www.pixo.de for up-to-date information
1-2 NiMH / NiCd 1.2 V AA Mignon or AAA Micro Rechargeable Batteries
Li-Ion / Li-Po Batteries in Mobile Phones, PDAs, mp3 Players and Car Navi-
gation Systems
Technical specication
Li-Ion charge function
• Unique snap-in support and contact method without additional adapter
plates
• Special microcontroller to control and supervise all charge processes
• Short circuit protection with automatic polarity and voltage detection
• Smart Vmax pulse charge with faulty battery pack detection
• Top-up charging phase with over charge protection and 11 hours safety
timer
• Battery Activator function for deep discharged Li-Ion batteries
• Charging time minimum of one hour depending on battery charge status
and capacity
• Li-Ion charge output rating: 4.2-8.4 VDC ~700 mA

NiMH / NiCd charge function
• Unique snap-in support and contact method for 1-2 NiMH / NiCd 1.2 V AA
Mignon or AAA Micro batteries
• Special microcontroller to control and supervise all charge processes
• Smart deltaV Cold-Charge-Methode and trickle charge
• Charging time from 2-8 hours depending on battery charge status and
capacity
• NiMH / NiCd charge output rating: 2 x 1.4 VDC ~700 mA
Mobile Phone and USB charge function
• The charger comes with a special USB Mobile Phone Charge Cable with
adapters for the most up-to-date mobile phones from Nokia, Sony Ercisson,
Motorola and Samsung.
• All other devices are charged via generic USB cable.
• The charging process is controled by the circuit of the external device and
it is possible to charge different battery technologies. The charging states
are shown on the external device. The charging time depends on the
external device. It is not possible to indicate any charging time for these
external devices.
• USB output rating: 5.3 VDC maximum 500 mA
Generic technical specications
• LEDs for visual indication of Li-Ion, NiMH or NiCd charge process
• Compact and light base unit with 125 x 65 x 27 mm and 85 grams
• Worldwide home use via the ultra light and compact 100-240 V switch
mode power supply with 12 VDC 1200 mA
• Mobile use via 12V car cigarette lighter plug
Scope of supply (what is in the box)
Base Unit, Power Supply, Car Cigarette Lighter Plug, USB Mobile Phone
Charge Cable with 9 Adapters, Users Manual
Charging process
Please connect the power supply or the car cigarette lighter plug to the
charger. The charger is ready to use when the red Power LED is on. You can
charge 1-2 NiMH / NiCd batteries or one Li-Ion battery pack.
Caution! You can not charge NiMH / NiCd batteries and Li-Ion battery packs
at the same time!

In addition to the batteries you can charge one mobile phone, one PDAs, one
mp3 player or one car navigation system at the same time via the USB power
connector, so long as the output power maximum is not exceeded.
NiMH / NiCd charge process
The batteries are xed and contact is made with the snap-in support. Take
care to have the right polarity. The charge process starts automatically after
battery insertation. The green LED indicates the charge process. LED func-
tions are explained in the list below.
Caution!
Do not charge generic dry batteries! Danger of explosion! Charge only high
quality and fast rechargeable batteries. Damages from leaked and low quality
batteries are out of guarantee!
Li-Ion charge process
All Li-Ion battery packs have at least two or more contacts. For the charging
process you will need only the contacts with the positive pole and the negative
pole. The positive and the negative pole are marked on the battery pack. The
other contacts are not needed for the charge process and should not be used.
The charger detects the polarity and the battery voltage automatically. You do
not have to worry about the right polarisation. You only have to make sure of
full contact. The Pixo C2+ has a short circuit protection for Li-Ion batteries.
1. Fix the battery pack provisionally in the snap-in support. The battery
pack can be inserted from the horizontal left side, from the horizontal right
side or vertically to be xed on top of the battery charger contacts. Position
is at 0 degree, 90 degrees or 180 degrees. The battery contacts must be
lined up in the direction of the battery charger contacts.
2. Battery charger contacts must be adjusted to the distance between the
battery pack positive and negative poles.
Caution! Move contacts very carefully! Use only a pen to move the con-
tacts! Do not use your ngers to move the contacts! Violence can damage
the contacts! Damaged contacts are out of guarantee!
3. Now you can denitely x the battery pack on top of the battery charger con-
tacts. The battery pack does not have to lie on the oor plate of the charger. A
oating position is sufcient.

The steps 1 to 3 must be repeated for every battery type. The green LED will
be on or ashes if the battery is contacted correctly. If the green LED is off,
the battery pack is not contacted correctly. Please check the contacts once
more. If the contact is ok you have inserted the wrong battery type or a faulty
battery pack. The green LED indicates the charge process. LED functions are
explained in the list below. The Battery Activator Function for deep discharged
Li-Ion batteries works with delay and starts the charge process after a longer
test stage.
Caution!
Do not charge 9 V NiMH / NiCd battery packs!
Mobile Phone charge process
The charger comes with a special USB Mobile Phone Charge Cable with
adapters for the most up-to-date mobile phones from Nokia, Sony Ercisson,
Motorola and Samsung. Select the right adapter for your mobile phone and
connect it to the USB connector of the Pixo C2+. The charge process is started
automatically. For more information about the charge process, please read
the technical specication of the Pixo C2+ or consult the manual of your mobile
phone.
Caution!
Use the special USB Mobile Phone Charge Cable only with the Pixo C2+
charger! Do not connect this cable to other USB devices!
USB charge process
This charge function supports many devices with internal batteries which
are charged via the USB interface (Mini USB connector). After the state
of engineering it is not possible to ensure a complete compatibility for all
devices. A generic USB cable (A Connector to Mini) is needed. This cable is
not included with the Pixo C2+, because it comes already with many devices.
Connect the USB cable to the USB connector of the Pixo C2+. The charge
process is started automatically. For more information about the charge
process, please read the technical specication of the Pixo C2+ or consult the
manual of your device.
Caution!
The Pixo C2+ USB connector can not be used for data transfer. It is only a power con-
nector with a limited output power. The maximum ratings are 5.3 V with 500 mA. This
output power is not sufcient for devices with a built-in hard disk drive. Hard disk
drive based devices have a peak power consumption of more than 1000 mA.

LED functions
The green LED indicates only the NiMH / NiCd and Li-Ion charge process. It
does not indicate any activity on the USB power connector.
CHARGE
green
P O W E R
red
Off Off No or faulty power supply.
Flashing On Charge process is going on.
On On Battery fully charged.
Off On Main power from power supply
or car cigarette lighter plug ok.
No battery pack inserted. Faul-
ty contact. Wrong or faulty bat-
tery pack.
Flashing Flashing Charge process was stopped by
11 hours safety timer.
Battery pack could not be fully
charged. Battery pack faulty.
Process error. Remove batte-
ries and try again.
Safety Notes
Use only the original power supply or the original car cigarette lighter plug .
The battery pack and the charger become warm when charging. This is not a
technical defect. Batteries must be charged only under supervision. When not
in use, disconnect the device from the power source and remove the battery
pack. Handle your charger carefully. Do not subject your charger to physical
shocks, high or low temperature, humidity, dirt, dust or liquids. Keep the unit
away from children. Use only in dry rooms.
Handling precautions for batteries
Charge new batteries before rst use. New batteries must be charged and
discharged several times to reach full capacity. Batteries must be removed
from the device, if you do not use it for a long time. Li-Ion batteries must
be stored in a discharged state, but not below < 3V / < 6V (deep-discharged
state). NiMH / NiCd must be stored in a fully charged state. Charge and dis-
charge the battery every 6 months. Batteries are consumable parts and must
be replaced at low capacity. Handle your battery carefully. Do not subject your
battery to physical shocks, high or low temperatures, humidity, dirt, dust or
liquids. Do not short circuit, solder, disassemble or put in re. Batteries may
become warm when charging and discharging. This is not a technical defect.

Use only special chargers to recharge the battery. Take care when disposing
of the batteries. In some countries there are special requirements for battery
disposal. Keep batteries away from children.
Technical specications are subject to be changed without prior notice. All
trademarks are property of their respective owners.

Manuel d’utilisation
Chargeur universel PIXO C2+
Toutes nos félicitations pour avoir choisi le Pixo C2+. Ce chargeur universel
vous permet de charger les batteries suivantes :
Toutes* les batteries Li-Ion 3,6-3,7 V ou 7,2-7,4 V d’appareils photo et
caméscopes numériques
* Les batteries suivantes ne peuvent pas être chargées :
Batteries qui échangent des données avec l’appareil photo ou le chargeur
d’origine. Par exemple : Canon BP-809, BP-819, BP-827 ou Canon LP-E6.
Batteries d’autres tensions. Par exemple : CR-V3 et CR123A de 3 V ou Nikon
EN-EL4 de 11,1 V. Batteries avec contacts spéciaux. Par exemple : Koyocera
BP-800/1000 ou Leica M8.
Visitez le site www.pixo.de pour des informations à jour
1-2 piles rechargeables NiMH / NiCd 1,2 V AA Mignon ou AAA Micro
Batteries Li-Ion / Li-Po de téléphones mobiles, PDA, lecteurs mp3 et
systèmes de navigation routière
Table of contents
Languages:
Other PIXO Batteries Charger manuals