Plus N-20S User manual

Copyboard
N-20S/N-20W
User’s Manual
Thank you for your purchase of the PLUS Copyboard.
Please read this User’s Manual carefully before use to take full advan-
tage of the functions of this product. After you have finished reading
the manual, please keep it for future reference.

E-2
Introduction
This manual is for both the N-20S and N-20W models.
The copyboards come in two sizes: standard size (model N-20S) and wide size (model N-20W).
The descriptions and diagrams in this manual refer to the model N-20S.
* When functions or operations are specific to a certain model of copyboard, the model name is specified.
Cautions on using networks
About the network connection environment
• Therequiredoperatingenvironmentissubjecttochangewithoutnotice.Also,PLUSdoesnotguaranteealloperations.
• Evenif allrequiredoperatingenvironmentconditionsaremet,itmayhappenthatoperationsdonotworkproperlyorthat
someproblemsarise.Dependingonthecommunicationsstatus,displaysmaybedelayedandcommunicationerrorsmay
occur.
Disclaimer
• PLUSwillacceptnoresponsibility whatsoeverforany consequencesofproblemsofcommunicationimpedimentsincon-
necteddevicesduetothenetworkfunctions.
• PLUSwillacceptnoresponsibilitywhatsoeverforimpedimentsincidentaltousageofortheinabilitytousethenetworkfunc-
tions(lossofbusinessprofits,lossesduetointerruptionofactivities,etc.).
• PLUSwillacceptnoresponsibilitywhatsoeverformalfunctionsduetocombinationswithconnecteddevicesorthesoftware
used,norfordamagesarisingfromhang-up,etc.
NOTE
Do not use ruled type tapes.
Donotmovethesheetwithtape,etc.,attachedtoit.Doingsocouldresultinmalfunction.
Do not attach template sheets or paper to the sheet.
Donotcopywhilefilm-typeobjectsorpapersareattachtothesheet.Doingsocouldresultinmalfunction.
Cleaning the eraser
Iftheeraser’serasingsurfaceisdirty,washitwithatappingmotion(donotrubit).Also,lettheeraserdrythoroughlybefore
usingit.Usingasoilederaserwillsoilthesheetsurface,anditwillbedifficulttoremovethesoiledmatterfromthesheet.
* Forothercautions,carefullyreadtheseparate“ImportantSafetyInformation”.
Trademarks
• MicrosoftandWindowsareregisteredtrademarksortrademarksintheUnitedStatesandothercountriesoftheMicrosoftCor-
poration.
• AdobeandAdobeAcrobatReaderaretrademarksofAdobeSystemsIncorporated.
• Safari,Apple,MacOSandMacintosharetrademarksorregisteredtrademarkofAppleComputer,Inc.,oftheUnitedStates.
Thetrademarksofthevariouscompaniesandtheproducttrademarks,evenwhennotwrittendown,willbegivenduerespect.
Productnamesandcompanynamesappearinginthismanualareregisteredtrademarksortrademarksoftherespectivecompa-
nies.
(1) Thecontentsofthismanualmaynotbereprintedinpartorwholewithoutpermission.
(2) Thecontentsofthismanualaresubjecttochangewithoutnotice.
(3) Greatcarehasbeentakeninthecreationofthismanual;however,shouldanyquestionablepoints,errors,oromissionsbe
apparent,pleasecontactus.
(4) NotwithstandingSection(3),thiscompanywillnotberesponsibleforanyclaimsoflossorprofitorothermattersdeemedto
betheresultofusingthisunit.
(5) TheuseofaprinterastheperipheraldeviceofthePLUSCopyboardistakentobeaprerequisite;therefore,operationwillnot
beguaranteedwhentheprinterisusedwithadirectconnectiontoapersonalcomputer.
(6) Manualswithincorrectcollatingormissingpageswillbereplaced.

E-3
Table of Contents
Meaning of the Terms Used in this Manual
• Mainunit(orset):Thisreferstothecopyboard.
• USBmemory: referstoUSBflashmemory.
• USBmemorystorage: meansthesavingofsheetsurfacedatausingMEMORY(i.e.,theUSBport)oftheoperationpanel.
• Memoryforcomputerstorage: indicatesatemporarysavinglocationoftheimagethathasbeenread.
• “copy”: Both“print”and“USBmemorysaving”meanto“copy.”
• “Sheetsurface”: refertothedrawingportion.
• “Scroll”or“move”: indicatesfeedingofthesheet
• Memoryfornetworkstorage:Memoryusedfornetworkstorage.
• Network: The communications network on which devices are interconnected in net fashion for communication (exchange of
data)betweenthedevices.Forthiscopyboard,the“network”indicatestheLANbelow.
• LAN(LocalAreaNetwork):Aclosedcommunicationsnetworkforcommunicatingwithinarestrictedarea,suchaswithinacom-
pany.
• FTP(FileTransferProtocol):Theprotocol(communicationsrules)usedwhentransferringfilesonaTCP/IPnetwork.
Introduction ...............................................................E-2
Table of Contents ......................................................E-3
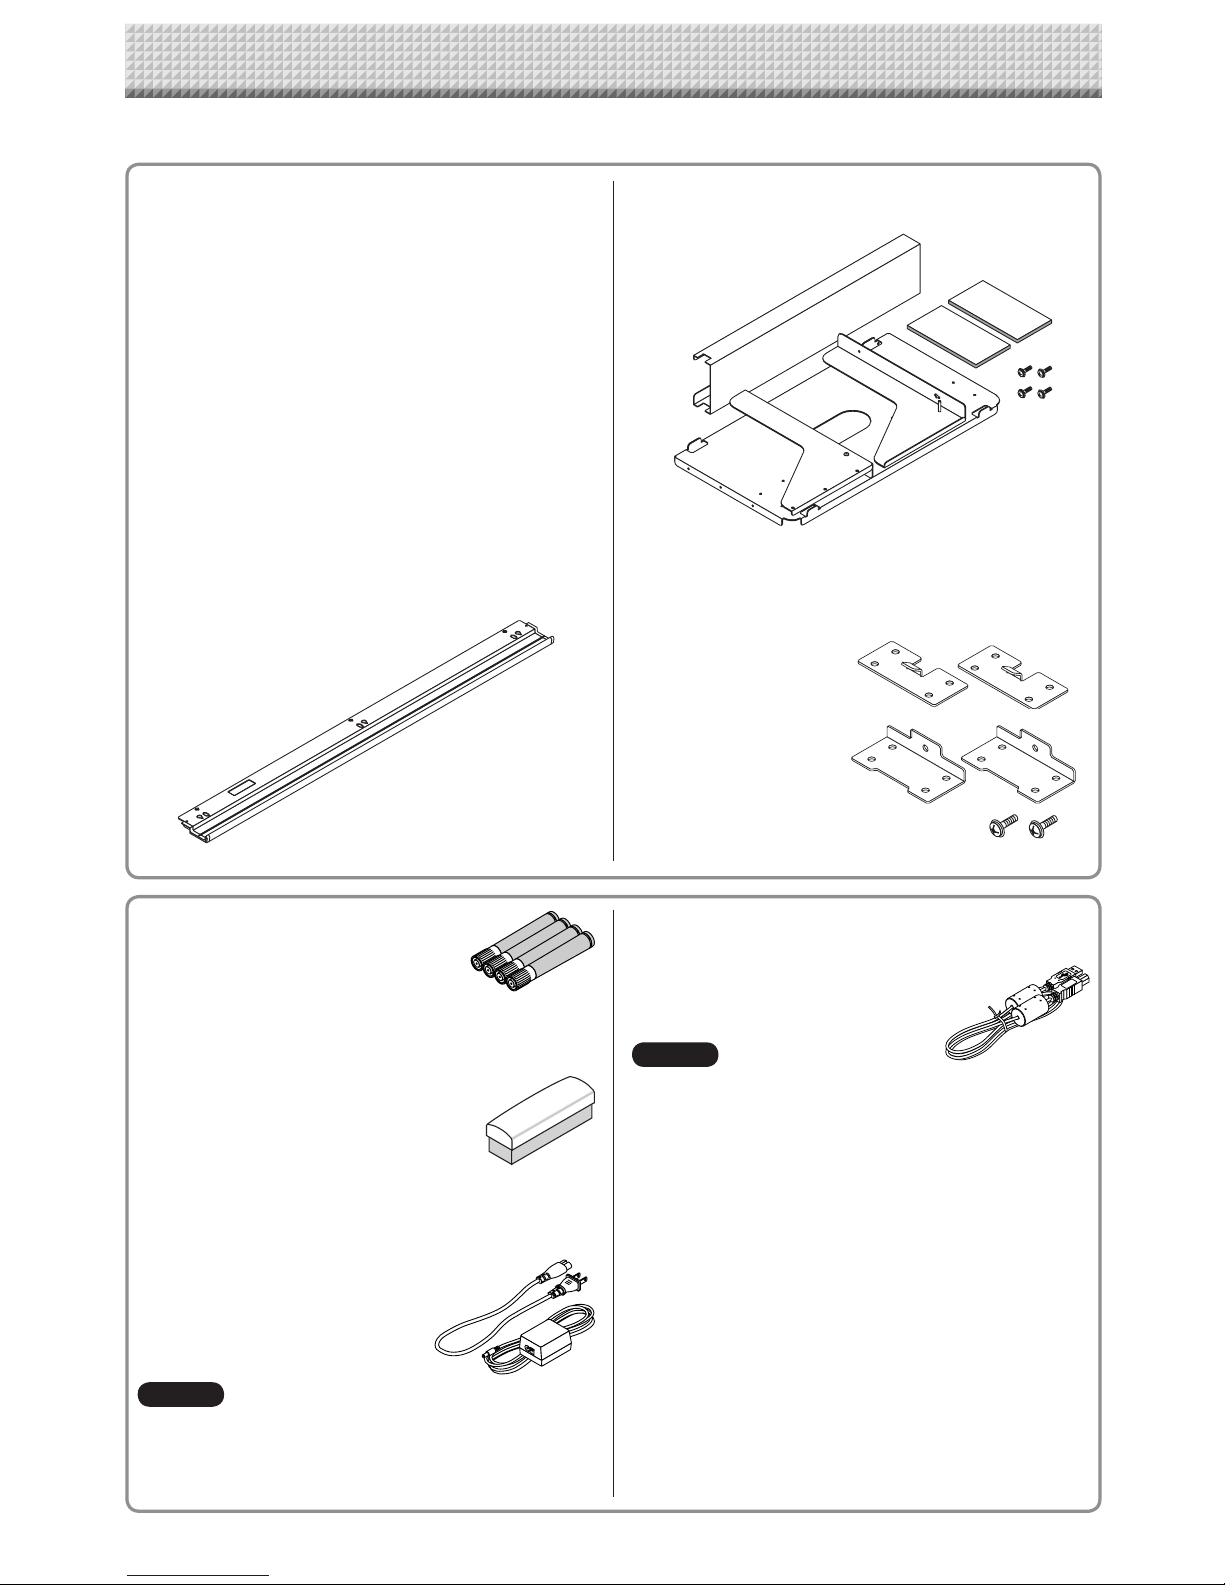
Package Contents......................................................E-4
Names of the Parts ....................................................E-5
Front ..................................................................... E-5
Input/output terminals ............................................. E-6
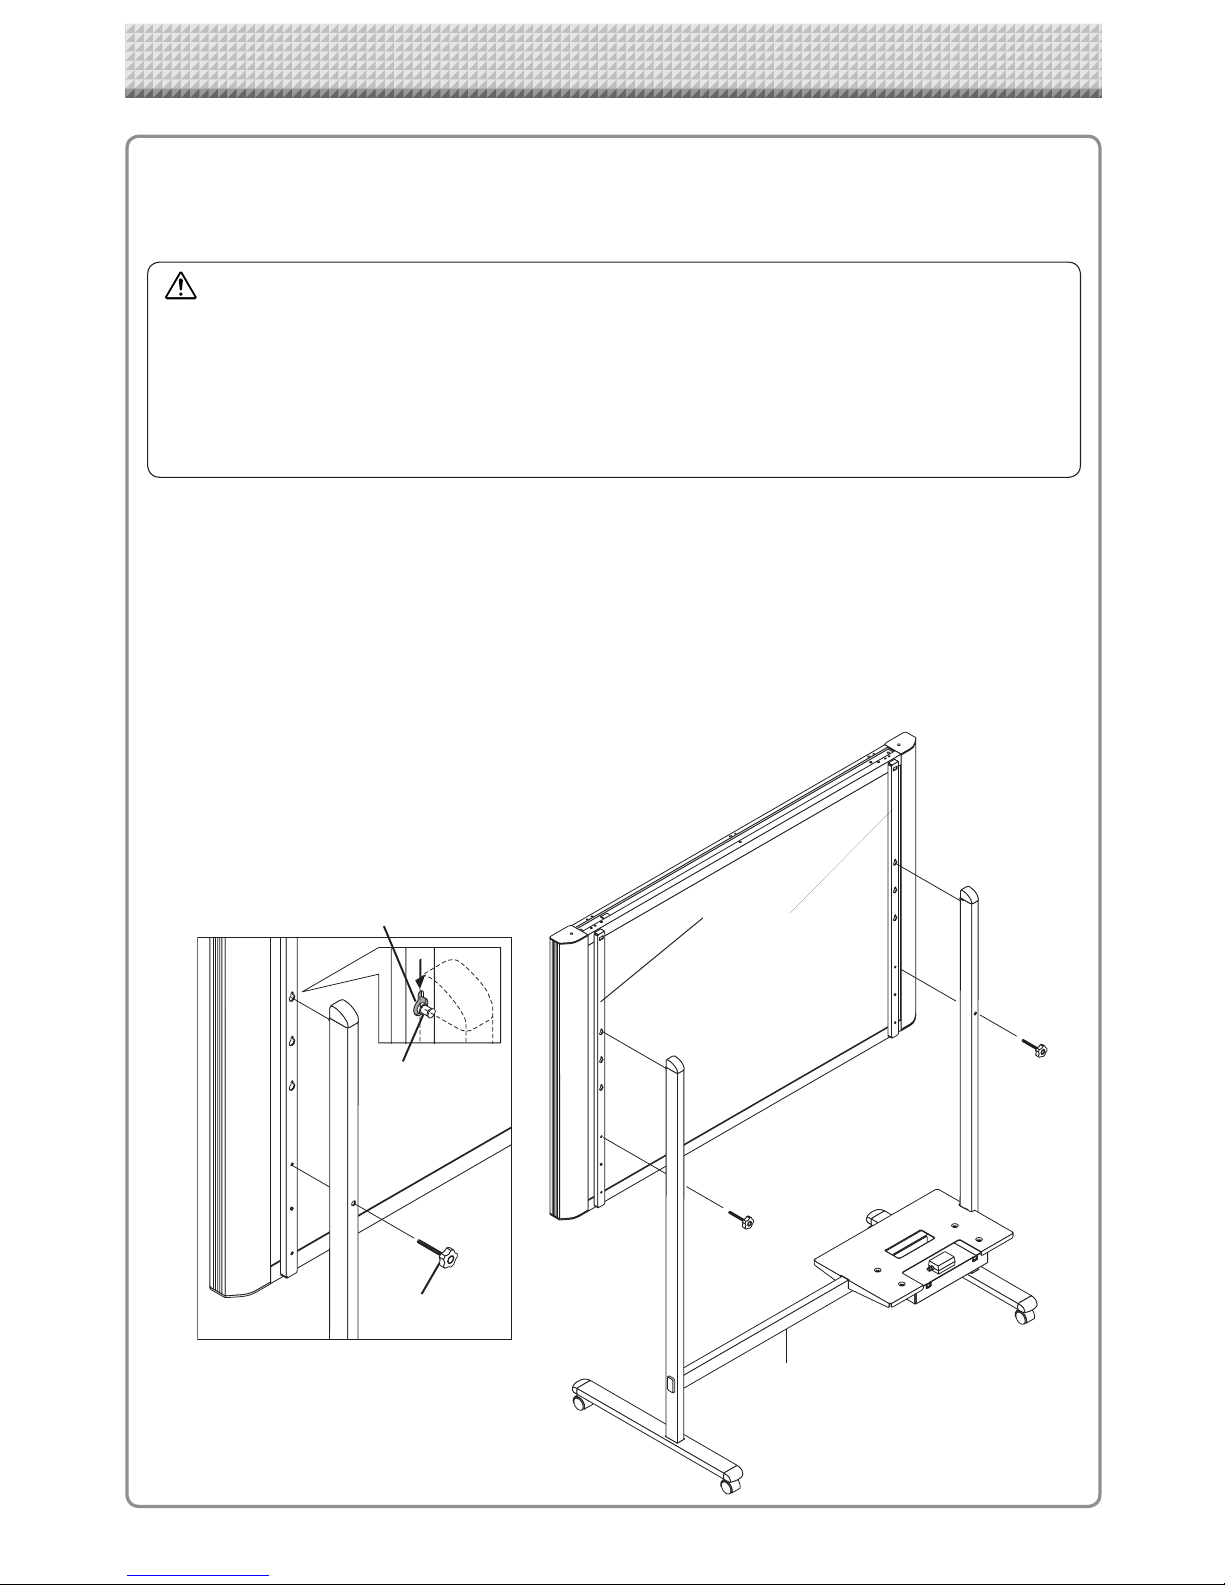
Changing the Height of the Unit................................ E-7
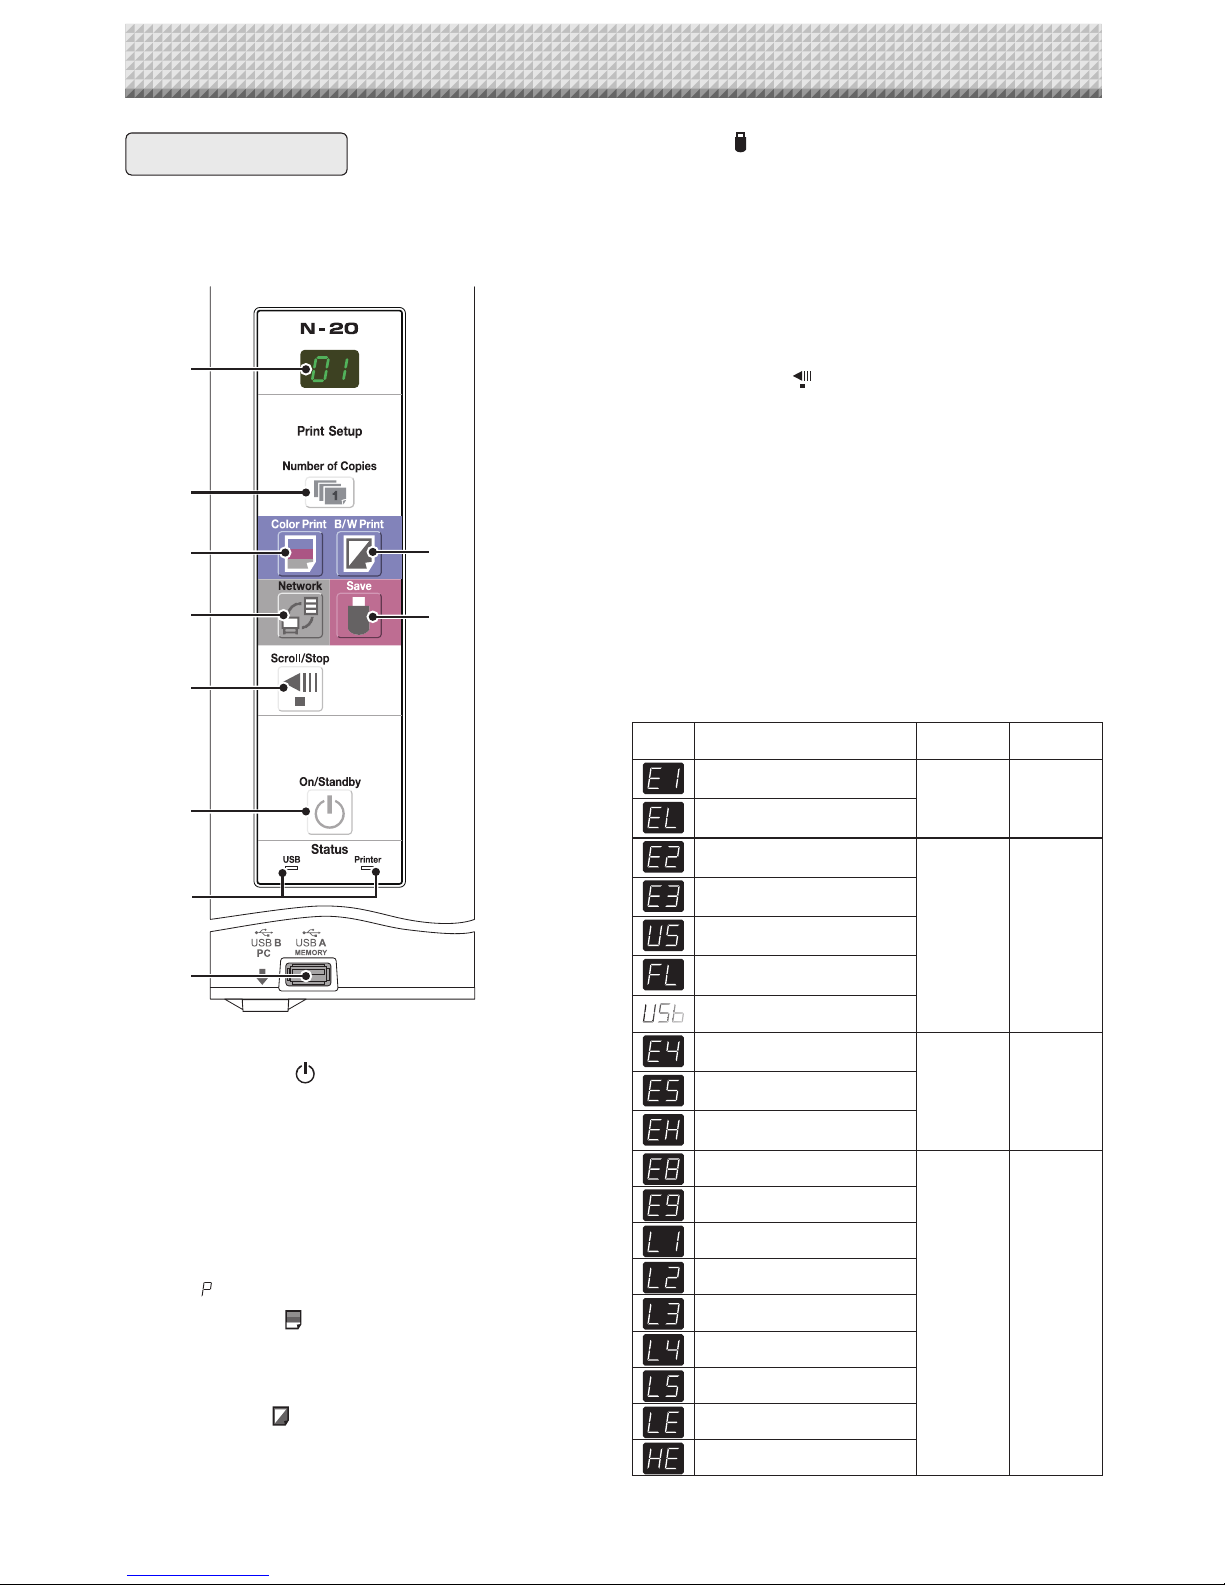
Control Panel.......................................................... E-8
Operation Steps .........................................................E-9
Connecting the Power .............................................E-10
Setting the Time.......................................................E-11
Description of Operations ...................................... E-11
Printing (printer sold separately)............................E-13
Preparing the Printer ............................................. E-13
Basic Printing Operation ....................................... E-14
Moving the sheet surface manually .................. E-15
Using USB Memory ..................................................E-16
USB Memory Storage Procedure ............................ E-16
Saving Image Files on a Computer/Deleting Image
Files..................................................................... E-18
Using the copyboard connected to a computer .....E-20
Using the Copyboard Connected to a Network.......E-21
Saving scanned images on the copyboard or FTP
server................................................................... E-21
Transferring image files to/deleting them from the
computer.............................................................. E-23
The information below must be input to
transfer the files.............................................. E-23
When the folder for saving is set to “Board”...... E-23
Deleting image files from the copyboard ........... E-25
When the folder for saving is set to “FTP
Server”........................................................... E-26
Deleting image files on the FTP server.............. E-27
CB Setup and Network Setting Procedure..............E-28
CB Setup (operating the copyboard’s buttons)......... E-28
Basic setting operation .................................... E-28
Table of Function Numbers and Settings ........... E-29
Simple Network Settings (via USB).......................... E-31
Making Detailed Settings (via LAN)......................... E-33
Table of Menu Items and Access Authority
Levels ............................................................ E-33
Basic Setting Operations.................................. E-33
CB Setup........................................................ E-36
Header/Footer................................................. E-37
Network Setting .............................................. E-38
User Setting.................................................... E-39
Security Setting............................................... E-40
Disk management Setting................................ E-41
CB Information................................................ E-41
Resetting the Network Settings ........................ E-42
Creating and Registering Headers and Footers.. E-43
Meaning of Error Messages ....................................E-44
Troubleshooting .......................................................E-46
Specifications ..........................................................E-48
Appendix ..................................................................E-49
Connections and Wiring Diagram ........................... E-49

E-4
Main unit [1]
Printer* [1]
Pleaseseetheinstructionmanualoftheprinterforinforma-
tionabouttheprinteraccessories.
* Depending on the type of product you have purchased,
theprintermaybesoldseparately.
Stand [1]
Amobilestand(withcasters)forsupportingthemainunit.A
printertableandACadapterboxareincluded.Forthecon-
tents of the stand’s package and instructions on assembly,
see the stand’s instructions or the separate Assembly and
SetupManual.
Pen tray [1]
Pen tray fixing screws (M4 × 20) (temporarily fastened on
mainunit)
N-20S:3screws,N-20W:4screws
(SeetheAssemblyandSetupManualforassemblyinstruc-
tions.)
Wall mount printer table [1 set]
Bracketfixingscrews(M4×8):4
ACpoweradapterbox:1
Velcro:2sets
* Soldseparately.
Wall brackets [1 set]
These are brackets for mounting the main unit on a wall.
(SeetheAssemblyandSetupManual.)
Upperwallbrackets:2
Lowerwallbrackets:2
Mainunitfixingscrews(M3×12:2)
* Soldseparatelyforsomeproducts.
Dedicated eraser [1]
Usethistoerasethedrawing.
Copyboard Accessories
Dedicated markers
(Oneeachofblack,red,blue,andgreen)
Usethesemarkerstodrawonthesheet
surface.
AC power adapter (with power cord) [1]
Thisisthepoweradapterforsupplying powertothecopy-
board(SeePageE-49).
(LTE36E-S2-3)
USB cable (type B ↔type A) [1]
[PLUScode715258900]
Cableforconnectingthemainunittoa
computer.
Usedformakingthedevicesettings.
• Donotusethiscableforconnection
totheprinter(soldseparately).
Documents
User’s manual [1] (this manual)
Includes instructions on using the set.
Important Safety Information [1]
Includes instructions to be heeded in order to use the set
safely.
Assembly and Setup Manual
Includes instructions on installing the set and connecting it
withtheprinter(soldseparately).
Notice
Notice
• The included AC power adapter and AC power cord are
exclusively for use with this unit. Never use them with
otherproducts.
The package contents are as described below. Please check before use.
Package Contents

E-5
Frame cover
Sheet
Dedicatedmarkersareusedonthesheettodraw
diagramsandtowrite.
Control panel (See Page E-8)
Input/output terminals
(see next page)
*Locatedonthebottomsurface.
Printer table
The printer* is placed here. (See the Assembly
andSetupManual.)
*Theprinterissoldseparately.
AC adapter box
Store the AC power adapters of the copyboard
and printer here. (See the Assembly and Setup
Manual.)
Stand
This stand supports the copyboard. (See the
AssemblyandSetupManual.)
Main unit
Names of the Parts
Front
Pen tray
* Depending on the product you have purchased, the printer may be
soldseparately.
*Thisillustrationdoesnotshowtheconnectioncords.
Effective Reading Size
Theareathatcan be copied is the gray areaof
thediagram.
• Itmightnotbepossibletoprintorcopywhen
storingtoUSBmemoryorpersonalcomputer
any portions that are drawn outside of this
range.
approx. 5 mm
approx. 10 mm
approx. 10 mm
approx. 5 mm
Effective reading size
Note

E-6
LAN terminal (RJ-45)
Connect to a LAN port on the network (switching
hub,etc.)usingacommerciallyavailableLANcable.
USB memory port (type A)
Insert a commercially available USB
memory device here. Scanned images
canbesaved.(SeepageE-16)
DC input connector
ConnectthiswiththeDCplugendoftheACpower
adapter. (See Page E-10, E-49.) (Only connect the
suppliedACpoweradapter;nothingelse.)
Printer connector (USB port Type A)
Connect this with the USB connector of the printer
(SeePageE-49).
(The printer connector is dedicated for use with a
printer;useitonlywithaprinter.)
* This illustration does not show the printer or
connectioncords.
Personal computer (PC) dedicated USB
port (Type B)
ConnectthiswiththeUSBport(typeA)ofthePC.
Personalcomputer(PC)dedicatedUSBport(TypeB)
Used to connect the copyboard to a computer to
make the copyboard’s device settings. Can also be
used to copy scanned images onto the computer.
(SeepageE-20,E-31)
Theconnectorislocatedonthebottomsur-
faceofthemainunit.
Thediagramviewisseenfromthebottom.
Names of the Parts
Input/output terminals
Unlock
Lock
Caster
Locking/unlocking the stand’s casters
Afterinstallation,lockthecasterswiththestoppers.Whenmov-
ingthestand,unlockthecaster’sstoppers.
Thestoppersarelockedwhenthebottomispressed.Pressthe
toptounlockthem.

E-7
Stand
Rear frames
Mounting hole
Hook
lock-screw
lock-screws
(1) Unplug the power cord from the wall power outlet, then disconnect all the connection cords
from the main unit.
(2) Remove the locking knobs (one on each side).
(3) Change the position of the main unit support pieces.
Lift the main unit about 1 cm to unhook it.
Insert the stand’s hooks securely into in the mounting holes in the main unit’s support pieces (one on
each side).
(4) Fasten the two locking knobs (left and right) to the mount support pieces.
(5) Connect all the connection cables.
• Atleasttwopersonsshouldholdthemainunit.Ifnot,themainunitcoulddroportip,resultinginaccidentalinjury.
• Lockthestand’scastersbypressingthebottomofthecasterlockbutton.Ifnot, thestandcouldmovewhilethe
mainunitisbeingmountedorremoved,resultinginaccidentalinjury.
• Afterunpluggingthepowercordfromthewallpoweroutlet,disconnectalltheconnectioncordsfromtheset’sinput/
outputterminals.Ifthesetisremovedwithoutdisconnectingthecords,itcouldtip,resultinginaccidentalinjury.
• Ifaprinterismountedontheset,removetheprinterbeforestarting.Ifnot,thestandcouldtipwhilethemainunitis
beingmountedorremoved,resultinginaccidentalinjuryduetotheprinterdroppingortippingover.
Changing the Height of the Unit
This is the height adjustment when setting up the copyboard on the optional stand. The stand height can
be adjusted to 3 levels by 100 mm.
CAUTION
* Thisillustrationdoesnotshowtheconnectioncords.
Names of the Parts

E-8
6 Save ( ) button (USB memory storage)
Thesheetismovedby1screenandread,andtheimage
isstoredontheUSBmemorydevice.
WhenconnectedtoacomputerbyUSBcable,theimage
isstoredinthecopyboard’sinternalmemory.
7 Network button
Scrollsandscansthesheetonescreen’sworthandsaves
thedatainthefolderforsaving.
Thedataissavedeitheronthecopyboardorinafolder
ontheFTPserver,aspreviouslyset.
8 Scroll/Stop ( ) button
Scrollsthesheetonescreenportionleft,thenstopsauto-
matically. A press of this button while scrolling will stop
thescrolling.
9 USB A Memory port (USB Type A)
Saves in commercially-available USB memory images
thathavebeenreadbythecopyboard.
10 Status
These indicators notify of errors in the copyboard, USB
memorydevice,networkorprinteraccordingtowhether
they are lit or off and how they light (see table below).
When the copyboard is functioning properly, the status
indicatorsarelitgreen.(Seetablebelow)
Alsochecktheerrormessageonthedisplaywindow.
Forerrorinformationandremedies,seepageE-44.
Display
window Meaning USB indicator Printer indicator
Printer problem
Off Lit red
An unsupported printer is connected
USB Memory not recognized
Lit red Off
USB Memory storage problem
USB memory not connected
Memory is full
Warning that disconnection of USB
memory has been forgotten
Reading error
Flashing red Flashing redSystem error
Time setting error
Security protection
Off Off
Color printed prohibited
LAN cable disconnected
FTP server recognition error
FTP server connection failure
FTP server writing failure
Network or other error
Network setting reset error
Header/footer writing error
*Theletters“USB”scrollonthedisplay.
2
3
4
7
8
1
10
9
5
6
1 ON/Standby ( ) button
Turnsthecopyboard’spoweronandoff(standbymode).
2 Display window
The number of copies, operating status and error mes-
sagesaredisplayedonthe7-segmentLEDs.
3 Number of Copies/Test print button
Press this button to set the number of copies to be
printed(max.10).Thenumberofcopiesisdisplayedon
thedisplaywindow.
* “ ”isdisplayedduringtestprinting.
4 Color Print ( ) button
Thesheetismovedby1screenandread,andtheimage
is printed in color in the number of copies indicated on
thedisplaywindow.
5 B/W Print ( ) button
Thesheetismovedby1screenandread,andtheimage
isprintedinblackandwhiteinthenumberofcopiesindi-
catedonthedisplaywindow.
When pressing a button, please press the center area
(the square bulge). The button may not work if it is
pressed on a corner.
Control Panel
Names of the Parts

E-9
Operation Steps
The copyboard uses an image scanner to scan characters or diagrams drawn using special markers (four col-
ors). When the Color Print or B/W Print button is pressed, the image on the screen is printed out to the
printer. When a USB memory device or computer is connected, the image on the screen is saved as image data
when the Save button is pressed. (For the memory for computer storage, one sheet’s worth of data is
saved, overwriting previously saved data.)
Furthermore, when network settings are made, image files can be saved on the copyboard or FTP server.
Preparation
• Setupthenewlypurchasedcopyboardandconnectaprinter.
Seeaseparatemanualtitled“AssemblyandSetupManual.”
• PlugtheACpowerplugsofthecopyboardandprinterintowallpoweroutlets.SeepageE-10.
• Afterpurchase,besuretosetthecopyboard’sclock.Ifnot,theproperdateandtimewillnotbedisplayedonprints
or in image files. See page E-11.
• Whenturningonthepower,waitabout5secondsormoreafterthepowerplughasbeenconnectedbeforepressingthe
Power button.
• ThecoloroftheimageswhenprintedincolororwhensavedinUSBmemorywilldiffersomewhatfromthemarkercolors.
• Blurredcharacters,thinlines,overlappingofmarkersandotherfactorscancausecolorstodifferinplacesandcanalso
resultinportionsthatcannotbescannedsuccessfully.
• Thedatainthememoryforcomputerstorageisdeletedwhen thePower buttonisturnedoff (standbymode)orthe
connectionwiththecomputeriscut.Thedatainthememoryfornetworkstorageisnotdeleted.
Draw on the Sheet Surface
Please draw with the dedicated markers that have been
supplied.
Ifanythingotherthanthededicatedmarkersoreraserare
used,itmaybeimpossibletoerasethesheetorthesheet
couldgetdirty.
Tomovethesheetmanually,see“MovingtheSheet Sur-
faceManually”onpageE-15.
Printing
(1) SetA4orlettersizepaper.
DonotsetanythingotherthanA4orlettersizepaper.
(2) Press the ON/Standby button of the copyboard
andswitchonthepower.
(3) Switchontheprinterpower.
For instructions on operating the printer, see the
printer’soperatinginstructions.
(4) PresstheColorPrint ortheB/WPrint button.
The copyboard will move a one-screen portion of
sheet,readtheimage,andstartthecopyoperation*.
See“Printing”onPageE-13.
Saving to USB Memory
(1) PresstheON/Standby buttonofthecopyboard
toswitchonthepower.
(2) Insert USB memory into the Memory port
(USBAport)ofthecopyboard.
(3) PresstheSave button.
See“UsingUSBMemory”onPageE-16.
Saving on a computer
(1) Press the copyboard’s power ( ) button to turn
thepoweron.
(2) Connectthecopyboardtothecomputerusingthe
PCdedicatedUSBport.
(3) PresstheSave( )button.
(4) Theimageissavedonthecomputer.
Using a network (via LAN)
(1) Checkthatthecopyboard is connectedtoaLAN
portonthenetwork.
(2) Pressthecopyboard’sPower buttontoturnon
thepower.
(3) PresstheNetwork button.
See “Using the Copyboard Connected to a Net-
work”onpageE-21.
When Not Using the Copyboard
(1) Byallmeans,cleanlyerasethedrawingfromthesheetsurfacewiththededicatederaser.(Leavingthedrawingforalong
periodwillmakeithardertoerase.)
(2) PresstheON/Standby buttonofthecopyboardandswitchoffthepower(standbymode).
ThepowercannotbeswitchedoffwhiletheUSBmemoryremainsinstalled.(Thisisapreventionfunctionagainstforget-
tingtounplugtheUSBmemory.)
(3) Switchofftheprinterpower.
Note

E-10
Wall outlet
Copyboard’s AC power
adapter
Printer’s AC power
adapter
AC adaptor box
About the connection and the AC adapter box
PlacetheACpoweradaptersofthemainunitandprinterintheACadapterbox.
Ifyouonlyhaveonepoweroutlet,connecttheACpoweradaptersofthemainunitandprintertoacommer-
ciallyavailablecabletap,placethemintheACadapterbox,andconnectthecabletap’spowerplugtothewall
poweroutlet.
Also,ifnotconnectedorplacedintheACadapterbox,seetheseparate“AssemblyandSetupManual”and
connectaccordingtothepurpose.
Note
* Besuretoinsertalltheplugssecurely.
Tousethecopyboard,connectthecopyboard’sACpowerplugtoawallpoweroutlet.
Themainpowerturnson.Inthismanual,thisisreferredtoasthe“standbymode”.
ThedescriptionsinthismanualassumethattheACpowerplugisconnected(thattheunitisinthestandbymode).
About the printer’s power supply
• Whenusingaprinter,connectitspowerplugtoawallpoweroutlet.
Also,turnontheprinter’spowerbeforeprinting.
When not using the copyboard for long periods of time
DisconnecttheACpoweradapter’spowerplugfromtheACpoweroutletinthewall.
• WhentheACpoweradapter’spowerplugisunpluggedfromthepoweroutlet,placethecopyboardnearthepoweroutlet
sothatitcanbereachedeasily.
• ThesuppliedACpoweradapterandACpowercordareintendedforexclusiveusewiththisproduct.Neverusethemwith
anotherproduct.
Notice
Connecting the Power

E-11
Setting the Time
The date and time are stamped on the printing paper and recorded in the file information when files are stored
on the copyboard and FTP server, so set the copyboard’s time correctly.
The time can also be set from a computer via a network (when connected to a LAN). (See page E-36.)
Press the Power button to turn on the power.
Thedisplaywindow’sLEDslightandthepowerturnson.
Press the Number of Copies button while
pressing the Power button,thenreleasethe
Power button.
Themodeswitchesto“CBSetup”,and“F1”isdisplayedonthe
displaywindow’sLEDs.
The mode returns to the normal mode if no buttons are oper-
atedfor10seconds.
Description of Operations
1Switch to “CB Setup”.
With the power turned on, press the Number of Copies
button while pressing the Power button, then release the
Power button.
2Press the Save button and switch to “Time Setting”.
ThemodeswitcheseachtimetheSavebuttonispressed.
Contentsofsettingmodedisplayedondisplaywindow
(First2digits) (Last2digits)
Christianyear Month Day Hours Minutes
3Set the setting mode’s date and time.
WhentheColorPrint orB/WPrint buttonispressedonce,thesettingcan
bemade.
UsetheColorPrint (Increase)andB/WPrint (Decrease)buttonstoset.
4Press the Save button to enter the setting.
Thecopyboardswitchestothenextsettingposition.
Repeatsteps4and5tosetthecurrentdateandtime.
• IfthePower buttonispressedduringsteps3to5,thepartiallymadesetting
iscanceledandthedateandtimereturntothevaluessetbeforethesettingwas
started.
5Complete the setting.
WhentheSave buttonispressedaftertheminute’ssettingposition(c.6display)
hasbeenset,the“TimeSetting”iscompletedandthe[F1]display(CBSetup)reap-
pears.PressthePower buttontoreturntothenormalmode.
continued on next page
Normalmode
“CBSetup”mode
Preparations :
Connectthepowerplugtoawallpoweroutlet(AC100V).SeepageE-10.
[Example]:Settingthedateandtimeto2:16pmOctober8,2011

E-12
Setting the Time
Use the Color Print (Increase) and B/W Print
(Decrease)buttonstoselect“14”(thehours),then
press the Save button to enter.
Thedisplayswitchesto“c6”(settingofminutes).
Use the Color Print (Increase) and B/W Print
(Decrease)buttonstoselect“08”(theday),then
press the Save button to enter.
Thedisplayswitchesto“c5”(settingofhours).
Use the Color Print (Increase) and B/W Print
(Decrease)buttonstoselect“16”(theminutes),
then press the Save button to enter.
Thedisplayswitchesto“F1”(functionsetting).
Press the Power button to return to the normal
mode.
• Thecopyboardalsoreturnstothenormalmodeifyoujustwait
10seconds.
This completes the time setting.
Use the Color Print (Increase) and B/W Print
(Decrease)buttonstoselect“10”(themonth),
then press the Save button to enter.
Thedisplayswitchesto“c4”(settingofday).
Use the Color Print (Increase) and B/W Print
(Decrease) buttons to select “11” (the last 2
digitsoftheyear),thenpresstheSave button
to enter.
Thedisplayswitchesto“c3”(settingofmonth).
Press the Save button to move to the last dig-
its of the year
Thedisplayswitchesto“c2”(last2digitsofyear).
Notice:
Thefirsttwodigitsoftheyear(“20”)are fixed. Simplypressthe
Save button to switch to the last 2 digits of the year setting
position.
While“F1”isdisplayed,presstheSave button
to enter.
Thedisplayswitchesto“c1”(first2digitsofyear).
Ifnobuttonsareoperatedfor10secondswhileinthetimesetting
mode,themodereturnstothe“CBSetup”mode.
“CBSetup”mode Normalmode

E-13
Notice
Notice
Set the paper.
PleaseuseA4orlettersizeprinterpaper.
• Whenusinglettersizepaper,setlettersizepaperin
thedevicesettings.(SeepageE-29,E-36.)
1)Arrangethepaperedgessothattheyareeven.
2)Insert paper at the specified position of the paper
tray.
3)Press the paper guide gently until it touches the
paper.
Seeyourprinter’soperatinginstructionsfora
descriptionofthepaperthatcanbeused.
Switch on the power.
Pressthepowerswitch.Thepowerindicatorlights.
This completes the preparation of the printer.
PresstheColorPrint ortheB/WPrint buttononthecopyboard’s
controlpanel.Onepageworthofdataisreadandtheprintingoperation
starts.
• Depending on the printer’s specifications, some time may be
requiredforcleaningoftheprinthead.
• Depending on the printer, indicators, etc., may flash after the
poweristurneduntiltheprinterispreparedtoprint.Inthiscase,
seetheprinter’soperatinginstructionsandcheckthattheprinter
isreadybeforestartingtheprintingoperationonthecopyboard.
When finished printing...
Switchofftheprinterpowerandremovethepaper.
Closethepapertray.
• Caution:DonotturnoffthepowerordisconnecttheUSBcable
duringprinting.
Discharge tray
Paper guide
Use a printer to print out the image that has been drawn on the sheet surface. Use a PLUS-designated printer.
Operations and names of parts differ from printer to printer. For details of operations, see your printer’s operat-
ing instructions.
Preparing the Printer
Pleasecheckthatthecopyboardandtheprinterhavebeenconnected.SeePageE-49.
Paper
Power switch
Appearance of printer is for illustration
purposes.
Note
Note
Paper tray
Printing (printer sold separately)

E-14
Prepare the printer. (See the previous page.)
• When turning on the power, wait about 5 seconds or more after the
powerplughasbeenconnectedbeforepressingthePower button.
• PresstheON/Standby buttontoswitchonthepower.TheLEDofthe
displaywindowwilllight.
• Turnonthecopyboard’spowerbeforeturningontheprinter’spower.
Note
Press the ON/Standby button and switch on the power.
Press the Scroll/Stop button and display the sheet sur-
face you want to print.
ApressoftheScroll/Stop buttonscrollsthesheetsurfaceonescreenportion
leftandautomaticallystopsit.
Tostoptheoperationpartwaythrough,presstheScrol/Stop buttonagain.
Note
Note
Press the Number of Copies button and select the
number of copies.
Basic Printing Operation
• Theone-screenthatisvisibleisprintableposition.
• Tofine-adjustthesheetsurfaceposition,withthesheetstopped,move
thesheetslowlybyhand.Thesheetcanbemovedeithertotheleftorto
theright.
• Printing of the portion located around the sheet surface might not be
possible.Pleasesee“Effectivereadingsize”onPageE-5.
• “01”isselectedwhenthepoweristurnedon.
• Upto10copiescanbespecifiedanddisplayedonthedisplaywindow.
• Thenumberofcopiesincreasesby1eachtimetheNumberofCopies
buttonispressed,and“ ”isdisplayedafter“10”(thisisusedfortest
printing:seepageE-47).Whenthebuttonispressedagain,thedisplay
switchesto“01”.Thenumberswitchescontinuouslyifthebuttonisheld
in.
• Aftersettingthenumberofcopies,proceedtostep4within1minute.
Thenumberofcopiesisresetto“01”ifnooperationisperformedwithin
1minute.
Preparation:
Preparation: Check that the AC power plugs of the copyboard and printer are
connectedtowallpoweroutlets.SeePageE-10.
Printing

E-15
Printing
Note
• When the Erase Reminder function is set to “Enable”, the Erase
Reminder function may not operate properly if the sheet surface is
movedbyhand.
Press the Color Print or the B/W Print button to print.
Note
• Thereadingoperationisperformedforaone-sheetportion(whilethesheetisscrolled)andtheprintingoperationis
performed.
Cancellation of the print operation in progress
WhentheON/Standby buttonispressed,thereadingofthesheetstops,andthepartiallyreadimagedataisprinted.
Waituntilthesheetisexpelledfromtheprinter.
or
Note
• Switchofftheprinterpower.
• WhentheEraseReminderfunctionissetto“Enable”
When the ON/Standby button is pressed, the display window and all the indicators flash
simultaneously, the sheet automatically moves to the surface that is not yet erased and the
powerturnsoff.TosettheEraseReminderfunctionto“Disable”,seepageE-30,E-36.
*TheEraseReminderfunctionmaynotworkproperlyduetodirtonthesheet'sadhesivesec-
tionsormarkerresidue.
• Ifnobuttonisoperatedwithin30minutes,thepowerturnsoffautomatically(autopoweroff).
Whenthepoweristurnedoff,scannedimagesstoredintheunit’sinternalmemoryarecleared.
• TheautopowerofffunctioniscanceledwhenthecopyboardandcomputerareconnectedbyUSBcable.
• IftheON/Standby buttonispressedwhilethesheetsurfaceisbeingread,printingisinterruptedandonlypart
oftheimagewillbeprinted.
Tomovethesheetsurface,waituntilscrollingstops,thenpresstheScroll/Stop button.
• Theone-screenportionisreducedtoA4papersizeandprinted.
For wide type copyboards (model N-20W), the image is compressed about 75% in the horizontal direction. To
printwiththesameproportionsastheimageonthesheetsurface,see“MakingtheDeviceSettings”(pageE-36).
• Aflashing“ ”inthedisplaywindowindicatesaprinterror.See“MeaningofErrorMessages”onPageE-44.
• Whenprinting,atimestamp(dateandtime)isprintedatthetoprightofthesheet.See“MakingtheCopyboard
Settings”(“CBSetup”)onpageE-29,E-36.
Whenthecopyboardisnotgoingtobeused,presstheON/Standby button and switch
off the power (standby mode).
Notice
Moving the sheet surface manually
The sheet can be moved even when the power of the copyboard is
switchedoff.
Thesheetcanbemovedwithyourhandeitherinleftorright.Pleaseplace
yourhandattheverticalcenterandmovethesheetslowly.
• Quickmovementcancausedamagetothedrivemechanismofthe
copyboard.

E-16
• NoUSBflashmemorydeviceisincluded.WhenpurchasingaUSBflashmemorydevice,payattentiontothefollowing:
1.USBflashmemorydevicesformattedinFAT16/FAT32aresupported.USBflashmemorydevicesinNTFSformatcannot
beused.
2.USBflashmemorydevicesprotectedbyasecurityfunctioncannotbeused.
3.USBflashmemorydeviceswithacapacityofover32GBcannotbeused.
4.IftheUSBflashmemorydeviceisdividedintomultiplepartitions,onlyonepartitioncanberecognizedwiththisunit.
Using USB Memory
The content of what has been drawn on the sheet surface of the copyboard can be saved in USB memory.
Later, the saved image can be read into a personal computer and made into a document of the proceedings of
the meeting, or affixed to a document.
Notice
USB Memory Storage Procedure
Preparation:
Checkthatthecopyboard’sACpowerplugisconnectedtoawallpoweroutlet. SeepageE-10.
• Checktheside(polarity)oftheUSB
memory device before inserting it.
Forcing it in the reverse orientation
willdamagetheUSBAMemoryport
orUSBmemorydevice.
• BecarefulnottobumpintotheUSB
memory device with hand or body
whileitis mounted. Doingsocould
damagetheUSBmemorydeviceor
USBAMemoryport.
Notice
Press the ON/Standby button and switch on the power.
• Whenturningonthepower,waitabout5secondsormoreafterthepower
plughasbeenconnectedbeforepressingthePowerbutton.
• PresstheON/Standby buttontoswitchonthepower.TheLEDofthe
displaywindowwilllight.
Note
Insert the USB memory device into the USB A Memory
port of the copyboard.
Theprocedurefordisplayingthesheetsurfaceyouwanttostoreisthesameas
forprinting.
See“BasicPrintingOperation”onpageE-14.
Press the Scroll/Stop button and display the sheet sur-
face you want to store.
• TheonescreenportionthatisviewablewillbesavedinUSBmemory.
• Savingoftheportionlocatedaroundthesheetsurfacemightnotbepos-
sible.Pleasesee“Effectivereadingsize”onPageE-5.
Note

E-17
Using USB Memory
• DependingontheUSBmemory,itmaytaketimeforrecognitionoritmaytaketimeforsaving.
• WhenthePower buttonispressedduringthereadingoperation,thereadingoperationwillbediscontinuedand
thepartiallyreadimagedatawillbestoredintheUSBmemory.
Tomovethesheetsurface,waituntilscrollingstops,thenpresstheScroll/Stop button.
• Thedateandtimeofthesavedfilewillreflectthecopyboardtimesetting.See“CBSetup”onPageE-36.
• WhenacertainamountoffreecapacityisnotavailableintheUSBmemory,“FL”willbedisplayedwhentheSave
buttonispressed.Deletedata,setthesheetsurfacebacktotheoriginalstatus,thenpresstheSave button
again.
• WhenthecopyboardandacomputerareconnectedbyUSBcable,thedataisstoredinthemainunit’sinternal
memory.
The (5 second) flashing “US” display indicates that the USB memory has not been inserted. Please
insert the USB memory and then press the Save button.
A (5 second) flashing “FL” display indicates that there is insufficient free capacity to permit storage
in USB memory. Replace with a USB memory device having sufficient capacity.
See “Meaning of Error Messages” on Page E-44 for other error displays.
• Thereadingoperationisperformedforaone-sheetportion(whilethesheetisscrolled)andUSBmemorystor-
age starts after the scrolling completes.
Flashing indicator “rotates” sequentially during USB memo-
ry storage operation.
Display window
Note
Press the Save button to store.
Notice
Removing the USB memory
Checkthattheflashingrotationofthedisplaywindowhaschangedtosteady
lightingandthattheUSBmemoryaccessindicatorisnotflashing,thenpullthe
USBmemorystraightout.(PleaseseeyourUSBmemorymanualfordetails.)
• DonotunplugtheUSBmemorydeviceduringtheUSBmemorystorage
operation (i.e., during the rotating, flashing display in the display win-
dow),orwhiletheaccessindicatoroftheUSBmemorydeviceisflashing
becausedatawillbedestroyed.
Whenthecopyboardisnotgoingtobeused,presstheON/Standby button and switch off
the power (standby mode).
• “ ”lettersappearingatone-secondintervalsinamovingdisplayinthedisplaywindowindicatethataUSB
memorydeviceismounted.UnpluggingtheUSBmemorydevicewillswitchoffthepower.(Afunctionthatserves
asaremindertounplugtheUSBmemorydevice)
• WhenthecopyboardandacomputerareconnectedbyUSBcable,theautopowerofffunction(whichturnsthe
poweroffautomatically)iscanceled.
• ScannedimagefilesstoredinthememoryforcomputerstoragearedeletedwhenthePower buttonisturned
off.Filesinthememoryfornetworkstoragearenotdeleted.
Note

E-18
Plug the USB memory device into a USB port of
the personal computer
When connecting to the personal computer for the first
time, the installation of a USB driver is required. Fol-
low the instructions manual of the USB memory device
that you are using.
• Usually, with Windows XP/Windows Vista/Windows 7, the
standard driver is installed automatically and the copyboard
isidentifiedas“Removabledisk”in“MyComputer”(or“Com-
puter”).
Using USB Memory
Saving Image Files on a Computer/Deleting Image Files
Examples of operations follow for saving the image files in the USB memory device to the hard disk of the per-
sonal computer, and for deleting the folder when the USB memory capacity is full. (There are various methods
that can be used for saving and deleting including the use of Explorer.) See the instruction manual of your per-
sonal computer or the software that you are using for information about using a personal computer.
The name of the folder on the USB memory device is “CB_Image”. Image files are stored in this folder.
By factory setting upon purchase, image files are named “PV-xxx.jpg” (JPEG files), where “xxx” refers to a
3-digit number starting from 001 (ex.: PV-001.jpg).
Images can be stored in JPEG, PNG or PDF format, selectable in the copyboard settings (“CB Setup”). (See
pages E-29 and E-36.)
Drag to My Documents
Saving the image files of a USB memory
device to a personal computer
1. Open “My Computer (or “Computer”)”
andfromwithin,openthedriveofthe
connected USB memory device.
The folder named “CB_Image” is the saved data of
thecopyboard.
2. Store the “CB_Image” folder in “My
Documents” or another location.
All of the data contained in “CB_Image” will be
stored.
• Depending on the computer’s usage environment,
theseoperationsmay notwork properly.This could
bethecaseforexample:
• whenseveralUSBdevicesareconnectedsimulta-
neouslytothecomputer.
• whentheUSBdeviceisconnectedtoaUSBhub
orwhenitisconnectedusinganextensioncable.
Notice

E-19
Deleting USB memory image files with the com-
puter
Beforedeletingimportantimagefiles, besuretosave
them on the computer (as a data backup).
1. Open “My Computer (or “Computer”)” and
then open the drive icon which shows USB
memory.
Thefoldernamed“CB_Image”contains the memory stor-
agedataofthecopy-board.
2. Place the “CB_Image” folder in the “Recy-
cleBin”,rightclickontheiconandselect
“Empty Recycle Bin” from the pull-down
menu.
Allofthedatacontainedin“CB_Image”willbedeleted.
Even when the entire folder is deleted, a new CB_Image
folder will be created automatically when USB memory is
usedagainwiththecopyboard. Drag to the Recycle Bin
Disconnect the USB memory
The disconnecting procedure depends on the computer’s
operatingsystem.Fordetails,refertothecomputer’soperating
instructionsorhelpfiles.
1. Click the [Hardware Removal] icon that is
displayed in the task tray.
Click“StopUSBMassstorage Device - drive(E)”.(TheE
drivecharacterwilldifferdependingon thepersonalcom-
putersystem.)
2. When the “USB mass storage device can be
safelyremoved.”screenisdisplayed,click
the display.
3. Click [X] to close.
ThisallowstheUSBmemorydevicetobeunpluggedfrom
thecomputer.
• DonotdisconnecttheUSBmemorydevicewhiletheUSB
memorydevice’saccessindicatorisflashing.Doingsowill
damagethedata.
• The USB drive may not be disconnected properly, for
exampleifthecomputerisintheprocessofcheckingthe
statusofperipherals.
“Remove hardware” icon (example)
Note
Using USB Memory

E-20
Notice
• Onlyonescreen’sworthofdatacanbestoredinthecopyboard’smemoryforcomputerstorage.
Whenthecopyboard’ssaveoperationisperformedsuccessively,previousdataisoverwritten.
• WhentheoperationfordisconnectingtheUSBmemoryconnection betweenthecopyboardandcomputerisperformed,
thedatainthememoryforcomputerstorageisdeleted.
• Donotstorecomputerdatainthecopyboard’smemoryforcomputerstorage.
• Thememoryforcomputerstoragecannotbeformattedfromacomputer.
• DonotdisconnecttheUSBcableoraccessthecopyboardwhiledataisbeingsavedafterpressingthecopyboard’sSave
button.Doingsowillcausethecomputer’soperationtobecomeunstable.
• Donotpressoperationbuttonsonthecopyboardwhilethecopyboard’smemoryforcomputerstorageisbeingaccessed
fromthecomputer.Doingsowillresultinincreasedtimeforresponsebetweenthecomputerandcopyboard,andopera-
tionsmaynotbepossible.
Turn on the copyboard’s power and connect the PC
dedicated USB port (type B) and computer using the
USB cable.
• Usually,withWindowsXP/WindowsVista/Windows7,thestandard
driverisinstalledautomaticallyandthecopyboard is identifiedby
thecomputerasaremovabledevice.
When the copyboard and a computer are connected by USB cable, the copyboard is recognized as an exter-
nal memory device (removable device). Below is the procedure for copying the “CBImage” file from this device
onto the computer.
Images can be stored in JPEG (.jpg), PNG (.png) or PDF (.pdf) format, selectable in the copyboard settings (“CB
Setup”). (See pages E-29 and E-36.) The factory default is “JPEG”.
Using the copyboard connected to a computer
Drag to My Documents
USB cable
included with
copyboard
To PC dedicated
USB port (type B)
To computer’s USB
port (type A)
Onthecomputer,open“MyComputer”,andfrom
there open the copyboard identified as a remov-
able device.
(1) Double-clickthe“MyComputer”(or“Computer”)icontoopen
it.
(2) When the device icon for the copyboard (displayed as a
removable disk) is double-clicked, the copyboard’s internal
memoryopens.
The“CBImage”fileisthescannedimagefile(“.jpg”,“.png”or
“.pdf”,accordingtosetting).
• The“setup”foldercontainsthesimplenetworksettingsfile.
(3) Copy the “CBImage” file to [My Documents], etc., on the
computer(“.jpg”,“.png”or“.pdf”,accordingtosetting).
To disconnect the USB cable, follow the procedure in step 3 on
thepreviouspage.
• Onesheet’sworthofthescreenisscanned(scrolled)andstor-
ing in the memory for computer storage starts once scrolling
stops.
TheLEDsonthedisplaywindowflashinacircularmotiondur-
ingsavinginthememoryforcomputerstorage.
LEDs flash in circular motion
during saving in memory for
computerstorage
Displaywindow
Press the Save button to store.
Other manuals for N-20S
3
This manual suits for next models
1
Table of contents
Other Plus Interactive Whiteboard manuals
Popular Interactive Whiteboard manuals by other brands

Panasonic
Panasonic UB-5335 brochure

Returnstar Interactive Tech
Returnstar Interactive Tech IQBoard DVT V7.0 user manual

Ricoh
Ricoh D8400 operating instructions

promethean
promethean ActivBoard Touch Quick install guide

Hitachi Solutions
Hitachi Solutions StarBoard FX-E90W user guide

BenQ
BenQ RP6501K user manual