Plus N-32S User manual

Copyboard
(Network board)
N-32S/N-32W/N-324
User’s Manual
Thank you for your purchase of the PLUS Copyboard.
Please read this User’s Manual carefully before use to take full advan-
tage of the functions of this product. After you have finished reading
the manual, please keep it for future reference.

E-2
Introduction
This manual is for the network board (model name: N-32S/N-32W/N-324).
• Themodelsarecategorizedintodifferenttypes.
Model Type
N-32S Standard size for two screens
N-32W Wide size for two screens
N-324 Standard size for four screens
ThedescriptionsanddiagramsinthismanualrefertothemodelN-32S.
Forusinganetwork,referto“N-32SeriesNetworkManual”.
* Whenfunctionsoroperationsarespecifictoacertainmodelofnetworkboard,themodelnameisspeci-
fied.
NOTE
• UseonlythepowercordandACpoweradaptersuppliedwiththenetworkboard.
ThesuppliedpowercordandACpoweradaptercannotbeusedwithotherproducts.
• Youwillbepunishedformerelyowningillegalcopies.
• Donotuseruledtypetapes.
Donotmovethesheetwithtape,etc.,attachedtoit.Doingsocouldresultinmalfunction.
• Donotattachanypaperonthesheet.
Donotcopywhilefilm-typeobjectsorpapersareattachtothesheet.Doingsocouldresultinmalfunction.
Trademarksandcopyrights
• MicrosoftandWindowsareregisteredtrademarksortrademarksintheUnitedStatesandothercountriesoftheMicrosoftCor-
poration.
• AdobeandAdobeAcrobatReaderaretrademarksofAdobeSystemsIncorporated.
• Safari,Apple,MacOSandMacintosharetrademarksorregisteredtrademarkofAppleComputer,Inc.,oftheUnitedStates.
• MifareisaregisteredtrademarkofNXPSemiconductors.
• FeliCaisaregisteredtrademarkofSonyCorporation.
• ThecopyrightofCyaSSLbelongstowolfSSLInc.
Thetrademarksofthevariouscompaniesandtheproducttrademarks,evenwhennotwrittendown,willbegivenduerespect.
Productnamesandcompanynamesappearinginthismanualareregisteredtrademarksortrademarksoftherespectivecompa-
nies.
(1) Thecontentsofthismanualmaynotbereprintedinpartorwholewithoutpermission.
(2) Thecontentsofthismanualaresubjecttochangewithoutnotice.
(3) Greatcarehasbeentakeninthecreationofthismanual;however,shouldanyquestionablepoints,errors,oromissionsbe
apparent,pleasecontactus.
(4) NotwithstandingSection(3),thiscompanywillnotberesponsibleforanyclaimsoflossorprofitorothermattersdeemedto
betheresultofusingthisunit.
(5) SinceprinterconnectedwiththenetworkboardisbasedontheuseasaperipheraldeviceforthePLUSnetworkboard,we
donotwarrantdirectconnectionwithacomputer.
(6) Manualswithincorrectcollatingormissingpageswillbereplaced.

E-3
TableofContents
MeaningoftheTermsUsedinthisManual
• Mainunit(orset):Thisreferstothenetworkboard.
• USBmemory: referstoUSBflashmemory.
• USBmemorystorage: meansthesavingofsheetsurfacedatausingMEMORY(i.e.,theUSBport)oftheoperationpanel.
• Memoryforcomputerstorage: indicatesatemporarysavinglocationoftheimagethathasbeenread.
• “copy”: Both“print”and“USBmemorysaving”meanto“copy.”
• “Sheetsurface”: refertothedrawingportion.
• “Scroll”or“move”: indicatesfeedingofthesheet
• Network: The communications network on which devices are interconnected in net fashion for communication (exchange of
data)betweenthedevices.Forthisnetworkboard,the“network”indicatestheLANbelow.
• LAN(LocalAreaNetwork):Aclosedcommunicationsnetworkforcommunicatingwithinarestrictedarea,suchaswithinacom-
pany.
• FTP(FileTransferProtocol):Theprotocol(communicationsrules)usedwhentransferringfilesonaTCP/IPnetwork.
• SMTP(SimpleMailTransferProtocol):Thisistheprotocolusedwhentransferringe-mailonTCP/IPnetworks.
• LDAP(LightweightDirectoryAccessProtocol):Thisistheprotocolforaccessingtheservicethatcentrallymanagesinformation
onnetworkusersonTCP/IP networks(thedirectoryservice).
Introduction ...............................................................E-2
Package Contents......................................................E-4
Names of the Parts ....................................................E-5
Front ...................................................................... E-5
Input/output terminals ............................................. E-6
Changing the Height of the Unit................................ E-7
Control Panel.......................................................... E-8
Keypad panel.......................................................... E-9
Functions of the Network board .............................E-10
Printing Functions ................................................. E-10
Saving Functions................................................... E-11
Operation Steps .......................................................E-12
Setting the Time.......................................................E-13
Printing (printer sold separately)............................E-15
Preparing the Printer ............................................. E-15
Preparing the Printer connected to a Network ......... E-15
Basic Printing Operation ........................................ E-16
Moving the sheet surface manually ........................ E-18
Printing Thumbnails............................................... E-18
Consecutive Printing.............................................. E-19
Changing Printing Color......................................... E-19
Using USB Memory ..................................................E-20
USB Memory Storage Procedure ............................ E-20
Using the network board connected to a
computer..................................................................E-22
CB Setup (Operating the Network Board’s
Buttons)....................................................................E-24
Basic setting operation .......................................... E-24
Table of Function Numbers and Settings................. E-25
Meaning of Error Messages ....................................E-27
Troubleshooting .......................................................E-29
Scanning Adjustment (White Calibration) ..............E-31
Specifications ..........................................................E-32
Appendix ..................................................................E-33
Connections and Wiring Diagram ........................... E-33

E-4
The package contents are as described below. Please check before use.
PackageContents
Mainunit[1]
Printer*[1]
Pleaseseetheinstructionmanualoftheprinterforinforma-
tionabouttheprinteraccessories.
Stand* [1]
A mobile stand (with casters) for supporting the main unit.
For the contents of the stand’s package and instructions
on assembly, see the stand’s instructions or the separate
AssemblyandSetupManual.
*Depending on the type of product you have purchased,
maybesoldseparately.
Pentray[1]
Pen tray fixing screws (M4 × 20) (temporarily fastened on
mainunit)
N-32S/N-324:3screws,N-32W:4screws
(SeetheAssemblyandSetupManualforassemblyinstruc-
tions.)
Wallmountprintertable[1set]
Bracketfixingscrews(M4×8):4
ACpoweradapterbox:1
Velcro:2sets
Wallbrackets[1set]
These are brackets for mounting the main unit on a wall.
(SeetheAssemblyandSetupManual.)
Upperwallbrackets:2
Lowerwallbrackets:2
Mainunitfixingscrews(M4×12:2)
NetworkboardAccessories
Dedicatedmarkers
(One each of black, red, blue, and
green)
Use these markers to draw on the
sheetsurface.
Dedicatederaser[1](Replacementsponge[2])
Usethistoerasethedrawing.
The eraser has four sides which
can be rotated to renew the eraser.
Afterusingupthefoursides,replace
the eraser with one of the supplied
sponges.
ACpoweradapter(withpowercord2.5m)[1]
Thisisthepoweradapterforsupply-
ingpowertothenetworkboard(See
PageE-33).
Model:LTE36ES-S2-3
Manufacturer:LiToneElectronicsCo.,Ltd.
Notice
• TheincludedACpoweradapterandACpowercord
areexclusivelyforusewiththisunit.Neverusethem
withotherproducts.
ICcard[1]
UseforsavingscanneddataonFTP
server.
USBcable(typeB↔typeA)[1]
[PLUScode715258900]
Cableforconnectingthemainunitto
acomputer.
Usedformakingthedevicesettings.
Notice
• Donotusethiscableforconnectiontotheprinter.
Documents
QuickGuide[1]
Briefexplanationonoperation.
AssemblyandSetupManual[1]
Includesinstructionson installing the set and connectingit
withtheprinter(soldseparately).
ImportantSafetyInformation[1]
Includes instructions to be heeded in order to use the set
safely.

E-5
NamesoftheParts
Framecover
Sheet
Dedicatedmarkersareusedonthesheettodraw
diagramsandtowrite.
Controlpanel(SeePageE-8)
NFCpanel(SeePageE-9)
Input/outputterminals(seenext
page)
*Locatedonthebottomsurface.
Printertable
The printer* is placed here. (See the Assembly
andSetupManual.)
*Theprinterissoldseparately.
ACadapterbox
Store the AC power adapters of the network
board and printer here. (See the Assembly and
SetupManual.)
Stand
Thisstandsupportsthenetworkboard.(Seethe
AssemblyandSetupManual.)
Mainunit
Pentray
* Dependingontheproductyouhavepurchased,theprintermaybe
soldseparately.
* Thisillustrationdoesnotshowtheconnectioncords.
EffectiveReadingSize
The area that can be scanned is the gray area of the dia-
gram.
Note
• Itmightnotbepossibletoprintorcopywhenstoring
to USB memory or personal computer any portions
thataredrawnoutsideofthisrange.
approx.5mm
approx.10mm
approx.10mm
approx.5mm
Effectivereadingsize
Front

E-6
LANterminal(RJ-45)
ConnectacommerciallyavailableLANcable.
USBmemoryport(typeA)
Connect a commercially available USB
memorydevice.Scannedimagescanbe
saved.(SeepageE-20)
DCinputconnector
Connectthiswith theDCplugendoftheACpower
adapter.(SeePageE-33.)(Onlyconnectthesupplied
ACpoweradapter;nothingelse.)
Printerconnector(USBportTypeA)
Connect this with the USB connector of the printer
(SeePageE-33).
(The printer connector is dedicated for use with a
printer;useitonlywithaprinter.)
* This illustration does not show the printer or
connectioncords.
Personalcomputer(PC)dedicatedUSB
port(TypeB)
ConnectthiswiththeUSBport(typeA)ofthePC.
Used to do the Simple Network Settings for this
product.(Refertotheseparate“N-32SeriesNetwork
Manual”.)Canalsobeusedtocopyscannedimages
ontothecomputer.(SeepageE-22.)
Theconnectorislocatedonthebottomsur-
faceofthemainunit.
Thediagramviewisseenfromthebottom.
NamesoftheParts
Unlock
Lock
Caster
Locking/unlockingthestand’scasters
After installation, lock the casters with the stoppers. When
movingthestand,unlockthecaster’sstoppers.
Thestoppersarelockedwhenthebottomispressed.Press
thetoptounlockthem.
Input/outputterminals

E-7
NamesoftheParts
(1) Unplug the power cord from the wall power outlet, then disconnect all the connection cords from
the main unit.
(2) Remove the locking knobs (one on each side).
(3) Change the position of the main unit support pieces.
Lift the main unit about 1 cm to unhook it.
Insert the stand’s hooks securely into in the mounting holes in the main unit’s support pieces (one on
each side).
(4) Fasten the two locking knobs (left and right) to the mount support pieces.
(5) Connect all the connection cables.
ChangingtheHeightoftheUnit
This is the height adjustment when setting up the network board on the optional stand. The stand height
can be adjusted to 3 levels by 100 mm.
* Thisillustrationdoesnotshowtheconnectioncords.
Mountinghole
Hook
Lock-screw
Rearframes
Lock-screws
Stand
CAUTION
• Atleasttwopersonsshouldholdthemainunit.Ifnot,themainunitcoulddroportip,resultinginaccidentalinjury.
• Lockthestand’scastersbypressingthebottomofthecasterlockbutton.Ifnot,thestandcouldmovewhilethemain
unitisbeingmountedorremoved,resultinginaccidentalinjury.
• Afterunpluggingthepowercordfromthewallpoweroutlet,disconnectalltheconnectioncordsfromtheset’sinput/
outputterminals.Ifthesetisremovedwithoutdisconnectingthecords,itcouldtip,resultinginaccidentalinjury.
• Ifaprinterismountedontheset,removetheprinterbeforestarting.Ifnot,thestandcouldtipwhilethemainunitis
beingmountedorremoved,resultinginaccidentalinjuryduetotheprinterdroppingortippingover.

E-8
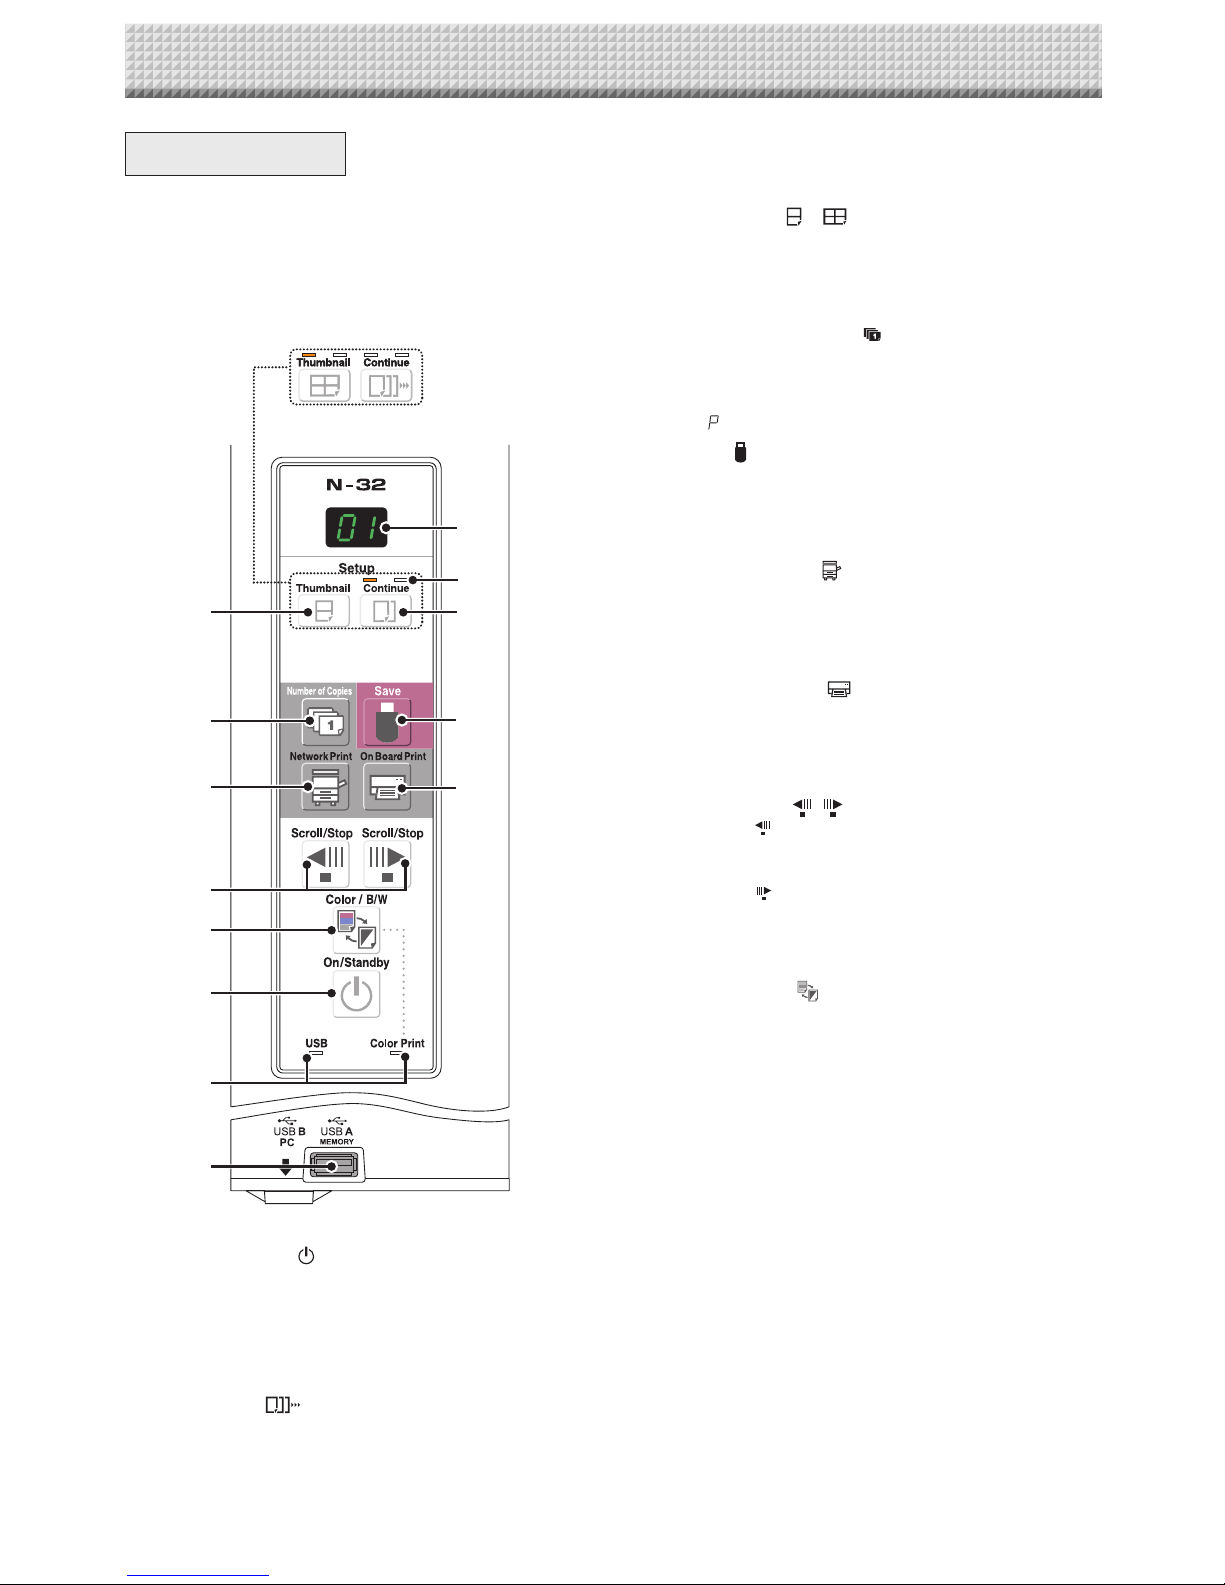
4 Consecutiveprintingnumberindicators
These light yellow to indicate the number of screens
selectedwiththeconsecutivebutton.
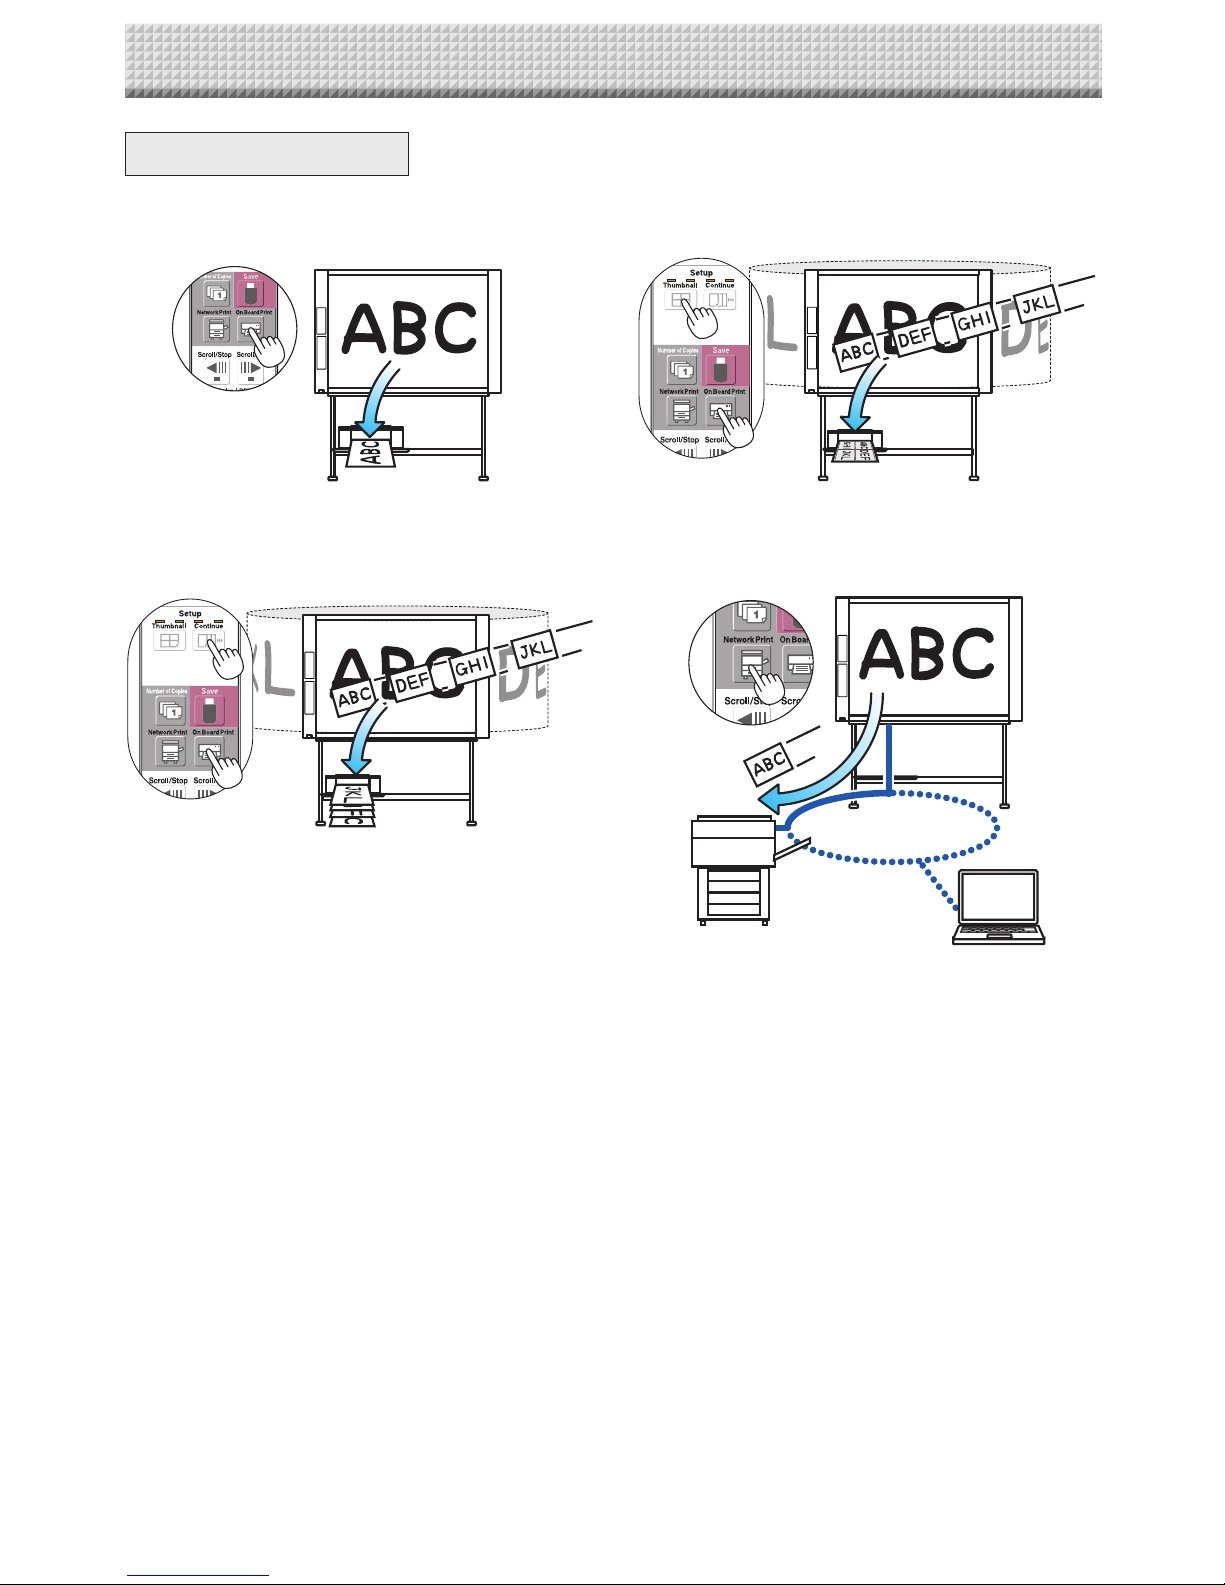
5 Thumbnail( )( onN-324)button
Usedtoselect the layout for printing thumbnails of mul-
tiplescreensonasinglepage.
The selected layout is indicated on the display window.
(PageE-18,“PrintingThumbnails”)
6 NumberofCopies( )/Testprintbutton
Press this button to set the number of copies to be
printed(max. 10).Thenumber ofcopiesis displayed on
thedisplaywindow.
* “ ”isdisplayedduringtestprinting.
7 Save( )button(USBmemorystorage)
Thesheetismovedby1screenandread,andtheimage
isstoredontheUSBmemorydevice.
WhenconnectedtoacomputerbyUSBcable,theimage
isstoredinthenetworkboard’sinternalmemory.
8 NetworkPrint( )button
Thesheetismovedby1screenandread,andtheimage
isprintedouttothenetworkprinteronthesamenetwork.
Thenumberofcopiesisdisplayedonthedisplaywindow.
* FTPsupportedprinter
9 OnBoardPrint( )button
Thesheetismovedby1screenandread,andtheimage
is printed out to the printer connected with the network
board.
Thenumberofcopiesisdisplayedonthedisplaywindow.
10 Scroll/Stop( )button
When the button is pressed, the sheet scrolls one
screen’s worth to the left (to the next screen) and stops
automatically.
When the button is pressed, the sheet scrolls one
screen’s worth to the right (to the previous screen) and
stopsautomatically.
Whenpressedduringscrolling,scrollingstops.
11 Color/B/W( )button
Changesprintcolor(Color/Monochrome).
SelectionstatusisshownaccordingtowhethertheColor
Printstatusindicatorislitoroffandhowitlights.
Color:Greensteadylight
Monochrome:Off
12 USBAMemoryport(USBTypeA)
Saves in commercially-available USB memory images
thathavebeenreadbythenetworkboard.
The USB status indicator lights green when the USB
memorydeviceisrecognized.
13 Status
Connectionsetting statusis shownbyturningon/offthe
indicator.
Fordetails,seepagesE-25andE-26.
ControlPanel
The control panel of the drawing refers to Model
N-32S/N-32W.
When pressing a button, please press the center area
(the square bulge). The button may not work if it is
pressed on a corner.
DisplayofmodelnameN-324
5
2
4
3
7
9
6
8
10
11
1
13
12
1 ON/Standby( )button
Turns the network board’s power on and off (standby
mode).
2 Displaywindow
The number of copies, operating status and error mes-
sagesaredisplayedonthe7-segmentLEDs.
3 Continue( )button
Used to select the number of screens when printing or
storingmultiplescreensconsecutively.
Model:N-32S/N-32W(singleanddoublescreens)
Model:N-324(onetofourscreens)
NamesoftheParts

E-9
NamesoftheParts
NFCpanel
When pressing the button, press the center area (the square
bulge).Thebuttonmaynotworkifitispressedonacorner.
1 ICcardread/writepart
TouchtheICcardhere.
Performs reading of IC cards or writing onto dedicated
ICcards.
Touch the touch mark with the IC card. Touching other
placesthanthetouchmarkmaycauseanerror.
2 Cancelbutton
Cancels successive transmission standby countdown
anddeletesthescanneddata.
3 ICCardindicator
Shows status of read/write to the IC card according to
whetheritislitoroffandhowitlights.
ICCardindicator StatusofICcard
Litgreen AcceptICcard
• Turning on the power lights
green.
Flashinggreen PreparingforwritingtoICcard
Litred IC card error in read/write (3 sec-
onds)
Off NotacceptICcard
Theindicatorlightsoffinthefollow-
ingcondition:
• “NetworkSetting”isnotdone.
• “Network Storage” in “Security
Setting”issetto“Invalid”.
• Inoperation
1
3
2
4
4 ScannedDataindicator
This indicates that scanned data is being held in the
memory.Ifso,theindicatorlightsgreen.

E-10
FunctionsoftheNetworkboard
PrintingFunctions
① Printing ② Printingthumbnailsofmultiplescreenson
asinglepage
Outputtopaper Printingofthumbnailsonsinglepage
③ Printingorstoringmultiplescreenscon-
secutively
④ Printtothenetworkprinter.
Consecutiveprintingorstoring,onescreen
atatime
LAN
FTPsupportedprinter
* Printingofthumbnailsof2screensandconsecutiveonModelN-32S/N-32W.

E-11
FunctionsoftheNetworkboard
01 02 99
LAN
Employee ID Card
Registeredemailsddress
FTPserver
Savelocation
SMTPserver
Blip!
SavingFunctions
⑤ StoringonUSBmemorydevices ⑥ Capturingimagesonacomputer
StoringonUSB
memorydevice
⑦ UsingthededicatedICCardtostoreimag-
esonaspecificfolderonanFTPserver.
⑧ SendsmailwithattachedimagesusingIC
cards(employeeIDcards,etc.),orsavesit
inanindividualfolderontheFTPserver.
Storingofimageoncomputer
LAN
01 02 99
Savelocation
Blip!
FTPserver
Viewing

E-12
DrawontheSheetSurface
Please draw with the dedicated markers that have been
supplied.
Ifanythingotherthanthededicatedmarkersoreraser are
used,itmaybeimpossibletoerasethesheetorthesheet
couldgetdirty.
Tomovethesheetmanually,see“Movingthesheetsurface
manually”onpageE-18.
Printing
(1) SetA4orlettersizepaper.
Do not set anything other
thanA4orlettersizepaper.
(2) Press the ON/Standby
buttonofthenetworkboardandswitchonthepower.
(3) Switchontheprinterpower.
For instructions on operating the printer, see the
printer’soperatinginstructions.
(4) PresstheNetworkPrint* ortheOnBoardPrint
button. The network board will move a one-screen
portion of sheet, read the image, and start the copy
operation.See“Printing”onPageE-15.
* To use a network printer, Network Setting is
required.
SavingtoUSBMemory
(1) PresstheON/Standby buttonof
thenetworkboardtoswitchonthe
power.
(2) InsertUSBmemoryintotheMemory port(USBA
port)ofthenetworkboard.
(3) PresstheSave button.
See“UsingUSBMemory”onPageE-20.
Savingonacomputer
(1) Pressthenetworkboard’sON/Standby( )buttonto
turnthepoweron.
(2) Connectthenetworkboardtothecomputerusingthe
PCdedicatedUSBport.
(3) PresstheSave( )button.
(4) Theimageissavedonthecomputer.
OperationSteps
The network board uses an image scanner to scan characters or diagrams drawn using special markers (four
colors). The image can be printed out to the printer and be stored on a USB memory device or a computer.
When connected to a network, completing the network settings makes it possible to transfer image files by
e-mail, save them on the FTP server or print them on a network printer.
To use a network, refer to the separate “N-32 Series Network Manual”.
Preparation
• Setupthenewlypurchasednetworkboardandconnectaprinter.
Seeaseparatemanualtitled“AssemblyandSetupManual.”
• PlugtheACpowerplugsofthenetworkboardandprinterintowallpoweroutlets.
• Afterpurchase,besuretosetthenetworkboard’sclock.Ifnot,theproperdateandtimewillnotbedisplayedon
printsorinimagefiles.SeepageE-13.
WhenNotUsingtheNetworkboard
(1) Byallmeans,cleanlyerasethedrawingfromthesheetsurfacewiththededicatederaser.(Leavingthedrawingforalong
periodwillmakeithardertoerase.)
(2) PresstheON/Standby buttonofthenetworkboardandswitchoffthepower(standbymode).
ThepowercannotbeswitchedoffwhiletheUSBmemoryremainsinstalled.(Thisisapreventionfunctionagainstforget-
tingtounplugtheUSBmemory.)
(3) Switchofftheprinterpower.
Note
• Whenturningonthepower,waitabout5secondsormoreafterthepowerplughasbeenconnectedbeforepressingthe
ON/Standby button.
• ThecoloroftheimageswhenprintedincolororwhensavedinUSBmemorywilldiffersomewhatfromthemarkercolors.
• Blurredcharacters,thinlines, overlapping ofmarkersand other factorscancause colors todifferinplacesand can also
resultinportionsthatcannotbescannedsuccessfully.
• Ifdarkhorizontallinesonaprintedouthardcopyorimageonthescreenaregenerated,performthescanningadjustment
(whitecalibration).SeepageE-31.
• ThedatainthememoryforcomputerstorageisdeletedwhentheON/Standby buttonisturnedoff(standbymode)or
theconnectionwiththecomputeriscut.

E-13
SettingtheTime
Be sure to complete clock setting to print correct time and attach time and date information to the created digi-
tal files.
The time can also be set from a computer via a network (when connected to a LAN). In this section, operation
for setting the time by using buttons on the network board is provided.
PresstheON/Standby buttontoturnonthepower.
Thedisplaywindow’sLEDslightandthepowerturnson.
PresstheNumberofCopies buttonwhile
pressingtheON/Standby button,thenrelease
theON/Standby button.
Themodeswitchesto“CBSetup”,and“F1”isdisplayedonthe
displaywindow’sLEDs.
The mode returns to the normal mode if no buttons are oper-
atedfor10seconds.
DescriptionofOperations
1 Switchto“CBSetup”.
With the power turned on, press the Number of Copies
buttonwhilepressingtheON/Standby button,thenrelease
theON/Standby button.
2 PresstheSave buttonandswitchto“TimeSetting”.
ThemodeswitcheseachtimetheSavebuttonispressed.
Contentsofsettingmodedisplayedondisplaywindow
(First2digits) (Last2digits)
Christianyear Month Day Hours Minutes
3 Setthesettingmode’sdateandtime.
WhentheNetworkPrint orOnBoardPrint buttonispressedonce,theset-
tingcanbemade.
UsetheNetworkPrint (Increase)andOnBoardPrint (Decrease)buttonsto
set.
4 PresstheSave buttontoenterthesetting.
Thenetworkboardswitchestothenextsettingposition.
Repeatsteps4and5tosetthecurrentdateandtime.
• If the ON/Standby button is pressed during steps 3 to 5, the partially made
settingiscanceledandthedateandtimereturntothevaluessetbeforetheset-
tingwasstarted.
5 Completethesetting.
WhentheSave buttonispressedaftertheminute’ssettingposition(c.6display)
hasbeenset,the“TimeSetting”iscompletedandthe[F1]display(CBSetup)reap-
pears.PresstheON/Standby buttontoreturntothenormalmode.
Normalmode
“CBSetup”mode
Preparations:
Connectthepowerplugtoawallpoweroutlet(AC100–240V).
[Example]:Settingthedateandtimeto2:16pmOctober8,2018

E-14
SettingtheTime
UsetheNetworkPrint (Increase)andOnBoard
Print (Decrease)buttonstoselect“14”(the
hours),thenpresstheSave buttontoenter.
Thedisplayswitchesto“c6”(settingofminutes).
UsetheNetworkPrint (Increase)andOnBoard
Print (Decrease)buttonstoselect“08”(the
day),thenpresstheSave buttontoenter.
Thedisplayswitchesto“c5”(settingofhours).
UsetheNetworkPrint (Increase)andOnBoard
Print (Decrease)buttonstoselect“16”(the
minutes),thenpresstheSave buttontoenter.
Thedisplayswitchesto“F1”(functionsetting).
PresstheON/Standby buttontoreturntothe
normalmode.
• Thenetworkboardalsoreturnstothenormalmodeifyoujust
wait10seconds.
Thiscompletesthetimesetting.
UsetheNetworkPrint (Increase)andOnBoard
Print (Decrease)buttonstoselect“10”(the
month),thenpresstheSave buttontoenter.
Thedisplayswitchesto“c4”(settingofday).
UsetheNetworkPrint (Increase)andOnBoard
Print (Decrease)buttonstoselect“18”(thelast
2digitsoftheyear),thenpresstheSave but-
tontoenter.
Thedisplayswitchesto“c3”(settingofmonth).
PresstheSave buttontomovetothelastdig-
itsoftheyear
Thedisplayswitchesto“c2”(last2digitsofyear).
Notice:
The first two digits of the year (“20”) are fixed. Simply press the
Save button to switch to the last 2 digits of the year setting
position.
While“F1”isdisplayed,presstheSave button
toenter.
Thedisplayswitchesto“c1”(first2digitsofyear).
Ifnobuttonsareoperatedfor10secondswhileinthetimesetting
mode,themodereturnstothe“CBSetup”mode.
“CBSetup”mode Normalmode

E-15
Use a printer to print out the image that has been drawn on the sheet surface. Use a PLUS-designated printer.
Operations and names of parts differ from printer to printer. For details of operations, see your printer’s operat-
ing instructions. The network board can print out to the printer connected to the network board or a network.
PreparingthePrinter
Pleasecheckthatthenetworkboardandtheprinterhavebeenconnected.SeePageE-33.
PreparingthePrinterconnectedtoaNetwork
• PrintersavailablefortheNetworkPrint buttonareFTPsupportednetworkprinters.Someprintersmaynotbesupported.If
youdo nothavea FTPsupportednetwork printer,usesoftware“PrinterServer forPLUSCopyboard”for printing.Please
downloadthissoftwarefrom"https://www.plus-vision.com/en/support/download/software.html".
• Toprintouttotheprinterconnectedtoanetwork,set“FTPPrint”for“Board/PrinterSetting”of“NetworkSetting”.Todoset-
tings,refertotheseparate“N-32SeriesNetworkManual”.
Printing(printersoldseparately)
Setthepaper.
PleaseuseA4orlettersizeprinterpaper.
• Whenusinglettersizepaper,setlettersizepaperinthe
CBSetupmode.(SeepageE-24.)
1)Arrangethepaperedgessothattheyareeven.
2)Insertpaperatthespecifiedpositionofthepapertray.
3)Pressthepaperguidegentlyuntilittouchesthepaper.
Note
Seeyourprinter’soperatinginstructionsforadescrip-
tionofthepaperthatcanbeused.
Notice
• Depending on the printer’s specifications, some
timemayberequiredforcleaningoftheprinthead.
Switchonthepower.
Pressthepowerswitch.Thepowerindicatorlights.
Thiscompletesthepreparationoftheprinter.
PresstheOnBoardPrint buttononthenetworkboard’scontrolpanel.Onepageworthofdataisreadandtheprinting
operationstarts.
Notice
• Dependingontheprinter,indicators,etc.,mayflashafterthepoweristurneduntiltheprinterispreparedtoprint.
Inthiscase,seetheprinter’soperatinginstructionsandcheckthattheprinterisreadybeforestartingtheprinting
operationonthenetworkboard.
Whenfinishedprinting...
Switchofftheprinterpowerandremovethepaper.
Closethepapertray.
Caution
• DonotturnoffthepowerordisconnecttheUSBcableduringprinting.
Dischargetray
Paperguide
Paper
Powerswitch
Appearanceofprinterisforillustrationpurposes.
Papertray

E-16
Preparetheprinter.(Seethepreviouspage.)
Note
• When turning on the power, wait about 5 seconds or more after the
power plug has been connected before pressing the ON/Standby
button.
• PresstheON/Standby buttontoswitchonthepower.TheLEDofthe
displaywindowwilllight.
• Turnonthenetworkboard’spowerbeforeturningontheprinter’spower.
PresstheON/Standby buttonandswitchonthepower.
PresstheScroll/Stop or buttonanddisplaythesheet
surfaceyouwanttoprint.
When the Scroll/Stop button is pressed, the sheet surface scrolls one
screen’sworthtotheleft(tothenextscreen)andstopsautomatically.
When the Scroll/Stop button is pressed, the sheet surface scrolls one
screen’sworthtotheright(tothepreviousscreen)andstopsautomatically.
Tostopduringscrolling,presstheScroll/Stop or buttonagain.
• TherearefourscreenonlyonmodelN-324.
Note
• To display the next screen, press the Scroll/Stop button after scrolling
stops. If the button is pressed during scrolling, scrolling stops immedi-
ately.Whenpressedagain,thesheetisscrolledonescreen’sworthfrom
thepointatwhichitstopped.
• Theone-screenthatisvisibleisprintableposition.
• To fine-adjust the sheet surface position, with the sheet stopped, move
thesheetslowlybyhand.Thesheetcanbemovedeithertotheleftorto
theright.
• Printing of the portion located around the sheet surface might not be
possible.Pleasesee“Effectivereadingsize”onPageE-5.
BasicPrintingOperation
Preparation:
Preparation:CheckthattheACpowerplugsofthenetworkboardandprinterarecon-
nectedtowallpoweroutlets.
Printing
PresstheNumberofCopies buttonandselectthenum-
berofcopies.

E-17
Printing
PresstheNetworkPrint ortheOnBoardPrint buttontoprint.
Note
• “01”isselectedwhenthepoweristurnedon.
• Upto10copiescanbespecifiedanddisplayedonthedisplaywindow.
• Thenumberofcopiesincreasesby1eachtimetheNumberofCopiesbuttonispressed,and“ ”isdisplayed
after“10”(thisisusedfortestprinting:seepageE-30).Whenthebuttonispressedagain,thedisplayswitchesto
“01”.Thenumberswitchescontinuouslyifthebuttonisheldin.
• Aftersettingthenumberofcopies,proceedtostep4within1minute.Thenumberofcopiesisresetto“01”ifno
operationisperformedwithin1minute.
Thereadingoperationisperformedforaone-sheetportion(whilethesheetisscrolled)andtheprintingoperationisper-
formed.
Tochangeprintingcolor(ColororB/W),performthumbnailprintingorcontinuousprinting,makeeachsetting(seenext
page)andpresstheappropriatePrintbutton.
Notice
• Tousethenetworkprintingfunction,connecttheFTPsupportedprintertothesamenetworkwherethenetwork
boardislocated,andmaketheprintersettingsonthenetworkboard.
Cancellationoftheprintoperationinprogress
WhentheON/Standby buttonispressed,thereadingofthesheetstops,andthepartiallyreadimagedataisprinted.
Waituntilthesheetisexpelledfromtheprinter.
Note
• IftheON/Standby buttonispressedwhilethesheetsurfaceisbeingread,printingisinterruptedandonlypart
oftheimagewillbeprinted.
• Theone-screenportionisreducedtoA4papersizeandprinted.
Forwide typenetwork boards(modelN-32W),theimageis compressedabout75%inthehorizontaldirection.
To print with the same proportions as the image on the sheet surface, see “CB Setup (Operating the Network
Board’sButtons)”(pageE-24).
• Aflashing“ ”inthedisplaywindowindicatesaprinterror.See“MeaningofErrorMessages”onPageE-27.
• Whenprinting,atimestamp(dateandtime)isprintedatthetoprightofthesheet.See“CBSetup(Operatingthe
NetworkBoard’sButtons)”onpageE-24.
or
• Switchofftheprinterpower.
Note
• WhentheEraseReminderfunctionissetto“Enable”
WhentheON/Standby buttonispressed,thedisplaywindowandalltheindicatorsflashsimul-
taneously,thesheetautomaticallymovestothesurfacethatisnotyeterasedandthepowerturns
off.TosettheEraseReminderfunctionto“Disable”,seepageE-26.
*TheEraseReminderfunctionmaynotworkproperlyduetodirtonthesheet'sadhesivesections
ormarkerresidue.
• Ifnobuttonisoperatedwithin30minutes,thepowerturnsoffautomatically(autopoweroff).
Whenthepoweristurnedoff,scannedimagesstoredintheunit’sinternalmemoryarecleared.
• TheautopowerofffunctioniscanceledwhenthenetworkboardandcomputerareconnectedbyUSBcable.
Whenthenetworkboardisnotgoingtobeused,presstheON/Standby buttonand
switchoffthepower(standbymode).

E-18
Movingthesheetsurfacemanually
Thesheetcanbemovedevenwhenthepowerofthenetworkboardisswitched
off.
Thesheet canbe movedwithyourhandeither inleft orright.Pleaseplaceyour
handattheverticalcenterandmovethesheetslowly.
Notice
• Quickmovementcancausedamagetothedrivemechanismofthenetwork
board.
Note
• WhentheEraseReminderfunctionissetto“Enable”,theEraseReminder
functionmaynotoperateproperlyifthesheetsurfaceismovedbyhand.
Printing
PrintingThumbnails
Multiplescreensfromthescreenatthecurrentpositioncanbeprintedonasinglepage.
• Thethumbnailprintingfunctionisforprintingonly.StoringwiththeSave orNetwork buttonisnotpossible.
1. PresstheThumbnail buttonandselectthepagelayout.
Displaywindowstatusandpagelayout
Thumbnail
selection
Movementofdisplaywin-
dowLEDs
Pagelayout
Thumbnailsof2
screens 1
2
Thumbnails
of 4 screens
(arrangedhori-
zontally)
12
34
Thumbnails
of 4 screens
(arrangedverti-
cally)
13
24
Cancel(1
screen) Cancel
(1)
Whenprintingisfinished,thumbnailprintingiscanceled.
Note
• Toprintthumbnailsof3screensonmodelN-324,specifythumbnailsof4screens(arrangedhorizontallyorvertically).
• Ifthereisablankscreeninthespecifiedsequence,thatscreenisprintedasablank.
• If the ON/Standby button is pressed during scanning, scanning is interrupted and only the images that have been
scannedareprintedasthumbnails.
2. PressNetworkPrint orOnBoardPrint buttontoprint.
Whenoneoftheprintbuttonsispressed,thespecifiednumberofscreensiscollectedsequentiallyinthescanningmemory
andthumbnailprocessingisperformed.Printingstartsafterthisprocessingiscompleted.
or
The mode switches in the following order each time the
buttonispressed.
Thumbnailsof2screens→Cancel...
(Thumbnails of 2 screens → Thumbnails of 4 screens
(horizontally) → Thumbnails of 4 screens (vertically) →
Cancel...onmodelN-324)
• Thethumbnailsarearrangedinorderfromthecurrently
visible screen, counted to the right as screen 1 and
screen2 (screen1,screen2, screen3,and screen 4
onmodelN-324).
Tostartfromaparticularscreen,presstheScroll/Stop
or buttontoscrolltothatscreen.
Notice
• Note that if you have drawn on the sheet after
moving it manually part way or after stopping
scrolling in the middle, the amount of movement
foronescreen’sworthchanges,sothepositionof
thescannedimageswillbesubstantiallyoff.
• Thisproductusesanendlesssheet.Notethatthe
positionofthescannedimagesmaygoslightlyoff
duetostretchingofthesheetorslippage.
(ButtononmodelN-324)

E-19
Printing
ConsecutivePrinting
Multiplescreensfromthescreenatthecurrentpositioncanbeprinted(orstored).
1. PresstheContinue buttonandselectthenumberofscreens.
ChangingPrintingColor
Printingcolorcanbeselectedbetweencolorandmonochrome.
1. PresstheColor/B/W buttontoselectcolorormonochrome.
Themodeswitchesinthefollowingordereachtimethebuttonispressed.
Screens 1 and 2 →Cancel...
(Screens 1 and 2 →Screens 1 to 3 →Screens 1 to 4 →Cancel...onmodelN-324)
Thenumberofconsecutivescreensisindicatedbythenumberofconsecutiveprintingnumberindicatorsthatarelityellow.
(“CP”isdisplayedonthedisplaywindowwhenconsecutiveprintingisselected.)
* Thescreensarecountedinorderfromthecurrentlyvisiblescreenasscreen1andscreen2(screen1,screen2,screen
3,andscreen4onmodelN-324).Tostartfromaparticularscreen,presstheScroll/Stop or buttontoscrolltothat
screen.
Notice
• Notethatifyouhavedrawnonthesheetaftermovingitmanuallypartwayorafterstoppingscrollinginthemiddle,the
amountofmovementforonescreen’sworthchanges,sothepositionofthescannedimageswillbesubstantiallyoff.
• Thisproductusesanendlesssheet.Notethatthepositionofthescannedimagesmaygoslightlyoffduetostretching
ofthesheetorslippage.
Consecutiveprintingnumber
indicators
Consecutiveprinting
numberindicators
Onelit:Cancel(single-screenprinting/storing)
Twolit:Screens1and2printed/storedconsecutively
Threelit:Screens1to3printed/storedconsecutively
Fourlit:Screens1to4printed/storedconsecutively
Onelit:Cancel(single-
screenprinting/storing)
Twolit:Screens1and2
printed/storedconsecu-
tively
Whenprintingisfinished,consecutiveprintingiscanceled.
Note
• Ifthereisablankscreeninthespecifiedsequence,thatscreenisprintedasablank.
• If the ON/Standby button is pressed during scanning, scanning is interrupted and only the images that have been
scannedareprinted.
• Ifprintingofmultiplecopieshasbeenspecified(withtheNumberofCopiesbutton),afterscanning,thespecifiednum-
berofcopiesisprinted,andthisisrepeateduntilthespecifiednumberofscreenshasbeenscannedandprinted.
TheColorPrintstatusindicatorlightstoindicatethefollowingcondition:
Litgreen:Colorprint
Off:Monochromeprint
Note
• If“ColorPrint”inCBSetupissetto“Invalid”,apressoftheColor/B/Wbuttonwillselectforciblymonochromecolor.
Toselect“Valid”for“ColorPrint”inCBSetup,seepageE-24in“CBSetup(OperatingtheNetworkBoard’sButtons)”.
2. PressNetworkPrint orOnBoardPrint buttontoprint.
When one of the print buttons is pressed, the screens are scanned and printed repeatedly until the specified number of
screenshasbeenscannedandprinted.
or
(Buttononmodel
N-324)

E-20
UsingUSBMemory
The content of what has been drawn on the sheet surface of the network board can be saved in USB memory.
Later, the saved image can be read into a personal computer and made into a document of the proceedings of
the meeting, or affixed to a document.
The name of the folder on the USB memory device is “CB_Image”. Image files are stored in this folder.
By factory setting upon purchase, image files are named “PV-xxx.pdf” (PDF files), where “xxx” refers to a
3-digit number starting from 001 (ex.: PV-001.pdf).
Notice
• NoUSBflashmemorydeviceisincluded.WhenpurchasingaUSBflashmemorydevice,payattentiontothefollowing:
1.USBflashmemorydevicesformattedinFAT16/FAT32aresupported.USBflashmemorydevicesinNTFSformatcannot
beused.
2.USBflashmemorydevicesprotectedbyasecurityfunctioncannotbeused.
3.USBflashmemorydeviceswithacapacityofover32GBcannotbeused.
4.IftheUSBflashmemorydeviceisdividedintomultiplepartitions,onlyonepartitioncanberecognizedwiththisunit.
USBMemoryStorageProcedure
Preparation:
Checkthatthenetworkboard’sACpowerplugisconnectedtoawallpoweroutlet.
PresstheON/Standby buttonandswitchonthepower.
Note
• Whenturningonthepower,waitabout5secondsormoreafterthepower
plughasbeenconnectedbeforepressingtheON/Standbybutton.
• PresstheON/Standby buttontoswitchonthepower.TheLEDofthe
displaywindowwilllight.
InserttheUSBmemorydeviceintotheUSBAMemory
portofthenetworkboard.
Notice
• Checktheside(polarity)oftheUSBmem-
ory device before inserting it. Forcing it
in the reverse orientation will damage the
USB A Memory port or USB memory
device.
• Be careful not to bump into the USB
memory device with hand or body while
itismounted.Doingsocoulddamagethe
USB memory device or USB A Memory
port.
Theprocedurefordisplayingthesheetsurfaceyouwanttostoreisthesameas
forprinting.
See“BasicPrintingOperation”onpageE-16.
Note
• TheonescreenportionthatisviewablewillbesavedinUSBmemory.
• Savingoftheportionlocatedaroundthesheetsurfacemightnotbepos-
sible.Pleasesee“Effectivereadingsize”onPageE-5.
PresstheScroll/Stop or buttontodisplaythescreento
bestored.
Other manuals for N-32S
1
This manual suits for next models
2
Table of contents
Other Plus Interactive Whiteboard manuals
Popular Interactive Whiteboard manuals by other brands

Smart Technologies
Smart Technologies SMART Board 2000i Projector replacement Projector replacement guide

Panasonic
Panasonic USB-7325 Specifications

SMART Board
SMART Board SB680-MP Assembly instructions

SMART
SMART Board 7000 quick start guide

SMART Board
SMART Board Board X800 Series user guide

SMART
SMART 600i installation guide