Polaris PRO HD 4500 WINCH KIT User manual

APPLICATION
Verify accessory fitment at Polaris.com.
NOTE
You must order below mentioned power cable kit
separately to connect battery to the vehicle bus bar.
• MY14/15 2 Seat Models - PN 2879862
• MY14/15 4 Seat Models - PN 2880055
• MY16 2 Seat Models - PN 2881551
• MY16 4 Seat Models - PN 2881646
NOTE
MY17 RZR Turbo comes with pre-wired for winch
installation. No additional power cable kit is required.
BEFORE YOU BEGIN
Read these instructions and check to be sure all parts and tools are accounted for. Please retain these
installation instructions for future reference and parts ordering information.
Instr 9927473 Rev 01 2016-12 Page 1 of 13
P/N 2882240
POLARIS®PRO HD 4500 WINCH KIT

Instr 9927473 Rev 01 2016-12 Page 2 of 13
KIT CONTENTS
This Kit includes:
REF QTY PART DESCRIPTION PART NUMBER
1 1 Winch Cable, Yellow 6 GA 4013468-480
2 1 Winch Cable, Blue 6 GA 4013469-400
3 1 Power Cable, Black 4013470-375
4 1 Power Cable, Red 4013471-375
5 1 Winch Assembly, 4500 HDDS 2206382
6 1 Latch Hook 2411836
7 1 Control Box **
8 1 Rope 2879187
9 1 Wireless Remote Kit 2879316
10 1 Contactor 4015095
11 1 Autostop Fairlead **
12 1 Winch Mount Bracket -
13 1 Fairlead Mount -
14 1 Rubber Stop Magnet **
15* 2 Screw - Socket Head - M10 X 1.5 X 25 -
16* 2 Screw - 10 X 5/8 -
17* 4 Screw - Hex Flange - M12 X 1.75 X 25 -

Instr 9927473 Rev 01 2016-12 Page 3 of 13
REF QTY PART DESCRIPTION PART NUMBER
18* 4 Screw - Hex Flange - M8 X 1.25 X 20 -
19* 4 Screw - Hex Flange - M6 X 35 -
20* 4 Screw - M10 X 1.5 X 25 -
21* 6 Nut - M10 X 1.5 -
22* 4 Nut - Hex Flange - M12 X 1.75 -
1 Winching Guide 9923644
1 Instructions 9927473
Internal Cam Service Kit (includes internal cam for freespool handle to
connect winch to a replaceable handle, purchase handle separately)
2205497
Service Handle (includes freespool handle and screw) 2205265
Items marked (*) are included in Hardware Kit PN 2205119.
Items marked (**) are included in Kit PN 2881288.
Power Cable Kit (PN 2881551) Includes:
REF QTY PART DESCRIPTION PART NUMBER
23 1 Power Cables, Vehicle Bus Bar to Battery 4015713
1 Instructions 9926617
TOOLS REQUIRED
• Safety Glasses
• Socket Set, SAE
• Socket Set, Metric
• Wrench Set, SAE
• Wrench Set, Metric
• Phillips Screwdriver
• Socket Set, Torx®Bit
• Pliers, Side Cutting

Instr 9927473 Rev 01 2016-12 Page 4 of 13
IMPORTANT
Your POLARIS®PRO HD 4500 WINCH KIT is exclusively designed for your vehicle. Please read the installation
instructions thoroughly before beginning. Installation is easier if the vehicle is clean and free of debris. For your
safety, and to ensure a satisfactory installation, perform all installation steps correctly in the sequence shown.
ASSEMBLY TIME
Approximately 45 minutes
INSTALLATION INSTRUCTIONS
PREPARATION
1. Shift vehicle transmission into “PARK”. Turn key to
“OFF” position and remove from vehicle.
2. Lift upward and forward on the driver seat while
lifting up on the latch lever Aand remove the seat
from vehicle.
3. Disconnect black negative (-) cable from battery
FIRST, then disconnect red positive (+) cable from
battery.
WARNING
ALWAYS disconnect black negative (-) cable from
battery FIRST. Failure to do so will result in a high
current electrical arc, and may result in battery
explosion, if tool touches grounded frame. Death or
serious personal injury may occur.
4. Remove the hood Dfrom vehicle by rotating two
latches E.
5. Remove shift lever cap F, retaining screw G, and
shift knob Hfrom shift lever J.

Instr 9927473 Rev 01 2016-12 Page 5 of 13
6. Remove the center console Kby removing two
screws Land five push darts M.
7. Remove the plastic winch cover Nby removing
two screws P
. Discard the plastic winch cover and
screws.
8. Disconnect the headlight connectors Qon both
sides of vehicle.
9. Remove front fascia Rby removing six screws S
supporting to radiator shroud and ten screws T
supporting to chassis and body panels.
POWER CABLES KIT INSTALLATION
1. Route the power kit cables (red and black) 2# from
battery to bus bar terminals following main wire
harness as shown. Do not connect power cables
to battery and bus bar terminals at this time.

Instr 9927473 Rev 01 2016-12 Page 6 of 13
2. Install red and black cables from power cable kit 2#
to vehicle bus bar as shown.
WINCH INSTALLATION
1. Align and install winch mounting bracket dto
chassis bracket Uand front suspension bracket
Vusing four screws 2) and nuts 2! and torque to
specification.
TORQUE
20ft. lbs. (27.1 Nm)
2. Connect blue wand yellow qcables to their
corresponding color terminals on winch assembly
tas shown. Torque to specification.
TORQUE
4ft. lbs. (5.4 Nm)
3. Slide winch assembly tfrom left to right and
install onto the mounting bracket dby aligning
holes and installing screws lfrom the bottom of
the bracket as shown. Torque to specification.
TORQUE
20ft. lbs. (27.1 Nm)
4. Install the autostop fairlead sto the fairlead
mounting bracket fusing two screws h. Torque
to specification.

Instr 9927473 Rev 01 2016-12 Page 7 of 13
TORQUE
16ft. lbs. (21.7 Nm)
5. Install the autostop fairlead mounting bracket to
the front suspension bracket Wand chassis
bracket Xusing four screws kand nuts 2@.
Torque to specification.
TORQUE
20ft. lbs. (27.1 Nm)
6. Feed the winch rope ithrough fairlead mounting
bracket f, autostop fairlead s, and rubber stop
has shown. Install winch hook yto rope iusing
clevis and cotter pin. HINT: Attach a plastic cable
tie to the end of the rope and feed the cable tie
through the rubber stop. Use a little wax or other
mild lubricant on the rubber stop and pull the rope
through the rubber stop using the plastic cable tie.
CONTACTOR INSTALLATION
1. Align contactor mounting holes with existing four
holes on firewall Zand install contactor ion
firewall using four screws y. Tighten until snug but
do not overtighten.
2. Connect blue w, yellow q, red r, and black e
cables to the contactor terminals as shown and
torque nuts to specification.

Instr 9927473 Rev 01 2016-12 Page 8 of 13
TORQUE
4ft. lbs. (5.4 Nm)
3. Connect the other ends of winch kit red rand
black ecables to bus bar connectors as shown.
CONTROL BOX INSTALLATION
1. Position control box roughly in the center of the
shock mount support behind the radiator and
fasten with supplied cable ties as indicated.
Connect white electrical connectors for the control
box as seen in the top photo of the Electrical
Connections Reference Guide section of your
instructions.
2. Route power wires from control box to bus bar and
connect red positive (+) (or orange depending on
the date your accessory kit was built) power wire
from control box to orange, keyed power terminal
on the vehicles bus bar. Route black negative (-)
wires from control box wto black (ground)
terminal area on bus bar.
3. Secure all remaining wires to the to the vehicle at
this time using supplied cable ties.
WIRELESS REMOTE RECEIVER INSTALLATION
1. Mount wireless remote receiver onto chassis using
supplied screws as shown.
2. Connect white electrical connectors from remote
receiver as seen in the top photo of the Electrical
Connections Reference Guide of the instruction
manual. Route remote receiver power wires to bus
bar area and connect red positive (+) power wire
to the keyed power terminal as shown and the
black negative (-) cable to the ground terminal.
3. Secure remaining power wires to bus bar using
existing fasteners.
4. Secure all remaining wires to vehicle main wire
harness using cable ties.

Instr 9927473 Rev 01 2016-12 Page 9 of 13
WIRELESS REMOTE HOLDER INSTALLATION
1. Wireless remote holder can be installed in desired
location on vehicle. Use screws supplied in the
wireless remote kit ofor holder installation. See
image below for possible mounting location.
FINAL INSPECTION
1. Confirm that all wiring is correct.
2. Confirm that there are no exposed wires or
terminals.
3. All loose wires need to be secured away from
moving parts and heat sources.
REINSTALLATION
1. Reinstall front fascia Rusing screws Sand T
onto vehicle.
2. Reconnect headlight connectors Qon both sides
of vehicle.
3. Reinstall center console Kusing screws Land
push darts M.
4. Reinstall shift knob Hand shift lever cap Fonto
the vehicle.
5. Reinstall the hood Donto the vehicle.
6. Re-connect the main vehicle battery cables and
cables from power cable kit 2# to battery terminals
using original hardware.
7. Reinstall the seat onto vehicle.
WIRELESS REMOTE OPERATION
• When properly installed, the wireless remote will
allow you to operate the winch from off the vehicle,
which can be a safe way to operate the winch when
done properly.
• To use the wireless remote, hold the small "On/Off"
button for three seconds or until the LED light on the
remote turns on. If the vehicle is on so that the
winch is receiving power, the wireless remote
should operate the winch as if you were using the
winch switch qlocated on the handlebar. If the
remote is not operating properly, see the
troubleshooting information at the end of the
instructions.
• The remote will automatically turn itself off after 30
seconds of inactivity. You will therefore need to turn
the remote back on if it has been more than 30
seconds since prior use.
• To manually turn off the remote, hold the small "On/
Off" button for 3 seconds or until the LED light turns
off.
• See the illustration below for proper wireless remote
operation.
AUTOSTOP OPERATION
The Autostop system is meant to help prevent
damage to the winch system from over-tightening of
the rope, but is not meant to prevent all foreseeable
winch damage. The winch system is very powerful
and care should be exercised whenever it is in
operation. The winch operator is always responsible
for using the winch properly and the Autostop system
should only be used as a secondary preventive
measure to help prevent damage to the winch from
over-tightening the rope.
The Autostop system works when the black rubber
puck nears the aluminum fairlead. Stop magnets in
the puck trigger sensors in the fairlead which prevent
the winch from pulling in the rope any further.

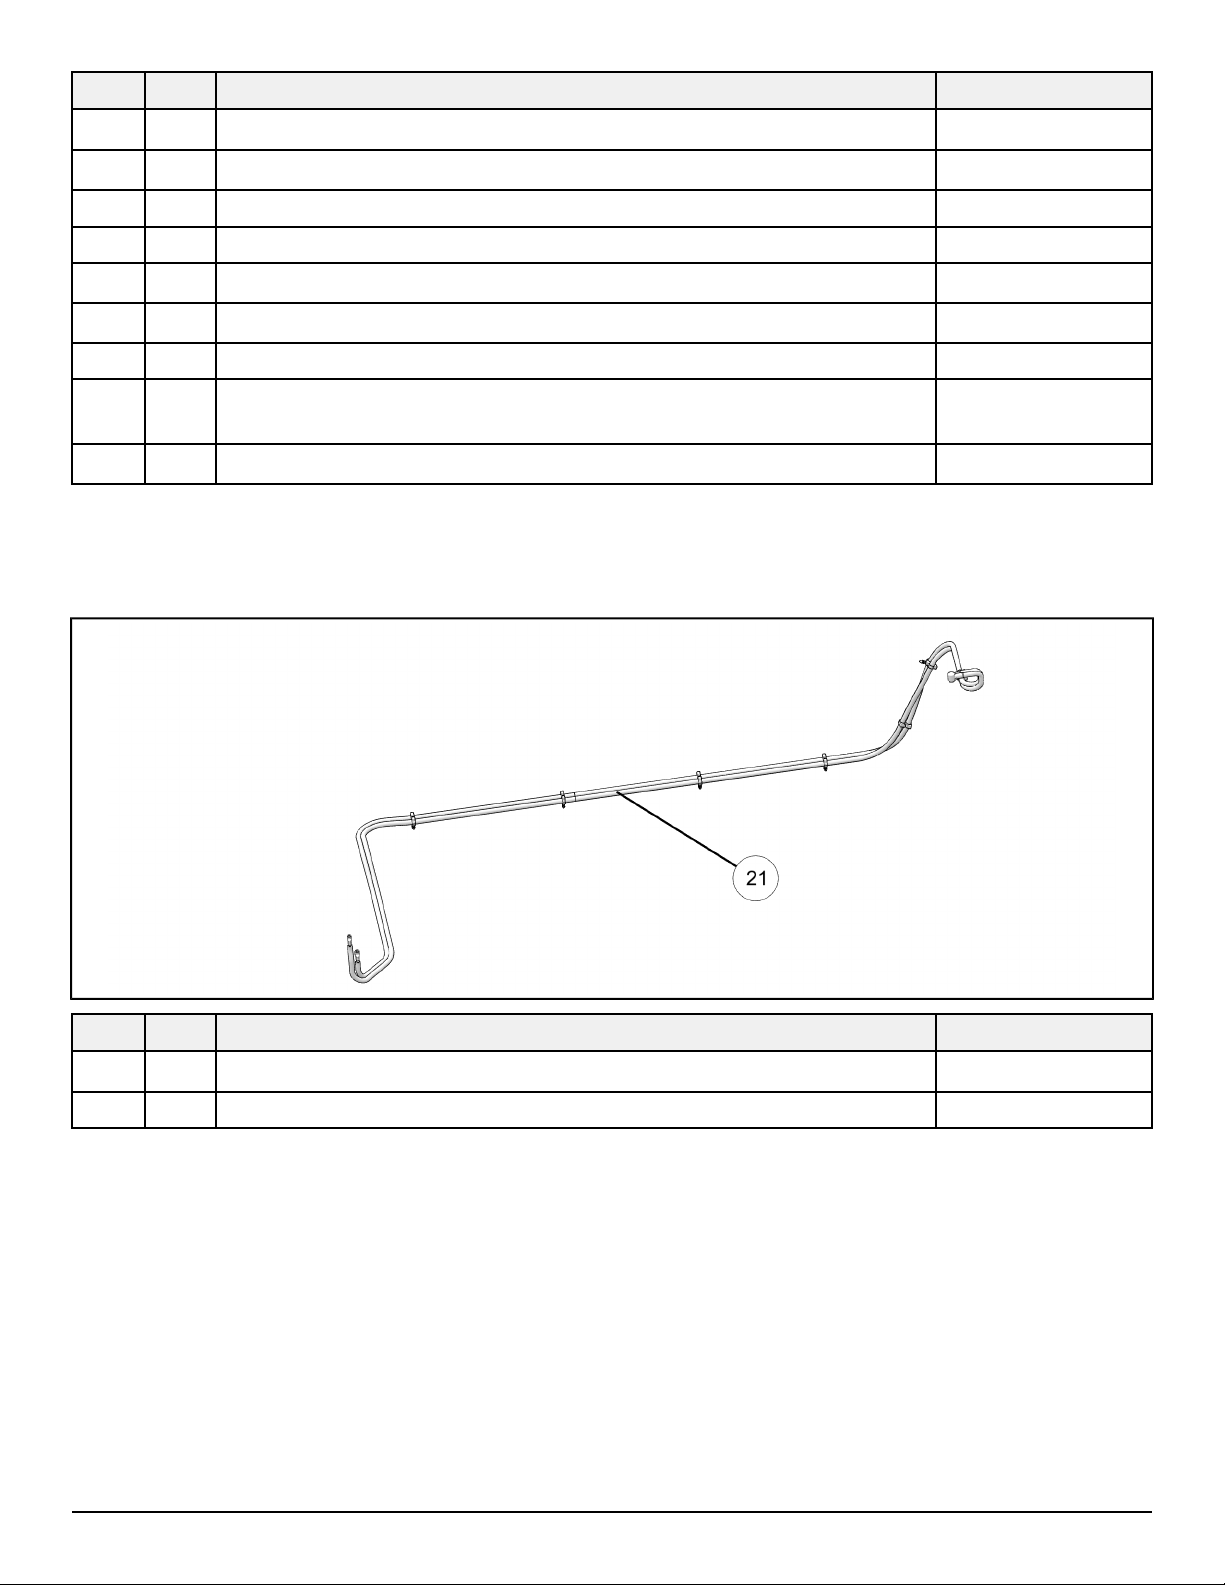
Instr 9927473 Rev 01 2016-12 Page 10 of 13
During final inspection, confirm that the Autostop is
functioning properly. See the troubleshooting section
to help diagnose and correct any problems.
GEAR SELECTION
WARNING
Attempting to shift the winch while the rope is under
tension is dangerous and can result in injuries or
death. Make sure the winch rope is not in tension
before shifting the winch between gears.
Your winch is equipped with three different gear
settings. High, Neutral and Low. When in neutral the
“N” marking will show thru the cutout window on the
shift knob. See photo below.
The high gear setting is meant for rapid recovery
mode only and should not be used while the rope is
under load. To shift into high gear, rotate the gear
shifting knob clockwise until the “H” marking shows
thru the cutout window on the shift knob. See photo
below.
NOTE
High gear is for rapid recovery of the winch rope
only. It is not intended for pulling and will reduce the
life of the winch if used under load.
To shift into low, rotate the gear shifting knob counter-
clockwise until the “L” marking shows thru the cutout
window on the shift knob. See photo below.
RAPID RECOVERY WINCH FUNCTION
NOTE
Rapid Recovery is for recovering the winch rope
only. It is not intended for pulling and will reduce the
life of the winch if used under load.
Your winch is equipped to quickly reel in the winch
rope when being used under no-load conditions.
Using this feature will significantly reduce the time it
takes to rewind your rope after use.
When to use
Use Rapid Recovery to quickly reel the rope in or out
to speed up the recovery process. The rope speed is
approximately five times the speed of standard
operation, so caution should be taken to always reset
the winch to “Low” gear after using the Rapid
Recovery so the speed of the winch will not take the
operator by surprise. Do not pull loads while in Rapid
Recovery gear.
How to shift
To operate the Rapid Recovery, make sure the winch
is not in operation and the rope is not in tension.
Rotate the shift knob fully clockwise to engage “High”
gear (Rapid Recovery). Pulling slightly on the winch
rope by hand will help the gears align and the shift to
be completed. Use Rapid Recovery only to reel in the
rope with “No Load”, then rotate the shift knob back to
“Low” gear (standard operating mode) by rotating the
knob back fully counter-clockwise.
WARNING
Attempting to shift the winch while the rope is under
tension is dangerous and can result in injuries or
death. Make sure the winch rope is not in tension
before shifting the winch between gears.

Instr 9927473 Rev 01 2016-12 Page 11 of 13
TROUBLESHOOTING
If your winch/Autostop is not functioning properly, below is a short guide that can help you diagnose and correct
the problem.
SYMPTOM POSSIBLE CAUSES RECOMMENDED SOLUTION
Dead Vehicle Battery Check that all power wires are
connected to the correct terminals
per your instruction manual and
not drawing any current while the
vehicle sits for longer periods of
time.
Rewire to ensure wiring is
connected properly per
instructions.
Winch will not operate Contactor not receiving power Turn vehicle key on.
Wireless remote not powered on Turn wireless remote on.
Connections between components
not in proper order
Check connections. Connect wired
handlebar switch connection from
vehicle main wire harness directly
to contactor to make sure a direct
connection will operate the winch.
If connections are not in the order
shown on the pictures in the last
page, the whole system may not
function or only certain parts of it
will function.
Keyed power circuit (orange wires)
not properly powered
Check fusebox for 10A accessory
circuit. Check voltage in certain
places, especially orange wires
coming out of the main harness by
the steering post.
Winch operates in one direction
only
Autostop fairlead not connected
properly
Check connections. If winch
operates only outward, check that
the black rubber puck is not
touching the aluminum fairlead. If
winch operates inward even when
puck is touching fairlead, check
connections of the Autostop control
box. If winch operates inward but
not outward when rubber puck is
touching fairlead, check color of
wires at connectors to make sure
they match on both sides of the
connection (in case two wires have
been switched in the connector).
Winch makes noise but rope does
not move
Contactor powered, but not winch If you can hear a clicking sound
when you press the winch control
but the winch does not make any
sounds, check the connections
between the winch and the
contactor. If the winch makes noise
but does not move, check that the
winch is in gear. If the winch is in
gear and the winch does not move,
have a dealer inspect the winch.

Instr 9927473 Rev 01 2016-12 Page 12 of 13
SYMPTOM POSSIBLE CAUSES RECOMMENDED SOLUTION
Winch makes noise but rope does
not move
Winch not in proper gear Rotate gear knob fully into L or H,
then recheck.
Winch operates too slowly Winch in wrong gear Rotate gear knob into proper gear,
then recheck.
Winch improperly loaded The winch, by design, operates
slowly in Low gear. In High (Rapid
Recovery), the winch operates
quickly but can be slowed if there
is a load on the rope or if the rope
is bound up inside the spool area.
Check that the winch is clear and
the rope is not bound up and that
there is no load pulling on the rope.
Winch will not change gears Rope is still under load The gears are purposely hard to
shift when a load is on the rope to
prevent accidental operation,
which could lead to winch failure or
personal injury. Make sure the rope
has no load in tension, then check
that the rope is not bunched up
and bound inside the spool area.
Operate the winch for a short
period, then attempt to shift again.

Instr 9927473 Rev 01 2016-12 Page 13 of 13
ELECTRICAL CONNECTION REFERENCE GUIDE
Winch with auto fairlead and wireless remote
FEEDBACK FORM
A feedback form has been created for the installer to provide any comments, questions
or concerns about the installation instructions. The form is viewable on mobile devices
by scanning the QR code or by clicking HERE if viewing on a PC.
FEEDBACK FORM
This manual suits for next models
1
Table of contents
Other Polaris Winch manuals
Popular Winch manuals by other brands

ArboTeam
ArboTeam ATD Installation and maintenance manual

SPEEDMASTER
SPEEDMASTER PCE553.1001 manual

Badland
Badland APEX 12000 user manual

Savwinch
Savwinch CS Series Installation, operation & maintenance manual

Ingersoll-Rand
Ingersoll-Rand Liftstar LS2-600H Product Maintenance Information

Warn Industries
Warn Industries 12-A-48 Series quick start guide

Speedway
Speedway 7253 manual

Rugged Ridge
Rugged Ridge Extreme Heavy Duty 2.0 owner's manual

Harken
Harken HighTailer IN171 product manual

BorMann
BorMann BWR5043 manual

Motoalliance
Motoalliance Midnight Series Installation and operation manual

Paccar
Paccar BRADEN PD10B Series Installation maintenance and service manual