manuals.online logo
Brands
  1. Home
  2. •
  3. Brands
  4. •
  5. Polycom
  6. •
  7. Telephone
  8. •
  9. Polycom 4 Series User manual

Polycom 4 Series User manual

This manual suits for next models

1

Other Polycom Telephone manuals

Polycom VVX 350 User manual

Polycom

Polycom VVX 350 User manual

Polycom VVX 301 Instruction manual

Polycom

Polycom VVX 301 Instruction manual

Polycom VVX 500 Instruction manual

Polycom

Polycom VVX 500 Instruction manual

Polycom VVX 101 User manual

Polycom

Polycom VVX 101 User manual

Polycom Daisy Hosted Voice User manual

Polycom

Polycom Daisy Hosted Voice User manual

Polycom VVX 500 series Instruction manual

Polycom

Polycom VVX 500 series Instruction manual

Polycom VVX410 User manual

Polycom

Polycom VVX410 User manual

Polycom VVX 400 Series Instruction manual

Polycom

Polycom VVX 400 Series Instruction manual

Polycom SoundStation 2W Service manual

Polycom

Polycom SoundStation 2W Service manual

Polycom VVX 501 Series User manual

Polycom

Polycom VVX 501 Series User manual

Polycom VVX 300 User manual

Polycom

Polycom VVX 300 User manual

Polycom VVX 500 User manual

Polycom

Polycom VVX 500 User manual

Polycom SpectraLink 6020 User manual

Polycom

Polycom SpectraLink 6020 User manual

Polycom VVX 601 Reference guide

Polycom

Polycom VVX 601 Reference guide

Polycom VVX101 User manual

Polycom

Polycom VVX101 User manual

Polycom VVX 411 User manual

Polycom

Polycom VVX 411 User manual

Polycom RealPresence Trio 8500 Assembly instructions

Polycom

Polycom RealPresence Trio 8500 Assembly instructions

Polycom VVX 400 Instruction manual

Polycom

Polycom VVX 400 Instruction manual

Polycom SoundPoint IP 300 User manual

Polycom

Polycom SoundPoint IP 300 User manual

Polycom VVX410 User manual

Polycom

Polycom VVX410 User manual

Polycom Integra VVX 500 User manual

Polycom

Polycom Integra VVX 500 User manual

Polycom VVX 500 series Instruction manual

Polycom

Polycom VVX 500 series Instruction manual

Polycom soundpoint IP series User manual

Polycom

Polycom soundpoint IP series User manual

Polycom VVX 411 User manual

Polycom

Polycom VVX 411 User manual

Popular Telephone manuals by other brands

Philips BaseLine Pro manual

Philips

Philips BaseLine Pro manual

V-tech i6772 user guide

V-tech

V-tech i6772 user guide

BT FREELANCE XD 5100 quick start guide

BT

BT FREELANCE XD 5100 quick start guide

Uniden 1360 user guide

Uniden

Uniden 1360 user guide

Fanvil D800 user manual

Fanvil

Fanvil D800 user manual

Avaya IP500 user guide

Avaya

Avaya IP500 user guide

NEC Univerge SV9100 installation manual

NEC

NEC Univerge SV9100 installation manual

Amanda MiniSOHO Installation and programming manual

Amanda

Amanda MiniSOHO Installation and programming manual

Hitachi SelecSet 900 Series user guide

Hitachi

Hitachi SelecSet 900 Series user guide

mPTech HAMMER BS21 quick start guide

mPTech

mPTech HAMMER BS21 quick start guide

NEC 2000IVX user guide

NEC

NEC 2000IVX user guide

ooma Phone Genie quick start guide

ooma

ooma Phone Genie quick start guide

Siemens Gigaset S450 user guide

Siemens

Siemens Gigaset S450 user guide

Clarity RC100 operating instructions

Clarity

Clarity RC100 operating instructions

GE 2-9480 user guide

GE

GE 2-9480 user guide

Geemarc PHOTOPHONE 155 user guide

Geemarc

Geemarc PHOTOPHONE 155 user guide

Interquartz Gemini IQ333 operating instructions

Interquartz

Interquartz Gemini IQ333 operating instructions

SSS Siedle HT 840-0 operating instructions

SSS Siedle

SSS Siedle HT 840-0 operating instructions

manuals.online logo
manuals.online logoBrands
  • About & Mission
  • Contact us
  • Privacy Policy
  • Terms and Conditions

Copyright 2025 Manuals.Online. All Rights Reserved.

QUICK INSTALLATION GUIDE
Intermedia • Copyright © 2013
OVERVIEW
Intermedia Hosted PBX phone system and service has been designed to use your existing broadband data
connection as well as the existing data wiring in your office. In order to begin using your new phone system
and service you must perform the following steps:
POLYCOM 4/6-LINE DESK PHONES
INSTALLING PHONES AT MULTIPLE LOCATIONS?
If you have ordered phones for multiple locations, it is critical that each phone is installed at the proper location. This is done to ensure that in the
event of an emergency, the 911 operator receives the correct address when you call. To view the assigned address for each phone, please refer to
the Packing List found in your shipping box.
1. Ensure the phones are installed at the proper address (see orange packing list in the box)
2. Activate your phone lines
3. Install the phones using your existing data network
4. Setup your optional Automated Attendant (not covered in this install guide)
5. Setup each phone’s voicemail box
6. Download the Reference Guides at http://www.intermedia.net/visitor/acs/default.aspx?nav=dpNBU
INSTALLATION OVERVIEW
PARTS CHECK
NEED HELP? Call 1-877-357-0750
ACTIVATING THE SERVICE
Before you can make or receive calls, you need to activate your phone
line(s). This also activates the billing for your phone line(s). To activate
your phone line(s):
1. Go to https://exchange.intermedia.net and enter your
Administrator Portal login name and password
2. Within the Account Info tab, click the Activate Service button
3. Activate the lines you intend to use. Lines will automatically
activate 30 days from purchase
1
2
*1159-PUG-002*
1 Handset per
Desk Phone
1 Handset phone cord
per Desk Phone
Desk Phone
Ethernet Cable
1 or more
Desk Phone(s) Desk Phone
Power Supply
Phone Base Stand
WIRELESS ADAPTER
(optional)
Desk Phone Wireless Adapter
and Power Supply
INSTALLING THE DESK PHONES
1. Assemble the Desk Phones
Use the included coiled handset cord and connect one end into
the base of the handset and the other end into the handset port
on the back of the phone .
(There is a handset and a headset port.)
2. Connect the Desk Phones
You have two options to connect your Desk Phones, use any or
all of them.
Option 1) Using your existing data network
Using the included phone cord, connect one end into the port on
the back of the phone labeled and the other end into any data
port on your network (router, switch or wall data jack).
Option 2) Using your existing data network then connect the
phones to your computer
If you already have a computer using a wall data jack or router/
switch port, unplug the computer from the network, then connect
the phone using the steps in Option 1. Plug your computer into
the port on the back of the phone labeled .
3. Connect power to the Desk Phones
Using the included power cord, plug one end into the back of the
phone and the other end into the wall outlet. The phone will in-
dicate it is configuring itself. This process may take up to several
minutes. Once the phone has finished its configuration, you will
see your extension number displayed in each of the call keys and
the phone number will be in the center of the display. At that time
it is ready to make and receive phone calls.
.
To your data
network
To your
computer
Back
of
Phone
INSTALLING THE DESK PHONES (continued)
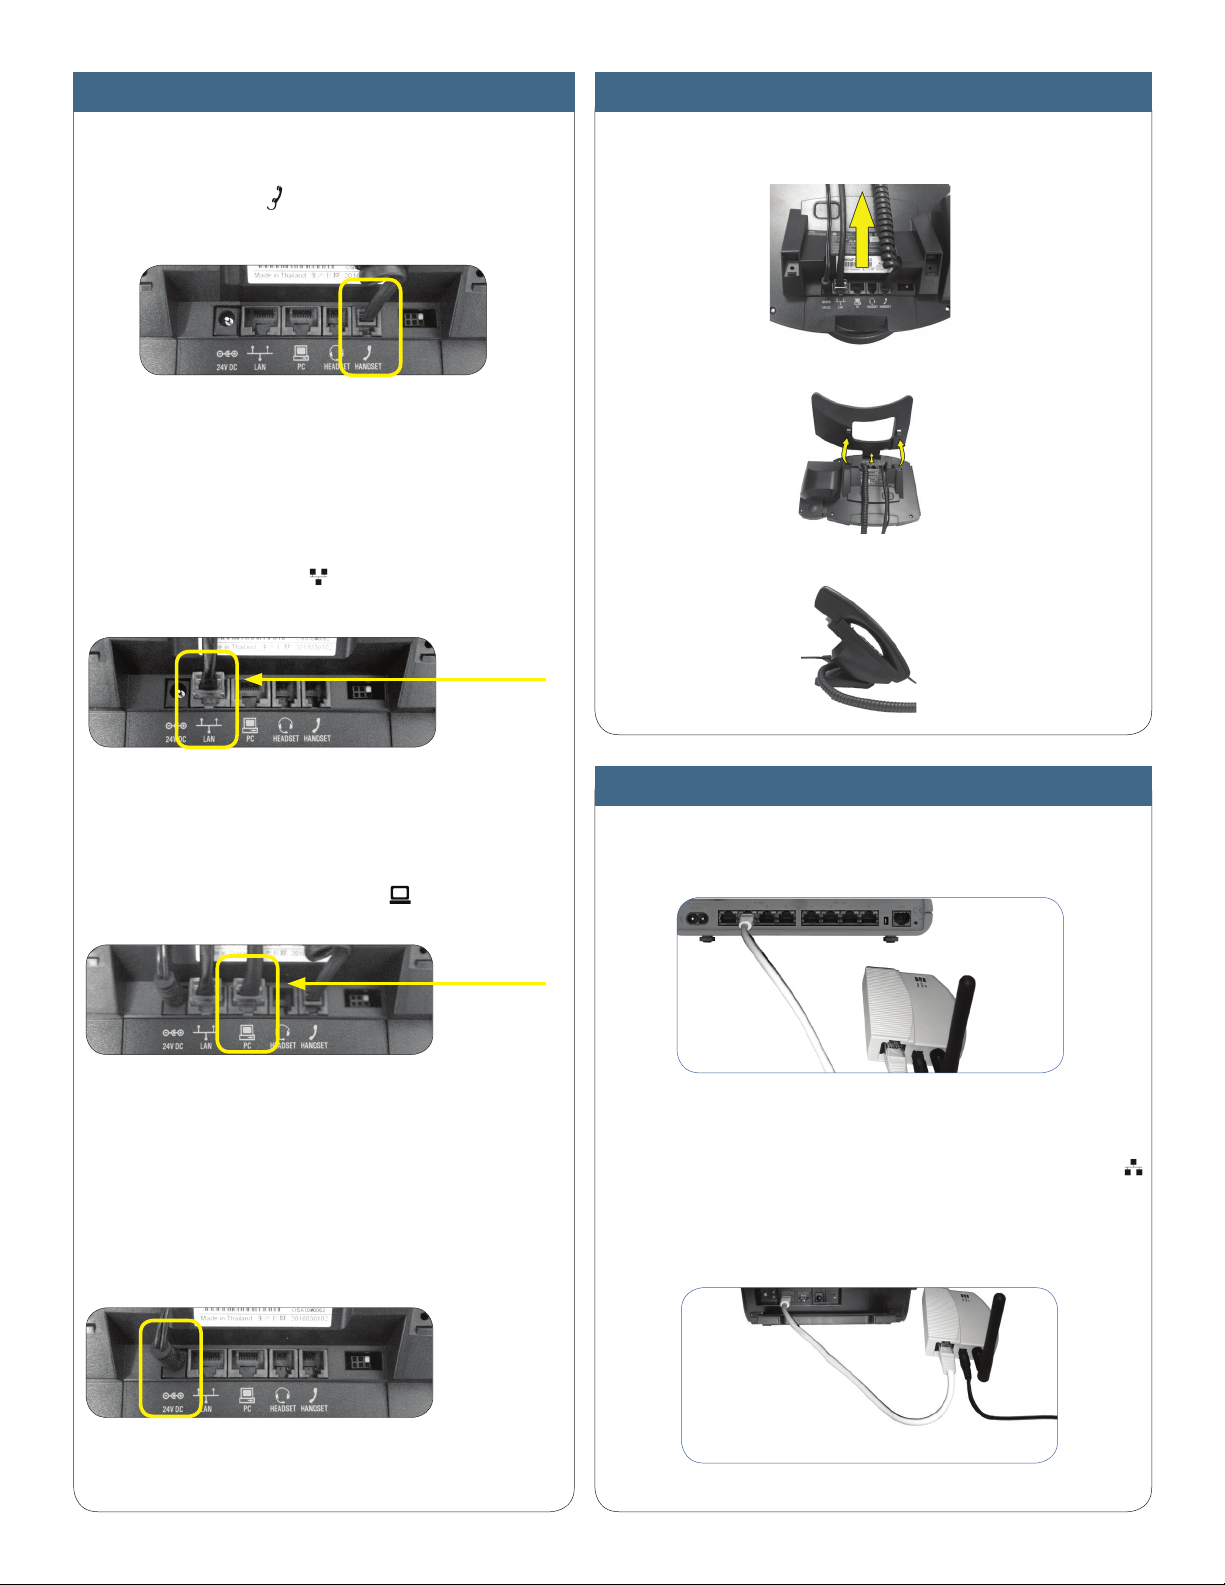
4. Attach the Phone Base as a Desk Mount
a. Place all the cords in the recessed area above the modular jacks.
b. Align the protrusions on the bracket with their corresponding holes in
the phone.
c. Snap them together to lock the bracket to the phone.
INSTALLING THE DESK PHONES WIRELESSLY
Step 1) Installing the Wireless Transmitter
Plug the Wireless Transmitter into a free port on your router or switch. Then
plug the power supply into a wall outlet.
Step 2) Connect phones wirelessly (within 40’) using the Wireless Adapter
The Wireless Adaptor allows the desk phone to connect through the
Wireless Transmitter. It has a range of 40 feet. Plug the rectangle ethernet
plug from the Wireless Adapter into the back of the phone using the
port. Then plug the Wireless Adapter’s power cord into a power outlet.
Note: To avoid interference or static on the phone, place the Wireless
Adapter away from the phone as shown.
Back of Router
or Switch
Wireless
Transmitter
Back of Phone
Wireless
Adapter
Plugs Into a
Wall Outlet a
GETTING HELP
If you have any questions regarding
your Intermedia Hosted PBX,
please contact Customer Service at:
1-877-357-0750
or visit
https://hosting.intermedia.net/support/kb/
RECORDING GREETINGS
Recording Each Phone’s Voicemail Greeting
Your new phone system comes with one voicemail box per phone. If a call
to your phone is not answered or your phone is busy, the voicemail box will
take a message and alert you through the message-waiting lamp at the top
of the phone or via email.
Setup Your Voicemail Box
• On the phone, press the Messages key.
• Press the Connect soft key.
• Enter your temporary PIN/password when prompted,
which is 0000.
• Follow the instructions to record your name, your
unavailable greeting and change your PIN/password.