manuals.online logo
Brands
  1. Home
  2. •
  3. Brands
  4. •
  5. PotteryBarn
  6. •
  7. Indoor Furnishing
  8. •
  9. PotteryBarn PIEDMONT SINGLE CONSOLE User manual

PotteryBarn PIEDMONT SINGLE CONSOLE User manual

Date:17‐Nov‐15www.potterybarn.com  Page1of8
Rev:  






PIEDMONT SINGLE CONSOLE






Date:17‐Nov‐15www.potterybarn.com  Page2of8
Rev:  


Important Safety Instructions:
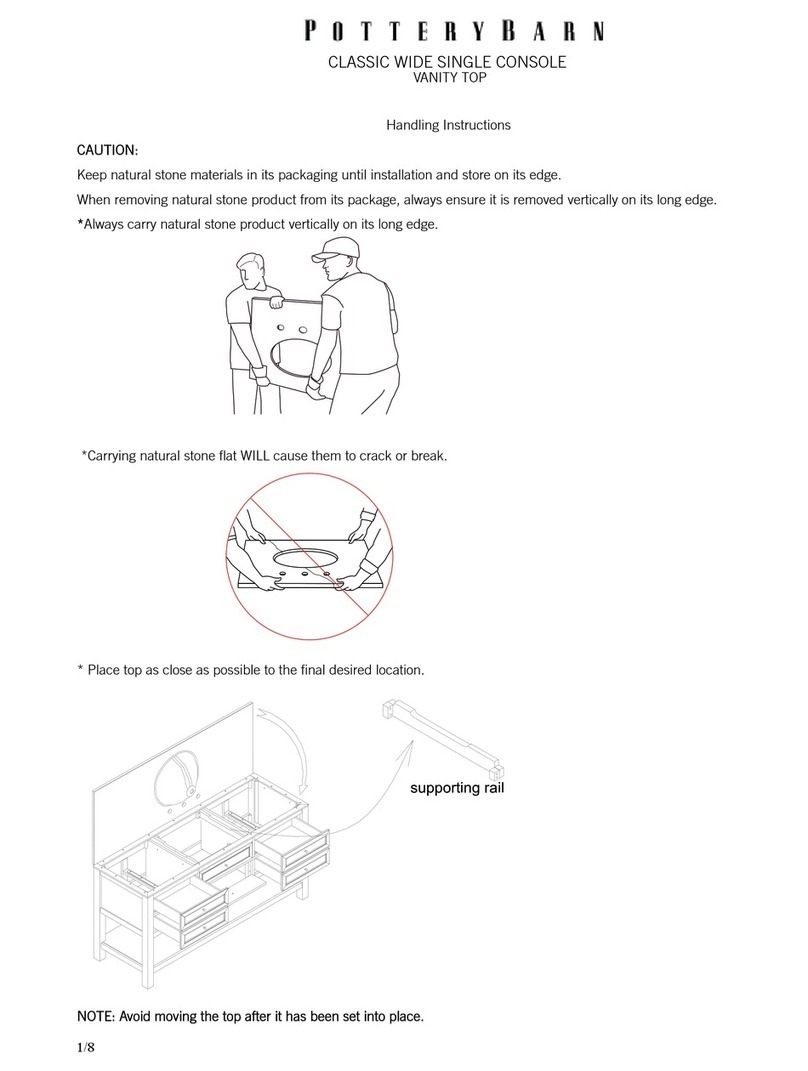
Always carry natural stone product vertically on its long edge.








Carrying natural stone flat WILL cause them to crack or break.










Place top as close as possible to the final desired location.
NOTE: Avoid moving the top after it has been set into place.
Keep natural stone materials in its packaging until installation and store on its edge.
When removing natural stone product from its package, always ensure it is removed vertically
on its long edge.
CAUTION:
Date:17‐Nov‐15www.potterybarn.com  Page3of8
Rev:  


PROFESSIONAL INSTALLATION REQUIRED - Contractor and Plumber needed for Installation.
Please read all instructions carefully before assembling.
For your safety, assembly by two or more adults is strongly recommended.
Keep instructions for future use.
Use only vendor supplied hardware to assemble. Using unauthorized hardware could jeopardize the structural
integrity of the item.
Pre-assembly:
Remove all parts and hardware from the box and lay out on a clear carpeted or scratch-free work surface, as
this will avoid damaging parts during assembly. The shipping box provides an ideal work surface.
Do not dispose of any packaging or contents of the shipping carton until assembly is completed to avoid
accidentally discarding small parts or hardware.
Use the parts and hardware lists below to identify and separate each of the pieces included.
The illustrations provided allow for easier assembly when used in conjunction with the assembly instructions.
The use of power tools to aid in assembly is not recommended. Power tools can damage hardware and split
wood.
Keep all parts out of the reach of children.
A standard 8” spread faucet should be used with this Marble top console.
Note: The Marble top is fragile. In order to preserve its integrity, it is important to limit the amount of handling it gets.
Due to the nature of this natural material, slight chipping or cracking may result with excessive handling or if placed
on a hard surface.
The Marble top, even when it is still packed, should never lie flat, except for when it is placed on top of the console or
during unpacking. Please note that arrows on the package indicate the side to be placed up while storing.
Marble should be unpacked with extreme care. Once unpacked, the marble top should be placed directly on top of
the console. If placing down, marble top should only be placed on its end and on a very soft, cushioned surface such
as a rug or thick toweling.
Note: Consoles usually need to be leveled and mounted to both wall and floor. Some hardware items needed for
proper assembly and installation are not included: ex. shim, spacer, high quality silicone or acrylic based bath
sealant, etc. DO NOT USE PLUMBERS PUTTY OR ANY OIL BASED SEALANT AS THIS WILL STAIN THE
MARBLE.
Note: Some cutting and drilling may be necessary to mount console base to wall or to shape shelves for under-sink
hardware or plumbing.
Parts Included:
(A)
Basin
1x
(B)
Marble countertop
1x
(C)
Console Base
1x
(D)
Back Splash
1x
Hardware Included:
(F)
Anchor
(G)
L Shape Bracket
4x 4x
Date:17‐Nov‐15www.potterybarn.com  Page4of8
Rev:  


Tools Required (Not Included):
Phillips Head Screwdriver Open Wrench Flat Head Screwdriver
Assembly Instruction Steps:
1. Position the basin (A) by placing over the marble top cutout. Remove top washer and nut from anchor (F).
Carefully set the threadless anchor end into the predrilled holes at backside of countertop.
Holdflatheadscrewdriver
stationarywithmoderate
downwardforce.
Thisnutisusedtoprevent
damagingthebolt.After
installation,removenutand
followstep2.
Useopenwrenchtotighten
nuttosetanchorinplace.
MarbleTop
F
A
B
Date:17‐Nov‐15www.potterybarn.com  Page5of8
Rev:  


2. Basin installation:
1) Place the L shape brackets (G), top washer and nut in succession through the other end of anchor. Secure by
tightening the nut with a wrench.
Note: position the basin (A) squarely under the cutout before fixing L shape brackets tightly, don’t tighten the
brackets at this stage.
2) Apply a continuous bead of high quality silicone or acrylic based bath sealant to the basin rim where it will
contact the countertop. DO NOT USE PLUMBERS PUTTY OR ANY OIL BASED SEALANT AS THIS WILL
STAIN THE MARBLE. Note: Don’t use adhesives or adhesive sealants.
Draw the basin rim up to the countertop until it is snug.
CAUTION: TO AVOID BREAKAGE, DON’T OVER-TIGHTEN WITH WRENCH.
Immediately wipe away any excessive sealant.
3. Leveler adjustment:
Note: Before installing marble top onto console base; console needs to be properly leveled, shimmed (if
necessary), and secured to floor and wall as required.
Levelers are pre-installed on the corner of bottom console and adjust as needed to make sure the console is
level. Turn counter-clockwise to increase height, clockwise to decrease height.
G
A
B
C
Date:17‐Nov‐15www.potterybarn.com  Page6of8
Rev:  


4. If needed, mounting blocks need to be centered on the sides and even with the top of the console. Use a dry
cloth to wipe off any dirt or dust from the top edge of console, apply high quality silicone or acrylic based bath
sealant to top edge of console. DO NOT USE PLUMBERS PUTTY OR ANY OIL BASED SEALANT AS THIS
WILL STAIN THE MARBLE.
Carefully lift up the marble countertop (B) with basin attached to place it onto the console base. Adjust the basin
position to make sure drain holes are right on top of the cutout for drainpipe on the shelf.
Now, secure the basin tightly.
Avoid moving the top after it has been set into place. Allow the top to dry a minimum of 24 hours to allow for proper
adhesion to the console.
5. Use high quality silicone or acrylic based bath sealant to install splash (D) and Side in place, clean up any
excess immediately with a clean damp rag. DO NOT USE PLUMBERS PUTTY OR ANY OIL BASED
SEALANT AS THIS WILL STAIN THE MARBLE. Wipe off any excess wax or residue that may have
accumulated around sink area.
Caution: For safe handling, 2-3 people are
recommended.
Note: Always carry any natural stone
vertically. Carrying stone products flat may
cause cracking or breakage.

C
B
D
C
Date:17‐Nov‐15www.potterybarn.com  Page7of8
Rev:  


Care Instructions:
Console Care:
Wipe cabinet with a soft, dry cloth. To protect the finish, avoid the use of all chemical and household cleaners
and abrasives as they may damage finish.
Marble Care:
Marble is a natural material, the amount of veining and coloration will vary which is part of its inherent beauty.
Marble is sensitive to acid, as it’s kind of natural stone, and consists mainly of calcium carbonate; please
remove wine or fruit juice immediately from the surface of marble top. We strongly advise to avoid using
acidic cleaners.
To maintain the marble top:
Consult with a professional at your local home supply store regarding sealer. Re-apply sealer every two
years.
Clean frequently with a clean soft damp cloth. Use a mild liquid detergent and warm water.
Avoid all types of abrasive cleaners and rough cleaning pads. Do not use any products that contain acids on
the marble as this can cause the finish to dull.
Liquid spills should be cleaned up promptly.
Placing protective pads on the bottom of any heavy objects will help prevent scratching of the marble surface.
Do not place extremely heavy items on the marble top.
Thankyouforyourpurchase
Stores|catalog

Date:17‐Nov‐15www.potterybarn.com  Page8of8
Rev:  


102mm 158mm 533mm 45mm
914mm(36")
838mm(33")

























229mm= from side of marble top to side basin
457mm= from side of marble top to basin drain hole
326mm= from front of marble top to basin drain hole
98mm= from front of marble top to front of basin
233mm= from center of basin drain hole to back of marble top
355mm 102mm 355mm102mm
559mm
165mm296mm98mm
229mm 456mm 229mm
86mm
51mm
326mm 233mm
457mm
118mm
914mm

Other PotteryBarn Indoor Furnishing manuals
PotteryBarn Stinson Wall Cabinet User manual

PotteryBarn

PotteryBarn Stinson Wall Cabinet User manual

PotteryBarn Over the Door Vanity Station User manual

PotteryBarn

PotteryBarn Over the Door Vanity Station User manual

PotteryBarn Mason Medicine Cabinet User manual

PotteryBarn

PotteryBarn Mason Medicine Cabinet User manual

PotteryBarn RECLAIMED BED User manual

PotteryBarn

PotteryBarn RECLAIMED BED User manual

PotteryBarn BENCHWRIGHT ENTERTAINING BUFFET User manual

PotteryBarn

PotteryBarn BENCHWRIGHT ENTERTAINING BUFFET User manual

PotteryBarn Classic Medicine Cabinet Regular User manual

PotteryBarn

PotteryBarn Classic Medicine Cabinet Regular User manual

PotteryBarn LIVINGSTON LARGE DESK User manual

PotteryBarn

PotteryBarn LIVINGSTON LARGE DESK User manual

PotteryBarn LOGAN DOUBLE LATERAL FILE User manual

PotteryBarn

PotteryBarn LOGAN DOUBLE LATERAL FILE User manual

PotteryBarn Hapao Wall Art User manual

PotteryBarn

PotteryBarn Hapao Wall Art User manual

PotteryBarn Hotel Medicine Cabinet Recessed User manual

PotteryBarn

PotteryBarn Hotel Medicine Cabinet Recessed User manual

PotteryBarn Hudson Q User manual

PotteryBarn

PotteryBarn Hudson Q User manual

PotteryBarn HAYDEN PIVOT MIRROR User manual

PotteryBarn

PotteryBarn HAYDEN PIVOT MIRROR User manual

PotteryBarn 3203531 User manual

PotteryBarn

PotteryBarn 3203531 User manual

PotteryBarn Brady User manual

PotteryBarn

PotteryBarn Brady User manual

PotteryBarn Tate Occasional Coffee Table User manual

PotteryBarn

PotteryBarn Tate Occasional Coffee Table User manual

PotteryBarn Anna Daybed Trundle User manual

PotteryBarn

PotteryBarn Anna Daybed Trundle User manual

PotteryBarn Mason Double Console with Sink User manual

PotteryBarn

PotteryBarn Mason Double Console with Sink User manual

PotteryBarn Savannah Daybed User manual

PotteryBarn

PotteryBarn Savannah Daybed User manual

PotteryBarn Hawthorne Slipcovered English Sofa User manual

PotteryBarn

PotteryBarn Hawthorne Slipcovered English Sofa User manual

PotteryBarn Oval Lattice Recessed Medicine Cabinet User manual

PotteryBarn

PotteryBarn Oval Lattice Recessed Medicine Cabinet User manual

PotteryBarn Modular Wall Storage Open Cubby User manual

PotteryBarn

PotteryBarn Modular Wall Storage Open Cubby User manual

PotteryBarn HOTEL DOUBLE DOOR CABINET User manual

PotteryBarn

PotteryBarn HOTEL DOUBLE DOOR CABINET User manual

PotteryBarn Double Cabinet Wall Art User manual

PotteryBarn

PotteryBarn Double Cabinet Wall Art User manual

PotteryBarn METRO DINING SIDE CHAIR User manual

PotteryBarn

PotteryBarn METRO DINING SIDE CHAIR User manual

Popular Indoor Furnishing manuals by other brands

Rutland County Kindling shelf Assembly instructions

Rutland County

Rutland County Kindling shelf Assembly instructions

IKEA GODMORGON WALL CABINET W2DRS 24X38" instructions

IKEA

IKEA GODMORGON WALL CABINET W2DRS 24X38" instructions

Kettler Cora HUC31553 Assembly instructions

Kettler

Kettler Cora HUC31553 Assembly instructions

VIPACK VISC865NAR Assembly instructions

VIPACK

VIPACK VISC865NAR Assembly instructions

DREAMS Single bed Assembly instructions

DREAMS

DREAMS Single bed Assembly instructions

Axim PR-7085 Series Assembly

Axim

Axim PR-7085 Series Assembly

DIVERSIFIED WOODCRAFTS PLAIN APRON TABLES Assembly instructions

DIVERSIFIED WOODCRAFTS

DIVERSIFIED WOODCRAFTS PLAIN APRON TABLES Assembly instructions

De La Espada 12061398 Assembly instructions

De La Espada

De La Espada 12061398 Assembly instructions

Dj MOVEIS Rack Verano manual

Dj MOVEIS

Dj MOVEIS Rack Verano manual

Courtyard Creations TGS17FS-WM Assembly instructions

Courtyard Creations

Courtyard Creations TGS17FS-WM Assembly instructions

comfortel COLOUR BAR II owner's manual

comfortel

comfortel COLOUR BAR II owner's manual

Kvik OU849 Assembly instructions

Kvik

Kvik OU849 Assembly instructions

ED Ellen DeGeneres 1580VA-36-201-900-SR manual

ED Ellen DeGeneres

ED Ellen DeGeneres 1580VA-36-201-900-SR manual

atmosphera TEDY 185053 manual

atmosphera

atmosphera TEDY 185053 manual

HB Moveis Buffet Melodia manual

HB Moveis

HB Moveis Buffet Melodia manual

AmazonBasics B00H7P1FUU instruction manual

AmazonBasics

AmazonBasics B00H7P1FUU instruction manual

HULALA HOME CHM0010 Assembly instructions

HULALA HOME

HULALA HOME CHM0010 Assembly instructions

LIVARNO 85943 Assembly instruction

LIVARNO

LIVARNO 85943 Assembly instruction

manuals.online logo
manuals.online logoBrands
  • About & Mission
  • Contact us
  • Privacy Policy
  • Terms and Conditions

Copyright 2025 Manuals.Online. All Rights Reserved.