Powercast WCG91501 User manual

USER GUIDE
compatible with Nintendo
Joy-Con controllers*
true wireless charging, made easy.
RF
energy 915
MHz
PowerSpot compatible
WCG91501

Table of Contents
Product Description
PowerSpot transmitter
Charging your Grip
LED Status Indicator
Recommended Charging Distances
The PowerSpot App
Updating Firmware
Putting Your Switch to Sleep
Troubleshooting
Compliance Statements
Support
3
4
5-6
7
8
9
10
11
12-13
14
15
2

Product Description
Overview
The Powercast Wireless Charging Grip (WCG91501)
has been designed to charge its internal battery
wirelessly while in range of a PowerSpot®TX91503
RF wireless power transmitter. The Wireless
Charging Grip uses stored, wirelessly harvested
power to recharge compatible Nintendo Joy-Con
controllers.
3

Before using your Wireless Charging Grip, set up your PowerSpot transmitter using the instructions
included in its package. For more information, visit www.powercastco.com/products/PowerSpot
Charge your Wireless Charging Grip over the air using your
PowerSpot transmitter
PowerSpot Transmitter
R
4

Charging Your Grip
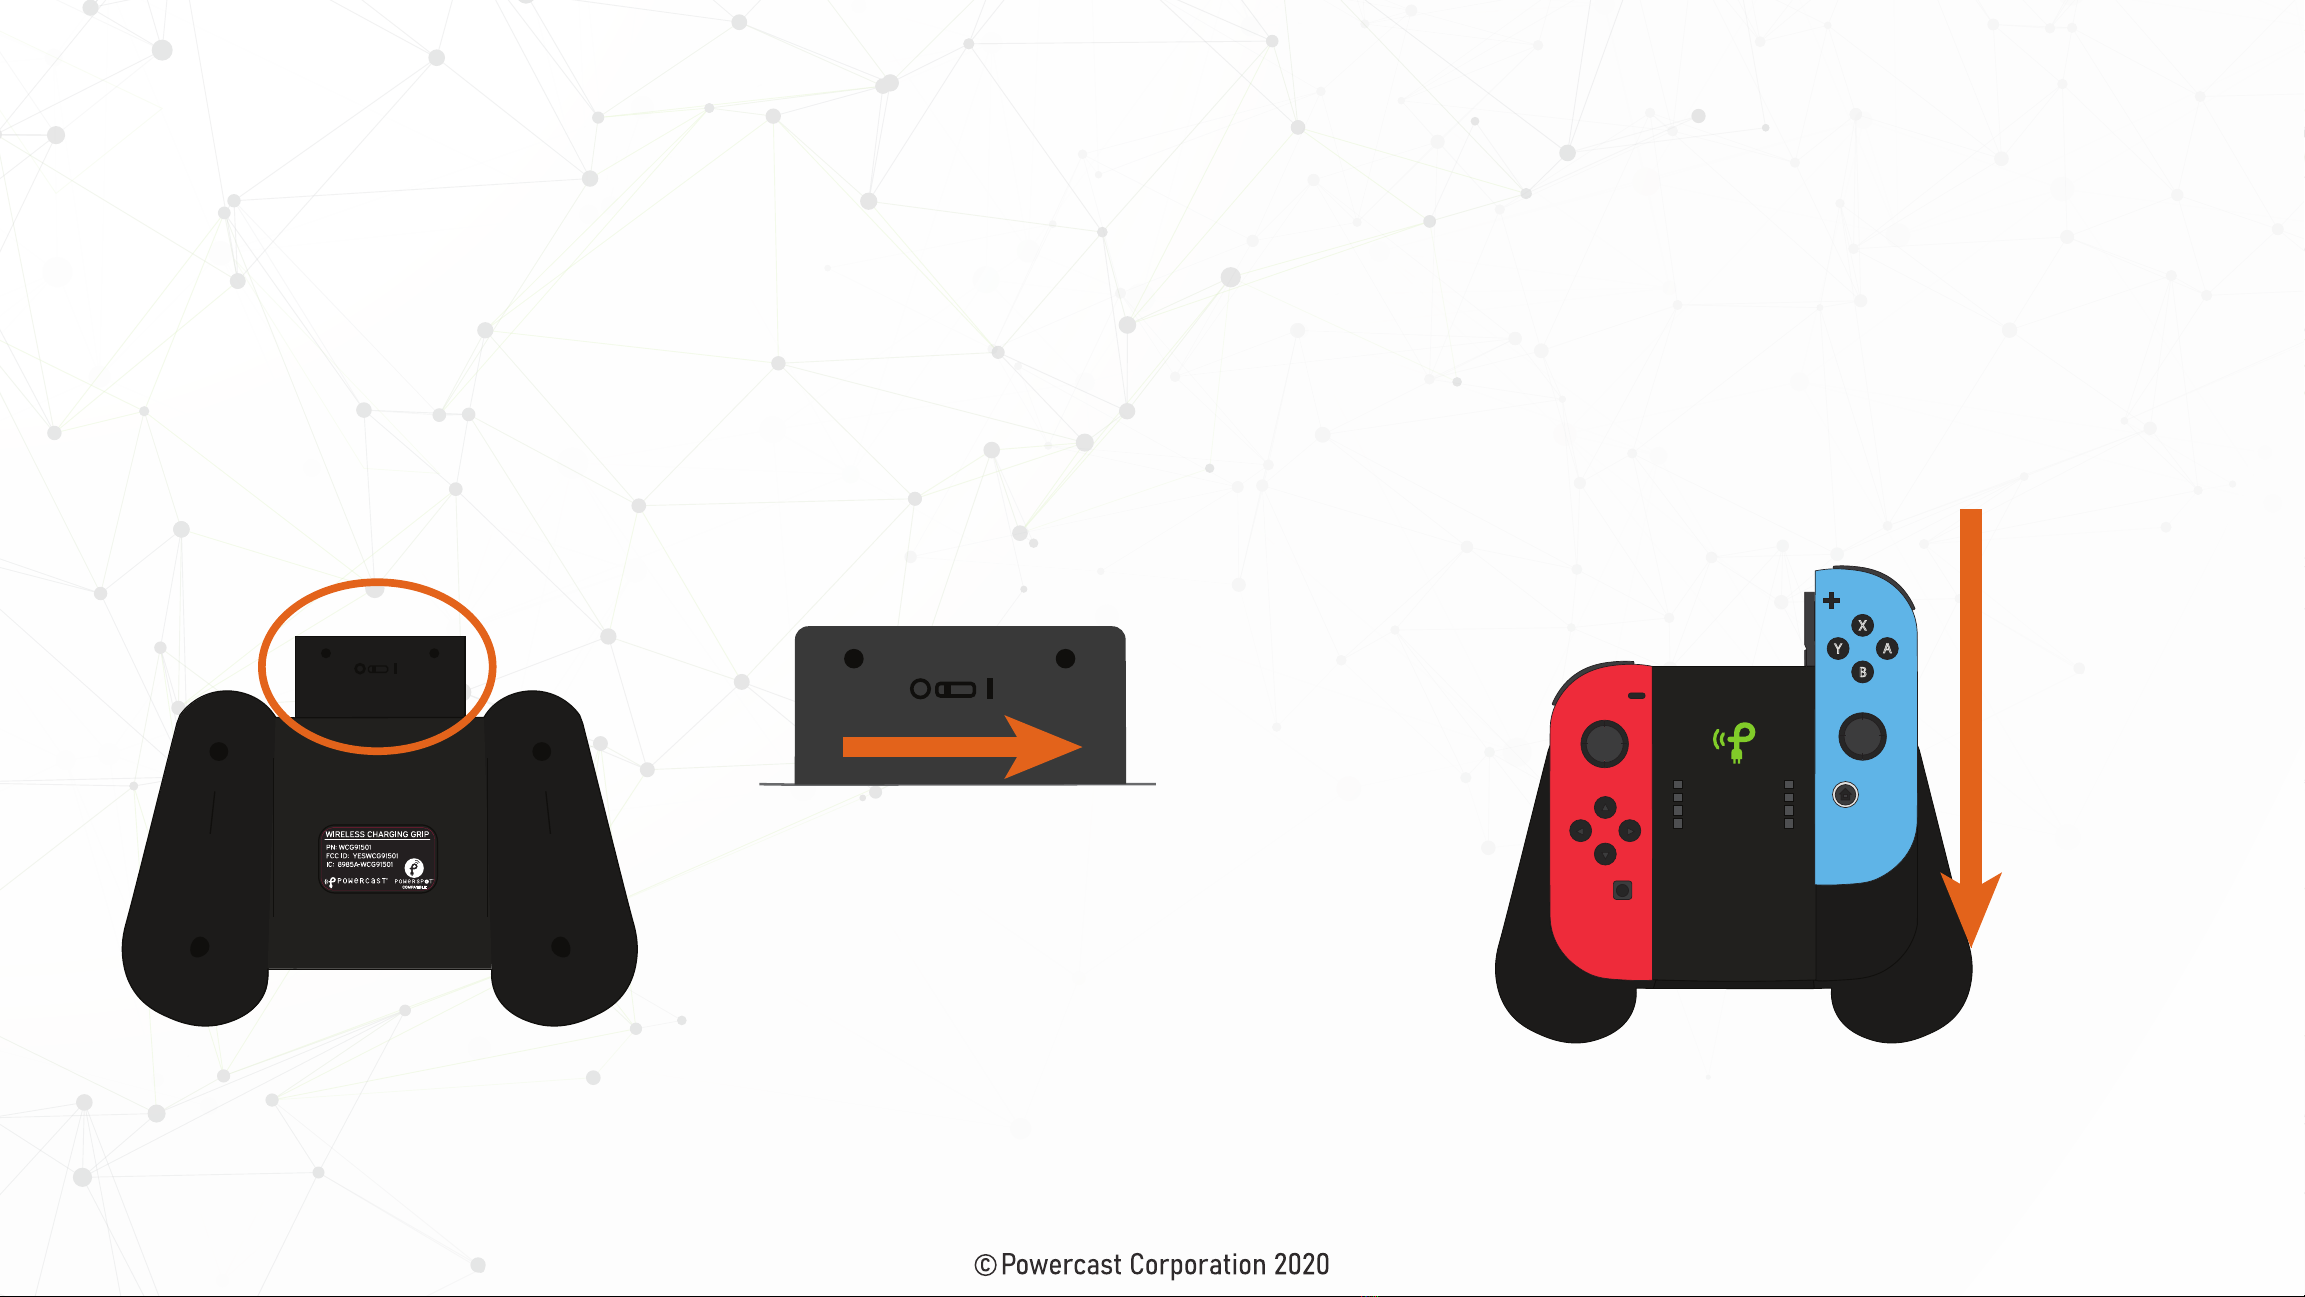
1. Turn on your Wireless Charging Grip. Using
something small, such as a paper clip or ink pen,
flip the switch on the back of your Wireless
Charging Grip from the “O” position to the “I”
position.
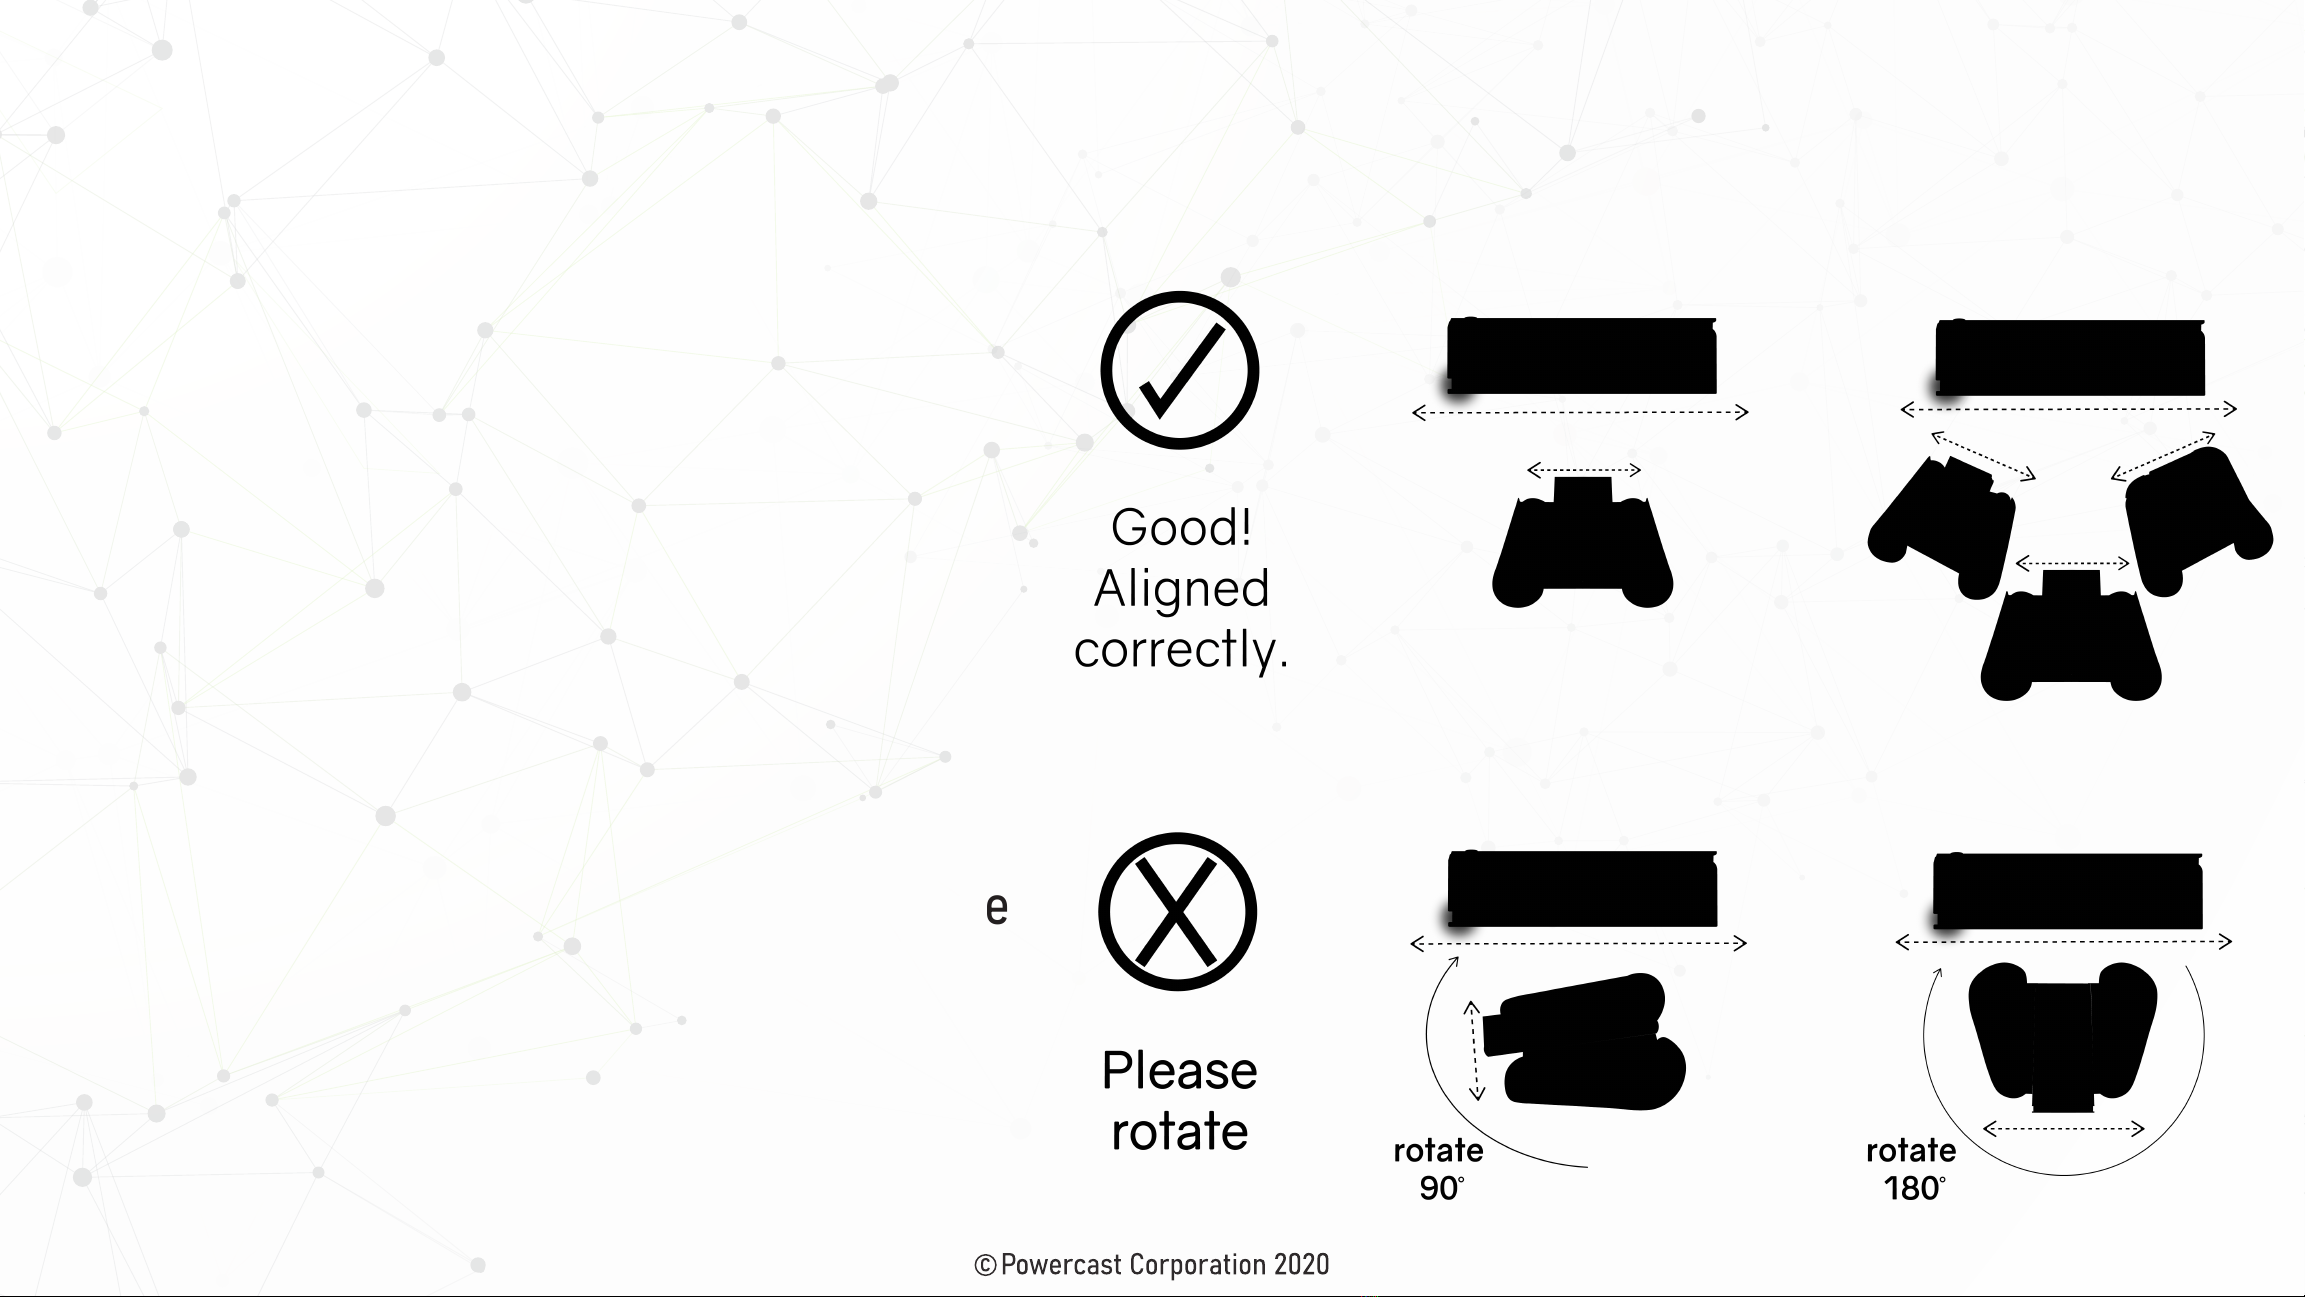
2. Slide your Joy-Cons into the Grip. Slide the
Joy-Con controllers downward into the brackets.
They will lightly click into place once secured.
X
A
B
Y
note: It is important to move this switch back to the “O” position when storing your
Grip or if you are not planning to use it for an extended period of time (4 months+)
Your Joy-Cons recharge from the battery embedded in the Grip. This means you can
also charge the Grip without your Joy-Cons installed & use it as a backup battery pack!
5

Charging Your Grip
3. Place your Wireless Charging Grip within
a foot of your PowerSpot transmitter. The
closer your Wireless Charging Grip is to
your PowerSpot transmitter, the faster it
will charge. Follow these placement
instructions and refer to the LED Status
Indicator table on the next page to optimize
wireless charging.
6

LED Status Indicator
LED Description
1x BLINK Fast charging
1x BLINK
Medium speed charging. Move Grip closer
to PowerSpot for faster charging
2x BLINK Fully charged
1x BLINK
Move Grip closer to PowerSpot transmitter
for faster charging
2x BLINK Low battery, please recharge
Grip is connected to power and charging via USB-C
GREEN
RED
BLUE
YELLOW
7

Recommended Charging Distances
The closer your Wireless Charging Grip is to the PowerSpot transmitter, the faster it
will charge. Light gamers can charge at a farther distance, while heavy gamers will
want to charge their Grip at a closer range to the PowerSpot transmitter. Use the
Grip’s status indicator LED to determine how far away to charge your Grip.
Up to 4-5 hours per day
Up to 1 hour per day
Green Blink
LED Hours played per day Approximate charging distance
Yellow Blink
4 inches
10 inches
( 10 cm )
( 25 cm )
8

The PowerSpot App
Use the PowerSpot app to
monitor charging status of your
. Wireless Charging Grip
view your PowerSpot-enabled devices
update firmware
snooze your PowerSpot transmitter
9

10
Updating Firmware
Grip rear view
update mode will
automatically time out after 2
minutes of inactivity
3. Flip the rear switch back to “I”
4. Navigate to the Scan Devices tab 5. A download icon should now be visible. Tap that
icon, then tap “Upgrade” to install firmware updates
6. Firmware updates installed!
2. Connect the Wireless Charging Grip to power
using the USB-C port on top
1 . Flip the rear switch from “I” to “O”

Putting Your Switch to Sleep
It is highly recommended that the
power settings on your Nintendo
Switch be set to go to sleep when
not in use. Without the Switch
going to sleep, the Joy-Con
controllers will consume power
constantly inside the Wireless
Charging Grip, thus substantially
reducing the battery life.
11

Troubleshooting
I put my Wireless Charging Grip in front of my PowerSpot wireless power transmitter
and the LED on my Wireless Charging Grip did not respond.
1. Verify that the switch on the back of the Wireless Charging Grip is turned on (“I”) and also verify that the PowerSpot wireless
power transmitter is plugged in. If the LED still does not respond, turn the switch on the rear of the Wireless Charging Grip off (“O”) for
5 seconds then back on (“I”) again
2. If the above does not solve the issue, then the Wireless Charging Grip’s internal battery may be completely depleted. Try one of the
options below:
Option 1: Connect a USB-C charging cable to the Wireless Charging Grip for wired charging for at least (2) hours.
Option 2: Place your Wireless Charging Grip(s) within 6 inches (15cm) of the front of your PowerSpot wireless power transmitter. Then,
press the button on top of the PowerSpot wireless power transmitter once to manually begin charging for 30 minutes. Repeat this
process until the LED on the Wireless Charging Grip begins to flash, indicating that it is charging.
12

Troubleshooting
Can I charge more than one Wireless Charging Grip with my PowerSpot wireless power
transmitter?
Yes! You can charge multiple Wireless Charging Grips with a single PowerSpot wireless power transmitter. Just be sure that each
Wireless Charging Grip follows the placement instructions included in this manual.
Can I use more than one PowerSpot wireless power transmitter at a time?
Yes! However if you are using more than one transmitter at a time, be sure to position them so that the Powercast logos are not facing
each other (directly or at an angle) and the transmitters are at least 6 feet apart from one another.
My Joy-Con controllers are docked in the Wireless Charging Grip but are not charging.
The Wireless Charging Grip will only charge the docked Joy-Con controllers if the Wireless Charging Grip’s internal battery has
adequate charge. The Joy-Con controllers will automatically begin charging from the Wireless Charging Grip once the internal battery
has been recharged to the required level. You may notice that the Joy-Con controllers will charge for a period of time, not charge for a
period of time, and then resume charging for a period of time. This is normal operation.
13

Compliance Statements
Changes or modifications not expressly approved by Powercast could void the user’s
authority to operate the equipment. Use and maintain device only as specified in
this manual.
This equipment has been tested and found to comply with the limits for a Class B
digital device, pursuant to Part 15 of the FCC Rules. These limits are designed to
provide reasonable protection against harmful interference in a residential
installation. This equipment generates, uses, and can radiate radio frequency
energy and, if not installed and used in accordance with the instructions, may cause
harmful interference to radio communications. However, there is no guarantee that
interference will not occur in a particular installation. If this equipment does cause
harmful interference to radio or television reception, which can be determined by
turning the equipment off and on, the user is encouraged to try to correct the
interference by one of the following measures:
• Reorient or relocate the receiving antenna.
• Increase the separation between the equipment and receiver.
• Connect the equipment into an outlet on a circuit different from that to which
the receiver is connected.
• Consult the dealer or an experienced radio/TV technician for help.
This device complies with Part 15 of the FCC Rules. Operation is subject to the following
two conditions:
(1) this device may not cause harmful interference, and
(2) this device must accept any interference received, including interference that
may cause undesired operation.
This device complies with Industry Canada licence-exempt RSS standard(s). Operation
is subject to the following two conditions: (1) this device may not cause interference,
and (2) this device must accept any interference, including interference that may cause
undesired operation of the device.
Le présent appareil est conforme aux CNR d'Industrie Canada applicables aux appareils
radio exempts de licence. L'exploitation est autorisée aux deux conditions suivantes : (1)
l'appareil ne doit pas produire de brouillage, et (2) l'appareil doit accepter tout
brouillage radioélectrique subi, même si le brouillage est susceptible d'en
compromettre le fonctionnement.
WARNING!
FCC and IC Radiation Exposure Statement:
This portable equipment with its antenna complies with FCC’s and IC’s RF radiation
exposure limits set forth for an uncontrolled environment.
Powercast products and technology are covered by one or more patents and other
patents pending. View the comprehensive patent list here:
www.powercastco.com/IP Powercast products are sold under limited warranty. Learn more:
www.powercastco.com/terms-conditions 14

Support
Technical support for Powercast products can be initiated through the following methods:
Website contact form:
Telephone:
www.powercastco.com/contact
+1 412-455-5800
www.powercastco.com
15
Other manuals for WCG91501
1
Table of contents
Other Powercast Batteries Charger manuals
Popular Batteries Charger manuals by other brands

Drill Master
Drill Master DRILL MASTER 67031 Set up and operating instructions

Hitachi Koki
Hitachi Koki UC 36YRL Service manual

Hama
Hama 054412 operating instructions

Hilti
Hilti C4/36-90 operating instructions

Battery Controller
Battery Controller BC SMART 400 quick start guide

AEG
AEG BL 1218 Original instructions